Zum Hauptinhalt wechseln

Diese Anleitung enthält neuere Änderungen. Wechsel zur neuesten unüberprüften Version.

Linksys WRT54G Motherboard Replacement

Was du brauchst

  1. Linksys WRT54G Motherboard Replacement, Antennas: Schritt 1, Bild 1 von 1
    • Unfold the antennas straight away from the device.

  2. Linksys WRT54G Motherboard Replacement: Schritt 2, Bild 1 von 3 Linksys WRT54G Motherboard Replacement: Schritt 2, Bild 2 von 3 Linksys WRT54G Motherboard Replacement: Schritt 2, Bild 3 von 3
    • Remove the black caps from the antennas by pulling them away from the device.

  3. Linksys WRT54G Motherboard Replacement: Schritt 3, Bild 1 von 3 Linksys WRT54G Motherboard Replacement: Schritt 3, Bild 2 von 3 Linksys WRT54G Motherboard Replacement: Schritt 3, Bild 3 von 3
    • Unscrew each of the antennas from the wireless device.

  4. Linksys WRT54G Motherboard Replacement, Casing: Schritt 4, Bild 1 von 2 Linksys WRT54G Motherboard Replacement, Casing: Schritt 4, Bild 2 von 2
    • Using a bit of force, remove the blue plastic case.

  5. Linksys WRT54G Motherboard Replacement, Motherboard: Schritt 5, Bild 1 von 2 Linksys WRT54G Motherboard Replacement, Motherboard: Schritt 5, Bild 2 von 2
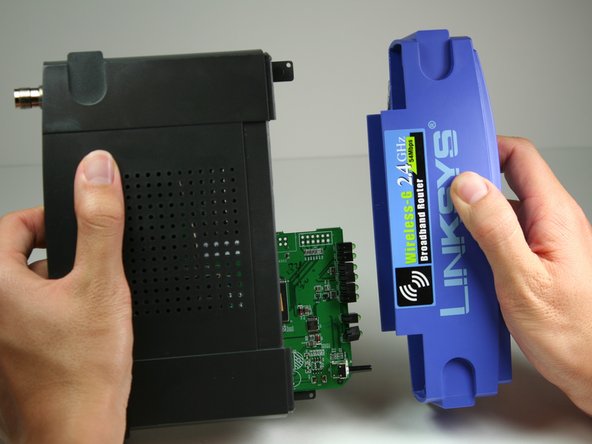
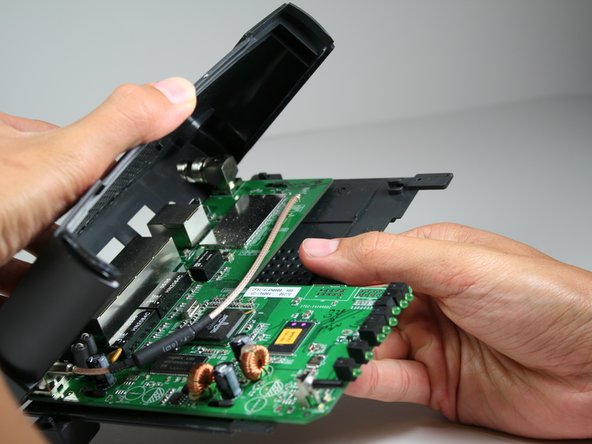
    • To remove the black casing that surrounds the green motherboard, slide the top half of the casing backwards. It only moves a very short distance.

    • Pull the top piece upwards and away from the bottom to remove.

  6. Linksys WRT54G Motherboard Replacement: Schritt 6, Bild 1 von 2 Linksys WRT54G Motherboard Replacement: Schritt 6, Bild 2 von 2
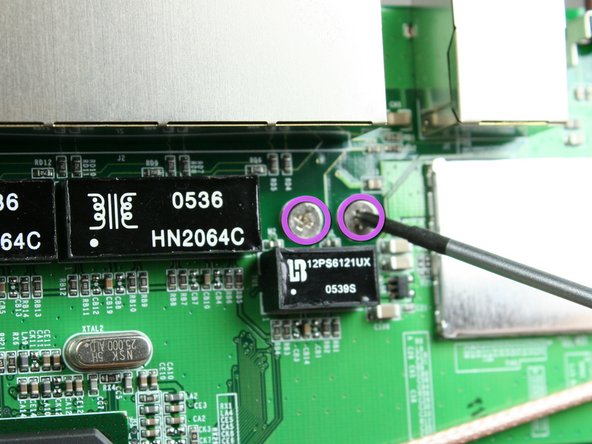
    • Locate the 2 M2.5x6mm screws that attach the motherboard to the back case.

    • Remove the two screws from the motherboard as indicated with the Phillips head screwdriver.

  7. Linksys WRT54G Motherboard Replacement: Schritt 7, Bild 1 von 1
    • Once screws have been removed, slide the motherboard in the direction of its LED lights.

    • Lift motherboard up and away from the black lower casing.

Abschluss

To reassemble your device, follow these instructions in reverse order.

3 weitere Nutzer:innen haben diese Anleitung absolviert.

Aaron Brown

Mitglied seit: 10/11/11

163 Reputation

2 Anleitungen geschrieben

Team

Cal Poly, Team 17-7, Regan Fall 2011 Mitglied von Cal Poly, Team 17-7, Regan Fall 2011

CPSU-REGAN-F11S17G7

4 Mitglieder

4 Anleitungen geschrieben

0 Kommentare

Kommentar hinzufügen

Seitenaufrufe:

Letzte 24 Stunden: 0

Letzte 7 Tage: 2

Letzte 30 Tage: 5

Insgesamt: 3,381