Einleitung
Die Hauptplatine steuert alle Vorgänge im Kontroller. Wenn du ihn anschaltest, aber nichts richtig funktioniert, ist möglicherweise die Hauptplatine defekt. Zum Ausbau benötigst du einen Kreuzschlitz-Schraubendreher.
Was du brauchst
-
-
Entferne die einzelne 6 mm Kreuzschlitzschraube #0, die sich unter dem Aufkleber neben dem USB-Ladeanschluss befindet.
-
-
-
Verwende ein Kunststoff-Öffnungswerkzeug, um die Rasten zu lösen, die die Vorder- und Rückseite des Geräts zusammenhalten. Auf jeder Seite des Geräts befinden sich drei Rasten, die gelöst werden müssen, damit das Gerät geöffnet werden kann.
-
-
-
-
Der Akku ist immer noch über ein Kabel mit dem Gerät verbunden. Um den Akku vollständig zu lösen, entferne das dunkle Plastikteil mit dem Kunststoff-Öffnungswerkzeug aus dem Steckplatz. Drehe das dunkle Kunststoffteil und den Akku langsam im Uhrzeigersinn, bis du sie unter der kleinen Platine mit dem USB-Anschluss herausnehmen kannst.
-
-
-
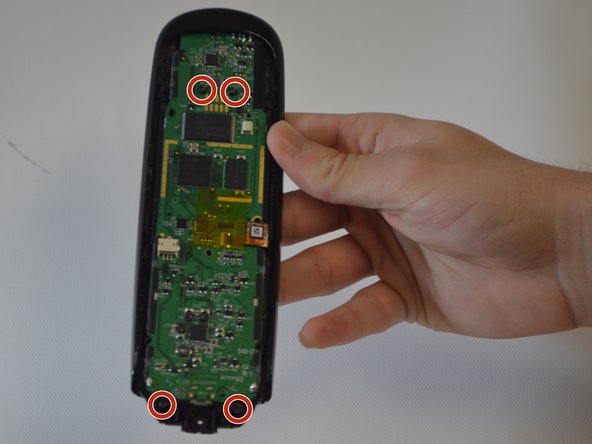
Entferne die vier 6 mm langen Kreuzschlitzschrauben #0 von der Hauptplatine.
-
-
-
Die Verbindung zwischen der Hauptplatine und dem Kunststoffgehäuse ist durch eine Klappe gesichert. Hebe die kleine schwarze Verriegelung mit dem Fingernagel nach oben.
-


Um dein Gerät wieder zusammenzubauen, folge den Schritten in umgekehrter Reihenfolge.
Um dein Gerät wieder zusammenzubauen, folge den Schritten in umgekehrter Reihenfolge.
Besonderer Dank geht an diese Übersetzer:innen:
100%
VauWeh hilft uns, die Welt in Ordnung zu bringen! Wie kann ich mithelfen?
Hier starten ›
Team

USF Tampa, Team 8-1, Eyestone Fall 2015 Mitglied von USF Tampa, Team 8-1, Eyestone Fall 2015
USFT-EYESTONE-F15S8G1
5 Mitglieder
8 Anleitungen geschrieben