Einleitung
Das Scrollrad dieser Gaming-Maus hat Löcher, die der optische Sensor verwendet, um zu erkennen, wann sich das Rad dreht. Wenn Schmutz oder andere Fremdkörper den Sensor oder die Löcher verdecken, funktioniert das Scrollrad nicht mehr oder nur noch sporadisch. In dieser Anleitung erfährst du, wie du die Maus öffnest und die Scrollrad-Baugruppe zur Reinigung auseinander nimmst.
Was du brauchst
-
-
Verwende eine dünne Klinge, um die Ecken abzulösen und die Mausfüße zu entfernen. Sie haften sehr gut wieder, also pass auf, dass du sie nicht beschädigst oder die klebrige Seite schmutzig machst.
-
Löse die drei Schrauben, die jetzt sichtbar sind.
-
Ziehe die obere und untere Hälfte der Maus vorsichtig auseinander. Sie sind durch ein Kabel verbunden.
-
-
-
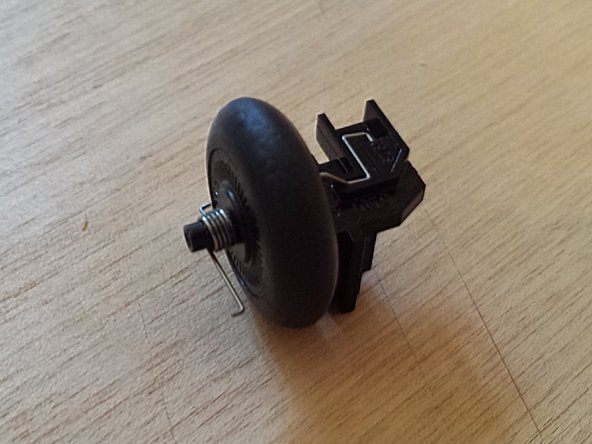
Schiebe das Scrollrad nach oben und aus dem Gehäuse heraus.
-
Nimm die Scrollrad-Baugruppe auseinander und säubere sie von offensichtlichen Verschmutzungen.
-
Schaue durch jedes der Löcher im Scrollrad, um zu sehen, ob der optische Sensor durch Fremdkörper blockiert wird. Verwende eine Nadel, um eventuelle Verstopfungen zu beseitigen.
-
-
-
-
Optional: Wenn sich in der Nähe des Mausfußes, unter dem Scrollrad, Material befindet, kann der Sensorchip abgeschraubt und entfernt werden.
-
Verwende Druckluft, um den restlichen Staub aus dem Inneren der Maus zu entfernen.
-
-
-
Baue das Scrollrad wieder ein.
-
Wenn alles richtig gemacht wurde, sollte das Rad beim Scrollen klicken. Das Rad sollte sich nicht frei drehen.
-
Optional: Bevor du den Radstift wieder einsetzt, trage bei Bedarf Schmiermittel auf.
-
-
-
Schiebe das Scrollrad zurück in sein Gehäuse.
-
Stelle sicher, dass die Feder richtig ausgerichtet ist.
-
Setze die obere Hälfte der Maus wieder auf die untere Hälfte und schraube die Maus zusammen.
-
Setze die Mausfüße wieder an ihre entsprechenden Plätze.
Worked, wheel is working extra smooth. But the wheel is extra smooth, but there is no clicking sound that comes are regular steps. I feel like dropped some tiny spare part from the wheel-sensor assembly while taking it part. But I am not complaining! Thanks to the author who helped me get my favourite mouse back. This mouse is atleast 7 years old, and fit my hands very well. A new replacement with same dimensions and design features would cost me a great deal of money here in India.
-


Schließe die Maus wieder an einen Computer an und prüfe, ob sie reagiert. Wenn das Mausrad sauber ist, jedoch immer noch nicht funktioniert, wende dich an den Logitech-Support.
Schließe die Maus wieder an einen Computer an und prüfe, ob sie reagiert. Wenn das Mausrad sauber ist, jedoch immer noch nicht funktioniert, wende dich an den Logitech-Support.
Rückgängig: Ich habe diese Anleitung nicht absolviert.
49 weitere Nutzer:innen haben diese Anleitung absolviert.
Besonderer Dank geht an diese Übersetzer:innen:
100%


Diese Übersetzer:innen helfen uns, die Welt zu reparieren! Wie kann ich mithelfen?
Hier starten ›
31 Kommentare
It worked! Thank you so much!
got my scroll wheel back from just being intermittent. nice guide for the best mouse ever made. All hail the mighty MX518, shotter of many heads, destroyer of Skyrim, Diablo I,II,III and lately bearer of the Witchers mighty blades. HAIL HAIL HAIL MX518!!!
My mouse went from scrolling just fine to nothing overnight. This helped a lot, but sadly its still not 100%. :(
Worked like a charm. Thanks. I really like this mouse and didn't want to have to get used to another one.
Fantastic!!! I've been really reluctant to replace my MX510 mouse -- your teardown of this one (which the internals appear to be identical anyway) was perfect!
My mouse is running like brand new again!
Great guide! Scrolling was "skipping" on my MX518 after 7 years of use and these instructions helped me reassemble after I cleaned untold amounts of lint and debris from inside. Would have probably given up on the finicky scroll wheel mechanism and discarded a perfectly good mouse if not for this guide...
Same problem here, but i had to change a 150ohm Resistor as well (0805 package). As crazy as it sounds it was cracked and the wheel was completely dead, that's what happens with a +10 year old mouse i guess, all sorts of weird things can occur. Oh and you can salvage parts from certain older Logitech ball mice like micro-switches and wheel mechanism, internally it's the same design !
Thanks for your help. Here are some notes on cleaning the MX600 scroll wheel that differ from your instructions:
1. There are 4 pads and 4 screws - lift each the teflon pad and the double-sided tape that's underneath to reach the screws.
2. The scroll wheel design is quite different - best to remove the mounting screw near the front of the mouse to remove the wheel assembly.
3. The wheel can be popped out of the assembly with care - NOTE that the inner hub has a tiny SPRING LOADED BALL BEARING!!!
So open it over a clean space (I lost the ball bearing twice while trying to re-assemble it).
4. To re-assemble the wheel assembly, hold the hub so the ball is sitting on the spring at the very top and then tip and lower the wheel over it.
Really nice guide! got my partner in crime MX518 back operational for further scrolling work.
Helpful guide. Clarity made it so simple for a beginner like me, and I believe everyone would agree on this. Thanks so much, I was able to fix the scroll wheel of my MX 518 mouse. And it's back on. Mercy!
Update: I have started facing a new problem on my MX 518. Buttons, and scroll wheel are working perfectly fine. However, the cursor does not move. LED light is off too. Any guidance to fix this issue would also be highly appreciated. Thank you! :)
Nice one Ben, I've been using my mouse for a few years on an Auto CAD workstation. brilliant thing but the scroll was playing around (used for zoom in and out) so I used this guide to clean it. I think I accidentally cleaned the underside so it's a bit quicker now and need to adjust, ha! Brilliant stuff, thank you very much.
I’m getting massive disconnections on the mouse and feel there is a cable connection issue but the cable from the USB port to the mouse is in perfect condition. I have to twist the cable at the mouth of the mouse to make it turn back on. It’s random. Can this guide help?
Great guide, thanks! My MX518 is about 7 years old and 5 of those are with a dog in the house. There was an unprecedented amount of lint and hair stuck around the wheel inside the mouse. Now my trusty old mouse will get a few more miles in the counter!
Just a heads up, the pads/skates on this MX518 had me very confused at first because they look like the G400/G400s skates.
My MX518 has different pads on it as shown here https://imgur.com/a/pn7uDTZ
That means the screws were easier to get at though!
I had the same cable issue as Hassan Gulzar, but managed to “fix” it by opening up the mouse and reseating the internal connector for the USB cable. I also gave it about 10mm more slack on the inside than it used to have, just so it doesn’t pull directly on the connector.
Now it seems to work as new again, the disconnect-when-moving issue is gone (for now) :)
You have an MX-518 v1, the one pictured in the guide is an MX-518 v2.
The MX500, MX510, MX518 v1, MX700, and MX900 share the same skates as each other.
The G400S, G400, and MX518 v2 share the same skates as each other.
(I’ve been thinking of getting a Hyperglide kit for my v2, but they make kits for both versions, so you have to make sure to get the right one.)
The cable thing is likely damage to the internal wires from repeated bending against the edge where they go in. Moving the cable in (to “give it slack”) probably put the damaged part inside the mouse where movement won’t flex it into a “bad” position. I’ve actually replaced the cable in my MX-518 twice over its life, using replacement cables bought cheap on eBay. I’m actually considering upgrading to a “paracord” cloth-covered cord sometime, which is definitely an option to keep in mind. (There are a number of people online who make and sell this type of mouse cord for a variety of mice.)
Just gotta say, I have this page bookmarked. I really don’t want to give up this mouse, and your guide is easy to follow. I’ve cleaned my mouse 4 times now - breathing new life into each time.
This was corrected my issue (MX518 wheel scroll not working / intermittent).
5 min fix, thanks for the detail explainer!
Logitech mx510 still running strong in 2020 because of this guide. Thanks man!
Got the MX518 without the dent design. So far the part for the scroll-wheel is exactly identical, only the connectors to the lower pcb are different. Thanks for the guide! Helped me with the springs, which jumped everywhere upon opening
My mouse is an RX 1000, and it went from working perfectly to no scroll in one step, so I assumed something weird had happened in software. Luckily, I have an identical spare, and although I expected it also not to work, it worked fine. The RX1000 is similar enough that I could follow this guide and — hey presto! after some crud removal, we’re back to full function.
Thank you so much for this and other wonderfully encouraging guides here!
Woohoo I can scroll again! Many years of fluff & gunk inside! Was apprehensive about opening the mouse up, so I’m glad I found this guide - I didn’t want to give this mouse up! Thank you :)
Years later, this still works.
Was going to look up buying a new MX518 to replace my ~12 year old one, looked this up, back to working perfectly.
Thanks.
Great guide, and I was able to work through it just fine yesterday. My issue is that the wheel doesn’t seem to be rolling as it should, even after a thorough cleaning. Does anyone have a suggestion for a good lubricant to apply to the scroll peg wheel (Step 4 “Optional”)? I don’t want to put something in there that’s going to get all over everything else or cause any problems. I assume only a very small dab will do.
Gracias acabo de darle nueva vida al scroll
Its 2023 and this guide saved my decade plus old mouse. Works perfect!! Thank you.
Woohoo! Looked up dozens of alternatives, realizing I wasn't ready to part with my beloved, beloved, MX518. 15 years of daily use. She has seen a lot of history, been through a lot of battles. Thanks to this guide she'll live another day! Best mouse ever made. SO SAY WE ALL!
Excellent guide! My scroll wheel just didn't work from one moment to the next and the culprit was a tiny piece of dust right in front of the sensor so this helped me immensely. Of note is that you can also use ifixit picks to get the feet off but they'll never be the same once you do (or I just did it incorrectly).