Diese Übersetzung enthält möglicherweise noch nicht die neuesten Änderungen der Original-Anleitung. Hilf mit, die Übersetzung zu aktualisieren oder sieh dir die Original-Anleitung an.
Einleitung
After some time left mouse click fails. This results in unintended double clicks or drag and drop. This can be solved by disassembling the mouse and folding a metal part.
Thanks to Kyler's Studio for the tutorial I initially followed.
Was du brauchst
-
-
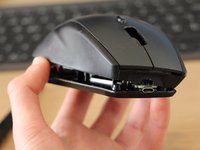
On the back of the mouse, slide the power switch so that the red area is showing to turn off the mouse. Pry open the panel on the bottom to remove the battery.
-
-
-
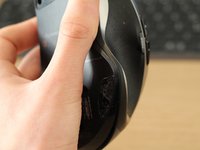
To access the screws necessary to open the mouse, you must remove the pads on the bottom of the mouse. Use a sharp tool such as an iFixit Jimmy tool or an X-acto knife to separate the pad from the case. Each pad has two layers. Ideally, both should remain attached, but this is hard to achieve.
-
-
-
Use a 00 Phillips-Head screwdriver to remove the screws at the bottom of the mouse.
-
-
-
-
This step isn't necessary, but it makes it easier to work on the mouse.
-
-
-
This helps to avoid losing the white piece.
-
-
-
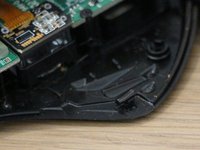
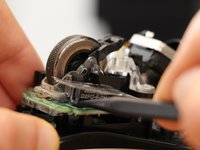
Use your spudger to push the vertical front part of the multiswitch outwards to unhook the top part of the switch casing.
-
-
-
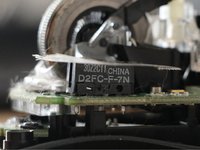
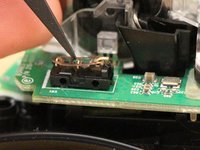
Flatten the metallic piece of the multiswitch (it will probably be curved upward) until you get a neat "click" sound.
-


To reassemble the mouse, follow the instructions in the reverse order.
Rückgängig: Ich habe diese Anleitung nicht absolviert.
11 weitere Personen haben diese Anleitung absolviert.
Besonderer Dank geht an diese Übersetzer:innen:
78%


Diese Übersetzer:innen helfen uns, die Welt zu reparieren! Wie kann ich mithelfen?
Hier starten ›
8 Kommentare zur Anleitung
merci , ca vient de sauver ma Revolution
Avec plaisir. J'en suis ravi :)
Thank you so much. My left click often unregisters incorrectly. If not for step 7 and 8, I wouldn't have opened the multiswitch top and clean the contact point. Seems to work perfectly normal now. It'd be a waste to throw away the whole item just because of a tiny defective component. Thanks again for helping me fixed it.
@Kenji @thuan: I'm glad I could help. Thanks for your comments!