Zum Hauptinhalt wechseln

MSI GP60 2PE Leopard Hard Drive Replacement

Was du brauchst

  1. MSI GP60 2PE Leopard Hard Drive Replacement, Battery: Schritt 1, Bild 1 von 1
    • Flip MSI GP60 2PE Leopard, so that the back is facing up.

  2. MSI GP60 2PE Leopard Hard Drive Replacement: Schritt 2, Bild 1 von 1
    • Find the unlock tab located on the upper right side of the device, then slide it to the right.

  3. MSI GP60 2PE Leopard Hard Drive Replacement: Schritt 3, Bild 1 von 3 MSI GP60 2PE Leopard Hard Drive Replacement: Schritt 3, Bild 2 von 3 MSI GP60 2PE Leopard Hard Drive Replacement: Schritt 3, Bild 3 von 3
    • Slide and hold the release tab on the left side of the battery, so that you can remove the battery.

  4. MSI GP60 2PE Leopard Hard Drive Replacement: Schritt 4, Bild 1 von 3 MSI GP60 2PE Leopard Hard Drive Replacement: Schritt 4, Bild 2 von 3 MSI GP60 2PE Leopard Hard Drive Replacement: Schritt 4, Bild 3 von 3
    • While holding the release tab, remove the battery slowly.

  5. MSI GP60 2PE Leopard Hard Drive Replacement, Back Panel: Schritt 5, Bild 1 von 1
    • Flip the device over so the back is facing up.

  6. MSI GP60 2PE Leopard Hard Drive Replacement: Schritt 6, Bild 1 von 2 MSI GP60 2PE Leopard Hard Drive Replacement: Schritt 6, Bild 2 von 2
    • Remove the four 5mm screws from the back of the device using a Phillips #00 screwdriver.

    • There is a screw located under the battery; lift the battery up to access it.

  7. MSI GP60 2PE Leopard Hard Drive Replacement: Schritt 7, Bild 1 von 2 MSI GP60 2PE Leopard Hard Drive Replacement: Schritt 7, Bild 2 von 2
    • Once all four screws are removed, lift the back off.

  8. MSI GP60 2PE Leopard Hard Drive Replacement, Hard Drive: Schritt 8, Bild 1 von 1
    • Remove the two 5 mm black screws on the right hand side with a Phillips #0 screwdriver.

  9. MSI GP60 2PE Leopard Hard Drive Replacement: Schritt 9, Bild 1 von 3 MSI GP60 2PE Leopard Hard Drive Replacement: Schritt 9, Bild 2 von 3 MSI GP60 2PE Leopard Hard Drive Replacement: Schritt 9, Bild 3 von 3
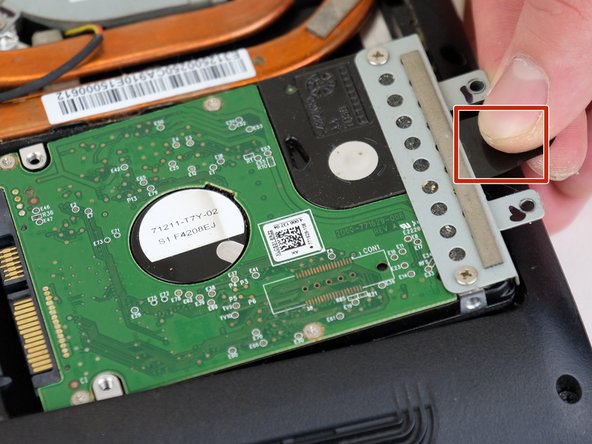
    • Lift the hard drive, then remove from the device. There is a black strip of plastic attached to make the process easier.

Abschluss

To reassemble your device, follow these instructions in reverse order.

3 weitere Nutzer:innen haben diese Anleitung absolviert.

0 Kommentare

Kommentar hinzufügen

Seitenaufrufe:

Letzte 24 Stunden: 0

Letzte 7 Tage: 5

Letzte 30 Tage: 18

Insgesamt: 1,381