Einleitung
Removing and/or replacing the Front Fan Assembly of a Mac Pro (Early 2008).
Was du brauchst
-
-
Type: Serial Attached SCSI (SAS) or Serial ATA (SATA) 3 Gb/s
-
Width: 3.9 inches (102 mm)
-
Depth: 5.7 inches (147 mm)
-
Height: 1.0 inch
-
-
-
Before you begin, open the computer, and lay it on its side with the access side facing up.
-
-
-
Make sure the latch on the back panel is up, so that the drives and carriers are unlocked.
-
Pull the hard drive out of the drive bay.
-
-
-
If you are replacing the hard drive with a new drive, remove the four screws that mount the 3. drive to the carrier and mount the new drive in the carrier.
-
-
-
This procedure explains how to remove a standard card and a card that includes a booster cable. Before you can remove either type of card, however, you must first loosen the two captive screws that secure the PCI bracket to the enclosure and remove the bracket.
-
-
-
-
1) Release the small locking clip at the front of the card’s logic board connector by pushing the clip up toward the media shelf.
-
2) Holding the card by the top corners, pull up the card and remove it from its expansion slot.
-
-
-
Disconnect the booster cable(s) from the logic board.
-
Release the small locking clip at the front of the card’s logic board connector by pushing the clip up toward the media shelf.
-
Holding the card by the top corners, gently pull up the card and remove it from its expansion slot.
-
-
Estoy buscando el cable de alimentación de la tarjeta gráfica, pero no lo consigo alguna idea de dónde lo podría conseguir?
-
-
Place the fingers of one hand under the lip of the heatsink cover nearest the logic board. Lift the lip slightly toward the media shelf to release the tabs and magnets under the top face of the cover.
-
With your fingers still under the cover’s bottom lip, lift the cover straight up to release the remaining tabs and magnets under the front face of the cover
-
Remove the cover from the enclosure.
You don’t need to place the fingers under the lip of the heat sink cover nearest to the logic board. It is much easier to use a pry tool and slide it through from front to the back. It will release the tabs very easily.
%#*@ this was a horrible guide until I read your comment. The model I’m pulling apart has no magnets holding it together
please, look this : http://pila.fr/wordpress/?p=1052 ;-)
This section of the guide does not apply to the 2006 A1186 (EMC 2113) MacPro 1,1. In this model (that I'm trying to disassemble in front of me, now), the heat sink cover is partly under the RAM cage, so it cannot come out before the RAM cage. The linked guide above seems to reference this fact.
Is there a way to submit an alternative version of this section for the models in question?
-
-
-
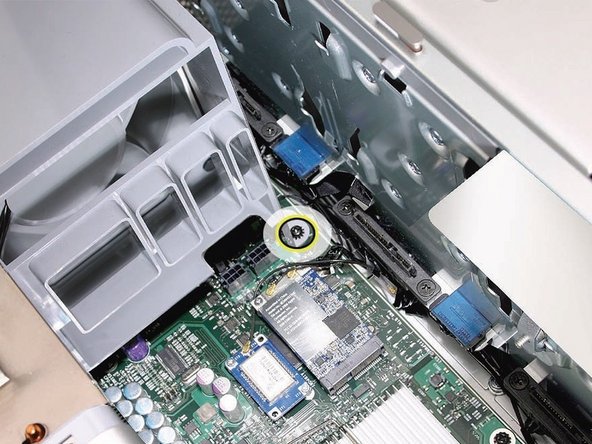
Using a long-handled, magnetized #1 Phillips screwdriver, remove the screw at the top rear of the front fan assembly that mounts the assembly to the logic board.
-
-
-
Remove the second Phillips screw at the bottom front of the assembly.
My MacPro1,1 doesn't have a philips screw in Step 14 .
Neither does my 3,1, nor does the Apple Service Source manual for the 3,1
-
-
-
Place one hand on each end of the fan, lift straight up, and remove the fan from the enclosure.
You may end up with a model that needs significantly more force to remove. Took over 3 hours for me to wiggle it out.
I just carelessly smashed it with a hammer :)
-
-
-
Replacement Note: Also make sure the latch on the inside top left edge of the fan assembly engages with the slot on the inside lip of the enclosure
-
To reassemble your device, follow these instructions in reverse order.
To reassemble your device, follow these instructions in reverse order.
Rückgängig: Ich habe diese Anleitung nicht absolviert.
27 weitere Nutzer:innen haben diese Anleitung absolviert.


Can you add an ssd by any chance ?
London Asylum Records - Antwort