Diese Version enthält möglicherweise inkorrekte Änderungen. Wechsle zur letzten geprüften Version.
Was du brauchst
-
Dieser Schritt ist noch nicht übersetzt. Hilf mit, ihn zu übersetzen!
-
Type: Serial Attached SCSI (SAS) or Serial ATA (SATA) 3 Gb/s
-
Width: 3.9 inches (102 mm)
-
Depth: 5.7 inches (147 mm)
-
Height: 1.0 inch
-
-
Dieser Schritt ist noch nicht übersetzt. Hilf mit, ihn zu übersetzen!
-
Before you begin, open the computer, and lay it on its side with the access side facing up.
-
-
Dieser Schritt ist noch nicht übersetzt. Hilf mit, ihn zu übersetzen!
-
Make sure the latch on the back panel is up, so that the drives and carriers are unlocked.
-
Pull the hard drive out of the drive bay.
-
-
Dieser Schritt ist noch nicht übersetzt. Hilf mit, ihn zu übersetzen!
-
If you are replacing the hard drive with a new drive, remove the four screws that mount the 3. drive to the carrier and mount the new drive in the carrier.
-
-
Dieser Schritt ist noch nicht übersetzt. Hilf mit, ihn zu übersetzen!
-
This procedure explains how to remove a standard card and a card that includes a booster cable. Before you can remove either type of card, however, you must first loosen the two captive screws that secure the PCI bracket to the enclosure and remove the bracket.
-
-
-
Dieser Schritt ist noch nicht übersetzt. Hilf mit, ihn zu übersetzen!
-
1) Release the small locking clip at the front of the card’s logic board connector by pushing the clip up toward the media shelf.
-
2) Holding the card by the top corners, pull up the card and remove it from its expansion slot.
-
-
Dieser Schritt ist noch nicht übersetzt. Hilf mit, ihn zu übersetzen!
-
Disconnect the booster cable(s) from the logic board.
-
Release the small locking clip at the front of the card’s logic board connector by pushing the clip up toward the media shelf.
-
Holding the card by the top corners, gently pull up the card and remove it from its expansion slot.
-
-
Dieser Schritt ist noch nicht übersetzt. Hilf mit, ihn zu übersetzen!
-
Place the fingers of one hand under the lip of the heatsink cover nearest the logic board. Lift the lip slightly toward the media shelf to release the tabs and magnets under the top face of the cover.
-
With your fingers still under the cover’s bottom lip, lift the cover straight up to release the remaining tabs and magnets under the front face of the cover
-
Remove the cover from the enclosure.
-
-
Dieser Schritt ist noch nicht übersetzt. Hilf mit, ihn zu übersetzen!
-
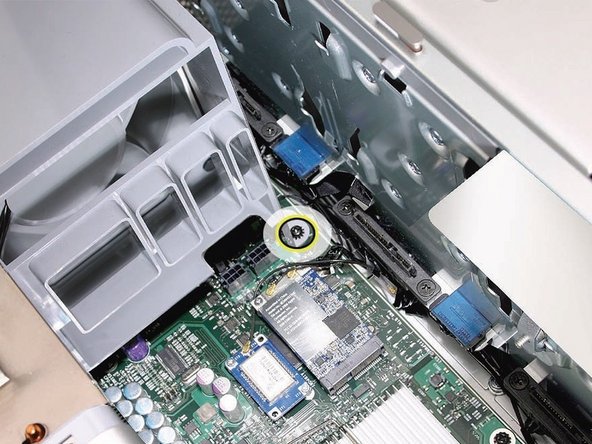
Using a long-handled, magnetized #1 Phillips screwdriver, remove the screw at the top rear of the front fan assembly that mounts the assembly to the logic board.
-
-
Dieser Schritt ist noch nicht übersetzt. Hilf mit, ihn zu übersetzen!
-
Remove the second Phillips screw at the bottom front of the assembly.
-
-
Dieser Schritt ist noch nicht übersetzt. Hilf mit, ihn zu übersetzen!
-
Place one hand on each end of the fan, lift straight up, and remove the fan from the enclosure.
-
-
Dieser Schritt ist noch nicht übersetzt. Hilf mit, ihn zu übersetzen!
-
Replacement Note: Also make sure the latch on the inside top left edge of the fan assembly engages with the slot on the inside lip of the enclosure
-


Rückgängig: Ich habe diese Anleitung nicht absolviert.
27 weitere Nutzer:innen haben diese Anleitung absolviert.
