Zum Hauptinhalt wechseln

Mac Pro Ende 2013 Stromanschluss

Was du brauchst

  1. Mac Pro Ende 2013 Stromanschluss, Äußeres Gehäuse: Schritt 1, Bild 1 von 2 Mac Pro Ende 2013 Stromanschluss, Äußeres Gehäuse: Schritt 1, Bild 2 von 2
    • Schiebe den Verriegelungsschalter nach rechts in die entriegelte Position.

  2. Mac Pro Ende 2013 Stromanschluss: Schritt 2, Bild 1 von 3 Mac Pro Ende 2013 Stromanschluss: Schritt 2, Bild 2 von 3 Mac Pro Ende 2013 Stromanschluss: Schritt 2, Bild 3 von 3
    • Hebe das Außengehäuse gerade nach oben vom Mac Pro ab.

    • Es kann helfen, auf die Mitte des Lüfters zu drücken, während das Gehäuse nach oben gehoben wird.

  3. Mac Pro Ende 2013 Stromanschluss, Lüftereinheit: Schritt 3, Bild 1 von 3 Mac Pro Ende 2013 Stromanschluss, Lüftereinheit: Schritt 3, Bild 2 von 3 Mac Pro Ende 2013 Stromanschluss, Lüftereinheit: Schritt 3, Bild 3 von 3
    • Entferne die fünf 5,1 mm T10 Torx Schrauben, die rund um die Lüftereinheit herum angebracht sind.

    You don't have to remove the fan assy to get to the wifi board & card. It can be done with the fan assy still attached.

    Fat Mango - Antwort

    Fat Mango is correct. That said. If you do pull the fan assembly note that the screws are all held in with blue Permatex and breaking them free takes a fair amount of effort. Getting a good set of Torx screwdrivers is a must.

    Jim WIlson - Antwort

    Hey guys, what would happen if you only replace one card.. I have a D300 but the plan is to upgrade to D500 or D600. So If I can afford and install one instead of the pair would it increase something? or will it cause any conflict? I guess I don’t understand if I the Mac Pro has 2 D300 graphic cards that means each has 1GB? Same as If I would Install 1 D600 that would increase 3GB only? Thanks.

    marcotamayo - Antwort

    D300 = 2GB each card. Very few apps uses two cards at the same time.

    Gio Cas -

    The (5) Screws are Apple part number 923-0713

    Steven Gier - Antwort

  4. Mac Pro Ende 2013 Stromanschluss: Schritt 4, Bild 1 von 2 Mac Pro Ende 2013 Stromanschluss: Schritt 4, Bild 2 von 2
    • Die Lüftereinheit ist mit zwei Kabeln mit dem Rest des Computers verbunden. Die Kabel befinden sich auf der Seite des IO Boards.

    • Kippe die Einheit nach oben, weg vom IO Board.

    • Versuche noch nicht die Lüftereinheit ganz zu entfernen, da sie noch durch zwei Kabel mit dem Computer verbunden ist.

  5. Mac Pro Ende 2013 Stromanschluss: Schritt 5, Bild 1 von 1
    • Halte die Lüftereinheit mit einer Hand fest und löse die zwei T8 nicht verlierbaren Schrauben in der Halterung des Lüfterkabels.

    • Diese Schrauben sind nicht-verlierbar und verbleiben daher im Mac Pro. Versuche nicht, die Schrauben aus deinem Mac Pro zu entfernen.

    On my Mac Pro (assembled mid-2017) these are T8 screws. In fact, there were no T7 screws anywhere in my machine.

    mark33 - Antwort

    There was no bracket on top of the cable at all, so I got a bit confused, so I had to skip step 5 and 6.

    Rakesh - Antwort

    On my machine, a TR7 worked to remove them due to the weird angle.

    Wilson Gaberino - Antwort

  6. Mac Pro Ende 2013 Stromanschluss: Schritt 6, Bild 1 von 1
    • Benutze eine Pinzette, um die Halterung des Lüfterkabels von der Lüftereinheit zu entfernen.

  7. Mac Pro Ende 2013 Stromanschluss: Schritt 7, Bild 1 von 2 Mac Pro Ende 2013 Stromanschluss: Schritt 7, Bild 2 von 2
    • Benutze das flache Ende eines Spudgers, um das Flachbandkabels der Lüftereinheit vom IO board zu trennen.

  8. Mac Pro Ende 2013 Stromanschluss: Schritt 8, Bild 1 von 1
    • Entferne das Antennenkabel der Lüftereinheit vom IO board.

    • Entferne die Lüftereinheit vom Mac Pro.

    You don't have to remove the fan assy to do the steps below. They can be done with the fan assy still attached.

    Fat Mango - Antwort

  9. Mac Pro Ende 2013 Stromanschluss, Gehäuseunterteil: Schritt 9, Bild 1 von 3 Mac Pro Ende 2013 Stromanschluss, Gehäuseunterteil: Schritt 9, Bild 2 von 3 Mac Pro Ende 2013 Stromanschluss, Gehäuseunterteil: Schritt 9, Bild 3 von 3
    • Drehe deinen Mac 180° herum, so dass die Unterseite nach oben zeigt.

    • Entferne die fünf 5,1 mm Torx T10 Schrauben entlang der Außenkante des Gehäuseunterteils.

  10. Mac Pro Ende 2013 Stromanschluss: Schritt 10, Bild 1 von 2 Mac Pro Ende 2013 Stromanschluss: Schritt 10, Bild 2 von 2
    • Hebe das Gehäuseunterteil behutsam hoch und entferne es vom Mac Pro.

  11. Mac Pro Ende 2013 Stromanschluss, Verbindungsplatine: Schritt 11, Bild 1 von 2 Mac Pro Ende 2013 Stromanschluss, Verbindungsplatine: Schritt 11, Bild 2 von 2
    • Benutze das flache Ende des Spudgers, um mit einer behutsamen Drehbewegung eine Seite der Datenverbindung zur Grafikkarte zu lösen.

  12. Mac Pro Ende 2013 Stromanschluss: Schritt 12, Bild 1 von 3 Mac Pro Ende 2013 Stromanschluss: Schritt 12, Bild 2 von 3 Mac Pro Ende 2013 Stromanschluss: Schritt 12, Bild 3 von 3
    • Löse genauso vorsichtig die andere Seite.

    • Klappe den Stecker hoch, so dass er der Grafikkarte nicht mehr im Weg steht.

    • Wiederhole das Ganze für die andere Grafikkarte.

  13. Mac Pro Ende 2013 Stromanschluss: Schritt 13, Bild 1 von 1
    • Entferne die beiden 6 mm Torx T7 Schrauben, mit denen die Verbindungsplatine am Kühlkörper befestigt ist.

    These are actually 6.0mm T8 Torx Screws. 12/07/2016.

    Todd - Antwort

    Ended up being T9 screws for me.

    Nathaniel Wilson - Antwort

    On my Mac Pro (assembled mid-2017) these are T8 screws. In fact, there were no T7 screws anywhere in my machine.

    mark33 - Antwort

    These are T8 screws in my 2013 Mac Pro.

    Sangers - Antwort

    T8 screws for me, i did and edit to this step

    Steve McGinn - Antwort

    Ended up being T15 screws on my machine

    Spencer Curtis - Antwort

  14. Mac Pro Ende 2013 Stromanschluss: Schritt 14, Bild 1 von 3 Mac Pro Ende 2013 Stromanschluss: Schritt 14, Bild 2 von 3 Mac Pro Ende 2013 Stromanschluss: Schritt 14, Bild 3 von 3
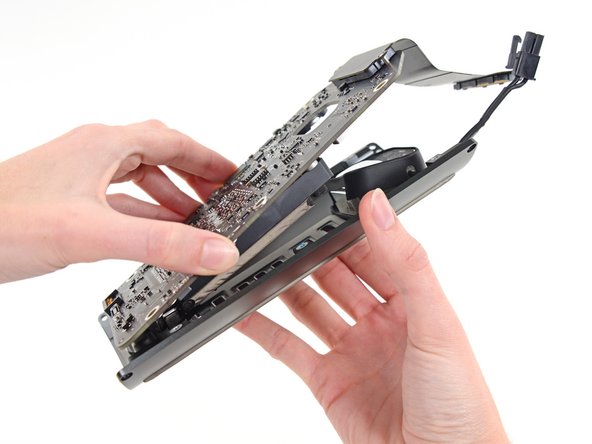
    • Lasse die Verbindungsplatine vorsichtig gerade aus ihrem Slot auf dem Logic Board "herauswandern".

    • Am Besten geht das, wenn du erst eine, dann die andere Seite anhebst.

    • Löse die Verbindungsplatine noch nicht ganz vom Mac Pro ab, sie ist immer noch am I/O Board angeschlossen.

  15. Mac Pro Ende 2013 Stromanschluss: Schritt 15, Bild 1 von 2 Mac Pro Ende 2013 Stromanschluss: Schritt 15, Bild 2 von 2
    • Klappe die Verbindungsplatine ganz um, so dass das I/O Board Datenkabel sichtbar wird.

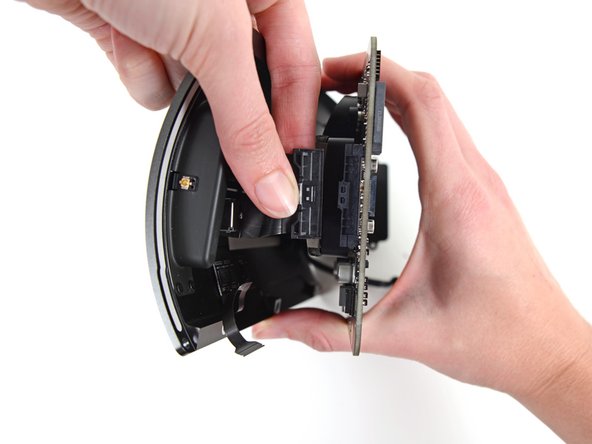
    • Benutze wieder das flache Ende des Spudgers und löse mit der gleichen Drehbewegung eine Seite des I/O Board Datenkabels.

  16. Mac Pro Ende 2013 Stromanschluss: Schritt 16, Bild 1 von 2 Mac Pro Ende 2013 Stromanschluss: Schritt 16, Bild 2 von 2
    • Löse mit dem flachen Ende des Spudgers auch die andere Seite des I/O Board Datenkabels.

    • Biege das Kabel aus dem Weg und entferne die Verbindungsplatine vom Mac Pro.

  17. Mac Pro Ende 2013 Stromanschluss, Netzteil: Schritt 17, Bild 1 von 1
    • Drehe den Mac Pro herum und lege ihn behutsam auf eine glatte Arbeitsfläche ab.

    • Wir empfehlen den Mac Pro so abzulegen, dass er auf einer Ecke des Kühlkörpers und auf den beiden Abstandsschrauben der Verbindungsplatine steht.

  18. Mac Pro Ende 2013 Stromanschluss: Schritt 18, Bild 1 von 2 Mac Pro Ende 2013 Stromanschluss: Schritt 18, Bild 2 von 2
    • Entferne die beiden 3,6 mm Torx T5 Schraube auf den Seiten des Netzteilkäfigs (eine auf jeder Seite).

    those are t4 screws in my mac

    Andrzej Kiryluk - Antwort

    T4s on mine, as well

    rwcinmsp - Antwort

  19. Mac Pro Ende 2013 Stromanschluss: Schritt 19, Bild 1 von 1
    • Entferne den Netzteilkäfig von der Oberseite des Netzteils.

    • Durch den Ausbau des Käfigs werden Bauteile im Inneren des Netzteils freigelegt. Sei sehr vorsichtig und berühre keine Bauteile oder die Leiterplatte.

    • Achte darauf, dass keine Schrauben oder Werkzeuge in das Netzteil hinein fallen, es könnte dadurch beschädigt werden.

  20. Mac Pro Ende 2013 Stromanschluss: Schritt 20, Bild 1 von 1
    • Entferne die vier 5,5 mm Torx T8-Schrauben, mit denen das Netzteil am Mac Pro befestigt ist.

  21. Mac Pro Ende 2013 Stromanschluss: Schritt 21, Bild 1 von 1
    • Entferne das Netzteil vom Mac Pro.

  22. Mac Pro Ende 2013 Stromanschluss, Netzteil: Schritt 22, Bild 1 von 3 Mac Pro Ende 2013 Stromanschluss, Netzteil: Schritt 22, Bild 2 von 3 Mac Pro Ende 2013 Stromanschluss, Netzteil: Schritt 22, Bild 3 von 3
    • Hebe den Stecker am Gleichstromausgang mit dem flachen Ende des Spudgers aus seinem Anschluss auf dem IO Board heraus.

    • Löse das Datenkabel des Netzteils mit der Spudgerspitze aus seinem Anschluss auf dem IO Board.

    • Achte bei beiden Kabeln darauf, dass du nur den Stecker gerade hochhebelst, nicht den Anschluss.

    Need to add T9 Torx Screwdriver to list of tools at the beginning of this article.

    htiek nworb - Antwort

    When I gently pried up on the power supply data cable, the entire socket came right off the board. Now what?

    rwcinmsp - Antwort

    Bought a new I/O board and got it back together. This little socket is held in only by 4 tiny solder joints. Suggest pressing down on the socket with a finger while gently prying up on the plug that snaps into it. (When reassembling, it presses in vertically.)

    rwcinmsp - Antwort

  23. Mac Pro Ende 2013 Stromanschluss: Schritt 23, Bild 1 von 2 Mac Pro Ende 2013 Stromanschluss: Schritt 23, Bild 2 von 2
    • Entferne die vier silberfarbenen 9 mm Torx T10 Schrauben an den Seiten des Netzteils.

    • Das Netzteil ragt ein bisschen über diese Schrauben drüber. Du musst deswegen einen Schraubendreher mit fester Klinge verwenden und ihn etwas schief ansetzen.

    I managed to untie the screws at an angle using the T9 screwdriver (instead of the T10) works well.

    Rakesh - Antwort

    awesome. thank you for the tip!!

    samuel culper - Antwort

    A T-10 tip used with a 4mm or 5/32” open-end wrench to loosen helps, too. (These really should be hex bolts…)

    MotorMac - Antwort

  24. Mac Pro Ende 2013 Stromanschluss: Schritt 24, Bild 1 von 2 Mac Pro Ende 2013 Stromanschluss: Schritt 24, Bild 2 von 2
    • Schiebe das Netzteil behutsam weg, so dass das Netzkabel aus seinem Plastikclip frei kommt.

    • Achte darauf, dass sich das Netzteil noch nicht ganz von der IO Board Einheit ablöst, es ist immer noch durch das Netzkabel angeschlossen.

  25. Mac Pro Ende 2013 Stromanschluss: Schritt 25, Bild 1 von 2 Mac Pro Ende 2013 Stromanschluss: Schritt 25, Bild 2 von 2
    • Klappe das Netzteil zurück, um an das Netzkabel heranzukommen.

  26. Mac Pro Ende 2013 Stromanschluss: Schritt 26, Bild 1 von 2 Mac Pro Ende 2013 Stromanschluss: Schritt 26, Bild 2 von 2
    • Drücke den Stecker am Netzkabel zusammen und ziehe ihn gerade aus seinem Anschluss im Netzteil heraus.

  27. Mac Pro Ende 2013 Stromanschluss, IO Board: Schritt 27, Bild 1 von 1
    • Entferne die beiden silberfarbenen 9 mm Torx T10 Schrauben, mit denen das IO Board an der IO Abschirmung befestigt ist.

    On reassembly, before tightening these 2 9.0mm T10s, make sure the other 4 holes line up. Otherwise you might be setting yourself up for cross threading the 4 remaining 9.0 mm T10 that are already in a bad spot for torquing.

    Might not be a bad idea to put the other 4 halfway in to be sure no resistance, then tighten the 2 in this step, then remove the other 4.

    is - Antwort

  28. Mac Pro Ende 2013 Stromanschluss: Schritt 28, Bild 1 von 2 Mac Pro Ende 2013 Stromanschluss: Schritt 28, Bild 2 von 2
    • Hebe das IO Board am Ende mit dem Stromanschluss von der IO Abschirmung ab.

    • Versuche noch nicht, das IO Board ganz von der IO Abschirmung abzulösen, die beiden Teile sind immer noch mit zwei Kabeln verbunden.

  29. Mac Pro Ende 2013 Stromanschluss: Schritt 29, Bild 1 von 3 Mac Pro Ende 2013 Stromanschluss: Schritt 29, Bild 2 von 3 Mac Pro Ende 2013 Stromanschluss: Schritt 29, Bild 3 von 3
    • Lege die Einheit auf eine Arbeitsfläche ab, um an die Stecker auf dem IO Board heranzukommen.

    • Klappe den Bügel am ZIF-Verbinder des Kabels der IO Abschirmung mit der Spudgerspitze hoch.

    • Löse das Flachbandkabel zur IO Abschirmung ab.

    This step is unnecessary as you can access the battery already.

    Gary Sheppard - Antwort

  30. Mac Pro Ende 2013 Stromanschluss: Schritt 30, Bild 1 von 2 Mac Pro Ende 2013 Stromanschluss: Schritt 30, Bild 2 von 2
    • Drücke den Stecker am Flachbandkabel zur Audiobuchse zusammen und ziehe ihn vom IO Board ab.

    This step is unnecessary as you can access the battery already.

    Gary Sheppard - Antwort

  31. Mac Pro Ende 2013 Stromanschluss, Stromanschluss: Schritt 31, Bild 1 von 1
    • Entferne die vier 6,5 mm Torx T4 Schrauben (mit Unterlegscheiben) vom Flansch um den Stromanschluss.

  32. Mac Pro Ende 2013 Stromanschluss: Schritt 32, Bild 1 von 1
    • Entferne den Stromanschluss vom IO-Panel.

Abschluss

Um dein Gerät wieder zusammenbauen, folge den Schritten in umgekehrter Reihenfolge.

4 weitere Nutzer:innen haben diese Anleitung absolviert.

Besonderer Dank geht an diese Übersetzer:innen:

en de

100%

VauWeh hilft uns, die Welt in Ordnung zu bringen! Wie kann ich mithelfen?
Hier starten ›

Team

iFixit Mitglied von iFixit

Staff

135 Mitglieder

16.732 Anleitungen geschrieben

Ein Kommentar

Does anyone know where to purchase the screw sets for the Mac Pro?

Andre Pacheco - Antwort

Kommentar hinzufügen

Seitenaufrufe:

Letzte 24 Stunden: 3

Letzte 7 Tage: 13

Letzte 30 Tage: 54

Insgesamt: 7,306