Einleitung
Diese Anleitung zeigt dir, wie du das obere Gehäuse, inklusive Tastatur, am MacBook Air 11" Anfang 2015 austauschen kannst.
Was du brauchst
-
-
Entferne folgende Schrauben:
-
Zwei 8mm 5-point Pentalobe Schrauben
-
Acht 2,5 mm 5-point Pentalobe Schrauben
-
-
-
Zwänge deine Finger zwischen Display und Gehäuseunterteil und ziehe nach oben, damit es sich vom Air löst.
-
-
-
Hebele den Akkustecker an beiden kurzen Seiten mit dem flachen Ende des Spudgers hoch, um ihn aus seinem Anschluss auf dem Logic Board zu lösen.
-
Biege das Akkukabel ein wenig vom Logic Board weg, so dass sich der Stecker nicht versehentlich wieder mit dem Anschluss verbinden kann.
-
-
-
Heble den linken und rechten Stecker am Kabel zur I/O Karte mit dem flachen Ende des Spudgers hoch und aus ihren jeweiligen Anschlüssen auf der I/O Karte heraus.
-
-
-
Drücke mit der Spudgerspitze vorsichtig abwechselnd an jeder Seite des Steckers am iSight Kamerakabel, um ihn aus seinem Anschluss auf dem Logic Board zu lösen.
-
-
-
Löse das iSight Kamerakabel aus der Klebeverbindung zum Lüfter.
-
-
-
Klappe mit der Spudgerspitze vorsichtig den Sicherungsbügel am ZIF Anschluss des Lüfterkabels hoch.
-
-
-
Entferne folgende Torx T5 Schrauben, welche den Lüfter am oberen Gehäuse befestigen:
-
Zwei 5,5 mm Schrauben
-
Eine 4,6 mm Schraube
-
-
-
Hebe den Lüfter an, aber entferne ihn noch nicht aus seiner Vertiefung im oberen Gehäuse.
-
Ziehe beim Entfernen des Lüfters aus dem Gerät das Flachbandkabel zum Lüfter aus seinem Anschluss heraus.
-
-
-
Heble beide Antennenkabelstecker mit dem flachen Ende des Spudgers nach oben und entferne sie aus ihren Anschlüssen auf der AirPort/Bluetooth Karte. Schiebe sie aus dem Weg.
Be very careful. When I did this - just as in the photo - I prised the top of the antenna connector off from the bottom of it, leaving me with only one functioning antenna.
You can usually pull the airport card out of the socket and let it dangle by the attached wires. They can be frustrating to re-attach.
This seems like great advice! Any more details would be greatly appreciated
Just walk it out slowly. The cables don’t have a lot of slack, so if you pull too hard on the card it may yank the cables out of their sockets, or worse, when it comes free.
When I did this, one antenna connection broke off and the other will not reattach for love nor money. I have not idea how to fix it. I’d try a blob of solder if my fingers were the size of matchsticks! Haha
-
-
-
Entferne folgende fünf Torx T5 Schrauben, mit denen der Akku am oberen Gehäuse befestigt ist:
-
Zwei 5,2 mm Schrauben
-
Eine 6 mm Schraube
-
Zwei 2,6 mm Schrauben
-
-
-
Hebe den Akku an der Kante nahe am Logic Board an und entferne ihn vom oberen Gehäuse.
-
-
-
Trenne das I/O Board ab, indem du seinen Stecker aus seinem Anschluss auf dem Logic Board ziehst.
Did it wrong to begin with by taking the complete socket away and not just the insert. Now I can’t get the socket back on the logic board contacts. Any ideas?
I have the same issue! Did you find a solution?
-
-
-
-
Hole die Antennenkabel mit der Spudgerspitze aus ihren Ausschnitten im Logic Board heraus.
They're not clicking back in when I reassemble it
-
-
-
Schiebe die Spudgerspitze vorsichtig unter die am Sicherungsbügel des Displaydatenkabels befestigte schwarze Plastiklasche, so dass der Sicherungsbügel vom Anschluss weg nach oben springt.
-
Halte den Sicherungsbügel weg vom Anschluss und ziehe das Displaydatenkabel vorsichtig aus dem Anschluss heraus.
-
-
-
Hebele mit der Spudgerspitze unter dem Stecker des Lautsprecherkabels und ziehe ihn gerade aus seinem Anschluss heraus.
-
Hole das Kabel aus seinem Ausschnitt im Logic Board.
-
-
-
Klappe den Sicherungsbügel am ZIF-Anschluss des Flachbandkabels zum Trackpad mit der Spudgerspitze oder dem Fingernagel hoch.
-
Ziehe das Flachbandkabel zum Trackpad gerade aus seinem Anschluss heraus zur Vorderkante des Air.
-
-
-
Klappe den Sicherungsbügel am ZIF-Anschluss des Flachbandkabels der Tastaturbeleuchtung mit der Spudgerspitze oder dem Fingernagel hoch.
-
Ziehe das Flachbandkabel der Tastaturbeleuchtung aus seinem Anschluss heraus.
-
-
-
Entferne die einzelne 2,9 mm Torx T5 Schraube, welche die AirPort/Bluetooth Karte am Logic Board befestigt.
-
-
-
Hebe das freie Ende der AirPort/Bluetooth Karte etwas hoch und ziehe sie aus ihrem Anschluss auf dem Logic Board.
-
-
-
Entferne die drei 3,6 mm Torx T5 Schrauben, welche das Logic Board am oberen Gehäuse befestigen.
-
Bei einigen Modellen sind dies 3,1 mm Torx T5 Schrauben.
-
-
-
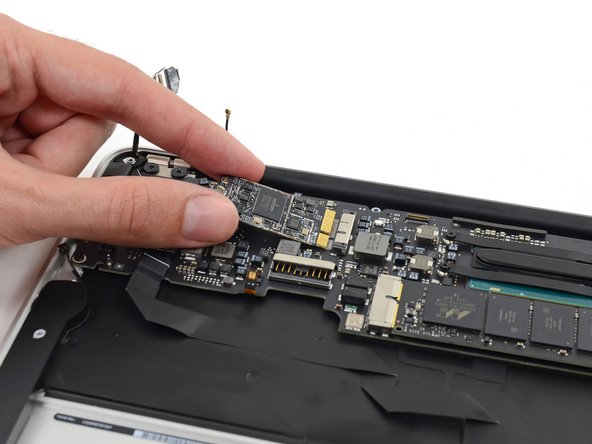
Hebe die Logic Board Einheit vorsichtig vom Kühlkörper weg. Ziehe sie dann weg von der Gehäuseseite mit den Anschlüssen und entferne sie vom Air.
There's a screw that's connecting the logic board to the casing that has to be removed before sliding the logic board out. I found that out the hard way.
Only 3 were in mine, where did you find another screw?
When replacing the logic board, make sure you haven’t trapped an antenna cable underneath. Easy to sort it out now, much more annoying if you only discover it after screwing everything down first!
-
-
-
Entferne die kleine Gummidichtung aus der Ecke des oberen Gehäuses nahe dem I/O Board.
-
Entferne die Dichtung aus der Ecke in der Nähe des Steckers des Displaykabels.
-
-
-
Klappe den Sicherungsbügel am ZIF Anschluss des Mikrofonkabels vorsichtig mit der Spudgerspitze hoch.
-
Ziehe das Flachbandkabel zum Mikrofon gerade mit der Pinzette aus seinem Anschluss.
-
-
-
Hebele mit der Spudgerspitze unter dem Lautsprecherkabel nahe am Stecker, und hebe ihn gerade aus seinem Anschluss heraus.
-
Hole das Kabel aus seinem Ausschnitt im Logic Board.
-
-
-
Entferne die einzelne 3,6 mm Torx T5 Schraube, welche das I/O Board am oberen Gehäuse befestigt.
-
-
-
Hebe das I/O Board am Versorgungskabel vorsichtig an und ziehe es weg von der Gehäuseskante.
-
-
-
Löse die sechs Kabelhalter, mit denen die Antennenkabel am oberen Gehäuse befestigt sind.
-
Ziehe die Kabelhalter vorsichtig nacheinander ein bisschen aus den Einschnitten im oberen Gehäuse.
-
Öffne die Kabelhalter mit dem Spudger, während du die Antennenkabel aus ihnen herausfädelst.
On the reassemble phase, rethread these before you reattach the display/
-
-
-
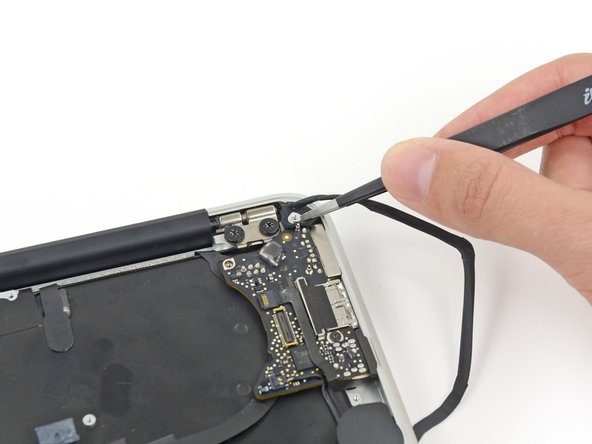
Entferne die innere 4,9 mm T8 Torx Schraube, die jedes Displayscharnier am oberen Gehäuse befestigt (also insgesamt zwei Schrauben).
-
-
-
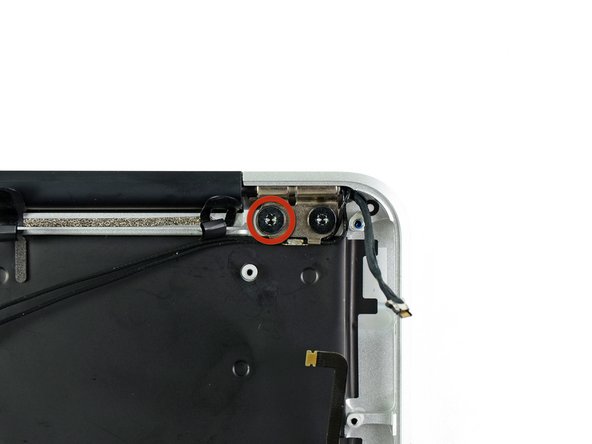
Während du das Air festhältst, entferne die übriggebliebene 4,9 mm T8 Torx Schraube von der unteren Displayklammer.
-
-
-
Entferne die letzte 4,9 mm T8 Torx Schraube, mit der das Display am oberen Gehäuseteil befestigt ist.
-
-
-
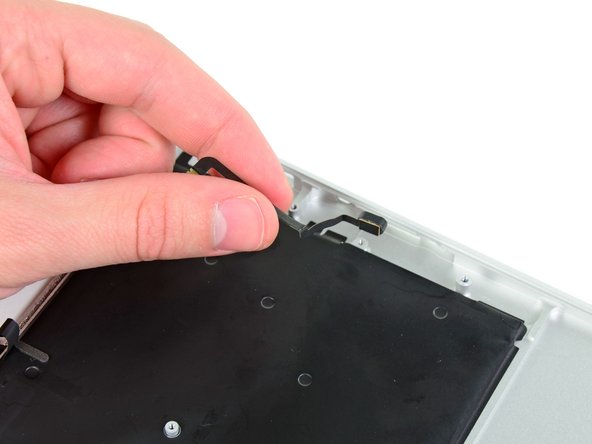
Schiebe den oberen Gehäuseteil leicht in Richtung der Displayeinheit und drehe es dann weg von der Vorderseite der Displayeinheit.
-
Sobald die beiden Displayscharniere es erlauben, entferne das Display und lege es beiseite.
-
-
-
Hebele den rechten Lautsprecher mit dem flachen Ende des Spudgers aus der Klebeverbindung zum oberen Gehäuse.
-
Entferne den rechten Lautsprecher vom oberen Gehäuse.
-
-
-
Hebele den linken Lautsprecher mit dem flachen Ende des Spudgers aus der Klebeverbindung zum oberen Gehäuse.
-
Entferne den linken Lautsprecher vom oberen Gehäuse.
-
-
-
Hebele das Mikrofon mit der Spudgerspitze weg von der Seite des oberen Gehäuses.
-
Entferne das Mikrofon vom oberen Gehäuse.
-
Das obere Gehäuse bleibt übrig.
This connector is different on mine and does not appear to be removeable. My replacement upper case came with it attached.
This microphone is different and glued in. Takes a bit of prying out
Don't pull too hard the microphone has the density of cardboard and I ripped mine in half.
-
-
-
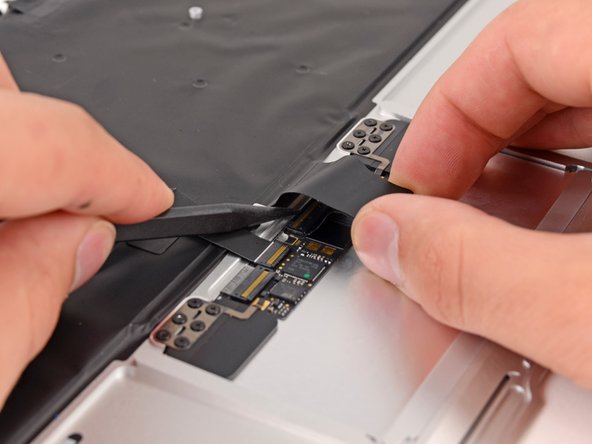
Hebe/Schiebe das Flachbandkabel zur Tastatur mit einer Hand weg vom oberen Gehäuse.
-
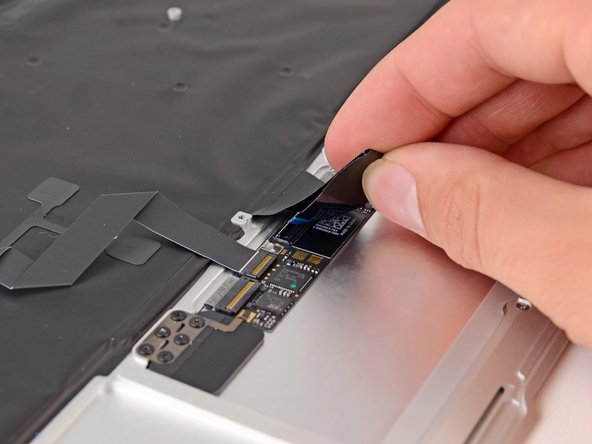
Nimm einen Spudger in die andere Hand und klappe damit den Sicherungsbügel am ZIF-Stecker hoch.
-
Wenn der Sicherungsbügel aufgeklappt ist, kannst du das Flachbandkabel vorsichtig aus seinem Anschluss herausziehen.
-
-
-
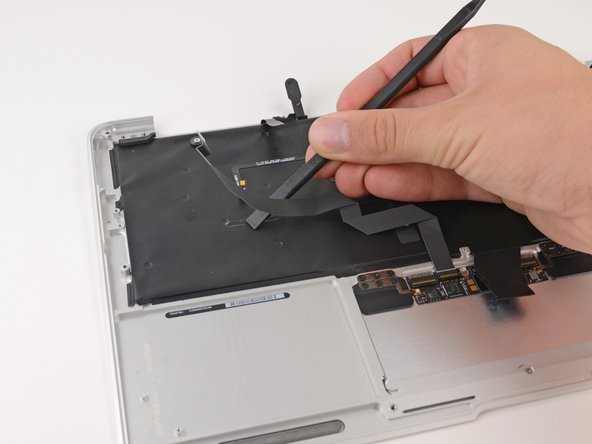
Löse das Flachbandkabel zum Trackpad mit dem flachen Ende eines Spudgers von der Unterseite der Tastatur.
-
-
-
Entferne die sechs 1,5 mm Kreuzschlitzschrauben #00, welche das Trackpad am oberen Gehäuse befestigen.
-
Untersuche dein Ersatztrackpad. Wenn es nicht die breite T5 Schraube hat, musst du sie vom alten auf das neue übertragen.
I needed the #000 bit instead of #00.
I also needed #000.
#000 is a necessity to remove those six screws - #00 is just too thick to fit.
-
-
-
Halte das obere Gehäuse mit einer Hand weg vom Tisch und drücke gleichzeitig das Trackpad hoch durch das obere Gehäuse.
-
Entferne das Trackpad vom oberen Gehäuse.
-


Um dein Gerät wieder zusammenzusetzen, folge den Schritten in umgekehrter Reihenfolge.
Um dein Gerät wieder zusammenzusetzen, folge den Schritten in umgekehrter Reihenfolge.
Rückgängig: Ich habe diese Anleitung nicht absolviert.
13 weitere Nutzer:innen haben diese Anleitung absolviert.
Besonderer Dank geht an diese Übersetzer:innen:
100%
VauWeh hilft uns, die Welt in Ordnung zu bringen! Wie kann ich mithelfen?
Hier starten ›


7 Kommentare
Steps 20 and 21 are necessary, as there is a logic board screw slightly hidden underneath the Wireless Card, as you can see in Step 22.
The isight cable in the top right corner: I don’t think yours is installed right, it shouldn’t be going over that rubber grommet, it should be going to the left. Your cable is all stretched. I don’t see why steps 20 and 21 would be necessary, except temporarily to remove the screw. Step 31: My inners are T9 and my outers are T10. Also, I wouldn’t rate this as a 3-bar difficult. There isn’t even anything glued in, you don’t need a heat gun or adhesive remover, no special tools besides the pentalobe bit are required. Estimated time 30-60 minutes.
Steps 20 and 21 are necessary, as there is a logic board screw slightly hidden underneath the Wireless Card, as you can see in Step 22.
I completed this process in hopes that I would have repaired a power button problem on this MacBook Air. This didn’t seem to work. Any other suggestions. Could it be the logic board? Just trying to find some answers. Wonderful step by step guide, though…Kudos to all involved.
Is this the guide to follow to replace the keyboard itself (as in the black part with the keys seen in the last image) or do I need to replace the entire upper case for that? The keys on my Early 2015 11,6” are a bit flimsy and not very firm.
When you say:
Remove the following ten screws:
Two 8 mm 5-point Pentalobe screws
Eight 2.5 mm 5-point Pentalobe screws
Do the 8mm & 2.5mm dimensions refer to the LENGTH of those screws, or the size of the pentalobe? That is, are there other sizes of pentalobe drivers like there are for hex, phillips and torx? When only one dimension is provided, it is usually the socket/driver size, not the screw length, maybe since the length cannot be seen when the screw is installed.
Can I suggest that you clarify your instructions so folks are confident they are only in need of _one_ pentalobe driver?
Nerdily yours,
Larry (whose iPhone 4S can now get through a day without 6 recharges thanks to ifixit.com ;-)
larryleveen - Antwort
The 8mm and 2.5mm are the length of the screws. One pentalobe P5 screwdriver suffices for all the screws (P5 is implicitly the size of the pentalobe screw heads).
Michael Welham -
I sourced all the parts from ifixit, plus a magnetic project mat which I found to be very useful for organising the teardown and reassembly.
Allen - Antwort
The magnetic mat is
GERARD SZAREK -
Keep the 2.5mm tiny screws away from the MagSafe connector as they will be attracted and sucked in to the magnet.
Frank O'Carroll - Antwort
A tip an old bench tech taught me that has saved me many times: I put clear “Scotch” tape over the case screws as they became “free”. The tape kept them in place while I lifted the lid off, cleaned it etc.
Michael Mee - Antwort
Thank you for a really smart tip! I will be using that countless more times!
Lilljedahl -
I’m confused about internet recovery and installing MacOS. Is all of this done before placing in the new ssd card or after. I don’t have any files that I would like to safe/transfer, is all of this necessary, if I don’t do it before placing new ssd, will I still be able to instal/upgrade macOS afterwards.
It’s an old Mac and now it won’t start or charge, I know I will have to replace battery and put new battery first and turn on Mac before doing the ssd stuff. Since it won’t effing start.
I’m really clueless about backing up old ssd, since I don’t need any files, besides MacOS(software) ,and is that related to the ssd?
AMG - Antwort
The answer to your question: You need to insert your SSD into the computer before internet recovery. If you start the recovery before inserting SSD, it won’t affect the setup, you won’t damage anything. But your SSD will not be detected (as there isn’t one inserted.)
Also, a little tip: If you bought a used SSD, go into Disk Utility and format the drive with the highest security level to permanently remove all of the previous files.
Also a FYI: Internet Recovery will load up Mac OS X 10.9.5 Mavericks, so I would recommend making a recovery drive from a Big Sur (or desired version) through another Mac, and a USB. You can visit this support doc: https://support.apple.com/en-us/HT201372
Hope this helps! -Dan
danielwen -
I got a macbook air with a damaged and swollen battery. I could remove all screws, except one 2,5 mm screw. I’m afraid it got damaged while attempting to remove it, I have no grip with the P5 pentalobe screwdriver. How can I proceed?
Robert Hermans - Antwort
Hi Robert!
Try some techniques found in this stripped screw removal guide. Good luck!
Arthur Shi -
Hello I have a macbook air they are say they do not have parts for my laptop macbook air 11 inches 2013 mid need to replace battery which one to buy
vensilver - Antwort
Hello! This is the part you want—maybe we’re not able to ship it to you if you’re out of the United States. The battery in your MacBook Air should be the same for all 11” between mid-2011 to early-2015.
Arthur Shi -
The smaller screws went in more easily when I put back all the screws along the hinge edge first.
Rachel Slatkin - Antwort