Diese Version enthält möglicherweise inkorrekte Änderungen. Wechsle zur letzten geprüften Version.
Was du brauchst
-
KaufenIn diesem Schritt verwendetes Werkzeug:P5 Pentalobe Screwdriver Retina MacBook Pro and Air$5.99
-
Entferne die folgenden zehn Schrauben:
-
Zwei 8 mm 5-Point Pentalobe Schrauben
-
Acht 2,5 mm 5-Point Pentalobe Schrauben
-
-
-
Löse das Gehäuseunterteil vom Air, indem du mit den Fingerspitzen zwischen Display und Gehäuse gehst und es nach oben ziehst.
-
Entferne das Gehäuseunterteil und lege es beiseite.
-
-
-
Dieser Schritt ist noch nicht übersetzt. Hilf mit, ihn zu übersetzen!
-
Use the flat end of a spudger to pry both short sides of the battery connector upward to disconnect it from its socket on the logic board.
-
Bend the battery cable slightly away from the logic board so the connector will not accidentally contact its socket.
-
-
Dieser Schritt ist noch nicht übersetzt. Hilf mit, ihn zu übersetzen!
-
Use the flat end of a spudger to pry both antenna connectors up from their sockets on the AirPort/Bluetooth card.
-
-
Dieser Schritt ist noch nicht übersetzt. Hilf mit, ihn zu übersetzen!
-
Remove the single 2.9 mm T5 Torx screw securing the AirPort/Bluetooth card to the logic board.
-
-
Dieser Schritt ist noch nicht übersetzt. Hilf mit, ihn zu übersetzen!
-
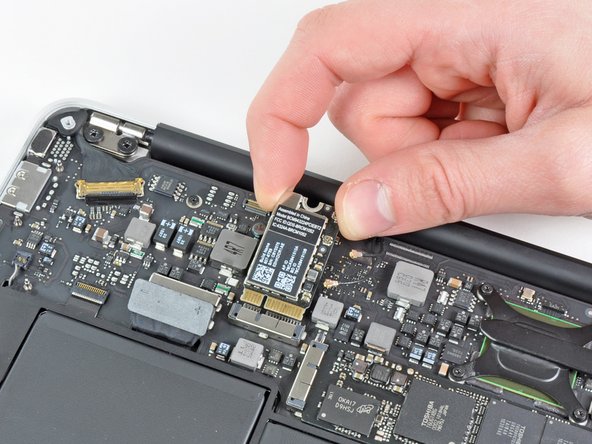
Slightly lift the free end of the AirPort/Bluetooth board and pull it out of its socket on the logic board.
-
Remove the AirPort/Bluetooth board from the Air.
-


Rückgängig: Ich habe diese Anleitung nicht absolviert.
11 weitere Nutzer:innen haben diese Anleitung absolviert.

Ein Kommentar
Hi Andrew, thanks for your guide on MacBook Air 11" Late 2010 Airport-Bluetooth Card. I am desperately trying to purchase new cables with female connectors to connect to the Card's male jacks. I ignore the size which is important: I tried MHF 4 too small, MHF 1 too big, so before buying wrong cables again I wonder if you can tell me what size is the Card's jack connection. I thank you for your help in advance.
Max