Diese Version enthält möglicherweise inkorrekte Änderungen. Wechsle zur letzten geprüften Version.
Was du brauchst
-
KaufenIn diesem Schritt verwendetes Werkzeug:P5 Pentalobe Screwdriver Retina MacBook Pro and Air$5.99
-
Entferne die folgenden zehn Schrauben:
-
Zwei 8 mm 5-Point Pentalobe Schrauben
-
Acht 2,5 mm 5-Point Pentalobe Schrauben
-
-
-
Löse das Gehäuseunterteil vom Air, indem du mit den Fingerspitzen zwischen Display und Gehäuse gehst und es nach oben ziehst.
-
Entferne das Gehäuseunterteil und lege es beiseite.
-
-
-
Benutze das flache Ende eines Spudgers, um die beiden kurzen Seiten des Akkusteckers hochzuheben und so den Stecker aus seinem Anschluss auf dem Logic Board zu lösen.
-
Biege das Akkukabel etwas vom Logic Board weg, damit sich der Stecker nicht versehentlich mit seinem Anschluss verbindet.
-
-
-
-
Entferne die folgenden fünf Schrauben, mit denen der Akku am oberen Gehäuse befestigt ist:
-
Zwei 5,2 mm T5 Torx Schrauben
-
Eine 6 mm T5 Torx Schraube
-
Zwei 2,6 mm T5 Torx Schrauben
-
-
-
Hebe den Akku an der Kante beim Logic Board an und entferne ihn aus dem äußeren Gehäuse.
-
Lade ihn auf 100% auf und lasse ihn mind. 2 weitere Stunden laden. Benutze das Gerät normal, um den Akku zu leeren. Wenn die Akkuanzeige niedrig ist, speichere deine Arbeit ab und lasse dein Laptop weiter laufen bis es sich wegen eines leeren Akkus von selbst abschaltet. Warte mind. 5 Stunden, lade dann dein Laptop ohne Unterbrechung auf 100% auf.
-
Falls du nach dem Einbau deines neuen Akkus irgendwelche Probleme oder etwas Ungewöhnliches feststellst, musst du unter Umständen den SMC deines MacBooks zurücksetzen.
-
-
Dieser Schritt ist noch nicht übersetzt. Hilf mit, ihn zu übersetzen!
-
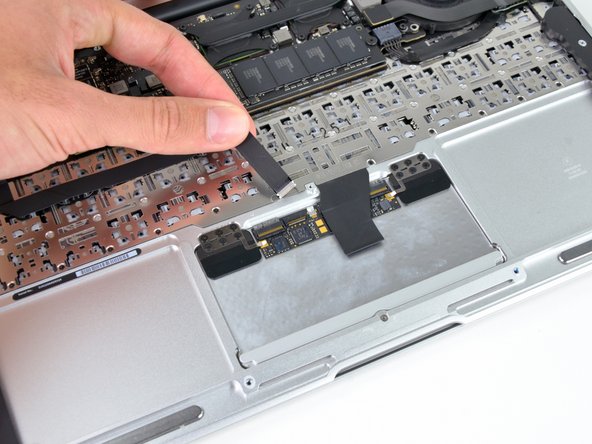
Use the tip of a spudger to pry up the retaining flap on the trackpad data cable ZIF connector.
-
Gently slide the trackpad ribbon cable out of the ZIF connector.
-
-
Dieser Schritt ist noch nicht übersetzt. Hilf mit, ihn zu übersetzen!
-
With one hand, lift the keyboard ribbon cable up and push it slightly away from the trackpad to access the ZIF connector underneath.
-
Use a spudger tip to pry up the retaining flap on the keyboard ribbon cable ZIF connector.
-
Gently slide the keyboard ribbon cable out of the ZIF connector.
-
-
Dieser Schritt ist noch nicht übersetzt. Hilf mit, ihn zu übersetzen!
-
Remove the six 1.5 mm Phillips #00 screws that secure the trackpad assembly to the upper case.
-
-
Dieser Schritt ist noch nicht übersetzt. Hilf mit, ihn zu übersetzen!
-
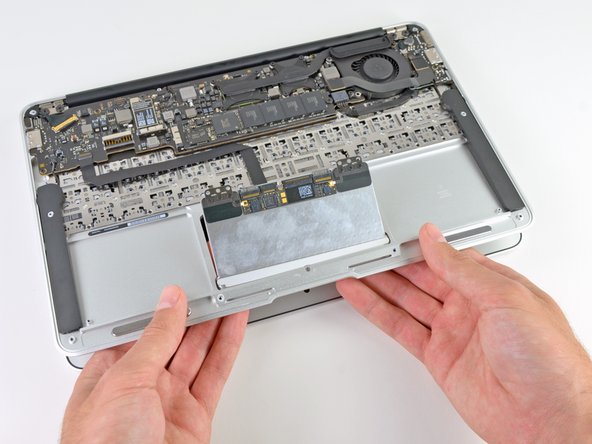
Open the MacBook about 10 degrees.
-
While supporting the upper case, press up on the side of the trackpad closest to the logic board.
-
Remove the trackpad.
-


Rückgängig: Ich habe diese Anleitung nicht absolviert.
28 weitere Nutzer:innen haben diese Anleitung absolviert.

4 Kommentare
I did it! Replaced the trackpad after the MacBook Air took a dive from a stand, which fortunately just shattered the trackpad's glass. Thanks for the easy to use instructions!
Just one note on step 8: I had to use a PH000 (triple 0) instead of the double 0 - almost destroyed one of the screws before realising.
Best regards,
StH
The trackpad from my macbook air would not click anymore. The pointer still worked, i could still tap and hoover around.
My guess was that something fell between the trackpad and the housing.
And I was right, it was a bread crumb or else of a little seed.
While following this guide, I saw that a little magnet underneath the unibody is lifting the trackpad up again, after being pushed down. Right in that tiny space was the little bugger :)
I'm with Stefan, about his comment by step 8. I actually did destroy one screw (there sat really, really tight) and had to use brute force with a pincer and a tip of WD-40 to loosen it. It seems like Apple took that into account, since there are enough to leave one out :)
I had the same issue, non-clicking mouse, and a dis-assembly & light clean also sorted me out. Thanks everyone!
pabz -
Replacement went well - iFixit guide marvellous as usual and replacement trackpad performs perfectly. So good to resurrect
the trusty MB Air!