Einleitung
Hier wird der Austausch eines defekten Logic Boards gezeigt.
Was du brauchst
-
KaufenIn diesem Schritt verwendetes Werkzeug:P5 Pentalobe Screwdriver Retina MacBook Pro and Air$5.99
-
Benutze einen P5 Pentalobe-Schraubendreher, um folgende zehn Schrauben zu entfernen, mit denen das untere Gehäuse befestigt ist:
-
Zwei 9 mm Schrauben
-
Acht 2,6 mm Schrauben
-
-
-
Löse das hintere Gehäuse vom Air, indem du mit den Fingerspitzen zwischen Display und Gehäuse gehst und es nach oben ziehst.
-
Entferne das hintere Gehäuse und lege es beiseite.
There is a nub on the inside of the case which is attached to the battery. When you try to pull it open, it appears to be attached to the plastic casing of the battery, which sometimes splits. I gently unhooked the nub from the battery before removing the case fully. This seems to happen if the battery has suffered some drop damage (plastic parts broken around screws and parts of plastic frame split). Just an FYI in case your lower case doesn't pull away easily.
To add - the slim 1cm tab “nub” is on the centre of the back cover & fits into a hole in the battery frame. I ran my fingers around the whole of the cover to eventually here it click out.
nijafe -
So this is a legit back cover for MacBook Air?
I bought the part and tools from iFixit and followed the directions. The mechanical part went smoothly - maybe 10 minutes to disassemble/replace/reassemble.
Getting Catalina (the current MacOS) to install was not working until I used Cmd-Opt-R (as noted in the OWC paper sheet that came in the box) which brought up the proper installer - I believe from a pre-prepared bootable SD card but it’s hard to say. From there the install succeeded taking ~1.5 hours.
Beware that (a) the install requires a working internet connection for verification and updates, and (b) the system must have been running at least macOs 10.13 (High Sierra) before the install in order to have an EFI BIOS that recognizes the SSD.
Thanks for the detailed photos. When repairing equipment, I don’t really like to disassemble plastic parts, they can be damaged, but your screenshots help a lot. For my studies, I am writing an essay comparing the reliability of laptops from various manufacturers and the complexity of their repair, maybe it will be useful for someone to check the essay for plagiarism here essay checker, when comparing different manufacturers, I understood why people love Apple so much. The minimum number of failures. Of course, repairing it in an official service is not cheap, but with the help of such detailed instructions, you can do it yourself and save a lot.
The screwdriver bit to use on these case screws is not named, but I found that my "CR-V 1.2" did the job nicely.
The driver for the screws inside the case are named, as "T5".
-
-
-
Nimm die durchsichtige Abziehlasche aus Kunststoff, die an der Akkusteckverbindung befestigt ist, und ziehe sie in Richtung der Vorderseite des Airs, um den Akku von dem Logic Board zu trennen.
The clear plastic tab is missing on mine. Whoever worked on my laptop before me seems to have ripped it off. Now what?
My plastic tab pulled off the connector. I worked the connection apart using two spurgers, slowly backing it out side to side.
I don’t see my socket on logic board, how can I fix it
-
-
-
Heble mit dem flache Ende eines Spudgers den Stecker des I/O Blendenkabels aus seiner Fassung auf der I/O Blende.
Be really careful when reconnecting the I/O board cable connector. The deep connector has a tendency to bend the pins with very little force applied. If this is the case, check to see if the gold pins are bent down, you may only see one row of gold pins vertically, or none.
They can be lifted with a flat head screwdriver bit. Gently slide the bit under the pins, this may need a small amount of pressure depending on how far they are bent down. Lever the pins back to the vertical position.
I found attempting to insert this connector was easier while holding the MacBook on a slight angle to see down the pins as I aligned the connector.
Another way to tell if the I/O connector cable is in place correctly is to run an Apple Hardware Test. Hold down the letter D while booting the mac and follow the prompts. If no issues found, you're all good.
A common error for a misconnected I/O Connector is 4SNS/1/C0000008:TS0P--124. This means the system cannot read the palm temperature sensor. Fix the cable and you're good
This is ridiculous.
From this point, skip ahead to step 18. There is no need to perform steps five through 17.
I am glad I saw your comment. This saved me a lot of time and allowed me to miss many points of failure. thanks.
-
-
-
Während du vorsichtig das I/O Blendenkabel nach oben in Richtung seines Anschlusses auf dem Logic Board ziehst, heble mit dem flachen Ende eines Spudgers abwechselnd auf beiden Seiten des Anschlusses, um ihn nach und nach aus seiner Fassung zu lösen.
-
Entferne das I/O Blendenkabel.
Agreed, there is no need to remove this cable.
-
-
-
Klappe mit der Spudgerspitze vorsichtig die Halteklappe auf dem ZIF-Sockel des Lüftungskabels hoch.
It is not necessary to remove the fan cable.
It's certainly necessary to remove the fan cable, as you won't be able to remove the fan in Step 10 if you don't!
If you break the ZIF socket, it could be a bad day.... It happened to me. Not one to throw in the towel, I fashioned a hold-down with a length of paperclip held in place by the nearby screw. So far, it is working like a charm. Hopefully, it continues to work and this helps some other poor soul.
I also haven't removed the fan cable. No need for this step IMHO. Just let the fan on the side instead of completely remove it.
Trouble putting the cable back in the ZIF socket?
Get some electrical tape and cut it down the the width of the ribbon cable fold over one end to create a pull tab. Now place the tape onto the ribbon to give yourself something to pull either in or out as needed. Then you can peel off the tape.
Don't forget the unlatch the connector first!
Source: Re-connecting fan ribbon cable
The hardest part is to put the fan cable back in the ZIF socket.
(Why do people say you don’t have to unplug the cable? that makes no sense)
after putting the cable back in the fan is very loud, can someone help?
Be very careful when locking the ZIF connector during reassembling. This was my first time seeing a ZIF connector, the retaining flap plastic bounced when I was reassembling the I/O board ( I didn’t pushed so hard though) and a struggled nearly 1 hour to reassemble it. Same connector, be careful. It was a nightmare, thank god it didn’t broke!
I see comments suggesting not to remove the ribbon cable. This would work. Simply flip the fan like the page of a book, from right to left, thereby getting it out of the way while you remove the i/o board. Flip it from left to right when you reinstall. This approach would save some frustration, as it is a challenge to reinsert that tiny ribbon into position.
If you do remove the ribbon, reinsert it before repositioning the fan. That will give you more play as to fiddle with the ribbon.
-
-
-
Löse die Gummidichtung vom Kleber oben auf dem Lüfter.
Note how the “ears” of the gasket are routed
Where can I purchase a replacement gasket? It’s missing after the repair place opened my computer
-
-
-
Entferne die folgenden drei Schrauben, mit denen den Lüfter an der oberen Schale befestigt ist:
-
Eine 3,6 mm T5 Torx Schraube
-
Eine 2,7 mm T5 Torx Schraube
-
Eine 3,6 mm T5 Torx Schraube mit einem kurzen Kopf.
So far great
When reinstalling, start all three screws before tightening down. There’s some play in these holes, and you will have trouble lining them up if you tighten one down first.
-
-
-
Hebe den Lüfter aus dem oberen Gehäuse heraus und ziehe das Flachbandkabel des Lüfters vorsichtig aus seiner Fassung heraus, wenn du es vom Air entfernst.
Would like more detail about removing the fan cable. Looks like it just pulls out to the right. I thought I ripped it off.
On re-installation of fan cable cable no tool required - just wiggle it in from from side/above (side force aided by bend of cable)
Super easy - my first computer repair..hope all is well
The ribbon connector held in the socket by a tiny square on top, which enters a square hole in the top of the socket. An xacto blade used to pry the top of the connector gently up will help release the connector.
Question: Is the ribbon connector a part of the fan, so that the new fan has its own ribbon connector? Apologies if this sounds trivial, but I could not tell from the wording/picture.
So I did the replacement according to this guide, with a replacement fan purchased from iFixit, and the fan would not spin even under heavy load! I took out the fan, and noticed that there was quite a lot of resistance when I spun the blades manually. It turns out, the fan was slightly squashed flat near the vent so that the resulting friction prevented the blades from spinning free. I un-squashed the fan, re-installed it, and the fan is spinning! The moral of the story is to make sure the blades can spin free when installing a new fan.
On reassembly, I found it hard to reinsert this ribbon cable, so did step 11 again. I disconnected the I/O board, connected the fan and snapped the retainer down on the ribbon cable, then undid step 11 (ie. I connected the I/O board again). As others have said, a brilliant step-by-step guide, and slloeing comments is a great idea too.
nice! Congrats!
Luis -
-
-
-
Trenne das I/O Blende, indem du das Netzkabel aus seiner Fassung auf dem Logic Board entfernst.
-
-
-
Ziehe das Kamerakabel parallel zu der Vorderseite der I/O Blende in Richtung der Ecke des Airs, um es von seiner Fassung zu trennen. Mit der Spudgerspitze kannst du nachhelfen, um den Stecker aus seiner Fassung zu bekommen.
My Macbook Air (2013) didn't have this cable.
Mine too, only a slot where a cable was passing,
-
-
-
-
Heble mit dem flachen Ende eines Spudgers den Kabelstecker des linken Lautsprechers nach oben und aus der Fassung auf der I/O Blende heraus.
-
Hole das linke Lautsprecherkabel aus seiner Halterung auf der I/O Blende.
On re-assembly, I haven't gotten the speaker or microphone to work. Must have broken the connection, but it looks fine. Ran the hardware diagnostic (holding down "D" at start up) and got the following error code - 4MOT/4/40000002:Exhaust-0
Anyone know what this means.
I recommend for the two speakers & mic connectors place thumb nail on top while prying up so you can gauge the upwards pressure better.
also generally before trying anything scary double click the picture & zoom in so you can see better what you’re dealing with. Or even get your phone magnifier to zoom in on to your tricky parts.
-
-
-
Heble den Mikrofon Kabelstecker mit dem flachen Ende eines Spudgers aus seiner Fassung auf der I/O Blende.
Be very careful: it is quite easy to accidentally pry the whole cable connector from the I/O board.
What do you do if this happens? Buy a whole new I/O board?
adamwitz -
I agree, I found this to be the only critical step of the entire disassembly procedure: I snapped the microphone connector socket off the board despite applying a relatively gentle pull on the cables. Fortunately I did this on a dead MBair from which I wanted to get the display, but now I'm afraid of doing the same damage while installing the display on the target MBair!
Any tricks/tips would be most welcome.
Lorenzo
Following up on my previous post I'd like to share how I eventually circumvented the risk of snapping the microphone connector socket on the I/O board. Instead of attempting to disconnect the mic (as suggested in this guide, step 14), I did the following: a. remove the battery, b. detach the right speaker, c. detach the microphone from the outer case (for steps b and c I followed the iFixit guide on how to replace a MacbookAir microphone). The advantage is that the microphone can now remain safely connected to the I/O board. Of course when reassembling the mac one has to reverse these extra steps (the microphone can be easily reattached to the case as it has a sticky side). I would strongly advise iFixit to revise this guide accordingly!
I don't think this step is necessary if you aren't seeking to fully remove the I/O board - if you are seeking only to remove the heatsink, you can skip this step, leave this delicate cable attached, then in the next couple steps you'll end up "flipping" the board out of the way, while leaving this cable connected.
I find it very helpful that you give directions on where to pry, and how to address each connection. I’m always hesitant for fear of snapping something off, so I appreciate this detail. Thanks.
-
-
-
Entferne die einzelne 3,6 mm T5 Torx Schraube, mit der die I/O Blende am oberen Gehäuseteil festgemacht ist.
The screw was stripped and I couldn’t remove it, but it didn’t matter, I could complete removal of the logic board without removing the I/O board. I think the steps involved with disconnecting the I/O board are redundant.
I have done this repair without the steps laid out above. The I/O board does not need to come out. Just be careful when de-routing the wires attached to the display and you should be fine. I was able to skip steps 11-21 and go straight to step 22 without issue.
-
-
-
Hebe das I/O Board vorsichtig von der Ecke, die am nahesten am Logic Board ist, her an und entferne sie vom oberen Gehäuseteil.
When following these instructions in reverse, and reinstalling the I/O board, be sure to carefully check and adjust the alignment of the ports on the board with the holes in the case - it is especially obvious if the headphone port is mis-aligned with the case.
Also on reassembly, make sure the speaker and microphone cables are visible before securing the i/o board!
-
-
-
Entferne die folgenden fünf Schrauben, die den Akku am oberen Gehäuse festmachen.
-
Drei 6,3 mm T5 Torx Schrauben
-
Zwei 2,4 mm T5 Torx Schrauben
Be careful when screwing in again not to overtighten, the plastic of the battery breaks easily with tightening.
-
-
-
Hebe den Akku von der Logic Board-Seite her an und entferne sie aus dem oberen Gehäuse.
-
-
-
Klappe den Halteclip auf dem ZIF Sockel des Tastfeld-Flachbandkabels mit der Spudgerspitze oder einem Fingernagel nach oben.
-
Achte darauf, an dem klappbaren Halteclip zu hebeln und nicht direkt am Sockel.
Disaster strikes. I pulled away the socket itself (just like it says not to). Is there any possibility to re-connect it, or did I just ruin the whole logic board?
-
-
-
Klappe den Halteclip des Flachbandkabel des ZIF-Sockels der Tatsturhintergrundbeleuchtung mit der Spudgerspitze nach oben.
-
Verwende den Spudger, um das Kabel aus der Fassung herauszuholen.
-
-
-
Heble den Kabelstecker der rechten Lautsprechers mit einem Spudger nach oben und entferne ihn von seiner Fassung auf dem Logic Board.
To snap back in, place speaker cable connector directly on top of socket and press down with your finger or tool.
This has to be done very gently. I only applied a mild lift and the socket broke off from the board. I had to say good-bye to the right speaker. :-(
Read my comment about using tweezers for the left speaker cable connector. But for some reason, the right connector was a little more tight and took more effort than the left speaker cable connector.
-
-
-
Drücke vorsichtig die Spudgerspitze gegen den schwarzen Kunststoffclip, der am Displaydatenkabelschloss angebracht ist, so dass das Schloss nach oben und weg von dem Sockel poppt.
-
Während du das Schloss von der Fassung auf Abstand hälst, entferne mit einem Spudger und deinen Fingern das Displaydatenkabel aus seiner Fassung.
Regarding the second photo on step 22, I believe the placement of the spudger is incorrect. If the second photo's purpose is to demonstrate the placement of the spudger described in the second bullet--"...use the tip of a spudger and your fingers to gently remove the display data cable..."-- then such placement could lead to damaging the connector. View this annotated screenshot to see what I'm trying to convey: https://www.evernote.com/shard/s4/sh/1f5....
I agree, I used tweezers to pull it gently and it worked beautifully
Agree. Use tweezers.
sdcsoup -
You should place the tip of the spudger on top of the connector and push out. At first I had the tip of the spudger on the bottom and tried to push up and that was incorrect.
-
-
-
Heble beide Antennenkabelstecker mit einem Spudger nach oben und entferne sie aus ihren Sockeln auf der AirPort/Bluetooth Karte.
-
-
-
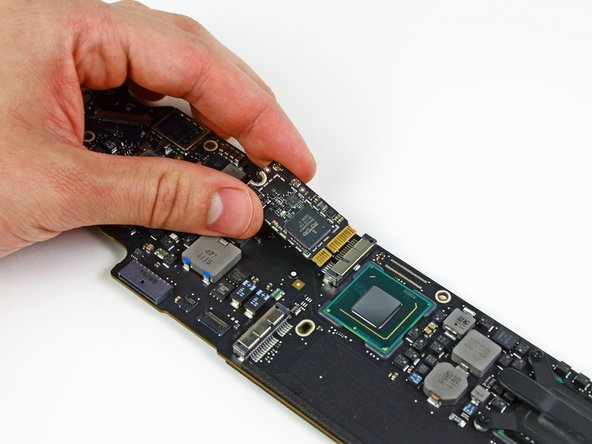
Entferne die einzelne 2,85 mm T5 Torx Schraube, mit der die SSD am Logic Board befestigt ist.
-
-
-
Ziehe das Laufwerk gerade aus seinem Anschluss heraus und entferne es vom Logic Board.
Warning: there may be adhesive keeping the SSD in place. i got 1 with, and 1 without, both slightly different models (but still the same model name, A1466 )
-
-
-
Entferne die sechs 6,3 mm T5 Torx Schrauben, mit denen das Logic Board am oberen Gehäuse befestigt ist.
Please Please Please remember to re-attach your antenna cables if you are replacing the upper case with a new or refurbished one. They have a way of slipping under the logic board.
These screws are easily stripped. If you accidentally push too hard, you will strip the screw when re-attaching. If that happens, get a pair of needle nose pliers and gently work the screw out taking care not to damage the board.
These screws are actually 3.6 mm T5 Torx. Please fix :)
I’ll second this observation.
sjosefw -
When putting the logic board back, make sure the speaker wire isn't trapped under it
I have not replaced a display on the A1369 but have done many A1466 which is a newer 13” model. They seem really similar and its not clear why one needs to remove the logic board to remove the display. The antenna cables on the A1466 dont have to rest under the logic board but can be tucked in the hinge crevice. Cant this same thing be done with the A1369?
-
-
-
Entferne die inneren zwei 4,9 mm T8 Torx Schrauben, mit denen der Antennenkabelhalter und das linke Kupplungsscharnier am oberen Gehäuse festgemacht ist.
These are T9-sized torx screws, not T8.
This is good to know. I think I need to order a screwdriver set - all I have is the pentalobe and one other that came with my SSD replacement kit.
I also had T9 screws on my device.
I found it helpful to loosen the 3rd screw of the hinge already a TINY bit. The screws are quite tight so it´s easier to loosen them while the case is lying flat on the surface. This procedure comes in handy in Step 34 where you have to hold the case perpendicular with one hand, while unscrewing this screw with the other hand.
Mine were T8 screws, but I was able to use a T9 torx with pressure and that worked.
Mine were T8 and my T8 bit worked fine.
-
-
-
Bewege den Antennenkabelhalter etwas beiseite und entferne die 3 mm T5 Torx Schraube, mit der das Ende des Wärmeableiters am oberen Gehäuse festgemacht ist.
When I was re-assembling, the screw hole of the heat sink didn’t align. I applied a mild force then the edge of the heat sink broke off from the rest, losing the contact to the case. I am hoping the Air would work for a while during the test run (if it ever works) but I would buy a replacement heat sink for regular use.
-
-
-
Entferne die Logic Board Einheit vorsichtig vom obere Gehäuse und achte dabei auf Kabel, die im Weg sein könnten.
On reassembly, as you seat the board in place, make sure the keyboard backlight cable is not trapped under it.
Removal of logic board and all the steps leading up to it I found unnecessary. They may be good for some but I really didn't need to dismantle the laptop as much as this guide shows to get the display off. Just my opinion, of course.
-
-
-
Entferne die einzelne 2,9 mm Torx T5 Schraube, welche die AirPort/Bluetooth Karte am Logic Board befestigt.
-
-
-
Hebe das freie Ende der AirPort/Bluetooth Karte ein wenig an und ziehe es aus seinem Sockel auf dem Logic Board.
-
Entferne die AirPort/Bluetooth Karte vom Logic Board.
-
-
-
Entferne die vier 2,5 mm Torx T5 Schrauben, welche den Kühlkörper am Logic Board befestigen.
-
-
-
Entferne den Kühlkörper vom Logic Board.
Arctic Silver's application guide http://www.arcticsilver.com/intel_applic... shows mobile 15 processors for 2nd generation, recommending a spread technique. But the 3-7th gen i5 only lists vertical line technique. I can find the actual processor model used in the 13" mid-2011 MBA (Core i5-2557M, found here: http://www.anandtech.com/show/4528/the-2...), but no way to correlate that to 2nd gen, 3d gen, etc.
I'm going to go with spread because it seems generally safer for laptops, but if anyone can confirm: What generation is the Core i5-2557M; and if it's later generation (3- on), is it really vertical line vs. spread?
Allen, it's been a while since you did the repair. Have you had any problems with overheating? Or anything else that might be caused by spread vs. vertical line?
Talon -
i’m looking for a CPU under the heatsink. is that integrated onto the mobo as well??
-


Rückgängig: Ich habe diese Anleitung nicht absolviert.
84 weitere Nutzer:innen haben diese Anleitung absolviert.
Besonderer Dank geht an diese Übersetzer:innen:
100%

Diese Übersetzer:innen helfen uns, die Welt zu reparieren! Wie kann ich mithelfen?
Hier starten ›

23 Kommentare
This does not show the battery removal in the early steps, but it is shown as removed in later steps.
Thanks for pointing that out! Missing steps have been added :)
Thanks i fixed my MacBook Air (11 inch) with this tutorial.
My MBA became very slow after a water spill over the keyboard.
Although Hardware check said everything was fine, i disabled the MB and found a spot with corrosion, after removing the corrosion and assembling it was on speed again. the water spill was some months ago so it had some time to corrode and show were a clean was needed :-)
Wat I real appreciatie is the accurate way of description of the connector disassembly :-)
Would it be possible to upgrade this machine to hold a newer logic board?
No. There are no compatible logic boards that I am aware of.
Talon -
with a little bit of skills you dont need to remove the T8 screws. But be sure not to damage the cable
[|your guide was really helpfull, but I´m looking for a piece that was ripped out (I took it to a store to get it cleaned, and they trick me) and would be great if you can help me, if you have an email account so i can send you the picture. The little piece is like a chip next to the airport/bluetooth board, the tiny tiny one.]
Thank you for this, it was really helpfull, but I actually have a little problem that you can help me with. I took my MacBook to a store to get it cleaned and I think they trick me, I found out later that a little piece had been ripped out, i’m trying to replace it but I don’t know the name or where to find it, its the little piece that is next to the airport/bluetooth board, the tiny tiny one. If you have an email account so I can send you the picture, would be great if you can help me out.
thanks !
Top! Top! Top!
Das Macbook gab nur mehr 3 Töne fortwährend bei 5 Sekunden Pause von sich. Habe dann nach dieser Anleitung Punkt für Punkt das Board demontiert, anschliessend bei 190 Grad während 8 Minuten in den Backofen , und siehe da, das Macbook läuft wieder.
Vielen Dank für die tolle Anleitung.
No experience in computers what so ever but when my girlfriend s computer started beeping I decided to try my luck with this guide. Just took it slow and steady following the steps of the guide. Once I removed the logic board from the computer I put it in the oven for 7 minutes at 170 C. Now it works perfectly again!
Thank you for the guide, was really helpful and easy to follow!
2011 Macbook air
Hi Oztrail (and any others)
I had the three beeps and tried the various simple methods to fix it - PRAM, SMC, Diagnostics, Vacuuming the inside - with no luck.
So I’ve now removed my logic board argh. Plan is to oven it.
I was just wondering before I put it in the oven if it could’ve been the thermal past that was the issue?
When I removed the heatsink it came away instantly without any resistance. The thermal paste was dried and chalky and I can’t imagine did a thing.
Is this normal? Or should I try a simple step of applying new paste before baking my board?
Any thoughts would be great!
Oh and I assume you baked without the heatsink in place, and reattached it after baking with some new thermal paste?
Thanks for any thoughts - I’ll post back my experience
Jeremy -
Hi. My macbook air 13” mid 2011 simply does not start. Green led on permanently in the charger. I simply do not know if the logic board is damaged or is a simple case of soding some chip. How do i get the guide of voltage of the parts of the macbook air? So then i can show to a specializer that can test the voltage of each part of the macbook air logic board.
Well I am now typing this on my previously 3 beep macbook air
In answer to my own questions above, I did remove the heatsink and baked the logic board.
I did it for 8 minutes at 180 deg C
Also reapplied plenty of new thermal paste.
It’s working beautifully so far.
Interestingly having applied the paste it is super quiet. Made me realise that before it had been really hot and noisy, so maybe it was the thermal paste causing the issue…
After reading through this procedure, I now understand why a logic board swap costs about $300 (parts + labor). You’d better know what you’re doing and be precise (and delicate). I counted a dozen steps where I would probably munge things up pretty badly. So thanks for keeping me from destroying what would be, otherwise, repairable. :D
Thank you for posting these repair instructions, I successfully installed a new logic board on my wife’s Macbook Air….couldn’t have done it without your detailed instructions. Cheers, Tom
Thank you so much for this detailed guide. I was able to bring back to life my MacBook Air pretty easily following your instructions.
Took my MacBook Air to certified Apple for repair. Advised $900 repair. I read this review baked the logic board at 180 degrees for 8 minutes and it’s like new. Had no thermal paste so used toothpaste as a substitute till thermal paste arrives. Thankyou sooooo much
Hi Malcolm,
It quite possible dries the CPU. My MacBook Air has now been running faultless for 3 weeks. Just ensure you remove the heat sink and clean the paste off the cpu. then after baking re apply thermal paste.
Pulling the fan cable out was terrifying but you actually just pull on the cable itself. No way to get any leverage at the connector to dislodge it. Did come out easily but like I said, scared me!
allison - Antwort
Draai de schroefjes voorzichtig los en leg ze op een stabiele plek neer en let erop dat de schroefje een verschillende lengte hebben.
bwgvanderveer - Antwort
I thought I could replace my 256 Gb SSD with 512? regards
ola m - Antwort
Do you have good Test Point Voltages? It appears there are silver colored Test points on the I/O Board. I am working on a water spill and trying to troubleshoot if both the I/O board and the Logic need replaced.
andrew - Antwort
It's probably not necessary but may be a little safer to completely discharge the old battery before replacing it.
Larry Smith - Antwort
tell a model that was not inferior to the speed of the one in the laptop.
Thank you
ilyabuhov - Antwort
Do i need to order tools separately to replace the battery i just ordered?
anne uhlir - Antwort
im looking for a Logic Board for a
Apple - MacBook Air® - 13.3" Display - Intel Core i5 - 8GB Memory - 128GB Flash Storage (Latest Model) - Silver Model: MQD32LL/A
Any help is appreciated.
Jamie Comstock - Antwort
P5 pentalobe screwdrivers are too big! The correct size for these screws are p4 pentalobe. P5 pentalobe was just able, with difficulty, to turn some of the screws. If the screws were at all tight, my p5 was unable to get them out, and started to strip the screws. A p4 screwdriver fit better and removed the screws with ease. (I was using high quality Wiha brand screwdrivers.)
William Skinner - Antwort
I had same experience (with MacBook Air 13-inch Mid-2012) … had to get P4, which worked swimmingly
eric -
Very simple installation. The screwdriver heads were exactly what we’re needed, one head for the outside case screws, the other for the screws holding the battery in place. The computer started right up. Now to see how the battery holds up, but I have a good feeling about this!
Dennis Eaton - Antwort
My P5 and the T5 worked perfectly with my early 2015 Air 13”! And it is super fast! Thank you iFixit!
Pennny Beach - Antwort
The supplied kit and instructions worked perfectly!
Nikolay Andreev - Antwort
Comments that the P5 pentalobe are too large are absolutely spot-on. There is no way the P5 pentalobe bit I have will work with the MacBook Air without destroying the screws. Hard target search for P4 pentalobe bit in progress…..
joemoog - Antwort
Bonjour j’aimerais changer mon SSD de 128 Go pour en mettre un de 512 Go. Je ne sais pas ce qu’il faut prendre car il faut qu’il soit compatible avec le macbook air A1466. J’aurais vu un Samsung Evo 970 500 Go mais si je ne me trompe pas, il faut un adaptateur.
Merci pour votre aide.
chicco33 - Antwort
oui, vous aurez besoin d’un adaptateur, pour completez le changement.
Dan -
The tool kit should include tweezers for re-inserting the battery connector.
Andre Clement - Antwort
P5 pentalobe worked perfectly for me. Instructions were spot-on. Antenna connections were a bit fiddly to refit but got them in ok.
michaelquinnell - Antwort
Maybe the problem some are experiencing is that the designations are confusing (blame Apple rather than iFixit). the P2 is also known as PL1. The P5 is also known as PL4. The P6 is also known as PL5. So it is possible to mistake the P6 (PL5) for the P5 (PL4), meaning it (P6-PL5) will be too big, while the P5 (PL4) will be just right. Sort of a 3 Bears explanation, but it is very confusing.
Thomas Lewis - Antwort
To add to this. In searching for the P5 screwdriver to buy in UK, as far as I can tell, it is also known as
Pentalobe 1.2(mm)
also
P4 = 0.8
P6 = 1.5
Just unscrewed the back case of MacBook Air 13” mid 2011, with no problems using Pentalobe 1.2
nijafe -
I have not replaced a display on the A1369 but have done many A1466 which is a newer 13” model. They seem really similar and its not clear why one needs to remove the logic board to remove the display. The antenna cables on the A1466 dont have to rest under the logic board but can be tucked in the hinge crevice. Cant this same thing be done with the A1369?
Sean Love - Antwort
Did mine today - but new battery wasnt charging. Went back in and noticed the battery connector cable was not quite 100% “seated. It was sticking out by less than a millimetre! - you need to give it quite a firm push in to get it seated properly. Otherwise - all ok .
John Brennand - Antwort
Just installed on a MacBookAir6,2 (13-inch, Early 2014).
Was very easy.
New iFixit battery looks great so far:
Jonathan Cross - Antwort
can you tell me which size of screwdrivers you’ve used to crack it up, please? I have the same model and size,
hawk_lpc -
Screw P5 Pentalobe 1.2
Mario Verlent - Antwort
Install went flawlessly. Only challange was reattaching blue tooth antennas. Those sockets are so tiny.
Joel Sebastian - Antwort
Installation was a little challenging at first because the instructions on this site did not perfectly match my model (late 2013 to early 2015).
Found this video on YouTube which described the procedure perfectly https://www.youtube.com/watch?v=Lue6lVWh...
Also the Ifixit kit I received was well put together with everything I needed and more. The calibration went perfectly and I am very pleased. Will buy again!!
Donald Niamath - Antwort
Gently pulled out connector of old battery, then pressed and held the power switch for 1 minute. Unscrewed and removed the old battery. Pressed and held power switch for 1 minute again. I know from previous work that this helps drain charge from spontaneous recharging as the dielectric recovers. Gently “fine tuned” leads from new battery to connector till connector stuck out at right angle to the edge of battery. Held the battery by the edges and let the connector slide into the socket. Set the battery down and put the screws in all the way. Then checked that the connector was completely seated before tightening the screws. The laptop come on immediately and showed 98% charge and registered normal (checked in “About this Mac”. Very happy to this point. Now for calibration.
Amir Zaidi - Antwort
Thank you very much for the guilde. My MBA2011 had reborn !
Billy Wong - Antwort
Allow for electrostatics, otherwise you may cook components on the logicboard /motherboard (like I did with one of these!)
See great advice: Electrostatic Discharge
Fletcher Cole - Antwort
… und wenn du eines von diesen wirklich kleinen Schräubchen vermisst: bevor du den Boden aufkehrst oder mit einem starken Magneten absuchst, schau mal am seitlichen (magnetischen) Ladekabelanschluss nach … ?
... and if you miss one of these really small screws: before you sweep the floor or search it with a strong magnet, take a look at the (magnetic) charging cable connection on the side … ?
Blatt - Antwort
Fot All People ha ing trouble finding their SSD
DONT PRESS CMD +R + POWER
instead press
OPTION+CMD+R +POWER
I just installed Monterrey with WD black sn 770 SSD in m'y macbook air 2015
Albert - Antwort
IFixit just had me submit "my story" re. fixing my MacBook Air 2013.
This repair was NOT difficult. The battery is enclosed in a plastic frame. It is NOT glued in like the newer models of Apple laptops. And unlike older laptops, the battery is not totally enclosed in a plastic housing. So once you remove the screws holding the batterie's frame, you can remove the battery.
Follow the instructions. Read the comments. Also read the comments re. installing a new battery.
Good luck. - Eric J.
ECJohansen - Antwort
On the back of the laptop, notice that each screw is angled a little bit inward, aiming toward the middle of the laptop. Keep your screwdriver lined up with the screw (angled a bit outward as seen at 01:23 in the video: https://youtu.be/tToAwO6f-SY&t=83). This will help you get a good bite on the screw to get it out and avoid stripping the head of the screw.
Use the same angle when putting each screw back in. If the screw is in line with its hole it should not feel like you are fighting to screw it in. If it does, check your angle and back up a little; you should feel the screw fall into line.
Rich Garella - Antwort
IFixit just had me submit "my story" re. fixing my MacBook Air 2013.
This repair was NOT difficult. The battery is enclosed in a plastic frame.
shrhh - Antwort