Einleitung
Use this guide to replace the plastic frame around your MacBook Core Duo's LCD.
Was du brauchst
-
-
Use a coin or spudger to rotate the battery-locking screw 90 degrees clockwise.
-
-
-
Remove the three evenly-spaced Phillips screws from along the rear wall of the battery compartment.
-
-
-
Lift up on L-shaped memory cover, slide it to the right, and lift it out of the computer.
-
-
-
Remove the following 3 screws:
-
One 11 mm Phillips #00 in the middle of the case.
-
Two 14.5 mm Phillips #00.
-
-
-
Remove the following 3 screws from the rear wall of the battery compartment:
-
Two 3 mm Phillips #00. (A1181 has three 3 mm screws and one 4 mm.)
-
One 4 mm Phillips #00 on the right side.
-
-
-
Remove the two 6 mm Phillips #00 screws from either side of the right wall of the battery compartment (not the ones closest to the battery connector).
-
-
-
Remove the four 3 mm indicated Phillips #00 screws from the front wall of the battery compartment. When working from the left, remove the 2nd, 4th, 7th and 9th screw.
-
-
-
Remove the following 4 screws from the back of the computer:
-
Two 7 mm shouldered Phillips on the far sides.
-
Two 10.5 mm Phillips toward the center.
-
-
-
Remove the two 5.2 mm shouldered Phillips #00 screws from the optical side of the computer.
-
-
-
Starting near the display and working around to the front of the computer, pry up on the upper case. It is held with clips on the right above the optical drive. These will release with some firm lifting pressure.
-
Be careful when prying up the upper case. It's very easy to slice open a fingertip and thus provide the blood sacrifice the Mac gods sometimes require of those who insist on doing their own repairs.
-
-
-
While holding up the upper case (from the bottom or the top), use a spudger to pry up the orange trackpad and keyboard cable from its connector.
-
-
-
Grasp the white plastic tab attached to the hard drive and pull it to the left, removing the hard drive from the computer.
-
-
-
-
Disconnect the newly-revealed display data cable. If there is no pull-tab on the top of the connector, it may be helpful to use a spudger to disconnect this connector.
-
-
-
Peel up the foil tape between the fan and the optical drive.
-
Remove the 8.5 mm Phillips screw securing the display data cable to the metal framework.
-
-
-
Pull up the display data cable from along the edge of the optical drive to reveal a silver Phillips screw.
-
-
-
Remove the 2.8 mm Phillips screw securing the optical drive.
-
After removing the screw, push the metal tab backwards, towards the fan, to release the front of the optical drive.
-
-
-
Lift the front edge of the optical drive and slide it up and out of the computer.
-
-
-
Remove the following 3 screws:
-
Two 3 mm Phillips near the right speaker.
-
One 6 mm Phillips threaded through a hole in a plastic finger above the subwoofer.
-
-
-
Using a spudger, gently pry up the white plastic slot and slide the metal c-channel to the right and away from the display.
-
-
-
Use a spudger to carefully disconnect the microphone cable from the logic board. You'll want to work from side to side, and slowly wiggle the connector out of its socket.
-
-
-
Lift up on the black right speaker cable with one hand, and deroute the silver microphone cable from the silver metal clip just above the right RAM slot.
-
-
-
Deroute the silver microphone cable and gray display data cable from the tabs at the bottom of the subwoofer.
-
-
-
Remove the single 3.2 mm Phillips screw securing the ground loop in the display data cable located just above the Bluetooth board.
-
-
-
Disconnect the two antenna cables from the Airport card, and the black inverter cable from the logic board. (Pull vertically on all three.)
-
-
-
Remove the following 2 screws from the right hinge mount:
-
One 6 mm Phillips on the left side of the hinge mount.
-
One 10 mm Phillips on the right side of the hinge mount.
-
Lift the right hinge mount out of the computer.
-
-
-
Hold the display with one hand while removing the screws from the left hinge mount.
-
Remove the following 3 screws from the left hinge mount:
-
One 6 mm smaller diameter Phillips from the right side.
-
One 6 mm larger diameter Phillips from the middle.
-
One 10 mm Phillips from the left side.
-
Lift the left hinge mount out of the computer.
-
-
-
Grasp the display assembly on either side, and lift it up and out of the computer.
-
-
In diesem Schritt verwendetes Werkzeug:Plastic Cards$2.99
-
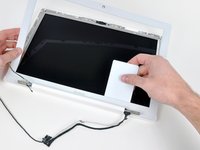
Use a thin plastic card to release the tabs and their clips holding the front display bezel to the display assembly. There are five tabs along the left side of the display bezel.
-
-
-
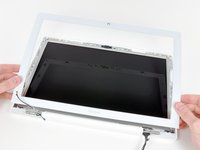
Lift up the front display bezel from the top and use your plastic card to free the tabs along the bottom edge of the display bezel.
-
After freeing all holding tabs, lift the front display bezel away from the display assembly.
-
-
-
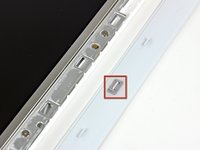
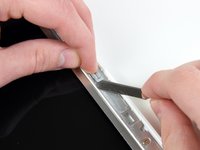
Use a metal spudger or another thin tool to carefully pry the gray plastic clips off the tabs molded into the front display bezel. A 0.8mm flat screwdriver may be useful for this step. You may find that it's easier to remove some of these clips by prying up on their long sides.
-
-
-
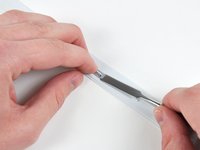
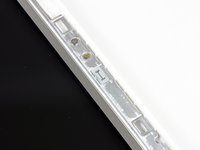
Insert one end of the retaining clip beneath the edge of its recess cut into the LCD bracket.
-
Use the edge of a spudger to push the short hook tab on the underside of the other end of the retaining clip into the recess cut into the LCD bracket.
-


To reassemble your device, follow these instructions in reverse order.
To reassemble your device, follow these instructions in reverse order.
Rückgängig: Ich habe diese Anleitung nicht absolviert.
30 weitere Personen haben diese Anleitung absolviert.

4 Kommentare
This may be a lame question but is it completely necessary to do steps 1-34? Can we simply remove the bezel with out taking off the display?
You're right, most of these steps are irrelevant. You can easily just pop it off. You can do 36-40 without taking apart the whole computer. just start on the lower sides. I did it yesterday. It's really easy.
Allison -
I don't mean to insult this guide. But you can definitely take the bezel screen frame off without taking apart the whole computer. It's not attached to anything other than the bezels. Just start at the bottom sides and go from there. This guide could definitely be simplified. You just need to do 36-40
You are right I just did mine yesterday, unknowingly with no prior knowledge, I fix a new display bezel without tempering with the top Case.
Cent Ci -