Einleitung
Nutze diese Anleitung, um das LCD-Kabel im Scharnier deiner Displayeinheit zu ersetzen.
Was du brauchst
-
-
Entferne die folgenden zehn Schrauben, mit denen das untere Gehäuse am oberen Gehäuse befestigt ist:
-
Zwei 2,3 mm P5 Pentalobe Schrauben
-
Acht 3,0 mm P5 Pentalobe Schrauben
-
-
-
Versuche mit den Fingern zwischen das obere und das untere Gehäuse zu kommen.
-
Ziehe das untere Gehäuse behutsam vom Oberen weg.
-
Entferne das untere Gehäuse und lege es zur Seite.
-
-
-
Das untere Gehäuse ist in der Mitte durch zwei Plastikklammern mit dem oberen Gehäuse verbunden.
-
-
-
Entferne die Plastikabdeckung über der Platine des Akkuanschlusses.
-
-
-
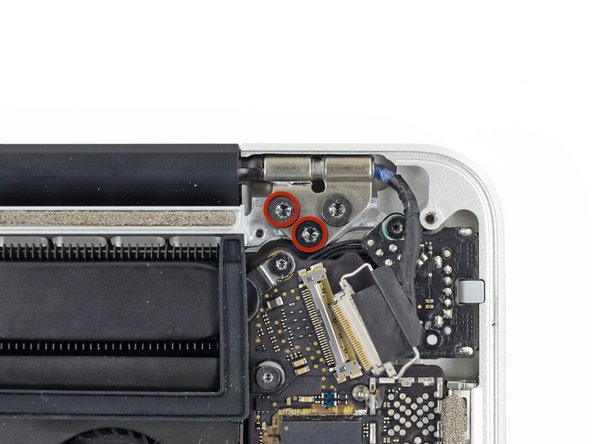
Entferne die folgenden Schrauben, mit denen die Platine des Akkuanschlusses am Logic Board befestigt ist:
-
Zwei 2,8 mm T6 Torx Schrauben
-
Eine 7,0 mm T6 Torx Paß-Schulterschraube
-
-
-
Mit einer Pinzette kannst du die Plastikabdeckung rechts an der Platine des Akkuanschlusses entfernen.
when doing this with metal tweezers as instructed in the video, it was difficult to get off and apparently while i was trying to do it, the tweezers went too far under and i believe made contact with the screw underneath? there was a zzz noise, an orange flicker and a little stream of smoke that came out. i freaked out and put everything back together to see if the laptop even still worked, it turned on and everything but died right away (i drained it before doing the repair anyway, so i was surprised it turned on at all).
i finished the battery repair and did several other things while in there. i have charged it all the way as recommended and will use it later on to see how everything is, im hoping that it’s a okay, but could someone explain to me what happened and the possible consequences?
-
-
-
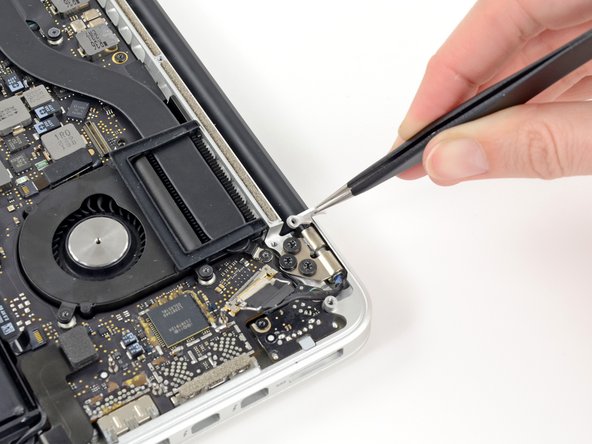
Entferne die 6,4 mm T6 Torx Breitkopfschraube, mit der die Platine des Akkuanschlusses am Logic Board befestigt ist.
-
-
-
Ziehe die Platine des Akkuanschlusses vorsichtig vom Logic Board ab.
-
Es empfiehlt sich, die Batteriekabel nur leicht zu biegen, um die Platine über dem Logic Board und aus dem Weg zu halten.
-
-
-
Schnapp dir den Interposer mit einer Pinzette.
-
Hebe den Interposer aus dem Logic Board heraus und entferne ihn.
you must lift it absolutely vertically, or it fouls against the locator pin in the corner- you can easily get the impression that it won’t come over the end of this pin- almost like it’s rivetted in. it isn’t. get a good grip on it with the tweezers in the centre hole & one of the sides, & lift it STRAIGHT up.
I would recommend to use plastic tweezers in order to reduce risk of damage.
Second that. If you have thin heat shrink tubing, form some over the tweezer tips. If the tubing is thin and small enough in diameter you’ll see the serrations of the tweezer tips.
wat is the model this SSD
-
-
-
-
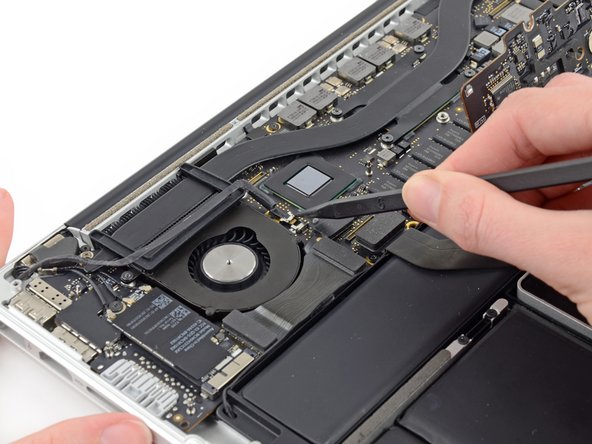
Schiebe den Stecker am iSight Kamerakabel mit der Spudgerspitze aus seinem Anschluss auf dem Logic Board.
This was the hardest part of the repair for me. The iSight cable was really lodged in its socket. "Walking" the connector as the guide suggests -- i.e. pushing on each side alternately at a 45 degree angle (with more force than I expected) -- eventually worked.
-
-
-
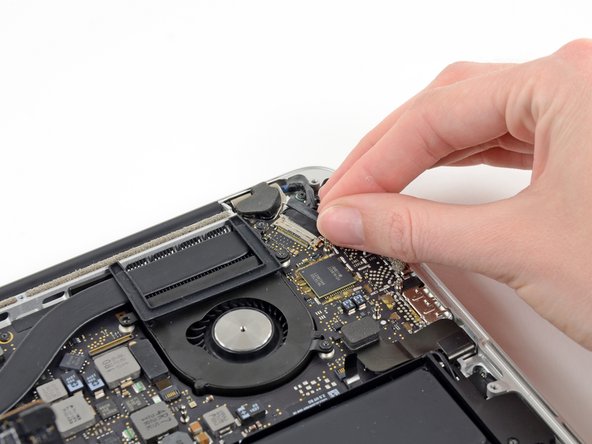
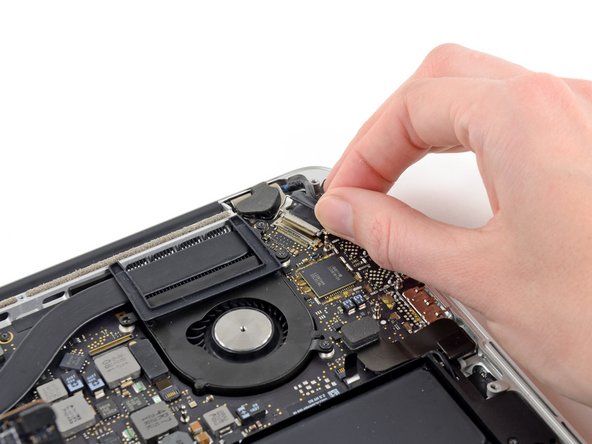
Hebele die drei Antennenstecker mit dem flachen Ende des Spudgers hoch und entferne sie von der AirPort Karte.
-
Die drei Kabel sind mit schwarzen Hüllen in verschiedenen Längen markiert. Verbinde sie beim Zusammenbau folgendermaßen:
-
Das Kabel mit der langen Hülle mit dem Anschluss, der den Ports am nächsten ist
-
Das Kabel mit der kurzen Hülle mit dem Anschluss neben der Schraube
-
Das letzte Kabel hat keine Hülle und wird am letzten leeren Anschluss neben dem Lüfter eingesteckt.
The long-sleeved and short-sleeved antenna cables are switched compared to this guide, on my Macbook Pro A1425. Maybe note which order they are in on your machine, since apparently they differ. http://i.imgur.com/r9g9ZXS.jpg
Be very careful with these, I wasn't and two of the cables detached from the connectors!!
As two other users have mentioned, the long-and short-sleeved cables for my late 2012/early 2013 A1425 were not in the order mentioned in the guide. If the laptop is positioned with fan in the upper left corner, the order (left to right) is short sleeve, long sleeve, no sleeve. If it is positioned as it is in the photo with the fan in the lower right, the order (left to right) is no sleeve, long sleeve, short sleeve.
I also found my cables were not as described in the guide. They were as @kagnew described.
-
-
-
Schiebe die Antennenkabel zur Seite, so dass der Weg für die AirPort Karte frei wird.
The display assembly has a metal retaining clip attached to the airport cables. I didn’t notice how this was positioned during disassembly, and it wasn’t mentioned in the guide. When I was reassembling the device, I found that it fit perfectly over the Torx T8 screws holding the display to the case. Attaching it here holds the airport cables nicely in place and out of the way.
-
-
-
Fasse die schwarze Plastiklasche am Verschluss des Displaydatenkabels und klappe den Bügel in Richtung der Seite des Computers mit dem DC-In Anschluss.
-
Ziehe das Displaydatenkabel gerade aus seinem Anschluss auf dem Logic Board.
-
-
-
Hebe mit einer Pinzette die Gummiabdeckungen über dem rechten und linken Displayscharnier ab.
-
-
-
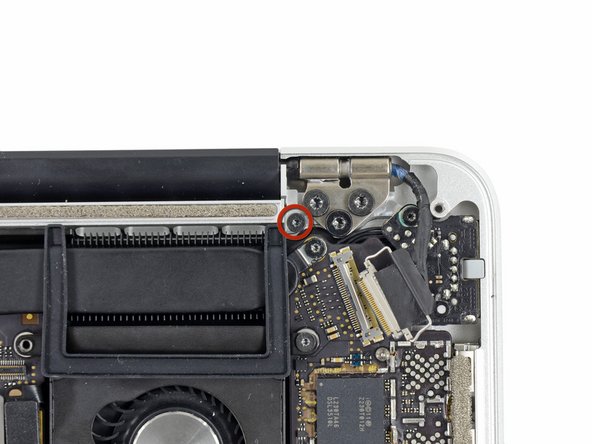
Entferne die zwei 3,1 mm Torx T5 Schrauben, welche die Aluminiumhalterungen der Scharniere befestigen.
I ended up stripping one of these out and had to use a T6 and some delicate pressure to get it out. Be careful.
The T6 and a lot of downward pressure ended up doing the trick for me. YMMV
-
-
-
Hebe mit einer Pinzette die Aluminiumhalterungen des linken und rechten Scharniers hoch.
-
-
-
Entferne die vier inneren 5,3 mm Torx T8 Schrauben (zwei auf jeder Seite), welche das Display am oberen Gehäuse befestigen.
There is a retainer for the airport cables that goes beneath the left and center screws.
My screws were covered with a thin tape, much like scotch tape. I used tweezers to remove it.
-
-
-
Halte das Display und das obere Gehäuse mit der linken Hand zusammen fest und entferne gleichzeitig die letzte T8 Torx Schraube von der oberen Displayhalteklammer.
-
Entferne die letzte Torx T8 Schraube, welche das Display noch am oberen Gehäuse befestigt.
-
-
-
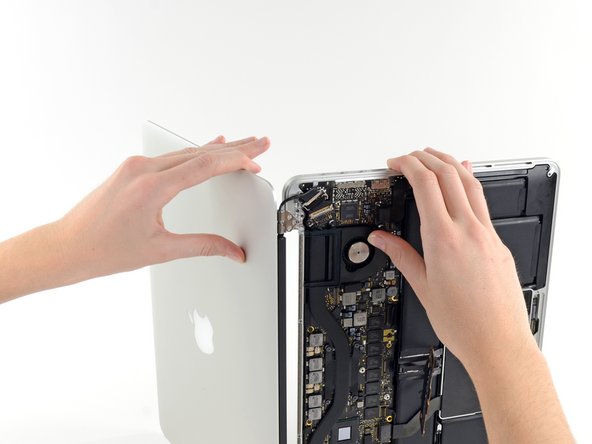
Fasse beide Hälften des Gerätes, eine in jeder Hand.
-
Schiebe die untere Hälfte des Gerätes vorsichtig nach vorne, um es von der Displayeinheit zu trennen.
-
Lege jedes Teil vorsichtig zur Seite. Achte darauf, dass die untere Hälfte mit der Tastatur nach unten liegt.
-
-
-
Lege das Gerät so, dass das Display zu dir zeigt und die Verschlussabdeckung aus Kunststoff nach unten. Fasse die Verschlussabdeckung und schiebe sie ganz nach rechts zum Scharnier hin.
-
Hebe die Abdeckung von unten hoch und entferne sie vom Display.
I was able to remove this plastic peace by sliding to the right, and then it came out. You need to apply some force in order to do this.
There’s a minor addition on how you do this. There are covers on both the ends of this clutch cover and they are connected like a hinge. For some models, it’s sliding this clutch cover to right and then you need to turn this clutch cover anti-clockwise and you’ll hear some clicking sounds affirming that the clutch cover is disconnected. Atleast this worked in my case :) .
This plastic cover is clearly not meant to be removed. There are small plastic catches under it as well as on the two plastic end covers. I found that it was impossible to remove it without breaking them. Sliding to the right is correct, but unfortunately the plastic was quite brittle and mine snapped in half.
I used this on a late-2013 model and found the plastic cover had side walls on both ends. Unfortunately they broke off when moving cover to the right.
-
-
-
Ziehe das Klebeband vom Kabelstecker ab.
-
-
-
Entferne die beiden Schrauben, mit denen das Kabel am Gehäuse befestigt ist:
-
Zwei Torx T8 Schrauben
-
-
-
Entferne die sechs Schrauben, mit denen die Antenneneinheit befestigt ist:
-
Sechs Kreuzschlitzschrauben #00
-
Hebe die Antenneneinheit hoch, so dass der Stecker des Antennenkabels unter der linken Seite sichtbar wird.
some tabs need to be lifted up on the bottom face of the antenna assembly before lifting straight off, I used a spudger to lever them off
-
-
-
Fasse die Metalleiste, die den Stecker des LCD Kabels befestigt, und drehe sie in Richtung der Unterkante des Displays.
-
Ziehe das LCD Kabel gerade aus seinem Anschluss auf dem Display heraus.
-


Um dein Gerät wieder zusammenzubauen, folge den Schritten dieser Anleitung in umgekehrter Reihenfolge.
Um dein Gerät wieder zusammenzubauen, folge den Schritten dieser Anleitung in umgekehrter Reihenfolge.
Rückgängig: Ich habe diese Anleitung nicht absolviert.
16 weitere Nutzer:innen haben diese Anleitung absolviert.
Besonderer Dank geht an diese Übersetzer:innen:
100%

Fabian Neidhardt hilft uns, die Welt in Ordnung zu bringen! Wie kann ich mithelfen?
Hier starten ›

Team

Experimax Coon Rapids Mitglied von Experimax Coon Rapids
Business
3 Mitglieder
17 Anleitungen geschrieben
6 Kommentare
Hi,
Can anyone help me ? It might be possible that my MacBook Pro 13” early 2015 restarts by it self once in a few minutes because this cable is slightly damaged? It had before LCD problems and has been serviced. As I have noticed, when I touch the cable and move it a little bit, computer restarts immediately, so I thought this might be the restarting problem.
(I have to say that I have already tried other options : I have fresh reinstalled the operating system, so theres no software issue, I have repasted the processor, I have checked the cables connections). The only strange thing is that it doesn’t turn on with the battery disconnected…
Does anyone have any suggestion?
Thanks a lot!!
Are there instructions using the MacBook Pro (Retina, 15-inch, Early 2013)? The inside is completely different. Alas.
I'm getting this because the hing broke. The real problem is both hinges have broken. Seems like the other hinge is not possible to replace. Is that right? Will just this one side be enough to open with light use? My Mac is a early 2013 15inch pro. Model A1398
This works on a mid-2015 Pro Retina also. The display is *slightly* different in that the black antenna cover does not simply slide to one side and come off. It has little tiny end caps that can be popped on/off. Apart from that and the antenna had one more screw all the way on the right (away from the display connecter) that doesn’t have to be removed to just lift up the antenna and while holding the antenna slightly up, you can remove and replace the LCD connector. All else was the same and I was able to fix my Mid 2015 MacBook Retina Pro. Thanks iFixit!!!
Hey peeps, hope you are all doing well
I have a backlight issue with my MacBook Pro early 2013 Retina display 13 in and I am trying to figure out where the issue is stemming from. I am wondering if i could use the LCD cable from an older model (Unibody mid 2010 matchbook pro 13in), would that work or be compatible with my current device? Any insight would be highly appreciated, Thank you.
Agree with others that this guide sort of "works" for early-and-mid 2015 Pro Retinas, but I really feel Ifixit dropped the ball here by not providing a separate guide for those MacBooks. There are a half-dozen steps that are missing, unneeded, or just plain different between the 2013s vs the 2015s, and a guide specific to the newer systems is really warranted.
(In particular, those fiddly little end caps on the antenna cover that @larry mentioned above are truly a pain to get back on if you didn't see them in place at the beginning - which you wouldn't since the 2013 guide above doesn't let you know they're there...)
Only a few photos and steps would need to change here to make something work for those systems and be 1000% better and more useful in repairing them.
If don’t have one of those neat project mats, then you can use small pieces of flattened blu-tack to hold the screws. If you arrange them in the shape of your mac book cover, and put the screws down methodically, you can get a one-to-one mapping of the screws to the correct screw holes.
Toby Thurston - Antwort
Or you can use an ice tray where you put the screws and the parts in separate bays in the same order as they come in the instructions.
timofej.se -
This is great! I used a small magnetic white board, and wrote on it to identify the parts as I went. This whole process, from the fast shipment to the great instructions to the complete, high quality, tool kit has been great. I’m typing this comment on my resurrected laptop. Thank you! Sue
Susan Greer - Antwort
It would be a good idea if people recorded in the comments which screws go where so that, if someone lost their screw positions, they could recover them from the comments.
Raymond Shpeley - Antwort