Einleitung
Benutze diese Anleitung, um den eingeklebten Akku mithilfe eines iFixit Kits mit Klebstoffentferner risikofrei aus deinem MacBook Pro zu entfernen. Der Klebstoffentferner weicht den Kleber auf, mit dem der Akku befestigt ist, und erleichtert so den Ausbau des Akkus.
iFixit Klebstoffentferner ist entzündlich. Arbeite bei dieser Anleitung in einem gut belüftetem Bereich. Rauche nicht, und arbeite nicht in der Nähe einer offenen Flamme.
Um das Risiko eines Schadens zu verringern, solltest du dein MacBook Pro anschalten und den Akku komplett entleeren, bevor du mit dieser Reparatur anfängst. Ein geladener Lithium-Ion-Akku kann zu einem gefährlichen und unkontrollierbaren Feuer führen, falls er versehentlich perforiert wird. Wenn dein Akku aufgebläht ist, musst du entsprechende Vorsichtsmaßnahmen treffen.
Hinweis: Das Lösungsmittel, dass zum Aufweichen des Klebers am Akku benutzt wird, kann manche Kunststoffe angreifen. Folge den Anweisungen genau und passe auf, wo du den Klebstoffentferner aufbringst
Was du brauchst
-
-
Schalte deinen Mac ein und starte Terminal.
-
Kopiere den folgenden Befehl und füge ihn im Terminal ein (oder tippe ihn exakt so ein):
-
sudo nvram AutoBoot=%00
-
Drücke die Eingabetaste [return]. Wenn du dazu aufgefordert wirst, gib dein Administratorpasswort ein und drücke erneut [return]. Hinweis: die Return-Taste kann auch mit ⏎ oder "enter" gekennzeichnet sein.
-
sudo nvram AutoBoot=%03
-
-
-
Entferne die sechs Schrauben, mit denen das Gehäuseunterteil befestigt ist, Benutze dazu einen Pentalobe P5 Schraubendreher:
-
Zwei 6,2 mm Schrauben
-
Vier 3,4 mm Schrauben
Sur le mien A1708 EMC3164 j’ai 4 vis de 6,2 (les coins) et 2 vis de 3,4 celles au milieu en bas
Ce tutoriel n’est pas dans la bonne section !
c’est le 13” avec touch bar et non celui avec les touches de fonction .
l’autre tuto nommé “écran complet” est le bon
Bonjour Vincent,
Si vous cherchez le même tutoriel pour le MacBook 13” non Touch Bar, le voici : https://fr.ifixit.com/Tutoriel/Remplacem...
Before you start I suggest you get magnifier eyeware as screws and connectors are very small and good lightning are a big PLUS
Completed whole steps in over 4 hours….but worth it. Works back perfect and battery error message is gone….
-
-
-
Setze einen Saugheber vorne in der Mitte auf das Gehäuseunterteil des MacBook Pro.
-
Hebe den Saugheber an, um den Rahmen und das untere Gehäuse leicht voneinander zu lösen.
-
-
-
Setze die Ecke eines Plektrums in den Spalt zwischen dem unteren Gehäuse und dem Rahmen ein.
-
Schiebe das Plektrum um die nächstgelegene Ecke und die Gehäuseseite bis zur Hälfte nach oben.
The instruction implies that sliding the pick up to the side of the case releases the clip. This is far from the truth; it takes a pretty strong force to pop the clip open. The plastic pick is a good start, but you need to reach in and pull the middle of that side of the case pretty hard.
-
-
-
Wiederhole den vorherigen Schritt auf der anderen Seite: Schiebe dein Plektrum unter das untere Gehäuse und an der Seite nach oben, um den zweiten Clip zu lösen.
-
-
-
Setze dein Plektrum erneut unter die Vorderkante des unteren Gehäuses, nahe bei einem der mittleren Schraubenlöcher.
-
Verdrehe das Plektrum kräftig, um den dritten Clip zu lösen, mit den das Gehäuseunterteil am Rahmen befestigt ist.
-
Wiederhole diese Vorgehensweise bei dem anderen mittleren Schraubenloch, um den vierten Clip zu lösen.
Look at Step 8 pics 2 and 3 to see exactly where the clips are that need to be released. Taking the bottom cover off my MBP took for ever because I didn’t realize the clips were not right around the edges as the wording suggests. Once I realized this, it came off quickly and easily.
-
-
-
Ziehe das Gehäuseunterteil kräftig nach vorne (weg von dem Bereich mit den Scharnieren), um die letzten Clips zu lösen, mit denen das Gehäuseunterteil befestigt ist.
-
Ziehe erst an der einen Ecke, dann an der anderen.
On the 2018 model, there are two more clips that need to be popped on the sides in the middle. Then it slides out easily.
-
-
-
Entferne das Gehäuseunterteil.
-
Positionere es entlang der Clips am Displayscharnier. Drücke es herunter und schiebe es Richtung Scharnier. Es sollte fest sein, wenn die Clips einrasten.
-
Wenn diese Clips eingerastet sind und das Gehäuseunterteil gerade auf dem Laptop liegt, drücke kräftig auf das Unterteil, damit die vier versteckten Clips einrasten können. Du solltest es hören und fühlen können, wenn sie einrasten.
-
-
-
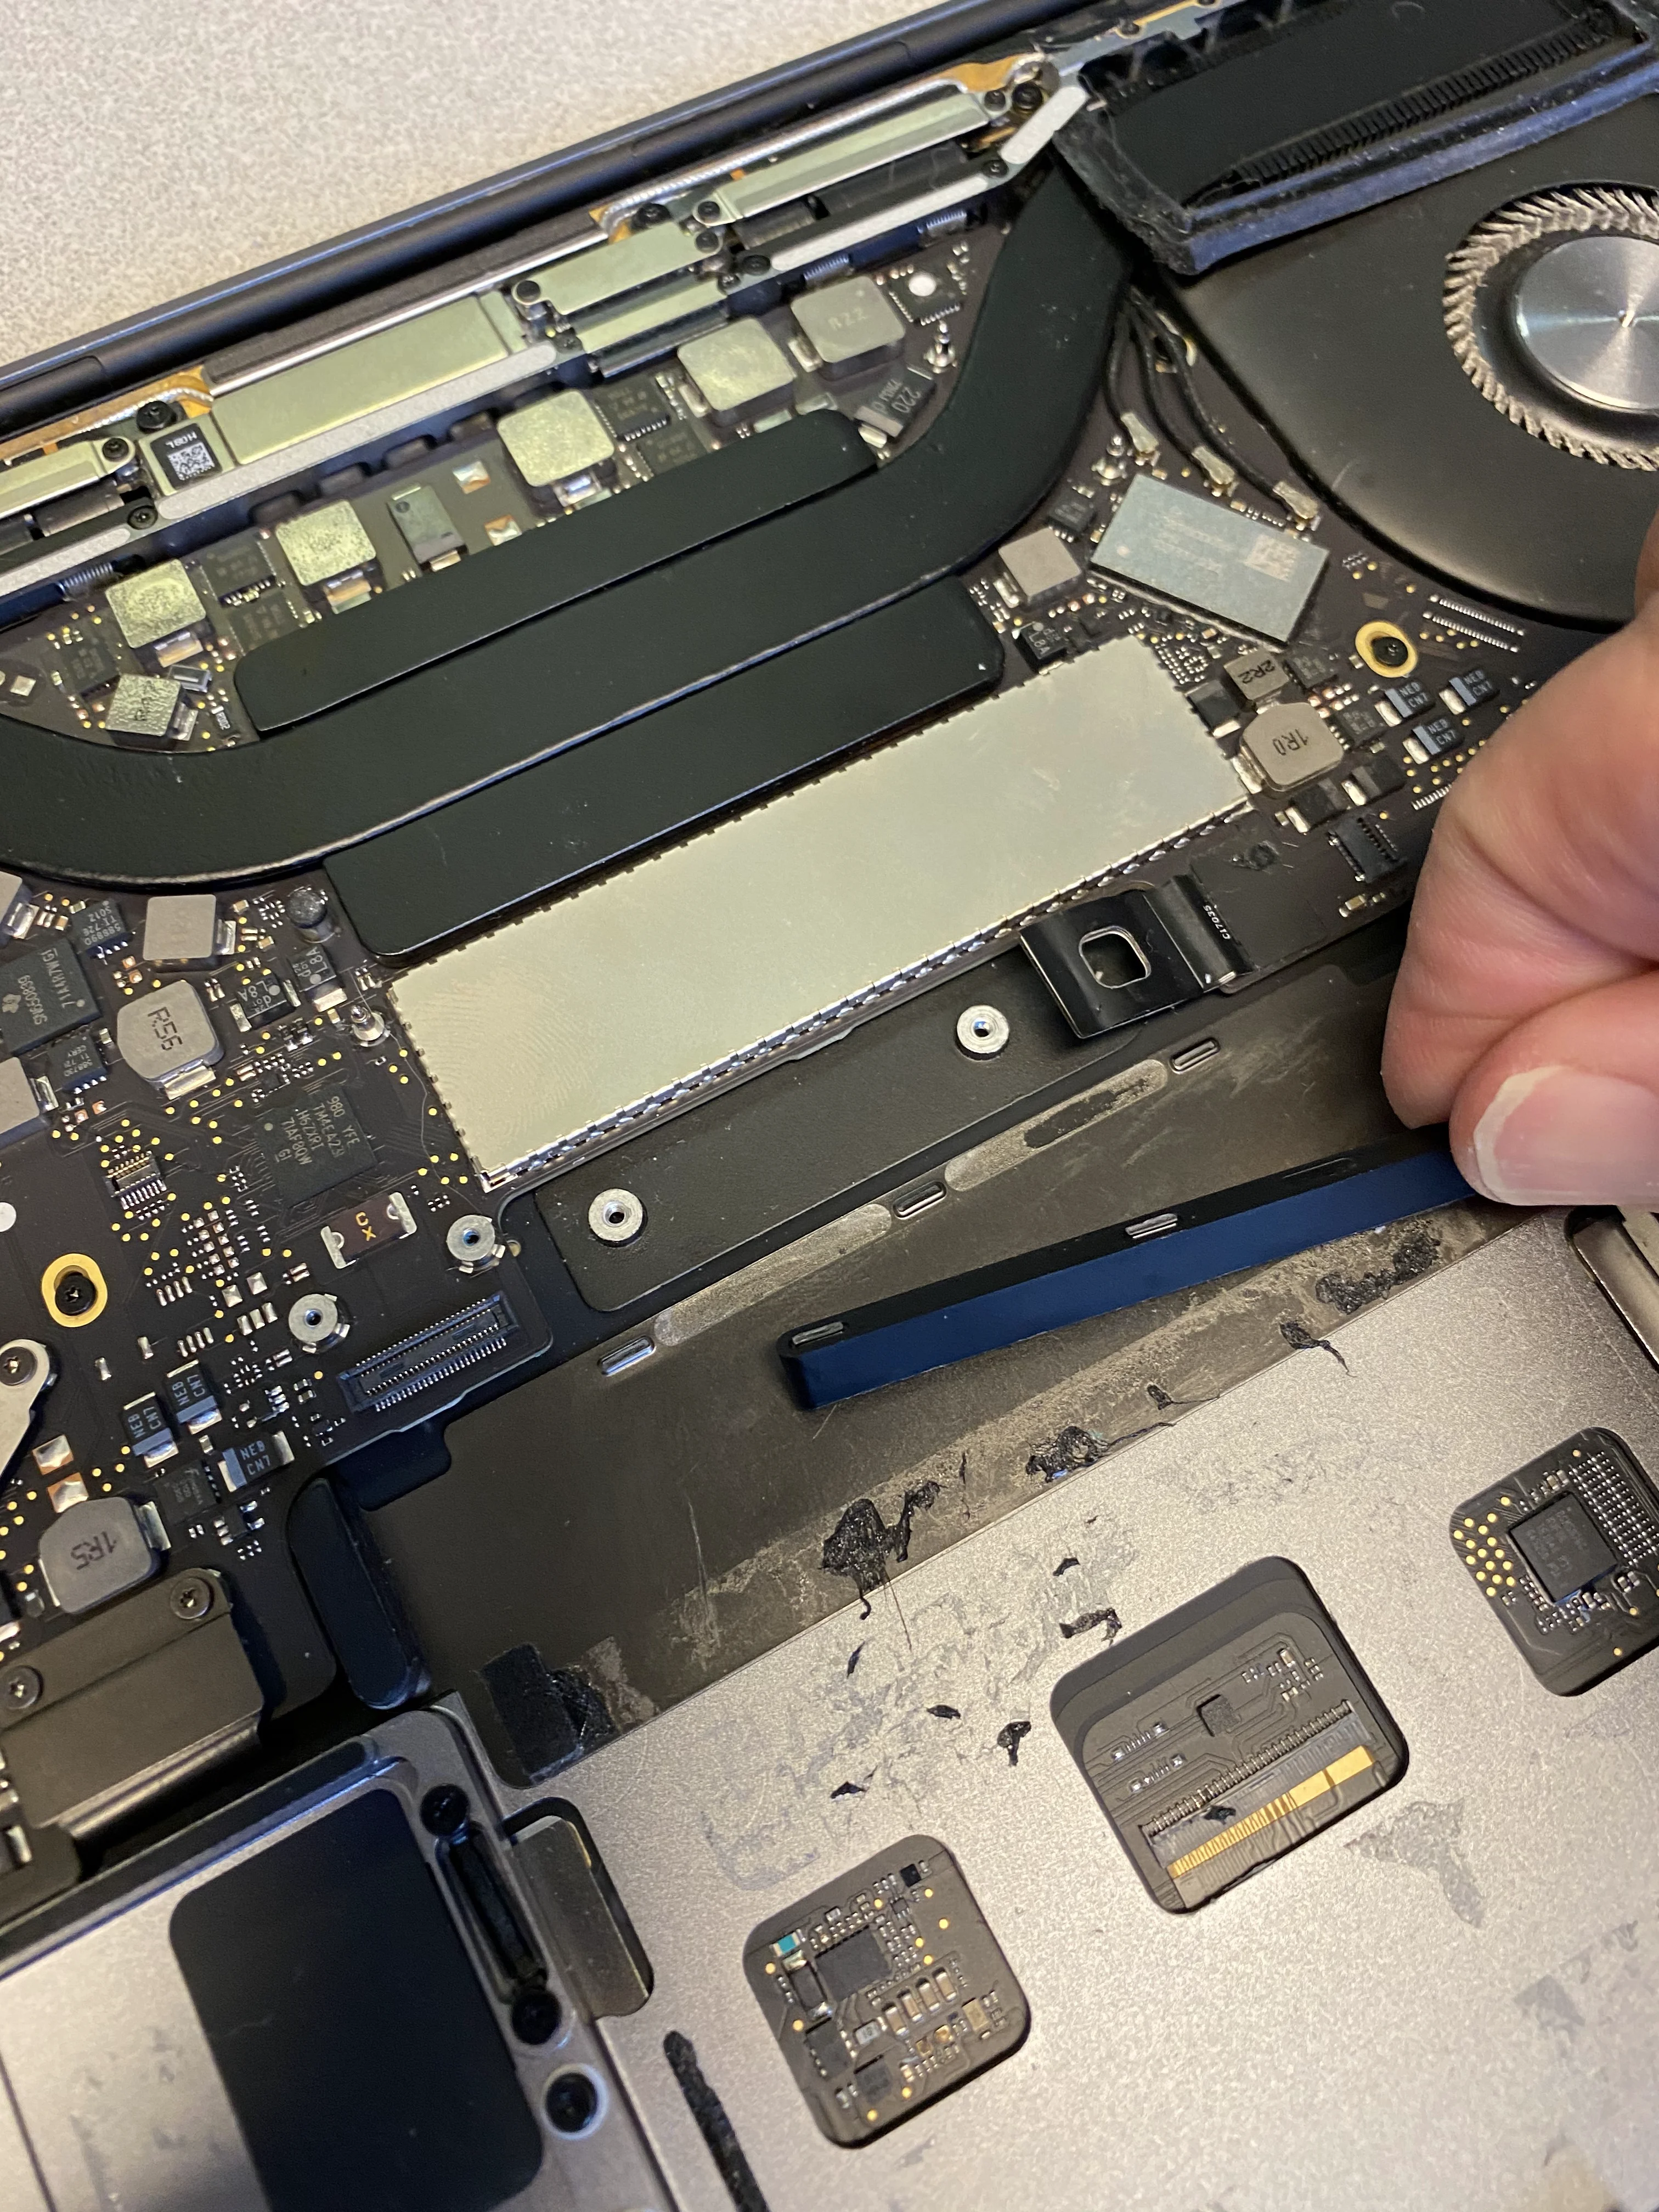
Löse sorgfältig das große Stück Klebeband auf dem Akkustecker an der Kante des Logic Boards direkt beim Akku ab.
-
Entferne das Klebeband.
Please be VERY careful, I torn up my battery cable and had to replace all the battery.
-
-
-
Löse sorgfältig das kleine Stück Klebeband ab, das den Stecker des Datenkabels der Akkuplatine bedeckt.
-
-
-
Benutze die Spudgerspitze, um die kleine schwarze Verriegelungslasche hochzuklappen, mit der das Kabel in seinem Stecker befestigt wird.
Be very careful here. I had to repeat this procedure several times on my MacBook Pro to replace faulty monitors. Eventually, after being opened and closed so many times, the small black locking tab came right off of the connector. Now my battery connection is broken and I can only use my MacBook when it is plugged into the power supply. I’m trying to find a way to securely connect the battery cable without this little locking tab (maybe with tape or something), but so far no luck. Does anyone at iFixit have any advice for me?
Like Jamie said, use mass amounts of caution here. The lever is very fragile, and mine came off as well - and I’m not exactly a muscular guy. Without it, the connection cannot be made to the data connector, and the computer will not think that a battery is installed. I had to finagle my connector with tweezers and a spudger back into place (and the picture above makes it look normal sized. The picture lies. It is TINY! We’re talking smaller than a small eyelash tiny), and then used some of the adhesive battery strip to hopefully keep it in place.
The previous comments are not exaggerated. There ain’t NOTHIN’ to that locking bar. I found it helpful to zoom in with my phone to work on it. It really requires no force to move, I imagine the tape is there to hold it down.
-
-
-
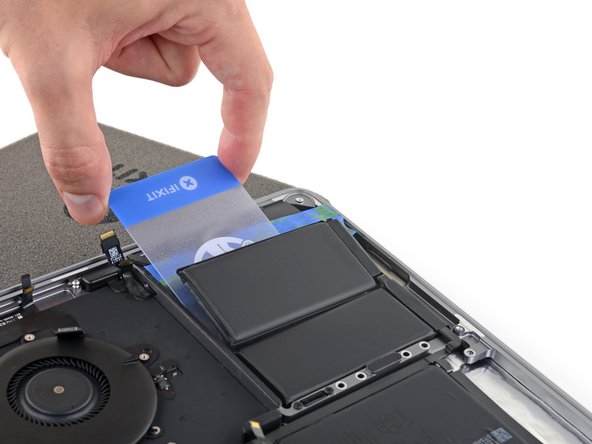
Trenne das Datenkabel der Akkuplatine ab, indem du es aus seinem Anschluss schiebst.
-
Schiebe es parallel zum Logic Board, in der Richtung des Kabels.
-
-
-
Biege das Datenkabel der Akkuplatine zur Seite, sodass es nicht im Weg ist.
-
-
-
Benutze einen T5 Torx Schraubendreher, um die 3,7 mm Flachkopfschraube zu entfernen, mit der der Akkustromstecker befestigt ist.
-
-
-
Hebe den Akkustromverbinder vorsichtig mit einem Spudger an, und trenne so den Akku ab.
-
Hebe den Verbinder so hoch, dass er von seinem Anschluss getrennt bleibt. Falls er sich während der Reparatur versehentlich wieder verbindet, könnte das dein MacBook Pro beschädigen.
Dies ist kein Stecker sondern eine Kontaktplatte, die nur leicht angehoben werden muss. Dann am besten mit etwas Tesafilm isolieren.
(Translation for myself and others; Thanks for the nice tip by the way!) This is not a plug but a contact plate that only needs to be lifted slightly. Then it is best to isolate with some scotch tape.
S Woo -
-
-
-
Entferne die beiden 1,8 mm Torx T3 Schrauben, mit denen die Halterung am Stecker des Trackpadkabels befestigt ist.
-
-
-
Hebe mit dem Spudger den Stecker am Trackpad-Flachbandkabel gerade vom Logic Board hoch und trenne das Flachbandkabel ab.
-
-
-
Erwärme einen iOpener und lege ihn etwa eine Minute lang auf das Trackpad-Flachbandkabel. Dadurch wird der Kleber aufgeweicht, mit dem das Flachbandkabel oben am Akku befestigt ist.
-
Wenn du keinen iOpener hast, kannst du das Kabel auch mit einem Haartrockner erwärmen. Das Kabel sollte warm sein, aber nicht so heiß, dass du es nicht mehr anfassen kannst. Überhitze den Akku auf keinen Fall.
I was able to extremely gentle peel (just applying a little bit of continuous tension and waiting for the adhesive to release) the cable off without heating. It came off relatively easy, probably due to age or heavy usage in the past.
-
-
-
Ziehe das Trackpad-Flachbandkabel behutsam vom Akku hoch und schiebe es aus dem Weg.
-
-
-
Entferne die zehn Torx T5 Schrauben, mit denen die Trackpadeinheit befestigt ist:
-
Zwei 4,3 mm Schrauben
-
Acht 5,8 mm Schrauben
-
-
-
Klappe das Display ein wenig auf, um an das Trackpad zu gelangen.
-
Führe das Trackpad-Flachbandkabel sorgfältig durch die Öffnung im Rahmen des MacBook Pro.
-
-
-
Entferne die Trackpadeinheit.
-
Verliere nicht die sechs kleinen Unterlegscheiben (zwei runde und vier eckige), die sich auf der Unterseite des Trackpads befinden.
-
-
-
Entferne die beiden 1,9 mm Torx T3 Schrauben von der Halterung des Tastatursteckers.
-
-
-
Trenne die Tastatur mit deinem Spudger ab, indem du ihren Stecker gerade vom Logic Board hebelst.
-
-
-
Entferne die beiden 2,9 mm T3 Torx Schrauben, die die Aluminiumabdeckung über dem Hauptdisplaykabel fixiert.
-
Entferne die Abdeckung.
-
-
-
Entferne die beiden 1,7 mm T3 Torx Schrauben, die die Aluminiumabdeckung über dem Anschluss fixieren.
-
Entferne die Abdeckung.
-
-
-
Entferne folgende Torx T3 Schrauben:
-
Die beiden 1,4 mm Schrauben von der Halterung des Thunderboltports auf der linken Seite.
-
Zwei weitere 1,4 mm Schrauben von der Halterung des Thunderboltports auf der rechten Seite.
If you are trying to replace the Thunderbolt port boards, you have to finish removing the entire logic board in order to get to the 2 screws holding each board in place. You can leave the battery and track pad in place though.
Apple used poor quality boards for the thunderbolt boards so they will definitely wear out over time. Make sure you replace them with metal boards and your USB C cable will click in nice and tight for a really long time.
-
-
-
-
Hebe den Stecker des linksseitigen Thunderboltports gerade vom Logic Board hoch und trenne ihn ab.
-
Drücke den Stecker vorsichtig zur Seite, so dass er beim Ausbau des Logic Boards nicht stört.
-
-
-
Wiederhole das Ganze für den Stecker des rechtsseitigen Thunderboltports. Hebele ihn von der Innenseite her hoch und schiebe ihn vorsichtig aus dem Weg.
-
-
-
Entferne die beiden 1,9 mm Torx T3 Schrauben von der Abdeckungshalterung, mit der die Stecker des Touch ID Sensors und der 3,5 mm Kopfhörerbuchse befestigt sind.
-
-
-
Heble das Flachbandkabel zur 3,5 mm Kopfhörerbuchse mit einem Spudger gerade vom Logic Board hoch und trenne es.
-
Drücke das Kabel behutsam zur Seite.
-
-
-
Heble das Flachbandkabel zur Einschalttaste und zum Touch ID Sensor gerade vom Logic Board hoch und trenne es ab.
-
-
-
Erweiche den Kleber unter dem Flachbandkabel zur Einschalttaste/Touch ID Sensor, indem du es mit einem iOpener, einem Haartrockner oder einem Heißluftgebläse leicht erwärmst.
-
-
-
Schiebe behutsam ein Plektrum unter das Flachbandkabel und löse es vom Logic Board ab. Drücke es vorsichtig zur Seite.
-
Wenn es zu schwer geht, darfst du keine Gewalt anwenden. Erwärme es nochmals ein wenig und probiere es erneut.
First let me thank you for this AMAZING guide which helped me a lot to achieve an almost successful battery replacement… I’m saying “almost” because, as you write in red letters, I wasn’t careful enough and my Touch ID cable got damaged.
Do you have any idea on how much should such a repair cost?
I know that only apple stores or authorized service providers can perform such a repair…
Thanks again!
Boy that’s a tough one :( It’s among the most problematic of all components to replace, because the fingerprint sensor is cryptographically paired to the logic board. The best option might be to get in touch with a skilled microsolderer and ask if they can take a look at the cable and try to repair the traces. Apart from that, the only options I’m aware of would be to pay Apple whatever they demand for a repair (no idea, but most likely a lot), or replace both the sensor and the entire logic board with another set that is already paired and undamaged. Wish I could be more help. Good luck!
Difficult though it may be, as a retired fixer, and amazed at the new tiny tiny parts, I am even more amazed at this new cooperative culture of fixers. The depth of helpful detail is amazing. The new environment of cheap special tools, and amazingly detailed hires pics is a powerful new repair meme. I used i-fixit for my first MBAir, but haven’t the skills for this, my current mac. But this addition, the carefully inserted comments of users, and the skills and cooperative attitude of you all, is quite amazing. And I watch and admire. Well done, you.
This cable has a metal plate that is PART OF THE CABLE. It is initially invisible, and can easily be mistaken for part of the logic board upon which it is adhered. As you begin to try to peel it up, make certain that your tool is also making its way beneath that integral thin metal plate. There are chip components that will delaminate from the cable if you attempt to lift it, or if your prying tool happens to not make it under the plate.
-
-
-
Entferne die 1,9 mm Torx T3 Schraube von der Halterung am Stecker des Touch Bar Digitizers.
-
-
-
Heble den Stecker des Touch Bar Digitizers mit dem Spudger gerade vom Logic Board hoch und trenne ihn ab.
-
-
-
Entferne die beiden 1,9 mm Torx T3 Schrauben von der Halterung am Stecker des Touch Bar Displays.
-
-
-
Heble den Stecker des Touch Bar Displays mit dem Spudger gerade vom Logic Board hoch und trenne ihn ab.
-
-
-
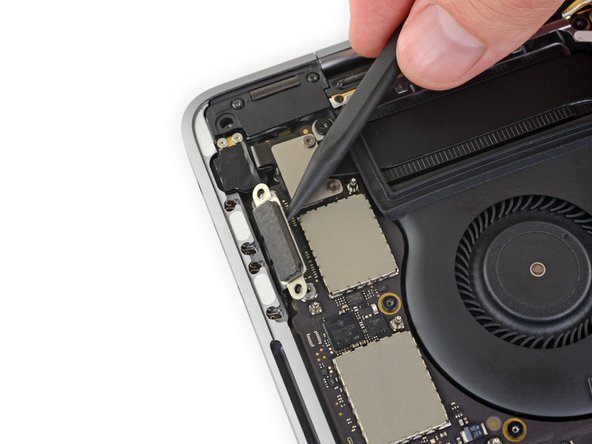
Ziehe eventuell vorhandenes Klebeband vom Anschluss des Mikrofonsteckers ab.
-
-
-
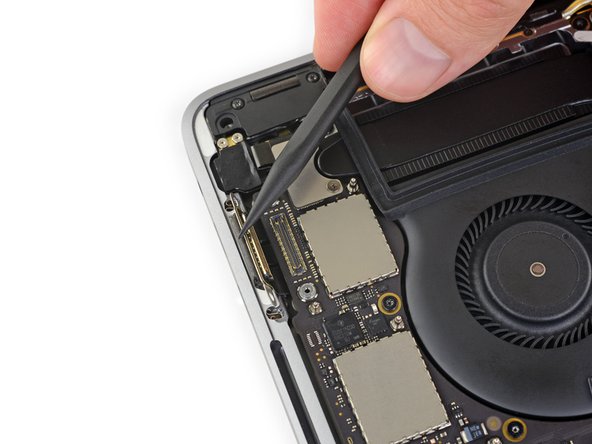
Klappe den Sicherungsbügel am ZIF Verbinder des Mikrofonkabels hoch, indem du ihn gerade vom Logic Board hochhebelst.
-
-
-
Ziehe das Mikrofonkabel zurück - weg vom Lüfter - bis es aus seinem Anschluss herausrutscht.
-
Ziehe, wenn möglich, eher an dem angeklebten Band als am Kabel selbst.
-
-
-
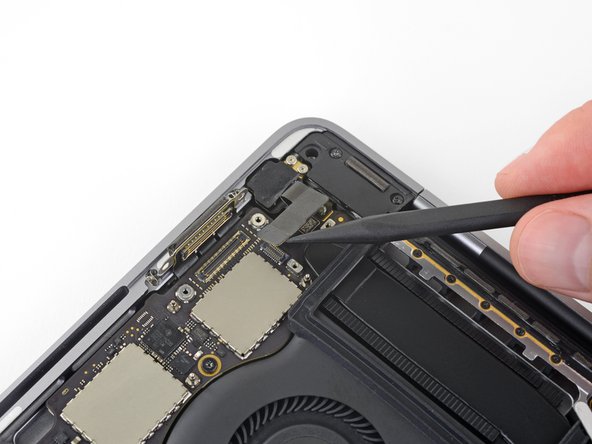
Klappe den Sicherungsbügel am ZIF Verbinder des linken Hochtöners hoch, indem du ihn gerade vom Logic Board hochhebelst.
-
-
-
Ziehe das Kabel zum Hochtöner hin, bis es aus dem Anschluss herausgleitet.
-
Ziehe, wenn möglich, eher an dem angeklebten Band als am Kabel selbst.
-
-
-
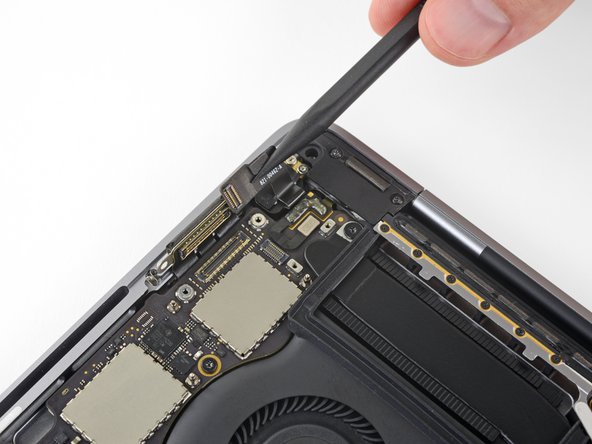
Ziehe eventuell vorhandenes Klebeband vom Anschluss des linken Lautsprechers ab.
For me, the main speaker tape on both sides tore loose, which is a real shame, because those are the two hardest to get back in - they're very short and stiff.
Important safety tip: On my laptop, the cables have two semicircular notches near the end. You can tell when they're fully-inserted when the notches are inside the connector.
-
-
-
Klappe den Sicherungsbügel am ZIF Verbinder des linken Lautsprechers hoch, idem du ihn gerade vom Logic Board hochhebelst.
-
-
-
Ziehe das Kabel des linken Lautsprechers zum Hochtöner hin, bis es aus dem Anschluss herausgleitet.
-
Denke dran, dass du nach Möglichkeit nur am angeklebten Band ziehst, nicht am Kabel.
-
-
-
Wiederhole die vorherigen sechs Schritte, um den gegenüberliegenden Hochtöner und Lautsprecher auf der rechten Seite abzutrennen.
-
Fange damit an, eventuell vorhandenes Klebeband vom Stecker des Hochtöners abzuziehen.
This step seems redundant as those six steps get repeated in detail anyway after this step.
-
-
-
Klappe den Sicherungsbügel am ZIF Verbinder des rechten Hochtöners hoch, indem du ihn gerade vom Logic Board hochhebelst.
-
-
-
Ziehe das Kabel zum Hochtöner hin, bis es aus dem Anschluss herausgleitet.
-
Denke dran, dass du nach Möglichkeit nur am angeklebten Band ziehst, nicht am Kabel.
-
-
-
Ziehe eventuell vorhandenes Klebeband vom Anschluss des rechten Lautsprechers ab.
-
-
-
Klappe den Sicherungsbügel am ZIF Verbinder des rechten Lautsprechers hoch, indem du ihn gerade vom Logic Board hochhebelst.
-
-
-
Ziehe das Kabel des rechten Lautsprechers zum Hochtöner, bis es aus dem Anschluss herausgleitet.
-
-
-
Heble das erste Antennenkabel gerade aus seinem Anschluss und trenne es.
-
Schiebe behutsam deine Pinzette oder das flache Ende des Spudgers unter das Kabel ganz nahe am Anschluss, verdrehe es dann ganz vorsichtig oder heble, bis sich das Kabel löst.
-
-
-
Wiederhole den vorhergehenden Schritt und löse auch die beiden restlichen Antennenkabel.
Reconnecting is very tricky. It doesn't take much force to push down, but the connectors have to be perfectly aligned. You won't really feel it snap into place, but it will stay put and resist wiggling.
Agreed, very tricky step. I found the two slightly longer leads easier to reattach. Then I used them as a visual guide to attach the small lead. It helped to slightly bend the lead. Glenn is correct, it doesn’t take much pressure to attach but the leads have to be perfectly aligned. Be careful if you test the fit, very easy to pry back off.
-
-
-
Entferne die 2,9 mm Torx T5 Schraube, mit der das Antennenkabelbündel befestigt ist.
-
-
-
Entferne die zehn Schrauben, mit denen die Logic Board Einheit befestigt ist:
-
Drei 2,5 mm Torx T3 Schrauben
-
Fünf 2,9 mm Torx T5 Schrauben
-
Zwei 3,0 mm Torx T5 Schrauben
-
-
-
Ziehe die beiden Vibrationssdämpfer aus Gummistreifen aus der Klebeverbindung zu den Lüftern hoch (aber entferne sie noch nicht).
-
Erwärme, falls nötig, den Kleber ein wenig mit einem iOpener, einem Haartrockner oder ein Heißluftgebläse, so dass der Kleber weich wird und sich die Dämpfer leichter ablösen lassen.
Mine had no adhesive on them at all. You only need to make sure they are loosened from the fan shroud. They come out with the logic board assembly.
-
-
-
Hebe zum Ausbau das Logic Board an der linken Seite hoch.
Wichtig !!
Vorher den Display Anschluß (hinten mitte) Abschrauben und lösen.
2x bleche mit jeweils 2 Scxhrauben
Ist nachgetragen. Danke!
What just happened… While I was removing the logic board one of the small black boxes from the bottom right just fell off. I am not sure but I think it is a capacitor - it says KO 336 16K 723. It just fell, I did not even touch this part… Maybe it was broken when I opened up the case in the beginning, but I did not notice it then.
Did I just break my laptop?
Translation
Important !!
First unscrew and loosen the display connection (rear center).
2x plates with 2 screws each
@Glendstone You are absolutely right. This is a key feature they forgot to explain.
The feedbacis has possibly already been addressed in step 27 as it was already fully disconnected when I got to this step.
-
-
-
Überprüfe die Ausrichtung der Vibrationsdämpfer aus Gummi und korrigiere sie, falls nötig.
-
Führe das Antennenkabelbündel durch die Lücke zwischen Logic Board und Kühlkörper und achte darauf, dass es korrekt ausgerichtet ist, wenn du das Logic Board absenkst.
-
Achte darauf, dass beim Einbau keine Kabel unter dem Board eingeschlossen werden. Überprüfe alle markierten Stellen ganz genau.
-
-
-
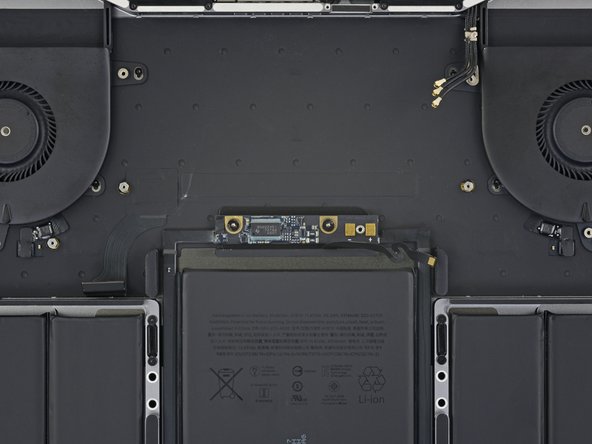
Entferne die beiden 3,2 mm Torx T5 Schrauben von der Akkuplatine.
Terrible time to lose screws, but that is exactly what ended up happening to me. I lost the battery board screws and ended up crazy glueing down.
-
-
-
Lege ein Stück Alufolie zwischen das Display und die Tastatur, um dein Display während der Reparatur zu schützen.
-
Benutze zusätzlich Klebeband und/oder Folie, um den Bereich unter dem Trackpad so gut wie möglich abzukleben. Du kannst außerdem eine Schicht saugfähiges Küchenpapier direkt unter den Bereich des Trackpads legen, um überschüssigen Klebstoffentferner aufzunehmen.
From here onward I just used the plastic cards provided without the adhesive. It just cut through the tape and took them off in 2-3 mins without any issue. I tried the floss and it just kept breaking and I didn't want to use the adhesive remover liquid if I could find another way. Using the cards was the best for me.
-
-
-
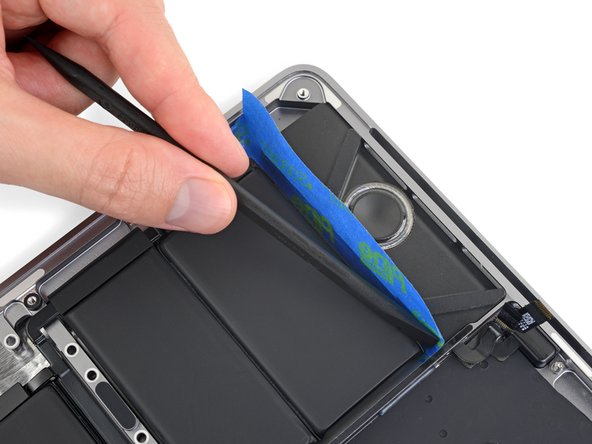
Schneide ein Stück Paket- oder Malerband ab und schiebe eine Kante zwischen den Akku und den linken Lautsprecher.
I didn’t have packing tape or painter’s tape so I tried to use some of the packing materials, but that was a bad idea. What ended up working for me was to elevate one side and used the plastic card to to direct the acetone away from the speaker. Worked a-ok.
-
-
-
Drücke mit dem Spudger an der Kante des Klebebands entlang, so dass es fest am Aluminiumgehäuse des MacBooks Pro klebt und so den Lautsprecher vom Akku abdichtet.
-
Falte das Klebeband herum und klebe es leicht am Lautsprecher fest, so dass es nicht mehr im Weg ist.
-
-
-
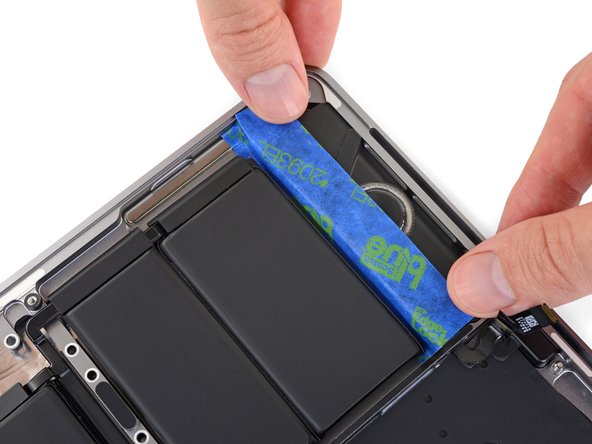
Wiederhole die beiden vorhergehenden Schritte auf der gegenüberliegenden Seite, um so den anderen Lautsprecher zum Akku abzudichten.
Note that no matter how well you tape off the speakers and elevate the sides of the laptop, there is not a lot of space between the battery and the speaker, and adhesive remover WILL wick under the speakers. Yay for capillary action, I guess? . . ..
-
-
-
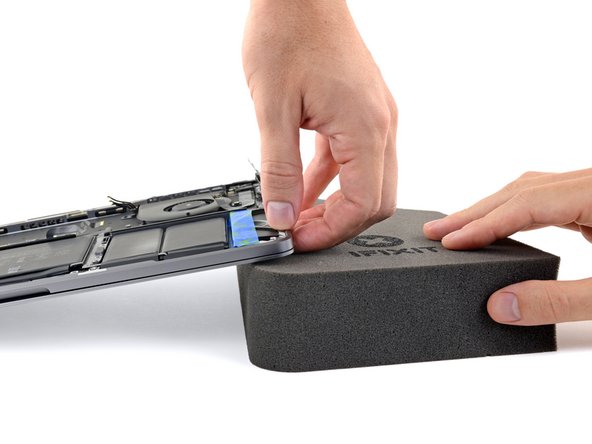
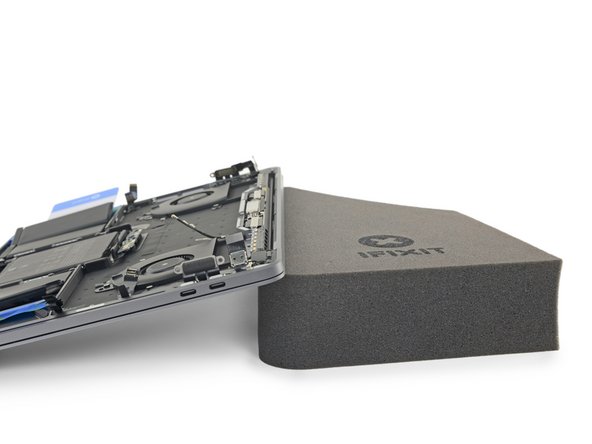
Um den Fluss des Klebstoffentferners zu kontrollieren, solltest du die rechte Kante deines MacBook Pro auf einem Buch oder einem Schaumstoffblock ein paar Zentimeter erhöht abstützen.
The Fix Kit box is the perfect size for this job. I stuck a little packing tape from the metal case to the box to stop it accidentally sliding off.
-
-
-
Dein MacBook Pro ist nun optimal vorbereitet, jetzt bist du an der Reihe.
-
Trage bei der Verwendung des Klebstoffentferners eine Schutzbrille. (Im Kit ist eine Schutzbrille enthalten.)
-
Trage keine Kontaktlinsen ohne eine Schutzbrille.
-
In deinem Kit sind auch Schutzhandschuhe enthalten. Um deine Hände vor eventuellen Reizungen zu schützen, solltest du sie jetzt anziehen.
-
-
-
Ziehe den schwarzen Gummistopfen von dem Fläschchen mit Klebstoffentferner ab.
-
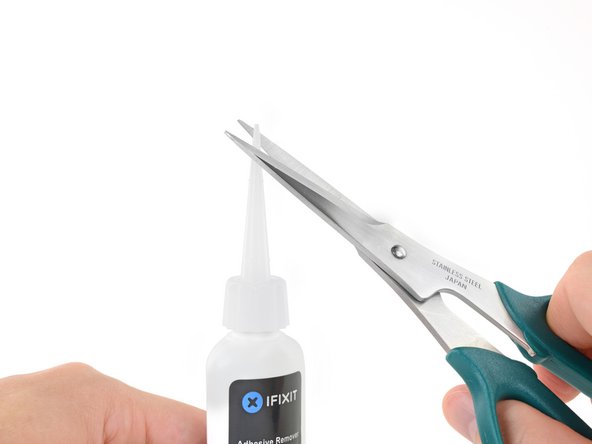
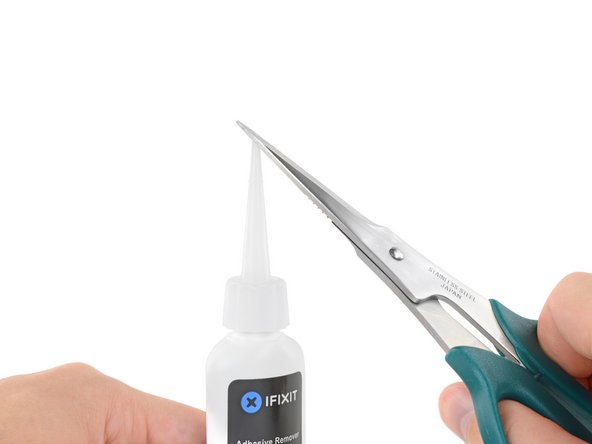
Schneide die verschlossene Applikatorspitze mit einer Schere ab.
-
Schneide die Spitze an der engen Stelle ab. Dadurch kannst du die Menge an Klebstoffentferner bei der Anwendung besser kontrollieren und kleinere Mengen auftragen.
-
-
-
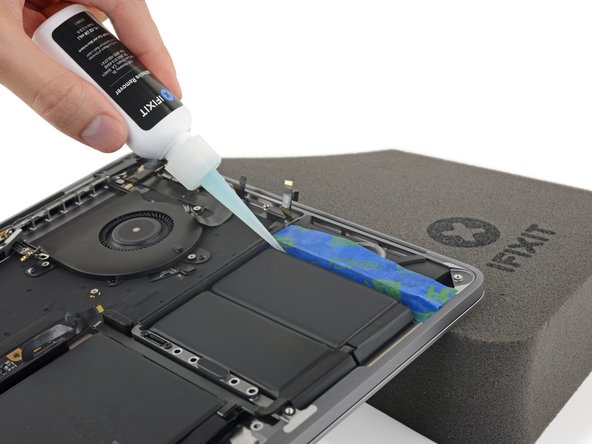
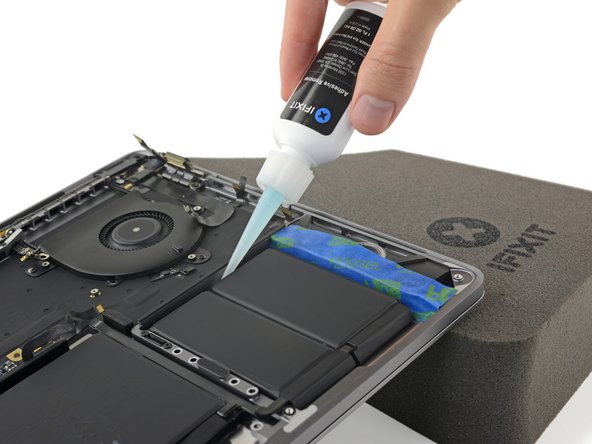
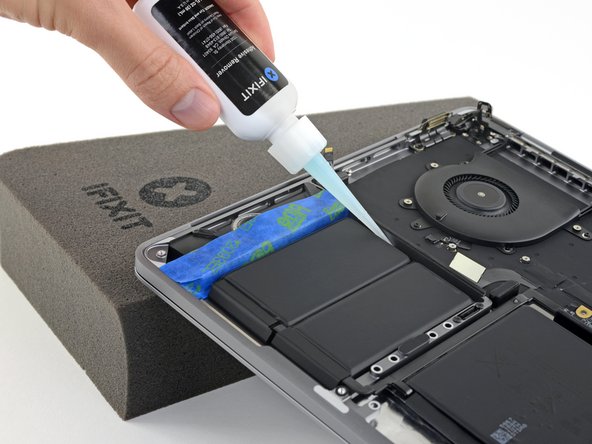
Träufle einige Tropfen des Klebstoffentferners gleichmäßig unter die Akkuzelle ganz rechts.
-
Lasse den Klebstoffentferner zwei Minuten lang einwirken und den Kleber aufweichen, bevor du zum nächsten Schritt übergehst.
It REALLY IS strong solvent! I accidentally got some on the rubber strip between the battery and the logic board compartment and it peeled right off! I had to replace this with some spare rubber feet I had for another device.
-
-
-
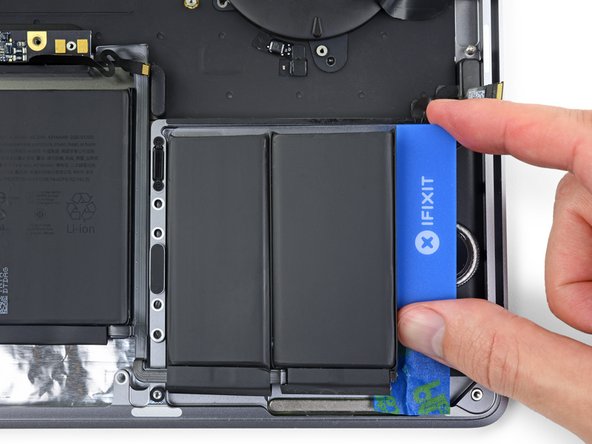
Nach ein paar Minuten kannst du die Ecke einer Kunststoffkarte unter die Akkuzelle ganz rechts schieben, fange dabei an der Vorderkante an.
-
Bewege die Karte hin und her und schiebe sie ganz unter der Akkuzelle entlang.
-
Hebe die Zelle an, um sie ganz vom Kleber zu lösen, aber entferne sie noch nicht.
-
Lasse vorläufig eine Kunststoffkarte unter der Akkuzelle stecken, damit sich der Kleber nicht wieder verbinden kann, während du mit dem nächsten Schritt weitermachst.
-
-
-
Wenn es dir schwer fällt, die Karte unter eine der Akkuzellen zu schieben, dann versuche ein Stück Nähgarn oder Draht unter der Akkuzelle entlang zu führen. Ziehe es mit einer sägenden Bewegung von Seite zu Seite und trenne den Kleber auf.
Bei der Entfernung der Akkus mit Zahnseide oder Maurerschnur jeden Akku seperat lösen.
Wie im Bild gezeigt von hinten einfädeln und dann zwischen den beiden Akkus nach vorne lösen.
Dabei die Zahnseide wie eine Säge nach rechts und Links bewegen.
Bei den kleineren Akkus sind die Klebestreifen von hinten nach vorne. Somit ist das auch die Richtung wie man sie einfach lösen kann.
Der Mittlere Akku ist von links nach rechts verklebt. Somit sollte man dort die Richtung ändern.
Danke für die Erläuterungen!
Translation (Google) : When removing the batteries with dental floss or masonry cord, loosen each battery separately. Thread it in from the back as shown in the picture and then release it to the front between the two batteries. Move the floss to the right and left like a saw. On the smaller batteries, the adhesive strips are from back to front. So this is also the direction how to solve them easily. The middle battery is glued from left to right. So you should change direction there.
-
-
-
Wiederhole die letzten paar Schritte, um auch die Akkuzelle ganz links abzulösen.
-
Hebe zunächst die linke Seite des MacBooks Pro an, so dass der Klebstoffentferner vom Lautsprecher wegfließt.
-
-
-
Träufle etwas Klebstoffentferner unter die Akkuzelle ganz links und lasse ihn etwa zwei Minuten lang einwirken.
-
-
-
Schiebe eine Ecke einer Plastikkarte unter die Akkuzelle ganz links und schneide behutsam die Klebeverbindung auf.
-
Lasse die Karte vorläufig unter der Zelle stecken, damit sich der Kleber nicht wieder verbinden kann.
-
-
-
Hebe die rückseitige Kante des MacBooks an, so dass der Klebstoffentferner von der Tastatur/ dem Logic Board wegfließt.
-
-
-
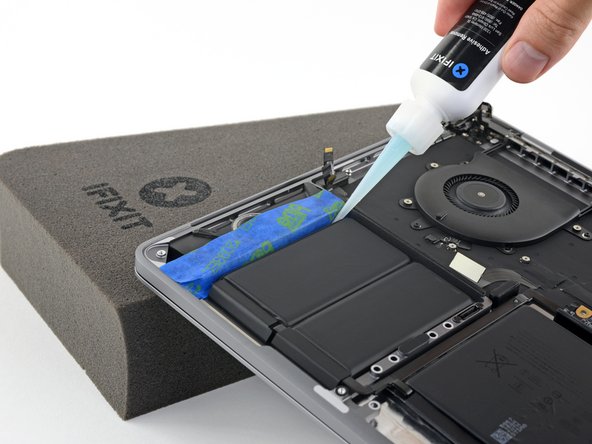
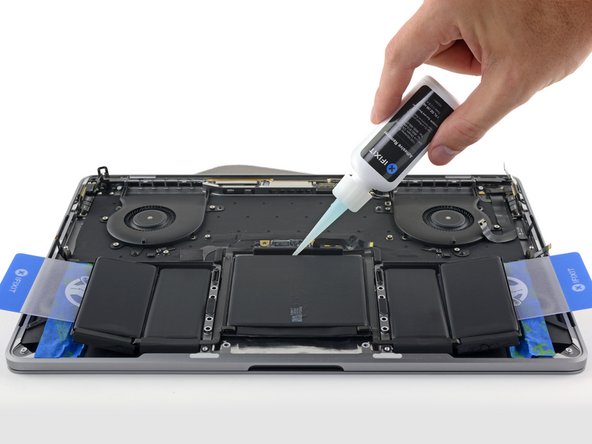
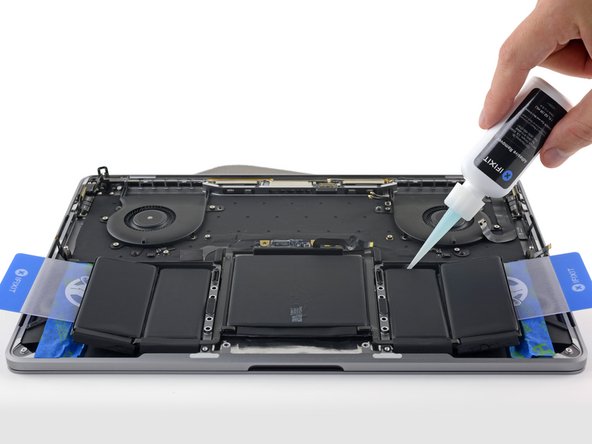
Träufle etwas Klebstoffentferner unter jede der drei noch verbliebenen Akkuzellen.
-
Achte auf eventuelle Lecks und träufle in den folgenden Schritten noch etwas mehr vom Klebstoffentferner hinein, falls nötig.
-
Lasse den Klebstoffentferner etwa zwei Minuten lang einwirken, bevor du weiterarbeitest.
-
-
-
Schiebe eine Plastikkarte komplett unter der Akkuzelle ganz links entlang - die du ja im vorigen Schritt schon abgelöst hast - und schiebe sie dann sorgfältig zwischen der anderen linken Akkuzelle und dem Aluminiumgehäuse des MacBooks Pro ein.
-
-
-
Trenne die letzte Akkuzelle links mit der Plastikkarte ganz ab.
-
Lasse die Plastikkarte vorläufig stecken, damit die linksseitigen Akkuzellen nicht wieder festkleben.
-
-
-
Wiederhole die vorhergehenden beiden Schritte und löse die letzte Akkuzelle rechts ab.
-
-
-
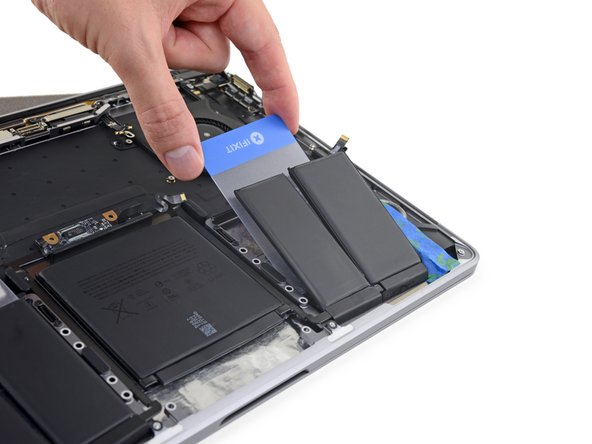
Schiebe die Ecke einer Plastikkarte unter die Oberkante der großen mittleren Akkuzelle.
-
Bewege die Karte wackelnd hin und her, wobei du sie unter die Akkuzelle schiebst und den Kleber darunter aufschneidest.
-
-
-
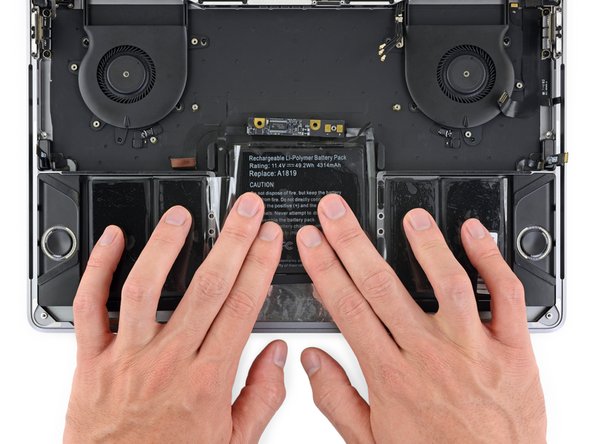
Entferne den Akku.
-
Bevor du den neuen Akku einbauen kannst, musst du erst alle Kleberreste vom Gehäuse des MacBooks entfernen.
-
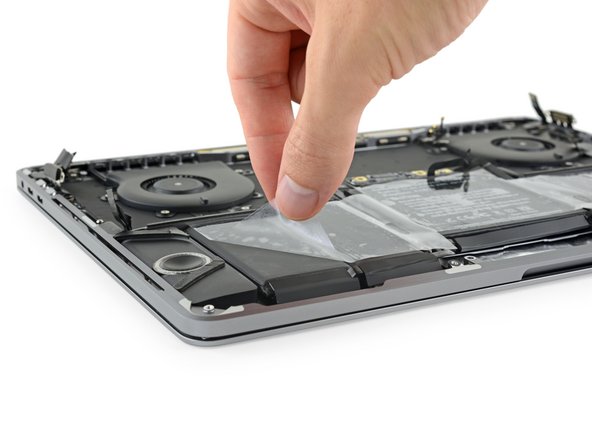
Ziehe alle Reste von Klebestreifen mit einer Pinzette oder der Hand (mit Handschuhen) ab.
-
Schabe größere Ansammlungen von Klebstoff mit einem Plastiköffnungswerkzeug ab und reinige darunterliegende Bereiche mit Klebstoffentferner oder Isopropylalkohol. Wische nur in eine Richtung (nicht hin und her), bis der Rahmen sauber und für deinen neuen Akku gut vorbereitet ist.
-
Wenn du fertig bist, dann entferne behutsam das schützende Klebeband von den Lautsprechern.
-
-
-
Denke an das Akkudatenkabel und achte darauf, dass es nicht durch die Akkuplatine eingeklemmt wird oder sich darunter verfängt.
-
Wenn dein Ersatzakku auf der Unterseite mit Klebestreifen versehen ist, dann drehe ihn herum und ziehe die Schutzfolie ab, so dass die Klebeflächen freigelegt werden. Wenn keine Klebestreifen auf dem Akku sind, dann bringe dünnes doppelseitiges Klebeband an, so wie Tesa 61395 und befestige damit den Akku.
-
Richte den Akku sorgfältig aus.
-
Drücke und halte jede Akkuzelle 5-10 Sekunden lang fest, damit sie gut am unteren Gehäuse hält.
Step 88 is a bit . . . . sparse. “Carefully position the battery and set it into place.“ Ha! Be prepared for mass amounts of swearing (and I don’t usually swear). iFixIt sends you a battery that has the adhesive strips covered with one long very thick piece of plastic. And by “battery” I mean five discreet sections held together with thin ribbon cables that make the entire thing as wriggly as a toddler and as unstable as my girlfriend in college. If you take it off the thick plastic and try to maneuver the battery into its very specific places while the battery’s strong adhesive strips stick to everything but what it should you will rue the day. Rue, I tell you! I cut the top piece of thinner plastic into three sections (middle, left side, right side) so I was able to place one section at a time, and it made it much easier (well, “much” may be a stretch. How about, “only slightly less-sweary”).
I feel sorry for Wayne though happy for his comment. I got my battery pack delivered with 5 separate plastic covers on the adhesive strips under, and one long plastic sheet holding the five parts together at the top. Thanks to the latter, I could easily position the 5-pack, remove the cover from the bottom parts one by one, and the holding sheet at last.
Thank you Wayne and thank you iFixit :-)
Thank YOU for this comment to Wayne because I too was confused about the purpose and proper use of the aligning plastic and adhesive pads. I originally thought it was meant to be the tape/pads to hold the new battery in place in the macbook, albeit they were a lot thicker and the way they were arranged etc made no sense for how to use it that way. Once I read your comment it all made sense and with the addition of some 3M double-sided I was all set. Thanks Paul!
-


Um dein Gerät wieder zusammenzubauen, folge den Schritten dieser Anleitung in umgekehrter Reihenfolge.
Entsorge deinen Elektromüll fachgerecht.
Lief die Reparatur nicht wie geplant? In unserem Antwortenforum kannst du Hilfe bei der Fehlersuche finden.
Um dein Gerät wieder zusammenzubauen, folge den Schritten dieser Anleitung in umgekehrter Reihenfolge.
Entsorge deinen Elektromüll fachgerecht.
Lief die Reparatur nicht wie geplant? In unserem Antwortenforum kannst du Hilfe bei der Fehlersuche finden.
Rückgängig: Ich habe diese Anleitung nicht absolviert.
40 weitere Nutzer:innen haben diese Anleitung absolviert.
Besonderer Dank geht an diese Übersetzer:innen:
100%


Diese Übersetzer:innen helfen uns, die Welt zu reparieren! Wie kann ich mithelfen?
Hier starten ›


25 Kommentare
You can remove the battery without removing the logic board, took me 45mins all in.
I did up to step 23 then jumped to 64, only a tiny bit of the battery cable is under the board and isnt glued down so can be removed/inserted easily.
i also didnt turn off autoboot as once the battery is disconnected it wont boot.
Darren - thanks for the hint! I was also wondering (and wouldn’t want to do) why to extract the whole logic board.
Overall took me an hour or so and I used the “thread” method to actually remove the batteries instead of the glue remover. Worked fine for me. The only issue was with getting the battery cable from und the board because of the tight fitting with the separator “wall” between the logic board and the main battery cell. I ended up breaking the glued little wall from the case, then you can easily slide the cable under the board and afterwards gluing it back into place.
All good now :-)
I exactly what Kerry did. You can break that “wall” and then you can easily slide the cable in under the logic board. Not sure what that wall does other than provide a stop from the bottom case pushing on battery. I glued it back and didn’t seem to have any problems. I did not use the double side tape to secure the batteries so it would be easier to change the next time. Don’ t know why apple has to put so much glue. Scraping off the batteries is the hardest part!
Here is a link to a picture of the batter “wall” that you can break off and then glue back. This will save you from removing the logic board:
I replaced the battery and it started up at first but when I went to unplug the mac it shut off, the next time I started it up it said that the battery wasn’t charging and shut off when I unplugged it even though the battery had 73% of charge. I opened the mac and made sure I did all the steps and make sure the battery was plugged in correctly, but now it won’t even startup at all.
Yes this also happened to me too! I think many of these batteries are older and will lose their charge over time, so if the new battery has a very low charge on it then there is a protection circuit on the board and it will not charge. Many lithium battery chargers have this as a safety precaution in case the battery is defective. This is what worked for me:
Remove the battery and the two gold tabs on the right that make contact with the logic board contacts (the ones that you but a screw in between) can be used to view how much voltage the battery is putting out. Just use a volt meter and you can also tell which contact is positive and which is negative. To add so voltage to the battery directly I just hooked this battery to a 12v trickle charger overnight. Be careful here! You do not want to overcharge the battery as this is very dangerous. Continued below….
I can’t guarantee this will work for you, but this is what I did and was happy it worked out for me. This is another reason why not to use the double sided tape (or use sparingly) until you know your battery is good. I had to take my battery out at least 3 times and I became an expert at changing the battery. It is easy if you don’t tape and you break that plastic wall to get the cables under the logic board. Good Luck!
Ian
The next morning the battery voltage did not change (I think it was really low to start with - I recall less than 3v) so I was a bit disappointed but I put it back into the Mabookpro and did not start right away. Instead I plugged in the charger and left the charger on the MacBook Pro for the rest for the day (about 18 hours). Then I booted up the MacBook Pro and it worked! The battery was fully charged and would hold its charge and recharge no problem.Â
Your initial 73% charge reading was probably wrong, my did this too the first time I installed and when I unplugged because it wasn’t uncharging the computer went off like it had no battery power. Continued below…
@Ian Jeffreys, so what did you do in the end, the 12v trickle charger or the 18h MBP charger?
Having the same issue myself now that the install is complete.
It boots same as ever when plugged in and all peripherals are functional (fingerprint, speakers, trackpad, TouchBar, etc), just no battery indicator anywhere, it's like it's not connected?
I'll try leaving it plugged in overnight before a full retracing of steps, hopefully it's just a serious low voltage making it fail to register with the system?
Thanks all who came before for the posting!
~MP
Update: removed the back cover and re-tightened the battery connection pancake screww et voilá!
I followed the suggestion of Darren and followed the ifixit guide to step 23 and then skipped to 64. There is no way I wanted to disassemble most of my Mac to swap the battery., Thanks Darren! When I swapped the battery, I gently slid the battery cable under the logic board without breaking the battery wall. Patience and gentleness is critical, force nothing at that step. My computer fired up and the new battery seems to operate normally. I spent about an hour and half for the whole swap, I had the Ifixit instructions on my iPad so I could reference them as I went through each step. I also watched several yourtube videos in preparation for the swap.
Thanks. Great tutorial. Worked like a charm, including the shortcut.
My Battery-Set that I bought had all the tools except the T3 Torx included. Also included was a plastic push thingy with a handle to scrap underneath the battery packs and “cut” the glue-stickers/tape. A bit scary, since the batteries did bend a little. But 2 Minutes later I had the batterie in my hand. Much better than risking to ruin the display and/or keyboard and everything stays dry. Glue remover on an ear-bud does the rest.
Another hint: In step 23 watch out for the 6 tiny washers on the touchpad. They are loosely placed. I turned the touchpad around to put it away and all washers fell to the ground. Now I am missing a small one…
Everybody out there: Good luck !
I was going through the steps and got to step 33 by the time I realized I didn’t have to gut the whole laptop just to remove the battery! Shame on you iFixit!
I put the hot iOpener on top of the palm rest, since the touchpad was out by then, and used the plastic card to slowly scrape at the adhesive. Worked like a champ even without the liquid treatment. The battery didn’t even blow up in my face even though it was puffed up.
But, I got a DOA battery, not from iFixit, and had already stuck it in place using the provided adhesive. I’ve receive about the same amount of DOA batteries for Apple products than Windows products, if that accounts for anything. Apple batteries purchase since 2012, about 10. Windows laptop batteries purchased since 2012, too many to even try to count.
OK, für die deutschen Benutzer ein paar Ergänzungen:
Die Schritte zwischen 23 und 64 sind definitiv nicht notwendig. Man kann das Kabel der Akku-Platine auch entfernen, ohne dass das Mainboard ausgebaut ist. Am einfachsten ist es, wenn man zuerst den rechten Teil des Kabels entfernt beziehungsweise beim Einbau einfügt. Dann muss man auch nicht das kleine Kunststoffstückchen ausbrechen.
Am schwierigsten empfand ich das Lösen der Verklebung des Akkus. Man kann dazu langsam Plastikkarten unterschrieben, die die Akkuteile leicht nach oben drücken. Wenn man dann einige Zeit wartet, hat sich der Akku ein wenig gelöst und man kann die Plastikkarte etwas nachschieben. Das wiederholt man einfach, bis der ganze Akku gelöst ist.
Die Klebstoffreste kann man sehr gut mit Brennspiritus einlösen und entfernen, ohne dass man Gefahr läuft, durch Aceton Kunststoffteile zu beschädigen.
Noch ein Hinweis zu Schritt 15: den Akkustromstecker braucht man nur leicht anzuheben, um die Stromversorgung zu unterbrechen. Zur Sicherheit ein kleines Stück Tesafilm unterkleben.
Bei meinem ersten Zusammenbau ist es mir nicht gelungen, das Trackpad 100-prozentig mittig auszurichten.
Ich bin dann so vorgegangen:
1. Ich habe die zehn Befestigungsschrauben des Trackpads leicht gelöst.
2. Dann habe ich an allen vier Seiten zwei Papierstreifen zwischen Trackpad und Gehäuse geklemmt.
3. Anschließend habe ich die Befestigungsschrauben wieder angezogen.
Das Trackpad ist nun wunderbar mittig ausgerichtet.
Noch etwas zu Schritt 15:
Ich war zuerst etwas verwirrt, weil ich den Stecker beim besten Willen nicht heraus bekam. Tatsächlich handelt es sich auch gar nicht um einen Stecker, sondern nur um eine Kontaktplatte, die mit der Befestigungsschraube angedrückt wird und so den Kontakt zum Akku herstellt. Also nicht wie ich an diesem Ding herumrupfen!
Es wäre sinnvoll, die Beschreibung entsprechend zu ändern.
Merci pour ce tutoriel tres precis qui m’a permis de changer la batterie de mon MacBook !! :)
I did the full teardown replacement, went smoothly, just be careful of your ziff sockets and tape tabs, you really want them to survive. This really takes a solid 3 hours! Not my first mac battery replacement but this one you go deep. Thanks for the photos, saved a whole lot of time! Adhesive from !&&*!!!
Plus 1 for removing the battery without taking the logic board out. With a bit of care the flat flex can babe slid out from under on removal and back under on installation.
Hallo hab gerade in 3 Stunden meine MacBook Pro Batterie gewechselt, die alte(n) haben das Gehäuse gebläht und die Kapazität war kleiner eine Stunde. Hatte erst Angst das Digitalboard komplett raus zu nehmen, ging aber nach Anleitung sehr gut. Die Akkus habe ich mit einem stumpfen Spachtel rausgelöst, wenn mans mal gemacht hat kein Problem.
Wichtig ist vorher wirklich tiefentladen, ansonsten sind Akkus halt schon keile Bomben.
Also gerne wieder, das Akku Kit ist klasse, der Mac sofort wieder hochgefahren und jetzt lädt er (-:
Definitely jump from Step 23 to Step 67. As others noted, just break the small piece blocking the battery board (actually it’s not breaking, it’s only a glued piece).
Instead of the adhesive remover liquid provided in the pack and the floss I used the plastic cards to remove the battery. The floss kept breaking and I didn't want to risk with the adhesive remover. With the plastic cards I did it in 3-5 min.
Replaced the batteries and I was so glad to see the MBP start again, after it was completely dead for a few weeks! I thank God for your work. God bless
Like others, I skipped the whole section on removing the logic board in the fixit guide, followed it up to step 23 and then skipped to 67.
Used the adhesive remover and the battery came out with some tugging, then used the fluid to clean it any residue.
The old battery was so dead that the Mac wouldn't even switch on when power was plugged in, so it was good to see the Mac booting up straight away as soon as I powered it up on battery. Battery reported to be at 33% with health warning, but after a reboot, the warning disappeared and it's now charging up nicely.
Very good instructions and kit supplied was brilliant.
Is this step necessary? I can’t perform this step as I am attempting to repair water damage and need to remove logic board & most likely replace the battery.
Macrepair SF - Antwort
@mac_medic You definitely don’t want the power coming on while the board is wet. In your case, I think powering on the machine to disable Auto Boot would do more damage than it prevents. I agree, skip this step and be prepared to disconnect the battery quickly if the laptop automatically powers on. Good luck!
Jeff Suovanen -
Thats right! You don't want power running while working on your logic board.
Dan -
This did not work when running High Sierra.
Kyle B - Antwort
Tried this on a 2018 MBP 13” Touchbar (there’s no iFixit guide for this model yet). Need to replace a broken screen.
Luckily I managed to connect to an external screen (Cmd-Down Brightness to switch displays) and enter above command. Seems to work, but there’s another problem with this model - it powers up as soon as any key is pressed……. ffs <gnashes teeth>
Cool_Breeze - Antwort
I unscrew the battery first and wrap electrical tape over the logic board battery connector before attempting any repairs to the board. Haven’t had any problems yet and I’ve worked on about 10 of these models already. Also when you open the bottom case use a suction cup at the bottom and pull up then run a plastic spudger along the edges to disconnect the clips. Also only use a plastic spudger on the board. Saw a youtube video from a repair shop and he did not disconnect the power and used all metal tools during the entire process of removing the board. His last step was to disconnect the battery terminal.
Brian - Antwort
Is this step necessary if my mac can turn on? Battery fully dead(
Nursat b - Antwort
BEFORE YOU START: The included torx head stripped off before I was done (and you might need an additional T4) so stop now and go buy a good one. Also they fail to warn you above to get some blue threadlocker ahead of time.
Jason Sherron - Antwort
This command did not work for me and I read that sometime in later 2020 Apple stopped this command from working…any ideas on a work around?
Patrick Machacek - Antwort
Not able to do that with damaged screen
richardjgreen - Antwort
If you have a damaged screen you can still use a converter from thunderbolt (USB 3) to HDMI and plug your Macbook Pro to your TV as monitor display. Just make sure to chose the right Source (HDMI IN) in your TV. I did it and to make it work I unplug and plug again in my Macbook and so I could disable the Auto boot
Roberto Sanchez Bustos -
Hi. This does not work on 2018 13” MacBook Pro with Touch Bar. I did exactly this to disable auto boot. But when I check by using nvram -p it says: auto-boot true. Am I doing something incorrectly? I did everything step by step. Copied and pasted the sudo command, pressed enter and then entered my password. I have Big Sur 11.1 installed. Is there any other way since I need to replace the screen. Thank you. Adrian
Adrian Vizik - Antwort
Hi everyone. This is also a little pointless if you can’t see anything on the screen, and you don’t have a display adapter to USB C to display it. I agree with Brian about removing the back and disconnecting the battery cable before you even think about opening the lid of the MacBook. Applying the insulation tape is also a handy little tip that just makes sure there is no way to discharge from either the board or battery.
Roberto Enrieu - Antwort
running `nvram -p | grep 'AutoBoot'` in terminal verifies that it was accepted
result: `AutoBoot %00`
Marek Polák - Antwort
Running Big Sur 11.6.7 on a 2019 16" MBP, it's "auto-boot". So it's:
nvram -p | grep 'auto-boot'to display the current state, the default istrue- and then to change it,sudo nvram auto-boot=falsewhich turns it off.Ed Mechem -
This step is completely unnecessary if you follow the guide to disconnect the battery properly. Just put some tape between the battery and logic board connection to prevent it from accidentally touching and therefore powering on the laptop.
Grant Ormsby - Antwort
It took me a few tries to make this command work, as I was able to copy and paste the command into Terminal, but could not type in my laptop’s password. I finally typed my password into a text document, copied it (command C), and then pasted it into Terminal and it worked.
tommy404 - Antwort
I didn’t do this. Mine never auto-booted before I replaced the battery. Now it does.
hatuxka - Antwort
BEFORE YOU DO ANYTHING - CHECK THE BATTERY!
I-fixit sent me a bad battery, which I didn’t realize until it was already install. They sent me a new one, but I wasted hours uninstalling and reinstalled.
Get a volt meter and measure the voltage on the output of the battery pack. If it reads 0 V, SEND IT BACK. It should read over 2 V.
bcardanha - Antwort
I've just received my replacement battery and it reads 0,042V between the two main connectors. Do you think it's dead?
peter sussex -
When I did this from Terminal.app within Recovery Mode, the “sudo” was not recognized but I could invoke it without the sudo part. It seems to have been accepted when looking at “nvram -p”
johann beda - Antwort
When in Recovery Mode, you already have superuser powers. So you don't need to prefix commands with the sudo command to invoke them with root privileges; you already have them. Do a
pwd(print working directory) after opening Terminal in Recovery Mode, and you'll see that you're in the root user's directory.Ed Mechem -
I received the battery kit for my 2018 MacBook Pro and as per the above comment from bcardanha - Oct 12, 2021, I checked the voltage on the pads marked + and - . It was zero volts so I panicked a bit.
I sent a message on the iFixiT Facebook page and I got no reply. I finally found the customer service email for Ifixit Europe and sent them an email voicing my concern as I was not keen to work for couple of hours just to discover that the battery is faulty. I had an almost instant reply on the email (kudos to them) and they adviced me to go ahead and install the new battery as the voltage measured when battery is not connected is not relevant.
I took a leap of faith and after two hours… the new battery showed 50% charge and everything seems to be working just fine. I am happy it worked.
Mircea Comanici - Antwort
After removing the old battery and installing the new battery I powered up the MBP before screwing the bottom on. I discovered the my keyboard would not function. It took a few hours of investigation and frustration that I discovered the track pad power ribbon had become partially dislodged from the trackpad. I was able to see that this through the little machined slot where the battery sat. I had to remove the trackpad to reinsert the power ribbon back into the connector in the trackpad. after reassembling and reinstalling the battery etc the keyboard worked. Just food for thought if your run into the keyboard issue.
Ed Mease - Antwort
This should be the default. IMO I tell you to power on - not the lid.
G Sena - Antwort
Est ce que cela fonctionne sur un macbook pro 2017 sans touchbar ?
maël muzelet - Antwort
Bonjour Maël, oui, ce tutoriel concerne "les MacBook Pro 2016 (et plus récents) et les MacBook Retina 12" 2017 (et plus récents)"
Claire Miesch -
Excellent instructions. I was able to follow and install the new screen. I recommend that you get a good set of tools before you begin. I started with an inexpensive repair kit bought online. The Penta and torx bits failed. I bought an IFIXIT kit with quality bits and I was able to do everything I needed.
Tom Markham - Antwort
If you're not running an admin account the sudo command won't work (which honestly, you should not be running admin). Rather than logging in to your admin amount via the OS, in the terminal type "login [admin username]," then the password and you'll be able to do the sudo command as described above. Once you're complete, type "logout [admin username]" and you'll be good to go. Obviously replace [admin username] with whatever the account name for your admin user is.
arichard2401 - Antwort
For those unable to complete this step because the screen is too damaged I recommend leaving your macbook on until the battery dies.
Nicholas R Licato - Antwort
Just replaced my 2018 15" MBP battery. Running Sonoma.
I found no way to disable AutoBoot (The status can be checked in the Power section of system report).
Anyway, i left my battery completely drain before opening the MBP, and had no issues during the process.
Cédric Bontems - Antwort
After sending this command in terminal when I checked what happens if I now open the lid, instead the screen lit slightly up (still black) then a battery symbol showing the charging state showed up.
Now, after replacement of the battery, this is all I get to see.
No reset of NVRAM nor PRAM helped.
Currently the new battery charges (58% atm) and it feels like it‘s mocking me.
webrockers - Antwort
I suspected the keyboard or TouchID sensor wouldn’t work, so I went on and checked every connector.
I missed connecting the left TouchID sensor from step 31.
webrockers -