Einleitung
Ersetze die Displayeinheit an deinem MacBook Pro (13 Zoll, Ende 2016, Touch Bar) mithilfe dieser Anleitung.
Bevor du mit der Reparatur beginnst, solltest du überprüfen, ob Apple sie kostenfrei ausführen würde. Wenn die Displaybeleuchtung nicht mehr funktioniert, oder auf dem Display senkrechte helle Streifen am unteren Displayrand zu sehen sind ("Stage Light", also Bühnenbeleuchtung genannt), könnte die Reparatur im Rahmen von Apples Serviceprogramm für die Display-Hintergrundbeleuchtung des 13"-MacBook Pro übernommen werden.
Entlade zur Sicherheit den Akku unter 25%, bevor du die Reparatur beginnst.
Was du brauchst
-
-
Schalte deinen Mac ein und starte Terminal.
-
Kopiere den folgenden Befehl und füge ihn im Terminal ein (oder tippe ihn exakt so ein):
-
sudo nvram AutoBoot=%00
-
Drücke die Eingabetaste [return]. Wenn du dazu aufgefordert wirst, gib dein Administratorpasswort ein und drücke erneut [return]. Hinweis: die Return-Taste kann auch mit ⏎ oder "enter" gekennzeichnet sein.
-
sudo nvram AutoBoot=%03
-
-
-
Entferne die sechs Schrauben, mit denen das Gehäuseunterteil befestigt ist, Benutze dazu einen Pentalobe P5 Schraubendreher:
-
Zwei 6,2 mm Schrauben
-
Vier 3,4 mm Schrauben
Sur le mien A1708 EMC3164 j’ai 4 vis de 6,2 (les coins) et 2 vis de 3,4 celles au milieu en bas
Ce tutoriel n’est pas dans la bonne section !
c’est le 13” avec touch bar et non celui avec les touches de fonction .
l’autre tuto nommé “écran complet” est le bon
Bonjour Vincent,
Si vous cherchez le même tutoriel pour le MacBook 13” non Touch Bar, le voici : https://fr.ifixit.com/Tutoriel/Remplacem...
Before you start I suggest you get magnifier eyeware as screws and connectors are very small and good lightning are a big PLUS
Completed whole steps in over 4 hours….but worth it. Works back perfect and battery error message is gone….
-
-
-
Setze einen Saugheber vorne in der Mitte auf das Gehäuseunterteil des MacBook Pro.
-
Hebe den Saugheber an, um den Rahmen und das untere Gehäuse leicht voneinander zu lösen.
-
-
-
Setze die Ecke eines Plektrums in den Spalt zwischen dem unteren Gehäuse und dem Rahmen ein.
-
Schiebe das Plektrum um die nächstgelegene Ecke und die Gehäuseseite bis zur Hälfte nach oben.
The instruction implies that sliding the pick up to the side of the case releases the clip. This is far from the truth; it takes a pretty strong force to pop the clip open. The plastic pick is a good start, but you need to reach in and pull the middle of that side of the case pretty hard.
-
-
-
Wiederhole den vorherigen Schritt auf der anderen Seite: Schiebe dein Plektrum unter das untere Gehäuse und an der Seite nach oben, um den zweiten Clip zu lösen.
-
-
-
Setze dein Plektrum erneut unter die Vorderkante des unteren Gehäuses, nahe bei einem der mittleren Schraubenlöcher.
-
Verdrehe das Plektrum kräftig, um den dritten Clip zu lösen, mit den das Gehäuseunterteil am Rahmen befestigt ist.
-
Wiederhole diese Vorgehensweise bei dem anderen mittleren Schraubenloch, um den vierten Clip zu lösen.
Look at Step 8 pics 2 and 3 to see exactly where the clips are that need to be released. Taking the bottom cover off my MBP took for ever because I didn’t realize the clips were not right around the edges as the wording suggests. Once I realized this, it came off quickly and easily.
-
-
-
Ziehe das Gehäuseunterteil kräftig nach vorne (weg von dem Bereich mit den Scharnieren), um die letzten Clips zu lösen, mit denen das Gehäuseunterteil befestigt ist.
-
Ziehe erst an der einen Ecke, dann an der anderen.
On the 2018 model, there are two more clips that need to be popped on the sides in the middle. Then it slides out easily.
-
-
-
Entferne das Gehäuseunterteil.
-
Positionere es entlang der Clips am Displayscharnier. Drücke es herunter und schiebe es Richtung Scharnier. Es sollte fest sein, wenn die Clips einrasten.
-
Wenn diese Clips eingerastet sind und das Gehäuseunterteil gerade auf dem Laptop liegt, drücke kräftig auf das Unterteil, damit die vier versteckten Clips einrasten können. Du solltest es hören und fühlen können, wenn sie einrasten.
-
-
-
Löse sorgfältig das große Stück Klebeband auf dem Akkustecker an der Kante des Logic Boards direkt beim Akku ab.
-
Entferne das Klebeband.
Please be VERY careful, I torn up my battery cable and had to replace all the battery.
-
-
-
Löse sorgfältig das kleine Stück Klebeband ab, das den Stecker des Datenkabels der Akkuplatine bedeckt.
-
-
-
Benutze die Spudgerspitze, um die kleine schwarze Verriegelungslasche hochzuklappen, mit der das Kabel in seinem Stecker befestigt wird.
Be very careful here. I had to repeat this procedure several times on my MacBook Pro to replace faulty monitors. Eventually, after being opened and closed so many times, the small black locking tab came right off of the connector. Now my battery connection is broken and I can only use my MacBook when it is plugged into the power supply. I’m trying to find a way to securely connect the battery cable without this little locking tab (maybe with tape or something), but so far no luck. Does anyone at iFixit have any advice for me?
Like Jamie said, use mass amounts of caution here. The lever is very fragile, and mine came off as well - and I’m not exactly a muscular guy. Without it, the connection cannot be made to the data connector, and the computer will not think that a battery is installed. I had to finagle my connector with tweezers and a spudger back into place (and the picture above makes it look normal sized. The picture lies. It is TINY! We’re talking smaller than a small eyelash tiny), and then used some of the adhesive battery strip to hopefully keep it in place.
The previous comments are not exaggerated. There ain’t NOTHIN’ to that locking bar. I found it helpful to zoom in with my phone to work on it. It really requires no force to move, I imagine the tape is there to hold it down.
-
-
-
-
Trenne das Datenkabel der Akkuplatine ab, indem du es aus seinem Anschluss schiebst.
-
Schiebe es parallel zum Logic Board, in der Richtung des Kabels.
-
-
-
Biege das Datenkabel der Akkuplatine zur Seite, sodass es nicht im Weg ist.
-
-
-
Benutze einen T5 Torx Schraubendreher, um die 3,7 mm Flachkopfschraube zu entfernen, mit der der Akkustromstecker befestigt ist.
-
-
-
Hebe den Akkustromverbinder vorsichtig mit einem Spudger an, und trenne so den Akku ab.
-
Hebe den Verbinder so hoch, dass er von seinem Anschluss getrennt bleibt. Falls er sich während der Reparatur versehentlich wieder verbindet, könnte das dein MacBook Pro beschädigen.
Dies ist kein Stecker sondern eine Kontaktplatte, die nur leicht angehoben werden muss. Dann am besten mit etwas Tesafilm isolieren.
(Translation for myself and others; Thanks for the nice tip by the way!) This is not a plug but a contact plate that only needs to be lifted slightly. Then it is best to isolate with some scotch tape.
S Woo -
-
-
-
Entferne die vier 1,9 mm T3 Torx Schrauben, mit denen die Plastikabdeckungen über den Displayscharnieren befestigt sind.
-
Entferne die beiden Plastikabdeckungen über den Scharnieren.
-
-
-
Entferne die beiden 2,9 mm T3 Torx Schrauben, mit denen die Aluminiumabdeckung über dem Hauptdisplaykabel befestigt ist.
-
Entferne die Abdeckung.
-
-
-
Entferne die beiden 1,7 mm T3 Torx Schrauben, mit denen die Aluminiumabdeckung über dem Displaykabel-Flexstecker befestigt ist.
-
Entferne die Abdeckung.
-
-
-
Trenne das Displaykabel vorsichtig mit dem flachen Ende eines Spudgers vom Display Board ab.
-
-
-
Entferne die vier 1,5 mm T3 Torx Schrauben, mit denen die beiden Aluminiumabdeckungen über den beiden Displaykabelsteckern befestigt sind.
-
Entferne die beiden Aluminiumabdeckungen mit einer Pinzette.
What is the exact size of these screws? lost one trying to put it back in and trying to figure out what I need to buy
Is this step necessary? actually i did it, but when installing the new screen, i found the 2 aluminum covers already in the new screen, so i installed the new one without taking them out…
after it worked, i believe we can skip this step.
my laptop is 2017 15”, 1707
-
-
-
Entferne die vier 3,9 mm T5 Torx Schrauben (zwei auf jeder Seite), mit denen die Antennenkabeleinheit befestigt ist.
-
Entferne ebenfalls die zwölf 1,1 mm P2 Pentalobe Schrauben (sechs auf jeder Seite).
The 1,1mm screws are completly stuck, I have the screwdrivers but the screws are just not turning. Any tips how to take them off ?
I tried other screwdrivrer and put a rubber on it while trying to take it off but nothing works,
Had the same problem with my ‘quality’ P2 screwdriver. A dirt cheap set from Ya Xun, nr. YX-6025 saved the day
The 1.1 screws are at a slight angle (on the 2018 model, not sure about the 2017 one) so make sure you angle your screwdriver around 10° off vertical towards the rear edge of the machine.
Just removing four LCD screen’s now. This is the worst part by far. I have what I thought was a reasonable quality Baku BK-338 P2 Pentalobe screwdriver. I am onto the third display removal and the WiFi antenna removal is where the fun begins. On the first two WiFi antenna, about five (too depressed to count them) screws rounded out in the pentalobe head. I managed to get them all out using flush cutters - gripping them with the cutters as flush as I could to the surface of the antenna and just trying to get them to rotate CCW a little to “break the seal“ so to speak without cutting in so deep as to totally mangle the head and locking them in even tighter :)
Then I pushed them tangentially with one arm of some stout tweezers and slowly worked them out. Got them all out with minimal damage to the brass part of the antenna but I am confident it will still function OK. On the third one now and four rounded out so I better get back to it. A totally s**t way to attach them and far too many screws IMO. My biggest tip is using a quality tool like the Wera or Wira brands, pushing down into the screw and carefully and slowly applying rotation force. Have some flush cutters on standby in case you round any screws out and good luck.
F# Apple for making pentalobe screws and f# them for using this many.
Wiha calls the P2 driver a 1PL
Pay attention: in both sides the two 3,9 mm T5 Torx screws they are different from each other.
DO NOT mix then otherwise you will won’t be able to install then again correctly.
-
-
-
Trenne die drei Koaxialkabel vorsichtig mithilfe einer Pinzette gerade nach oben vom Logic Board ab.
-
Schiebe deine Pinzette oder das flache Ende deines Spudgers unter jedes Kabel, bis du an den Anschluss kommst und drehe oder hebele dann vorsichtig, um es zu lösen.
-
-
-
Entferne die 2,8 mm T5 Torx Schraube, mit der die drei Antennenkoaxialkabel an der Hauptplatine befestigt sind.
-
-
-
Heble die Antennenkabeleinheit mithilfe eines Plektrums an den drei gezeigten Stellen heraus.
-
-
-
Beginne vorsichtig die Antennenkabeleinheit zu entfernen, indem du sie leicht nach oben und weg vom MacBook ziehst und das Kabel unter dem Kühlkörper hervorziehst.
Reversing this step was the hardest part for me. There is a small “tunnel” that runs under the heat pipe which the 3 antenna cables plus the securing bracket must be threaded through. The shortest cable easily got stuck or pushed off to the side under the heat pipe. After many attempts, I found success by bending the 3 wires ever so slightly to the left before inserting them in the tunnel, so that when they make it through the tunnel, they were more prone to stay straight. It was easy to grab them one by one with tweezers by doing that. Just have to be very careful.
To easily fit the antenna cables – turn the whole antenna assembly about 90 degrees ccw and wiggle it a bit back and forth. Since the cables are a bit prebent they quite easily “pops” up – no need to tie them together. The last trick is to not forget the metal tab – using tweezers or a spudger to help guide the tab in position.
-
-
-
Entferne die Antennenkabeleinheit.
I had a LOT of trouble re-installing the three antenna cables underneath the heat pipe! The only way I could get them through was to use clear tape to bind the three antenna connectors together tightly into one pointy end. I was able to push that through into place, but I was not able to push the three separate wires through.
It’s possible to avoid this problem by just not removing the antenna assembly entirely. I secured the three cables and the screw holder together with a small cable tie to avoid them slipping out. You can fit the new screen without removing the assembly completely.
Thanks dkraermer2 for that tip of wrapping all 3 wires into a narrow point. I used Capton tape. The metal screw holder needed help as it catches on a ridge in the MB. I used tweezers to “Lift” it over that last ridge.
Make sure the antenna cable assembly locates correctly on reassembly. It is important to install this down onto its locating lugs, not pushing from the rear of the machine towards the front. There is a small ‘u’ shaped cutout on bottom of the assembly and a metal tab which must locate into the corresponding ‘u’ shaped lug and slot cut into the metal of the top case. If this is not located correctly there is a good chance that the screen will foul when opening and closing resulting in an audible click as it catches the antenna assembly.
+1 for BrianS comment. The U shape is a placeholder for the antenna and is located at antenna center. If this ever happened to you, fold gently the antenna strip to leave 3 mm space from the antenna main block, and place the antenna center first in oder for the antenna to fit into the U shape properly.
+1 to both BrianS and Xavier Fischer’s comments above. Even when the lug and the cutout are identified, it’s not easy to tell if it’s been seated correctly until you test the hinge. I found Xavier’s suggestion worked.
Putting the three antenna cables to snap onto the connectors again, It felt like I succeeded after much struggle. But after putting it all together - the screen is black. External monitor works though. 2 of 3 feels certain though as it seems on place.
Once all 16 antenna screws are removed along with single screw securing wifi simply loosen the antenna and while holding each end , ROTATE it and pull away gently so as to not disturb the bend of the wifi wires passing thru the heat pipe. The wires are never physically touched and they keep their “natural” bend. To reassemble, holding antenna, guide the two wi-fi wires and the securing lug thru heat pipe as the antenna is rotated into place . There is a very narrow milled slot on the underside that the antennas metal shield must fit into or else it will cause the snapping clicking noise ( spoken of earlier in this guide )as the display assembly hangs up during its opening / closing. Make sure if need be, the spacing between the metal shield and plastic body of antenna is the same as the ridge between the milled slot and the milled out area moving towards rear of palm rest. Alignment is important.
-
-
-
Entferne die vier 3,9 mm T3 Torx Schrauben, mit denen die Federn der beiden Displaykabelabdeckungen befestigt sind.
-
-
-
Fasse die linke Seite der Displaykabeleinheit und ziehe sie zum unteren Ende des MacBook und weg von der Feder der Abdeckung.
-
Ziehe die Feder des Displaykabels mit Hilfe einer Pinzette aus ihrer Fassung.
-
Wiederhole diesen Schritt bei der rechten Feder an der Abdeckung der Displaykabeleinheit.
When placing back the holder for the display cable I used the wrong length screws and the bolts connected to the connector strip came off. Is this a concern as I am having back light issues in that I can see the outline of an image but its very dim. Thank you.
-
-
-
Klappe dein MacBook ganz auf und platziere es mit der Tastatur nach unten so an die Tischkante, dass das Display nach unten hängt.
-
-
-
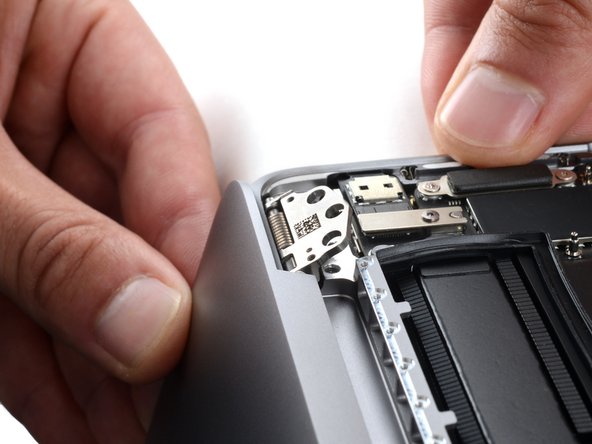
Halte das Display mit einer Hand fest und entferne die sechs Torx T8 Schrauben der Scharniere mit der anderen Hand.
-
-
-
Halte das Hauptgerät des MacBooks mit einer Hand fest.
-
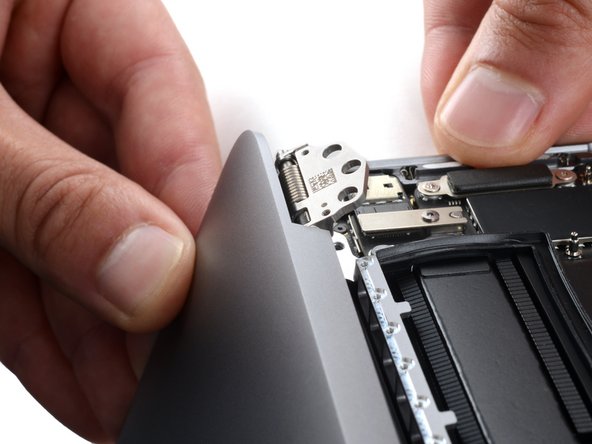
Drücke die linke Seite des Displays mit der freien Hand nach oben zum Boden des Laptops hin, um das linke Scharnier abzulösen.
-
-
-
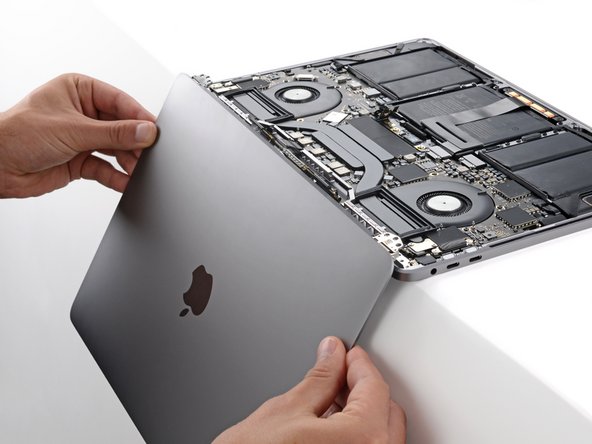
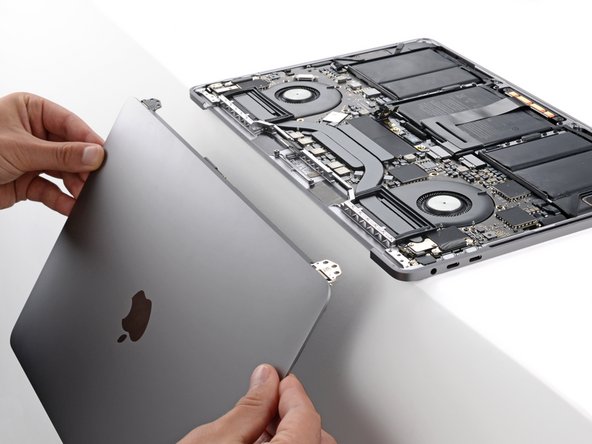
Löse das rechte Scharnier und entferne das Display.
-
Achte darauf, dass die Displayscharniere ganz geöffnet sind und führe sie in ihre Vertiefungen im Rahmen ein.
-
Ziehe die sechs Scharnierschrauben teilweise an.
-
Schließe das Display und kontrolliere, ob es gut sitzt.
-
Ziehe die Schrauben ganz fest.
-


Vergleiche dein Ersatzteil mit dem Originalteil. Möglicherweise musst du fehlende Teile übertragen oder Schutzfolien vom Neuteil abziehen, bevor du es einbauen kannst.
Um dein Gerät wieder zusammenzubauen, folge den Schritten dieser Anleitung in umgekehrter Reihenfolge.
Entsorge deinen Elektromüll sachgerecht.
Lief die Reparatur nicht wie geplant? Probiere es zunächst mit einigen grundsätzlichen Problemlösungen nach Reparaturen. In unserem Antwortenforum kannst du Hilfe bei der Fehlersuche finden.
Rückgängig: Ich habe diese Anleitung nicht absolviert.
77 weitere Nutzer:innen haben diese Anleitung absolviert.
Besonderer Dank geht an diese Übersetzer:innen:
100%


Diese Übersetzer:innen helfen uns, die Welt zu reparieren! Wie kann ich mithelfen?
Hier starten ›


29 Kommentare
Hello Lucas Zhu,
the interior build of the A1708 model is a bit different to this one. Especially the connection of the battery. You can check our guides for the A1708 model for the disconnection procedure. The removal of the display in general, is more or less the same with a few differences (e.g. two instead of 3 coax cables). Although the A1708 is a different model you might be able to remove the display following this guide.
THANK YOU THANK YOU THANK YOU!! You made my life so much easier. This guide was thorough and definitely made things a lot easier to understand.
Thanks for the guide! I’ve completed mine around 1 1/2 hours while being really careful not to short-circuit any components. Other video that I used for reference: https://youtu.be/153tVLIZVm8 and https://youtu.be/bEDhEWLrkUs
Thanks!
This took me more than 2 hours to remove and replace the display. By far the most time-consuming step was removing and re-feeding the antenna wires under the heat pipe. (See my suggestion above.)
The other Guides for display removal for the other similar MacBook Pro models (2017, non-touch bar, etc.) list times of 20 or 30 minutes. Those times are totally unrealistic, at least for first times through the process.
Thanks for taking the time to document the display replacement procedure. I used these instructions to replace a display for a late 2016 function key Macbook Pro 13” A1706 model. There are two antenna cables in a different location on the on the earlier model. I did not remove them and was able to move the antenna cable assembly while still attached and easily manipulate the screen connection assembly round it. The twelve 1.1 mm P2 screws used to hold the antenna cable assembly in place are minute and I had to hold them in forceps in order to load them on to the screwdriver and then screw them into place - very fiddly. The spring hinges of the display cable were tricky to put back in too. Otherwise went as described in the guide.
Thanks for the very thorough guide I managed to replace my screen in about 1 hour 45 mins taking alot of care.
After I have replaced the screen the touchbar seems to be functioning visually but is unresponsive to touch. Ive tried to kill the touch bar agent via terminal and activity monitor. I just wondered if you may have any guidance or advice as to what might have happened and how I can fix it :)
Thanks in advance,
Danny
Same happend to me. Let me know if you find a solution. So far I am using “TouchBarServer.app” to compensate. I think I found it on Github
Felix J -
FYI
Not to disparage commerce for the good people of iFixit but check this link before you take the plunge to repair your 13” MacBook Pro Model A1706. It might qualify for a free repair.
https://support.apple.com/13-inch-macboo...
Happy trails or whatever you’re on.
No disparagement taken! Great tip, added to the guide introduction. Thanks for chiming in.
Thank you for the guide! Und die deutsche Übersetzung natürlich!
I could change the display successfully even though I dont have a lot of experience in this stuff. I have to warn though that these models are very fragile; I probably broke my touchbar in the process. Its not responding to touch interactions anymore.
Thanks for the great instructions! Almost everything works perfectly after following these instructions. However, there is one issue: the camera does not work. If I look at the system report, under “Camera” it says “No video capture devices were found.” and if I open photo booth it says “There is no connected camera”. I’ve tried re-booting, but with no luck. Any ideas what I might have done wrong? Besides the camera, everything else seems to be fine.
Great guide, except now my computer won’t power on - apparently, that Touch ID/Power button needs to be “Re-Packed”, which requires that Apple does it - and they say another new screen is required to do it. And, possibly, a logic board.
The repair will cost more than buying a new computer…
I completed the screen replacement as per the guide on an A1706 MacBook Pro in running OS 11.2.2 (Big Sur)
Mechanically, everything went fine, but when I booted up again the display was garbled and flickering, including on an external monitor. Did all the usual stuff (NVRAM/SMC reset, booting up is safe mode, reinstalling OS) but to no avail.
So I popped into the my nearest Apple accredited repair shop for them to have a look. They confirmed to me that I’d installed the new screen perfectly but told me that :
A. There is a “calibration” that needs to be don’t in order for the new screen to work,
B. It can only be done by a registered technician
C. It can’t be done on a “third party screen” i.e. one that hadn’t been sourced directly from Apple (who don’t sell spares to the public)
Have other people come across this? The fact that dozens of people have completed the repair with out issue would suggest it’s bulls**t. Or is this something that’s been snuck in with big sure to prevent DIY repairs?
Flickering on an external screen would not be caused by lack of calibration on the built-in display. Apple’s techs are required to perform a calibration step when they replace almost any part, but it’s not necessary in order for a new display to work—We’ve tested this many times. Even the term “calibration” can be misleading here, as often all they’re doing is verifying the repair with Apple’s servers so that the repair shop can get paid by Apple for completing the repair.
Normally when we see problems on both internal and external displays, I’d suspect a bad GPU, but it’s odd that it happened immediately after your repair. Does the external monitor flicker regardless of which port it’s plugged into? Have you tried them all? If so, I’d probably move your question to the Answers forum and maybe run through the standard troubleshooting checklist before going further. Good luck!
once youve done acouple you do better and better, the first ones the worst one. I still put the ifixit guide up when im doing a repair, i dont trust me because ive know myself all my life. so haveing this in the background makes it easier
Thanks, I used this and a YouTube video to replace my MacBook Pro A1708 display. https://m.youtube.com/watch?v=ewqZtZEhG1...
After having followed the steps and changed the screen, my MacBook does not give video, the screen is black, even when I put the previous screen that worked with the lid a little open and for HDMI. Does anyone know what could have happened?
Is it possible to just replace the connection cables of the display, or do I have to change the whole display unit?
Great Description. Thanks a lot, that rescued my MacBook because it is just out of service at Apple. Just one hin: You don't need a TR8 an T8 is well for the screws of the display hinge. And you didn't need the P5 as well.
What a great instructional text / illustrations - thank you!
I am mechanically skilled, but I have never previously attempted or done anything like it and it worked out real well with these instructions.
And my respects for the people who design these machines and for the people who assemble them!
I had to grind out one of the 12 screws of the antenna cable unit and I struggled a bit with actually unhinging the display from the body. And in all honesty, I had my doubts whether my Macbook Pro would ever start up again after all my working on it - but it did so perfectly!
So thank you !
Muy buen tutorial
Is this step necessary? I can’t perform this step as I am attempting to repair water damage and need to remove logic board & most likely replace the battery.
Macrepair SF - Antwort
@mac_medic You definitely don’t want the power coming on while the board is wet. In your case, I think powering on the machine to disable Auto Boot would do more damage than it prevents. I agree, skip this step and be prepared to disconnect the battery quickly if the laptop automatically powers on. Good luck!
Jeff Suovanen -
Thats right! You don't want power running while working on your logic board.
Dan -
This did not work when running High Sierra.
Kyle B - Antwort
Tried this on a 2018 MBP 13” Touchbar (there’s no iFixit guide for this model yet). Need to replace a broken screen.
Luckily I managed to connect to an external screen (Cmd-Down Brightness to switch displays) and enter above command. Seems to work, but there’s another problem with this model - it powers up as soon as any key is pressed……. ffs <gnashes teeth>
Cool_Breeze - Antwort
I unscrew the battery first and wrap electrical tape over the logic board battery connector before attempting any repairs to the board. Haven’t had any problems yet and I’ve worked on about 10 of these models already. Also when you open the bottom case use a suction cup at the bottom and pull up then run a plastic spudger along the edges to disconnect the clips. Also only use a plastic spudger on the board. Saw a youtube video from a repair shop and he did not disconnect the power and used all metal tools during the entire process of removing the board. His last step was to disconnect the battery terminal.
Brian - Antwort
Is this step necessary if my mac can turn on? Battery fully dead(
Nursat b - Antwort
BEFORE YOU START: The included torx head stripped off before I was done (and you might need an additional T4) so stop now and go buy a good one. Also they fail to warn you above to get some blue threadlocker ahead of time.
Jason Sherron - Antwort
This command did not work for me and I read that sometime in later 2020 Apple stopped this command from working…any ideas on a work around?
Patrick Machacek - Antwort
Not able to do that with damaged screen
richardjgreen - Antwort
If you have a damaged screen you can still use a converter from thunderbolt (USB 3) to HDMI and plug your Macbook Pro to your TV as monitor display. Just make sure to chose the right Source (HDMI IN) in your TV. I did it and to make it work I unplug and plug again in my Macbook and so I could disable the Auto boot
Roberto Sanchez Bustos -
Hi. This does not work on 2018 13” MacBook Pro with Touch Bar. I did exactly this to disable auto boot. But when I check by using nvram -p it says: auto-boot true. Am I doing something incorrectly? I did everything step by step. Copied and pasted the sudo command, pressed enter and then entered my password. I have Big Sur 11.1 installed. Is there any other way since I need to replace the screen. Thank you. Adrian
Adrian Vizik - Antwort
Hi everyone. This is also a little pointless if you can’t see anything on the screen, and you don’t have a display adapter to USB C to display it. I agree with Brian about removing the back and disconnecting the battery cable before you even think about opening the lid of the MacBook. Applying the insulation tape is also a handy little tip that just makes sure there is no way to discharge from either the board or battery.
Roberto Enrieu - Antwort
running `nvram -p | grep 'AutoBoot'` in terminal verifies that it was accepted
result: `AutoBoot %00`
Marek Polák - Antwort
Running Big Sur 11.6.7 on a 2019 16" MBP, it's "auto-boot". So it's:
nvram -p | grep 'auto-boot'to display the current state, the default istrue- and then to change it,sudo nvram auto-boot=falsewhich turns it off.Ed Mechem -
This step is completely unnecessary if you follow the guide to disconnect the battery properly. Just put some tape between the battery and logic board connection to prevent it from accidentally touching and therefore powering on the laptop.
Grant Ormsby - Antwort
It took me a few tries to make this command work, as I was able to copy and paste the command into Terminal, but could not type in my laptop’s password. I finally typed my password into a text document, copied it (command C), and then pasted it into Terminal and it worked.
tommy404 - Antwort
I didn’t do this. Mine never auto-booted before I replaced the battery. Now it does.
hatuxka - Antwort
BEFORE YOU DO ANYTHING - CHECK THE BATTERY!
I-fixit sent me a bad battery, which I didn’t realize until it was already install. They sent me a new one, but I wasted hours uninstalling and reinstalled.
Get a volt meter and measure the voltage on the output of the battery pack. If it reads 0 V, SEND IT BACK. It should read over 2 V.
bcardanha - Antwort
I've just received my replacement battery and it reads 0,042V between the two main connectors. Do you think it's dead?
peter sussex -
When I did this from Terminal.app within Recovery Mode, the “sudo” was not recognized but I could invoke it without the sudo part. It seems to have been accepted when looking at “nvram -p”
johann beda - Antwort
When in Recovery Mode, you already have superuser powers. So you don't need to prefix commands with the sudo command to invoke them with root privileges; you already have them. Do a
pwd(print working directory) after opening Terminal in Recovery Mode, and you'll see that you're in the root user's directory.Ed Mechem -
I received the battery kit for my 2018 MacBook Pro and as per the above comment from bcardanha - Oct 12, 2021, I checked the voltage on the pads marked + and - . It was zero volts so I panicked a bit.
I sent a message on the iFixiT Facebook page and I got no reply. I finally found the customer service email for Ifixit Europe and sent them an email voicing my concern as I was not keen to work for couple of hours just to discover that the battery is faulty. I had an almost instant reply on the email (kudos to them) and they adviced me to go ahead and install the new battery as the voltage measured when battery is not connected is not relevant.
I took a leap of faith and after two hours… the new battery showed 50% charge and everything seems to be working just fine. I am happy it worked.
Mircea Comanici - Antwort
After removing the old battery and installing the new battery I powered up the MBP before screwing the bottom on. I discovered the my keyboard would not function. It took a few hours of investigation and frustration that I discovered the track pad power ribbon had become partially dislodged from the trackpad. I was able to see that this through the little machined slot where the battery sat. I had to remove the trackpad to reinsert the power ribbon back into the connector in the trackpad. after reassembling and reinstalling the battery etc the keyboard worked. Just food for thought if your run into the keyboard issue.
Ed Mease - Antwort
This should be the default. IMO I tell you to power on - not the lid.
G Sena - Antwort
Est ce que cela fonctionne sur un macbook pro 2017 sans touchbar ?
maël muzelet - Antwort
Bonjour Maël, oui, ce tutoriel concerne "les MacBook Pro 2016 (et plus récents) et les MacBook Retina 12" 2017 (et plus récents)"
Claire Miesch -
Excellent instructions. I was able to follow and install the new screen. I recommend that you get a good set of tools before you begin. I started with an inexpensive repair kit bought online. The Penta and torx bits failed. I bought an IFIXIT kit with quality bits and I was able to do everything I needed.
Tom Markham - Antwort
If you're not running an admin account the sudo command won't work (which honestly, you should not be running admin). Rather than logging in to your admin amount via the OS, in the terminal type "login [admin username]," then the password and you'll be able to do the sudo command as described above. Once you're complete, type "logout [admin username]" and you'll be good to go. Obviously replace [admin username] with whatever the account name for your admin user is.
arichard2401 - Antwort
For those unable to complete this step because the screen is too damaged I recommend leaving your macbook on until the battery dies.
Nicholas R Licato - Antwort
Just replaced my 2018 15" MBP battery. Running Sonoma.
I found no way to disable AutoBoot (The status can be checked in the Power section of system report).
Anyway, i left my battery completely drain before opening the MBP, and had no issues during the process.
Cédric Bontems - Antwort
After sending this command in terminal when I checked what happens if I now open the lid, instead the screen lit slightly up (still black) then a battery symbol showing the charging state showed up.
Now, after replacement of the battery, this is all I get to see.
No reset of NVRAM nor PRAM helped.
Currently the new battery charges (58% atm) and it feels like it‘s mocking me.
webrockers - Antwort
I suspected the keyboard or TouchID sensor wouldn’t work, so I went on and checked every connector.
I missed connecting the left TouchID sensor from step 31.
webrockers -