Einleitung
Diese Anleitung zeigt, wie die Festplatte deines MacBook Pro (13 Zoll von 2010) ausgetauscht oder aufgerüstet werden kann.
Vergiss nicht, alle Daten von der alten auf die neue Festplatte zu übertragen.
Was du brauchst
-
-
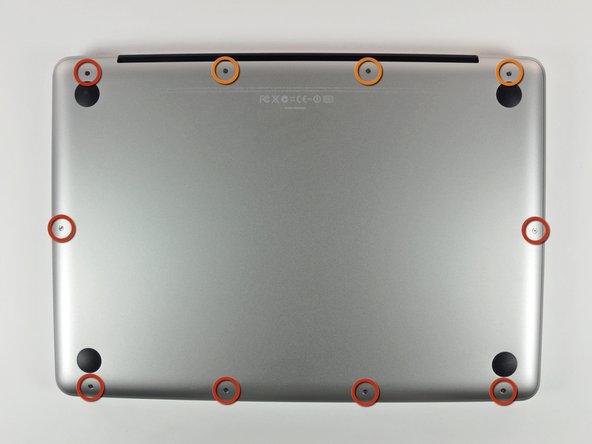
Entferne die folgenden 10 Kreuzschlitz-Schrauben, die die Gehäuse-Unterseite des MacBook Pro 13" Unibody befestigen:
-
Sieben 3 mm Schrauben.
-
Drei 13,5 mm Schrauben.
-
-
-
Hebe die Unterseite vorsichtig an und drücke sie Richtung Rückseite des Laptops, um die Halterungsclips zu lösen.
-
-
-
Löse mit der Kante eines Spudgers den Akkuanschluss nach oben, weg vom Sockel auf dem Logic Board.
-
-
-
-
Entferne die beiden Kreuzschlitzschrauben, die die Halteklammer der Festplatte am oberen Gehäuseteil sichern.
-
-
-
Hebe die Festplatte aus ihrer Halterung indem du an der Zuglasche ziehst. Achte dabei auf das Kabel mit dem sie am Computer angeschlossen ist.
-
-
-
Entferne das Festplattenkabel, indem du seinen Verbinder gerade aus der Festplatte heraus ziehst.
-
-
-
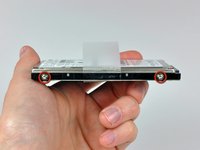
Entferne die beiden Torx T6 Schrauben auf jeder Seite der Festplatte, also vier insgesamt.
-



Um dein Gerät wieder zusammenzusetzen, folge den Schritten in umgekehrter Reihenfolge.
Rückgängig: Ich habe diese Anleitung nicht absolviert.
526 weitere Personen haben diese Anleitung absolviert.
Besonderer Dank geht an diese Übersetzer:innen:
100%


Diese Übersetzer:innen helfen uns, die Welt zu reparieren! Wie kann ich mithelfen?
Hier starten ›


15 Kommentare zur Anleitung
THANK YOU! I'm still on a high from repairing my husband's Macbook. It feels so nice to have two computers up and running again. You saved me nearly a grand, and made me realize how much I really did learn as a kid building PC towers with my dad.
Hi, I got the 1TB SSD Hybrid you have listed above. Regardless of what I try, my computer does not recognize it. It sees the 32GB flash drive I used for an install disk and it sees my USB external drive where I have the time machine backup. But it just can't see this drive. Is there any troubleshooting for this product? Thanks!
Hi Robbyglasco, Have you been able to fix the issue? I'm having the same problem :-)
lkaravis -
I know this is a long time after the event for both of you, but for others Im pretty sure that this will be that you haven't yet formatted the SSD in Disk Utility. Before you can reinstall from Time Machine you have to go into Disk Utility and format the SSD. You get to Disk Utility from the option screen after you have booted the computer with "Command and R" (cmd-R).
Thank you very much. This made the job much easier than it would have been if I had to figure it out for myself.
I replaced a 5 year old 320GB hard drive with a new 1TB hard drive. I first cloned the drive by attaching the new one via a USB dongle and running Carbon Copy Cloner. Then I booted the new drive via USB to confirm that it was properly cloned.
Then I followed the directions here. It took all of 15 minutes to do, because I knew exactly what to expect and had all the necessary tools on-hand. Your web site is an incredibly valuable resource. Thanks again.
