Einleitung
Folge dieser Anleitung, um ein defektes Trackpad zu ersetzen.
Was du brauchst
-
-
Entferne die folgenden 10 Kreuzschlitz-Schrauben, die die Gehäuse-Unterseite des MacBook Pro 13" Unibody befestigen:
-
Sieben 3 mm Schrauben.
-
Drei 13,5 mm Schrauben.
-
-
-
Hebe die Unterseite vorsichtig an und drücke sie Richtung Rückseite des Laptops, um die Halterungsclips zu lösen.
In the introduction you should link fixers to this excellent doc: https://www.ifixit.com/Misc/HD_Software_...
It is really critical, super easy, and free(!) to clone your existing drive onto the new one you will install. I ran into one error, but SuperDuper! support replied immediately on how to fix it...Thanks ifixit and SuperDuper! (I ponied up the $28 for the software anyway, I was so impressed!)
Long story short: I drank the AppleKoolAid back in 1984 and have always left the guts of my machines up to Apple - until recently when I needed to swap the SATAs from my original MacDaddy (2009 13" MBPro that I killed in 2018 - coffee + blackout = OOOOPS) into a pristine 2009 MBPro from a Goodwill in North Carolina through eBay. I need the files from iCal and MacMail that can't be opened in my newer machines.
Well . . . I ain't never done nuttin' like that, before!
Enter Luke Miani on YouTube. He raves about you guys! So, I watched everything I could, read your site, bought the right tools and at the ripe old age of 72, I sat down, this morning and did the work. Now my original MacDaddy lives in MacDaddy2.0.
Am I allowed to cry?
Seriously, I can't thank you enough for your bitchen site and killer tools. I wish I'd'a been turned on to this shizzle 30+ years ago.
IFIXIT - IDIGIT!
HAHAHAHAHAHAHAHAHAHA.
That was a brilliant read.
Yes, I came across ifixit a few years ago. Totally helped me out on several occasions.
Glad your Mac repair journey worked out.
:)
Cary B -
-
-
-
Entferne die folgenden zwei Tri-Point Schrauben, die den Akku an der Gehäuse-Oberseite befestigen:
-
Eine 5,5 mm Tri-Point Schraube.
-
Eine 13,5 mm Tri-Point Schraube.
Mine does not have triwing screws.... They have 5 points but none of my torx stuff works? What is it? I have one of your sets of 20 or so pieces and nothing works.....
pentalobe. its an apple specific driver to keep you out. The bottoms of the airs use this as well. You can fid one on eBay
Where in the world can I find a tri-point screw bit?
-
-
-
Löse mit der Kante eines Spudgers den Akkuanschluss nach oben, weg vom Sockel auf dem Logic Board.
use two spudgers, one of each side of the connector.
I used the nails of thumb and pointer finger simultaneously - worked pretty fine
-
-
-
-
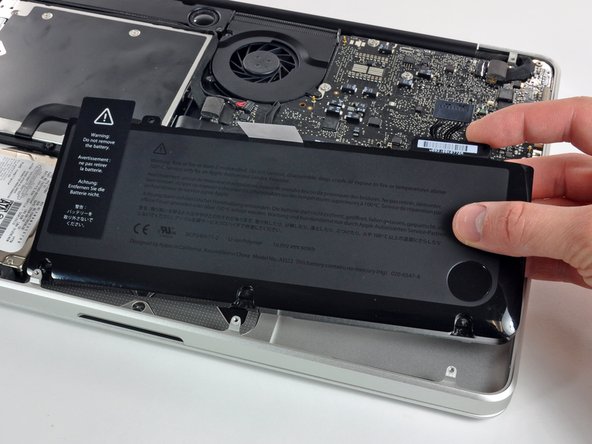
Hebe den Akku aus der Gehäuse-Oberseite.
-
Lade ihn auf 100% und lasse ihn mindestens zwei weitere Stunden am Ladegerät. Ziehe den Stecker und benutze dein MacBook normal, um den Akku zu entladen. Wenn die Ladeanzeige am Minimum ist, dann speichere ab und lasse den Laptop an, bis er von selbst ausgeht. Warte wenigstens 5 Stunden und lade dann ohne Unterbrechung auf 100% auf.
-
Wenn dir nach dem Einbau deines neuen Akkus etwas Ungewöhnliches auffällt oder Probleme auftreten, kann es sein, dass du den SMC deines MacBooks zurücksetzen musst.
Did everything correctly, but now the battery doesn't charge. Do I have to do something in particular to make it work now that's installed? Thanks
I am answering a 2 year old post but this is for those who may have the same or similar issue in the future.
When I was putting the battery connector back on that it didn't sit flat against the board before I put pressure on the top of the connecter to press it back into its socket. I then took time to examine the battery connector socket and saw it consisted of long thin vertical pins. I deduced that if the battery connector was not aligned correctly to the pins on the motherboard then it may be very easy to bend one or more of the pins in a way that they wouldn't mate up with the opposing female part on the connector. That sure would cause a battery charging issue. If you feel too much resistance when pressing the connector back into the socket then stop and make sure it is all aligned correctly. I know, not easy with the size, the black connector and black socket. A spudger can be used on the battery side of the connector to raise it to a level position prior to applying pressure to the top of it.
I too encountered the same problem. After resetting the SMC (http://support.apple.com/en-us/HT201295), it resolved the problem.
I put the battery in ok, then placed it on charge and tried to start it. It didn't like this at all, letting out evenly spaced unfamiliar beeps. I felt sure i had done something terrible. I held down the start button and turned it off. Half an hour later I turned it back on, upon which it sprung back to life, much to my relief. The battery needed to be charged before starting it seems.
Yes, you should charge your battery before using.
Cary B -
One important hint is missing: Don't tighten the two battery screws too much! I did, causing the new battery to press against the trackpad from below, thefore my trackpad wouldn't click well anymore. After opening the MacBook Pro again and loosening the two battery screws a bit, my trackpad is working well again.
-
-
-
Hebe vorsichtig mit dem flachen Ende eines Spudgers den Anschluss des Trackpads vom Sockel auf dem Logic Board.
In this photo, what are the two connectors immediately to the right of the track pad connector? I’ve scrolled this posting and can’t quite identify what’s what without totally disassembling, which I’m avoiding.
-
-
-
Halte das Trackpad an der Kante, die dem Logic Board am nächsten ist, mit einer Hand fest, und entferne die vier rot markierten 1,2 mm Kreuzschlitzschrauben.
A word of caution if you are replacing your trackpad due to a bulging battery. This guide assumes that the original mounting tabs are not damaged and it does not look like the iFixit trackpad replacement kit comes with new tabs. My MBP had a bulging battery, which pushed up on the bottom of my trackpad, deforming one of these tabs. Now that I have removed the battery, the trackpad still works, but it is not flush with the case and the physical clicks are not as responsive as I would like. Does iFixit sell just the replacement tabs?
Same here luckily the trackpad still works but the taps have deformed. Anyone find a place to pick up just those tabs? Edit: found them MacBook Pro Unibody (Mid 2009-Mid 2012) Trackpad Mounting Screws
iAndrewC -
Be careful with this step. The very tiny screws are very hard to remove with a #00 screwdriver. I tried with mine and I mashed the srews heads, it was then very very hard to remove it. Better to use a #000 screwdriver. If the heads are mashed like me, I suggest you use a 0.1 flat screwdriver, it worked well in my case.
I couldn't even begin to use the #000 as the edges were not deep or narrow enough for the condition of the screws from factory install. The .1 flat screwdriver worked like a charm though and didn't mess up the screws further at all. I was getting nervous that I'd need to get another screwdriver beyond what's in the iFixit toolkit, but this worked as a better solution.
I used a #0 screwdriver, and it worked fine.
TIP: Remove and insert the screws over a large, clear work surface. The slightest pressure off center an the screws will suddenly fly off and vanish.
-
-
-
Wenn notwendig entferne vorsichtig die Ecke das Trackpads neben der Tastatur aus ihrer Vertiefung im Gehäuse-Oberteil, indem du sie von den Klammern des Oberteils wegdrückst.
-
Drücke vorsichtig den Anschluss und das Kabel des Trackpads nach unten durch den Schlitz im Gehäuse.
-
Es könnte nötig sein, den Anschluss des Trackpads mit einem Spudger an der Ecke des Logic Boards vorbeizuschieben.
-
Wenn das Kabel komplett durch den Gehäuseschlitz gezogen wurde, ziehe das Trackpad weg vom Gehäuse-Oberteil und entferne es aus dem Laptop.
-
-
-
Um das Kabel vom alten Trackpad zu lösen, öffne erst den Verschluss des ZIF Verbinders. Dann erhitze das Kabel mit einem Fön oder einem iOpener, um den Kleber zu lösen und entferne dann vorsichtig das Kabel.
If your replacement trackpad comes with the cable separated and loose, the connection to the trackpad needs to have a tab pressed down which keeps the connection snug. It won't work without it. It's a tab on the trackpad part of the connection. Tab might be the wrong word; the connection has to be in all the way, then clamp it closed with the tab... oops! LOL
Tip: Getting the cable nicely through the slit to the top is much easier, if you take a tiny cable binder, form half a loop in that little space the cable has to come up and lift it gently with it.
-
-
-
Befestige als nächstes das Trackpad mit den vier 1,2 mm Kreuzschlitz-Schrauben am inneren Rand des Touchpad.
-
Prüfe die Ausrichtung des Trackpads im Gehäuse-Oberteil an der Seite der Tastatur. Wenn du das Touchpad perfekt im Oberteil ausgerichtet hast befestige die vier Kreuzschlitz-Schrauben wieder komplett.
trackpad still doesn't click. I've tried two separate parts.. but what makes it pop back up after depressing the pad? It just lays there. I've taken it apart four times to adjust the tork screw... nothing. HELP!
two options here :
_adjust the screw which control the deepness of the click
or
_the back panel put pressure on the battery which prevent the movement of the trackpad
My trackpad was driving me up the wall, bouncing all over the place. Ifixit Trackpad comes with extra screws, hinge and adjuster. You won't believe how tiny these screws are! If one falls in the carpet-it's GONE! Bless you Ifixit! To center when re-installing adjust by sliding a thin piece of paper (scotch tape?), under bottom of trackpad, let Trackpad rest on it's own weight and then tighten one top and bottom screw a little bit, and eyeball it, just the tiniest crack of daylight on each side. I strongly suggest the highest quality magnetic screwdriver you can find. The little torx screw disc is an adjuster. If too tight, trackpad won't 'click.' On a Mac, click is not really essential as long as tap and slide are working right. Needs a small amount of clearance. When properly installed you can 'feel' the click if it's right. Probably won't need to mess with it at all. Now my trackpad works like it should, I am a happy camper!
I replaced the trackpad with a new one: the arrow moves but was not possible to click. I putted back the old trackpad and it works with. The solution: the eleventh picture shown a gray Torx type screw to the left of the connector where there is the recess in the back of the mouse. This screw is used to increase or decrease the depth of clicks. in my case it was too screwed and it was as if I held continually pressed the truckpad: therefore, it was enough to loosen it. At this point I ask myself since in the old truckpad I had problems with the physical click, I probably would have been enough to adjust the screw.
Vielen Dank, dies hat mir sehr beholfen :-)
ifitit is once again amazing. My trackpad just stopped working on my four year old machine. Bought a new trackpad from iFitit, followed the guide and now I have a functional laptop again. One thing to note. 1.2mm is small very, very small. The screws for the trackpad *will* get lost if they fall of the table. Make sure that doesn't happen.
I was having trackpad issue on my 2010 machine, did the replacement from ifixit which arrived broken (bummer) but they replaced it no problems. It worked great for just under a year but now I'm having the same issues again of poor finger tacking, jumping, and lack of sensitivity. I've tried cleaning the whole unit, rebooting in safe mode, refreshing code, and anything else the web has provided. I'm starting to wonder if it's something else on my machine or if the trackpads just don't hold up well enough. Overall I'm super frustrated to have a newer pad crap out this early.
I don't have a magnetic head driver so I had a terrible time trying to get the screws in. I found getting the screw on the table Phillips side up, I pushed my finger tip into the head til it stuck and placed the screw into the thread that way. The screw stayed in long enough for me to tighten with the driver ! Oh, what a relief! I only lost one screw; thank god for replacement screws! Order your trackpad with screws! They fall and get lost easy! Now I'm happy! :)
Next time rub the tip of the screwdriver against a magnet about 10-20 times in the SAME direction (A fridge magnet works)
I installed the trackpad, but it was not behaving correctly. Took it apart again and reinstalled, using the 2 new foils that go under the trackpad keeper screws (my old ones were kind of mangled, probably from all the force I had to use on the old trackpad). I also made extra sure the trackpad was precisely lined up this time. Voila! A nice, sensitive new trackpad.
Thanks, iFixit!
I found it difficult to adjust the trackpad’s position so that it had just the same amount of space on every side to move freely when being clicked.
What worked for me was putting all four screws in - but a little loose as suggested - and then putting the button case back on (without screws) for protection. Turn the laptop in normal position, open it, adjust the trackpad, fix its position with one large strap of of easy to remove tape - approximately 15 x 4-5 cm e.g. masking tape.
This will hold the trackpad in position while turning the MacBook Pro around and tightening the screws.
Watch this Youtube, it shows an additional issue with the click mechanism pressure contact that may be causing the Track Pad to not register clicks. https://youtu.be/awihkz3aYkg
I installed my trackpad and am having trouble getting it to work properly. At first it wouldn’t click at all but I readjusted it and now I can use it mostly, but there seems to be small portions of the trackpad that don’t register my touch (mostly noticeable when I try to scroll with 2 fingers - it just wont). Can you give me some pointers?
Still having this same problem with no reply. I sometimes can’t use the zoom function on my laptop because the trackpad doesn’t recognize that I am touching it at all. In certain parts of it my touch is not being recognized. I have tried to readjust several times without success. Would love some recommendations if anybody has any.
bea -
I have followed every step of this guide, word for word, and my for some reason the new replacement trackpad is unresponsive. Any tips?
-


Arbeite die Schritte in umgekehrter Reihenfolge ab, um dein Gerät wieder zusammenzubauen.
Arbeite die Schritte in umgekehrter Reihenfolge ab, um dein Gerät wieder zusammenzubauen.
Rückgängig: Ich habe diese Anleitung nicht absolviert.
149 weitere Nutzer:innen haben diese Anleitung absolviert.
Besonderer Dank geht an diese Übersetzer:innen:
100%


Diese Übersetzer:innen helfen uns, die Welt zu reparieren! Wie kann ich mithelfen?
Hier starten ›

10 Kommentare
Bought a new trackpad, installed it, fiddled with centering it, loosened the click adjuster screw and it would hardly click if I pressed real hard, just like the old trackpad. Problem solved by putting two 1/32" thick sticky pads under battery where the battery sits on the macbook frame near the lower bottom edge. The battery was new and not swollen but is was still too thick. Didn't need the new trackpad but now I have a spare.
The removal and installation went exactly as described, and the new trackpad worked correctly the first time. The toughest part - truly, not all that difficult - was manipulating the four screws that hold the trackpad in place. I don't think I've seen such small threaded fasteners since I went to a watch museum!
Would a swollen battery cause the track pad to seemingly pop out of the top of my 2010 MBP? Right side of trackpad is lifted the worst, top is slightly raised. The four corners and left side are seemingly flush with the rest of the computer. Trackpad works fine, other than no click...still has perfect movement.
That is indeed a common symptom of a swollen battery, you can pop the rear case off of your laptop and peek at the battery, and even take it out for a moment, if it looks swollen, you should probably replace it.
Thanks so much for the suggestion Sam! Checking it out today.
Great breakdown of replacing trackpad. Mine stopped clicking. At first thought it was my battery, but when I opened my laptop, I realized my battery was not swollen. Decid d to replace the track pad to see if it was faulty. Followed your instructions and got it done in 10 minutes and my trackpad working perfectly. No issue at all with the install. Glad I chose to do it instead of giving it to Apple for a week and playing so much money that really only cost me the price of the replacement. Thank you so much.
Good repair guide, nevertheless, if you’re swapping your trackpad because you lost the ability to click, consider first that your battery may be aging and expansing its volume which no longer allows the “click travel” correctly. And therefore the trackpad is not the issue but the battery is.
Very good repair guide. After changing the battery i found the trackpad not very well responding, even by hard pressing. But before swapping the trackpad try adjusting the pentalobe screw which is the counterpart to the clicking notch at the bottom of trackpad.
Nevertheless, a 11 yo macbook is back on track…..!!!!
Compare the short screws carefully before reinstalling them. The shouldered screws go in the holes on the front edge.
David Kilbridge - Antwort
Before I started removing any screws I took a piece of paper and drew the bottom of the laptop and put a piece of double-sided tape in the spot where each screw goes. That way when I took out the screws, I could put them on the tape so I knew exactly which screw went in which spot. I did the same thing for dismantling the inside on another sheet of paper, then a third sheet for the screen after getting the front glass off.
mastover - Antwort
I use a similar technique: I print out the iFixit manual for the job, and Scotch-tape down the screws/brackets/cables I remove at each step next to the component descriptions. That way, when I'm reassembling, the bits are taped right next to the photo of where they came from.
adlerpe -
That's exactly what I do for all my repairs! It's the best way to keep track of all of the parts ' original location and to make sure that you don't miss any parts during reassembly.
joyitsjennie -
Great idea and one I use often
Thomas Overstreet -
Excellent idea! Thanks for sharing it here.
Laura Sharkey -
I used a 00 that fit but the screws were very tight so I used a tiny paintbrush with some wd40 on it and put it around the edges of the screws. Worked like a charm
valentinedhdh - Antwort
I use a magnetic mat and place the screws in order on that :)
Cary B - Antwort