Einleitung
Benutze diese Anleitung, um den eingeklebten Akku mithilfe eines iFixit Kits mit Klebstoffentferner risikofrei aus deinem MacBook Pro zu entfernen. Der Klebstoffentferner weicht den Kleber auf, mit dem der Akku befestigt ist, und erleichtert so den Ausbau des Akkus.
iFixit Klebstoffentferner ist entzündlich. Arbeite bei dieser Anleitung in einem gut belüftetem Bereich. Rauche nicht, und arbeite nicht in der Nähe einer offenen Flamme.
Um das Risiko eines Schadens zu verringern, solltest du dein MacBook Pro anschalten und den Akku komplett entleeren, bevor du mit dieser Reparatur anfängst. Ein geladener Lithium-Ion-Akku kann zu einem gefährlichen und unkontrollierbaren Feuer führen, falls er versehentlich perforiert wird. Wenn dein Akku aufgebläht ist, musst du entsprechende Vorsichtsmaßnahmen treffen.
Hinweis: Das Lösungsmittel, dass zum Aufweichen des Klebers am Akku benutzt wird, kann manche Kunststoffe angreifen. Folge den Anweisungen genau und passe auf, wo du den Klebstoffentferner aufbringst.
Was du brauchst
-
-
Schalte deinen Mac ein und starte Terminal.
-
Kopiere den folgenden Befehl und füge ihn im Terminal ein (oder tippe ihn exakt so ein):
-
sudo nvram AutoBoot=%00
-
Drücke die Eingabetaste [return]. Wenn du dazu aufgefordert wirst, gib dein Administratorpasswort ein und drücke erneut [return]. Hinweis: die Return-Taste kann auch mit ⏎ oder "enter" gekennzeichnet sein.
-
sudo nvram AutoBoot=%03
-
-
-
Schließe das Display und drehe das Laptop um.
-
Entferne die sechs Schrauben, mit denen das untere Gehäuse befestigt ist, mithilfe eines P5 Pentalobe Schraubendrehers. Die Schrauben haben folgende Längen:
-
Vier 4,7 mm Schrauben
-
Zwei 6,6 mm Schrauben
So this need to replace each and every screw in its exact former position explains exactly the excruciating difficulty I am having in getting the set of four shorter screws screws back in after everything else having gone successfully. Wanna scream at the top of my lungs. Maybe this point needed to be made in all ALL CAPS and BOLD for me. So can I still just start over trying each screw in each hole or have I messed up the threads in trying to screw in screws mismatched to their holes?
The front screws are at a slight angle, pay attention when putting them back!
I did not have the magnetic project mat, but instead I stuck loops of blue painter's tape on the table, wrote the step number on them in sharpie, and stuck the screws/covers for the corresponding step on them.
-
-
-
Setze einen Saugheber zwischen die Schraubenlöcher nahe an der Vorderkante des unteren Gehäuses auf.
-
Hebe den Saugheber gerade soweit hoch, dass unter dem unteren Gehäuse ein kleiner Spalt entsteht.
-
-
-
Schiebe die Ecke eines Plektrums in den eben entstanden Spalt unter dem unteren Gehäuse.
-
Schiebe das Plektrum um die nächste Ecke und dann bis zur Hälfte der Seitenkante des MacBook Pro nach oben.
-
-
-
Wiederhole den vorherigen Schritt auf der gegenüberliegenden Seite, um mithilfe des Plektrums die zweite Klammer zu lösen.
-
-
-
Hebe die Vorderkante des unteren Gehäuses (die Kante gegenüber vom Displayscharnier) gerade soweit hoch, dass du deine Fingerspitzen darunterschieben kannst, um das Gehäuse zu fassen.
-
-
-
Ziehe das untere Gehäuse fest nach vorne (weg vom Bereich mit den Scharnier), um die letzten Klammern zu lösen, mit denen es befestigt ist.
-
Ziehe zuerst an der einen Ecke, dann an der anderen.
-
Du musst wahrscheinlich ziemlich kräftig ziehen.
I found it easier to insert a screwdriver through the hole (not too far down), and use that to pull sideways, as it was hard to get a strong grip with my fingers.
If you have a black stick, or a nylon probe tool, you can insert it at the back at the point closest to the screw holes, and use that to push the lower case forward. I’ve seen this help me quite a few times, and it makes it quite easier.
I like adrianbrown's suggestion. Spot on!
Its difficult if the side catches arent released properly, check them again if it seems too much.
I snapped one of the spring loaded logic board grounding pins. Take your time. Leverage from the back in order to push it out versus pulling on it.
Take the opening pick and stick the edge down behind the hinge all the way to one side, so it is perpendicular to the case, and give it a twist. That end should pop free. Do the same on the other side and there you go.
This step requires a lot of force to slide the back cover away. Make sure you get a good grip of the mac body and of the back panel.
I literally cut myself with the bottom case, when it finally got freed from the upper case. I have opened a lot of macs, phones, and other items in my life, this was a first. Some light duty cloth gloves next time.
I didn’t understand some suggestions above. Tried Indawg Wetrust but didn’t really get it. Now looking back, it means use the pick just on the tiny lip of the cover, close to the hinge. Not on the antenna, but just on th slip of metal I believe. If that can help others.
-
-
-
Entferne das untere Gehäuse.
-
Setze das Untergehäuse an seinen Platz und richte die Gleitklemmen nahe am Displayscharnier aus. Drücke es nach unten und schiebe die Abdeckung in Richtung Scharnier. Sobald die Klammern eingerastet sind, kann es nicht mehr weiter geschoben werden.
-
Wenn die Gleitklemmen ganz hingerastet sind und das Untergehäuse richtig ausgerichtet aussieht, kannst du es fest nach unten drücken, damit die vier versteckten Klammern einrasten. Das solltest du hören und spüren können.
I am doing a battery replacement for a client on this model. The battery has swollen more than I have ever seen before on a Mac! Roughly a ½” higher, once cover removed. Cover was so tight that one screw stripped and had to drill out one screw after trying everything else! Fortunately, I’m an exmechanic/machinist and I own a full size drill press! None of the screw extraction tools sold by ifixit worked or were applicable until I finally got the cover off. Then the small screw pliers from Japan were easier to use than anything else I own. My tools are mostly for larger nuts, bolts and screw extraction. Possibly a mini hammer driver screwdriver would work if one could be made small enough for tiny screws! Ross
-
-
-
Löse die große rechteckige Abdeckung über der Akku-Platine an der Kante des Logic Boards, die dem Akku am nächsten ist, ab und entferne sie.
-
Falls sich die Abdeckung nicht leicht ablösen lässt, kannst du sie mithilfe eines iOpeners, eines Föns oder einer Heißluftpistole leicht erwärmen, um den Kleber darunter aufzuweichen, und es dann erneut versuchen.
What is the though behind this step? I have replace my trackpad before, and I did not do this step. At the time, there was no guide. As a result, I’m wondering how this changes/or if it is necessary for the repair process.
It’s necessary in order to disconnect the battery. Always disconnect the battery before making repairs.
I found my one of my fan making some noise, when open the bottom of my Mac I see this piece floating over the fan. Trying to put it back where it goes but don’t seem to stick anymore and move around. Does this piece is really necessary or I can simply remove it or order a new one from you?
It should be pretty easy to reattach. Put a dab of rubber cement or a bit of double-sided tape on top of each of the screws underneath the cover, press the cover down, and close up your MacBook. It should stay put. Don’t use superglue or anything else that will harden over the screw heads and make it impossible to fit a driver in there later.
Do you know if this piece is necessary. I lost mine.
My Macbook doesn’t appear to even have this piece.
This cover is not attached to anything critical underneath, so do not be afraid that you can break anything like pulling anything from the mainboard. Just pull it out. To reattach, I removed the old double side adhesive tape and replaced with fresh one.
-
-
-
Löse das Klebeband über dem Stecker des Akkuplatinen-Datenkabels ab.
The replacement battery did not come with the “tape” in this cable so it was very difficult to reinsert the cable into the zif socket. Now I can’t get the replacement battery to charge.
I have the same issue, My battery is not charging. Did you figure out how to get your battery to charge?
In my case, the original replacement was faulty. iFixIt sent an RMA without hesitation, and I am happy to report that the new one works fine. But also recheck this step and steps 13/14.
J D -
Note that the tape covering that comes on the OEM battery is not included in the battery sent from iFixIt. I removed it from the old and attached it to the new, but it does not “re-stick” very well, so it’s rather difficult to re-insert. Be careful, the ribbon is fragile.
I broke the locking flap! Also, my original tape lost its stickiness as well. I cut out a small piece of electrical tape to keep the cable snug in place. Also will work to keep it secure since I broke the locking flap.
I was able to reinsert the cable easily a number of times with the nice Ifixit angled tweezers as the ziff connectors tiny latch came off! I ended up using a bit of Pliobond 25, contact cement to mke sure the data cable doesn’t move. A future repair will just pull off or at most need an xacato blade knife to slit the rubbery cement. Ross
REALLY important. You need to really pull this back in snug for things to work when you reassemble.
I didn’t seem to have any tape covering it, I just proceeded to the next step
My battery board connecter is broken. Let me know where can I get these cables.?
I recommend to just lift a little the right end (end of the cable side), then keep the socket in place with a spudger while removing this adhesive tape, to avoid any accident like ripping off your socket. With a little care, it is safe and easy to remove completely.
-
-
-
Heble den Sicherungsbügel auf dem ZIF-Stecker des Akkuplatinen-Datenkabels vorsichtig mit einem Spudger hoch.
Mein Sicherungsbügel ist abgebrochen, oder zumindest nicht mehr auf dem ZIF-Stecker. Ist dieser Sicherungsbügel sehr wichtig, oder kann ich das Kabel dennoch zurück stecken?
Hallo Fabio, wahrscheinlich wird das Kabel ohne den Bügel nicht mehr halten. Das Zurückstecken geht, aber es bleibt nur sehr fragil drin.
My zif connector was already open. It apparently never got closed during manufacture. Being so tiny this made it difficult to see why there was nothing to pry up with the spudger. Once I put my finger on top of it I realized the flap was already verticle.
I had no issue here but I recommend to use a second spudger to keep the rest of the socket in place while GENTLY lifting the lock. It should lift without effort.
When putting it back, be careful, there might be a little piece of transparent adhesive foil on top of the socket, gently lift it up on the side of the cable. The cable should slide in easily, but do not force it. About 0.5mm of the cable contacts will be VISIBLE on the left side, when the cable is fully it, do not force it more than that.
コネクタのプラスチックが割れたのですが、代替品を教えてもらえませんか?
-
-
-
Trenne das Akkuplatinen-Datenkabel, indem du es aus seinem Anschluss herausschiebst.
-
Schiebe es parallel zum Logic Board in Richtung des Kabels.
If this breaks, what’s the risk to the computer?
I tried powering mine on after my zif connector socket broke. It made bad electrical noises. I had water damage at one point and cleaned the unit very well but never replaced the battery. Through excesive, a hot and bad battery, or water damaged weakening the area mine came right off with the tape when i peeled it up. Im working on finding the part and will attempt to solder it back. Of course i still need a battery which ours was swollen. After water damage it worked great for over a year though.
Mine broke and now the Macbook will not power on, this was after a battery replacement, the Macbook powered up afterwards, but after transporting it, it would not power up. I removed the back cover and noticed the battery board cover was missing and the zif gate for the battery data connector was half off.
Same here, I broke the cable which was soldered on the mainboard. I tried to hold it on place with a tape, but I couldn‘t charge my macbook though. Then I tried to solder it and I also failed. I wish I had read the comments before :/
I couldn‘t find the fpc 6 pin connector with 0,5 mm grid. However I managed to connect the flex cable directly on the mother board with 0,3 mm isolation filament! It was tough but I‘m so happy that it works again :)
Would you be able to give a little instruction on how you were able to make this work? I’m super curious and need a solution to the same issue.
Tim -
Surprised by the tolerance of this little connector to my mistake of not flipping up the not very noticeable clamping element on side opposite to where the contact tip is inserted. The contact tip pulled right out without having done that. Saw in a video I should have done that before pulling the contact tip out. Remembered when reinstalling it.
The cable is stuck on the board underneath with adhesive, so it is best to first work it a little from left under (as the picture is oriented) in order to break the adhesive, and then pull it sideways. At all times, I kept the socket safe with a spudger to avoid ripping it off the board. The cable will come out with a little effort. Remember, it is the socket you need to take care of, not the cable (the cable will be thrown away with the old battery).
I had issues in reassembly - the lever for the ZIF socket was missing. I think it came off with the tape. I found the lever, but it was way too small for me to reattach (I couldn't hold it well enough with the tweezers and wasn't sure where the hinge pins went).
The computer did not recognize the battery or recognized it with errors (if I got the cable just right) without the lever.
My solution was to cut a tiny bit of electrical tape and put it on the back of the ribbon cable to make it thicker. This gave it enough traction to stay in the socket and pushed the ribbon onto the contacts.
-
-
-
Entferne mithilfe eines T5 Torx Schraubendrehers die 3,7 mm Flachkopfschraube, mit der der Akkustrom-Stecker befestigt ist.
-
-
-
Hebe den Akkustrom-Stecker vorsichtig mit einem Spudger hoch, und trenne so den Akku.
wondering if i didn’t heed this warning close enough. mac not powering on. only black screen with battery and lightning bolt beneath it. What happens if this connector makes contact?
im in the exact same boat right now.
Was everything okay in your case?
Same here until I realized that I never reconnected the tiny power button/Touch ID connector in step 31! It’s underneath the headphone cable jack from step 30. Mine was hiding under the board and I carefully fished it out with a tweezers.
ajm0824 -
I have the same issue. Followed Instructions to theT. Battery is connected properly as it fully charged however, it will not power on. If i disconnect the battery and connect the power adaptor, it powers on. How did you resolve your issue?
Ian Duff -
Hi, did you manage to fix this? Ive got the same issue sadly.
Same problem, any solution?
Lifting up to about 75 degrees is more that enough and safe, and I did also use some electrical tape to block the contact. When this goes back, there is no socket in place, it is just the screw that keeps it there.
-
-
-
Entferne mithilfe eines T3 Torx Schraubendrehers die beiden 1,9 mm Schrauben, mit denen die Abdeckhalterung des Trackpad-Kabels befestigt ist.
-
Entferne die Halterung.
T3 doesn’t seem to fit, somehow on my a1707 the driver doesn’t grip and it just slips on the screw.
What am I doing wrong?
I don’t have a T2 to try, what can I do?
I managed to get a holt of a T2, but still no luck: there are a bunch of screws that seem to be T2 but everything I stick inside them just spins around and doesn’t grip :(
T4 worked perfectly
Indeed, a T4 worked for me, also.
-
-
-
Benutze einen Spudger, um das Trackpad-Kabel zu trennen, indem du seinen Stecker gerade vom Logic Board hochhebelst.
I managed to pry the metal bit with screw holes off first. Whoops.
Make sure the spudger goes under the entire plastic connector, not just the surface metal place, as you risk damaging it like the comment above.
If you get to this point and realize that the connector isn't lining up quite as perfectly as you hoped, don't panic. Open up the lid enough to get a couple fingers under the trackpad to support it. Use your T5 to loosen all of the trackpad screws JUST A COUPLE TURNS not all the way. It will flex around a little bit in the housing and give you some slack if you need it. Then just tighten it all back up again.
-
-
-
Erwärme das Trackpad-Kabel leicht, um den Kleber aufzuweichen, mit dem es am Akku befestigt ist.
-
Du kannst einen iOpener, einen Fön oder eine Heißluftpistole benutzen, achte aber darauf, den Akku nicht zu überhitzen. Das Kabel darf sich nur warm, nicht aber heiß anfühlen.
I used a hairdrier. Barely needed to hold it there for 20 seconds before I could peel it off.
Just warming it gently made it easy to peel off. Work with care starting from the free end, lift a little, move your grip, etc. Do not lift it all at once, there is a risk of breaking it. It is safe to then move it at 180 degrees angle, completely on the other side.
All my battery packs were swollen. The trackpad ribbon cable was barely adhered to this battery pack. No heating necessary.
I didn't need to heat the ribbon, I carefully peeled it back without putting to much pressure on it. I can however, if the adhesive is stronger than on my computer, to warm it up slightly.
-
-
-
Löse das Trackpad-Kabel vorsichtig vom Akku ab und schiebe es aus dem Weg.
thin ifixit pick opener sliding gently/slowly underneath ribbon cable towards the front edge of mbp did the trick for me. no need for heat.
In my case the sticky part of the track pad ribbon remained on the battery. So after replacement the trackpad ribbon does not have a sticker to stay on the battery.
Did it work all right without the adhesive there?
That happened to me too! I thought that was what was supposed to happen, until I read your comment. I managed to peel it off the battery, but before I could catch it it rolled up into a tight ball. I got about half of it unrolled and onto the ribbon.
rileybk -
Since this step you can skip the part with removing the trackpad and logic board and just remove 7 screws (step 47, except green and blue) holding the logic board so you can lift it for a few millimetres just to take off the battery. You can find a YouTube videos where a guy is replacing the battery very easily. So waste of time and a lot of places to screw up you MacBook doing it this way.
This comment and that YouTube video saved me a lot of time - thanks!
Note that there are 8 logic board screws to remove excluding green and blue (now on step 46) and battery board screws are on step 50; the rest of these steps are irrelevant, making this a very easy replacement.
Max Z -
My logic board has 9 screws. Each fan has 3 plus the other three in the blowup. Total waste of time and effort to remove the logic board when it can be tilted up to remove the battery. As stated, no need to remove the trackpad either.
F#%K Apple for making this a difficult job when the batteries were just screwed in before. Absolutely no need for such difficult glue and hiding cables apart from sheer bastardry!
Jack -
-
-
-
Benutze einen T5 Torx Schraubendreher, um die 13 Schrauben zu entfernen, mit denen die Trackpad-Einheit befestigt ist:
-
Neun 5,8 mm Schrauben
-
Vier 4,9 mm Schrauben
Using a piece of cellophane tape can help hold the trackpad in place with with proper clearance all around.
-
-
-
Klappe das Display ein wenig auf, aber lasse das MacBook immer noch umgekehrt liegen. Die Trackpad-Einheit sollte sich lösen und flach auf dem Display aufliegen.
-
Ziehe das Flachbandkabel des Trackpads vorsichtig durch seinen Schlitz im Rahmen.
WARNING - READ THE NEXT STEP NOW OR YOU WILL LOSE THE WASHERS. Please update this with BIG RED LETTERS in the step to indicate what is about to happen, or you’ll skip forward and the washers will fly everywhere. I’m really upset right now.
Merci beaucoup vous venez de me sauver
-
-
-
Achte beim Entfernen der Trackpad-Einheit darauf, nicht die neun kleinen Metall-Unterlegscheiben auf den Schraubpfosten zu verlieren.
-
Entferne die Trackpad-Einheit.
They are not kidding about the jumping washers.
Pro Tip: put your magnetic mat under the trackpad as you slide it out to catch the tiny washers. Alternatively, a magnetic tool bowl, or a terry cloth towel so the lighter guys can’t get far if they fall.
Mine are made of aluminum or stainless or something that magnets don't attract. Flypaper, maybe? :-D
dgatwood -
Can I change the battery with out removing the trackpad and logic board?
yes
I did it, you just have you remove enough screws on the board to bend it upwards in order to pull the battery frame that’s it…
my mac is working fine
a m -
yep lost a washer in the process
One of the washer remained stuck on the body, luckily I observed it on the working table when I cleaned the dust from the trackpad casing area. Be VERY careful to not loose these tiny metal pieces!
Without the washers the clicking and moving mouse around doenst work well. very important
Ok, I have all but 1 round washer. I found the rest. Not knowing a source (not even in my extensive parts collection) I will reassemble with the middle one without a washer. If anyone knows of a parts source (other than buying a trackpad assembly) please post here, Thanks.
When you put the trackpad to the side, write a note and put it on top so you don’t forget about the washers when you come to reassemble it.
I used a clean paint brush to dust off the back of the trackpad and internals. One of the round washers flew out of the assembly and got lost. The washers are super easy to lift off the posts. BE VERY GENTLE WITH THE TRACKPAD REMOVAL AND HANDLING!
This needs to be moved WAY up higher. You are 100% guaranteed to lose one by the time you start the previous step, because the trackpad will fall the microsecond you start to open the case. Really, you shouldn't remove the last screw until you're holding the trackpad from underneath.
Also, the battery replacement kit should really come with at least one extra washer, because I can pretty much guarantee nobody will ever do this without losing one. It is darn near impossible to deal with something that lightweight. Even putting the trackpad down on the counter is enough to lose one, much less having it drop out of the bottom while you're cracking open the laptop.
I found it, and it wasn't in a place you might expect. There's a bit of metal trim on the back of the trackpad itself, and the washer was underneath that. I actually had to dump all the washers out onto the bottom case, and suddenly it peeked out from under the metal rim. Worse, these things are aluminum (or maybe metallized mylar), so you can't pick them up with magnets....
It might be a good idea to put some masking tape on the trackpad to hold it in place so that it doesn't drop out when you open the lid. Then very carefully press it down from the underside with a spudger after you have opened the lid fully and have your hand under it to catch the trackpad so that it doesn't suddenly drop.
dgatwood -
Pro tip: During reassembly, put the plastic backing from the battery down on top of your display, put the trackpad upside-down on top of that, and slowly close the top case down onto it, working the cable through the slot. Then, when it is almost fully closed, use the plastic backing to maneuver the trackpad into position so that the pins line up.
Be careful when you remove this touchpad! I followed every step from the instructions provided here and also checked some video tutorials on YouTube from time to time. Everything went well after swapping the battery, at least that's what I thought. When I started the computer, unfortunately, my keyboard and touchpad didn't work, and the fans were very loud. I used an external keyboard and mouse, searched online for the problem, and tried some solutions such as PRAM reset, but nothing worked. Anyway, I opened the computer again and found that the end of the cable attached to the touchpad was loose. After putting it back in place, everything worked flawlessly.
I had the same problem as Mercan. The touchpad and keyboard would not work. The cable on the back of the touchpad had a partial open on the connector. The only thing I can add is the connector on the back of the trackpad has a lever that must be raised, the the cable inserted and closed. (Just like the data cable on the system board) BIg shout out to Mercan. Thanks.
Dwight
-
-
-
Benutze einen T3 Torx Schraubendreher, um die beiden 1,9 mm Schrauben zu entfernen, mit denen die Abdeckhalterung des Tastatursteckers befestigt ist.
-
Entferne die Halterung.
I’m just curious - why did the entire logic board have to come out in order the replace the battery? It seems like after the trackpad you could skip to battery removal. Is it to protect the board? Thanks!
Yeah this is where I stopped and said, wait, you have to remove the entire logic board?
So I looked around for more tutorials and indeed, it is not at all necessary. You just need to remove a few of the board's screws, enough to lift the board up and slide the battery cables out. That is all. This tutorial is way way overcooked.
Here you go:
I am also wondering if it is necessary to remove the logic board. I’m just looking to remove a leaking battery from my macbook pro and safely discard of it while I get a replacement as it is releasing some chemical smell which I assume must NOT be good for one’s health.
As far as I can tell there is a part of the battery that is below the logic board. It’s the thin black stripes next to the battery pcb on either side. You can see it after the logic board is removed on step 50.
Absolutely correct. No way to skip the steps.
Please, elaborate.
Because the one small cable to the right is the battery data cable, it's been disconnected in step 10 and then presumably comes out with the battery (there's no indication it is glued nor instructions to unglue it by heating it and it doesn't look like it is UNDER the logic board) and the only cable that is UNDER the logic board is the keyboard cable, whose connector gets disconnected in next step but needs not being further removed.
I can't imagine all these risky actions (both when disassembling and reassembling are actually needed!
Actually, a T4 Torx driver works perfectly.
T3 stripped mine, should have used T4. Screw Extracting Pliers to the rescue.
Hands up everyone that’s never buying an apple product again?
Hah yep never again.
I can confirm that the logic board removal is mandatory, because two battery connection cords are under the logic board and cannot be removed otherwise. Even if that would be possible by cutting them, it is not possible to install the new battery anyway.
Thanks for your hands-on feedback Cristian.
Would you please elaborate? Which "two battery connection cords?" What I see in step 50 are the keyboard cable (which needs not removing) and the battery board cable, whose connector has already been disconnected (step 10) and comes out with the battery, because new battery shows the cable (and the board).
the cables CAN be slid out with slight upward pressure on the loosened logic board. There is no need to remove it entirely.
Marc -
I'm about to try this again. My MB Pro late 2016 has had three battery replacements so far.
The first one went fine but found the battery cable receptacle had poor solder joints on it and was repaired by Luis's shop in NYC - bit thank you to those guys. They did the last battery swap too as I was too busy to try it myself.
Now my battery shows full but has zero capacity so going to replace it once again.
I've never removed the logic board to do the replacement of the battery! I simply loosen the retaining screws on the logic board and very carefully slide the cable past the interference and Voila it's out and in. Of course, be very careful doing this so you don't warp the board much.
I'll post the post battery stuff here once I do this for the 4th time.
-
-
-
-
Trenne die Tastatur mit deinem Spudger ab, indem du ihren Stecker gerade vom Logic Board hochhebelst.
Again, make sure you pry from underneath, not only the metal plate. Goes off easily and then it also gets back easily when putting it back.
Don't do what I did :( When I reinstalled the logic board and bolted down everything, I realized I didn't pull keyboard cable connector through and was stuck underneath the board. Rather than taking the time to disconnect all the cables and unbolt everything to carefully pull the cable back through, I unbolted only left side and attempted to pull cable through using tweezers. I tore the cable which is very fragile. This ultimately disabled my keyboard. Hopefully, people will read this and will not happen to anyone. If it does, the cable can easily be purchase from Amazon for $6. The cable that worked for me is part #821-00612-04.
-
-
-
Benutze einen T3 Torx Schraubendreher, um die beiden 3,5 mm Schrauben zu entfernen, mit denen die Abdeckung über dem Flachbandkabel der Displayplatine befestigt ist.
-
Entferne die Abdeckung über dem Flachbandkabel der Displayplatine.
-
-
-
Benutze einen T3 Torx Schraubendreher, um die beiden 1,7 mm Schrauben zu entfernen, mit denen die Halterung für den Kabelstecker der Displayplatine befestigt ist.
-
Entferne die Halterung vom Kabelstecker der Displayplatine.
This appears to be a T4 not a T3
They are definitely T3 ;) But not all driver kits are created equal. If your T4 works better for you, go with that.
I concur the the T3 didn’t work, T4 worked great.
't4'나사에 전해 맞습니다.
The bracket of the display board connector in my case is glued. So wasnt able to remove it.
I also found a T3 to be too small and T4 too large. I skipped this step and was able to complete the installation by using this connector (still secured by the screws I couldn’t take out) as a hinge to carefully lift the logic board up when needed. I ended up not requiring any of the adhesive remover liquid to remove the battery; just heat from a hairdryer and elbow grease to slide the cards under each cell. Laptop working perfectly again now with this new battery.
I used my T3 on my 2017 but I had to press a bit harder to get these to unscrew.
-
-
-
Heble das Flachbandkabel der Displayplatine gerade mit einem Spudger nach oben, um es abzulösen.
When putting it back, I did not notice any “click”, but it was definitely secured in place. Just do not overpress it expecting the “click”. It fits back easily.
-
-
-
Benutze einen T3 Torx Schraubendreher, um die beiden 2 mm Schrauben zu entfernen, mit denen jede Scharnierabdeckung befestigt ist (insgesamt vier Schrauben).
-
-
-
Entferne die beiden Scharnierabdeckungen.
Mine were aged and cracked, too.
-
-
-
Benutze einen T3 Torx Schraubendreher, um die beiden 2,4 mm Schrauben zu entfernen, mit denen die Abdeckhalterung für die Kabelstecker der Touch ID und der Kopfhörerbuchse befestigt sind.
-
Entferne die Halterung.
Again, a T4 worked here, not T3.
't4'나사에 전해 맞습니다.
T3 worked for me. MBP 2016.
I only had the bottom screw of this pair to remove. The other is missing,
The top screw of the cover bracket screws into a larger bottom screw. You need to keep that bottom one separate from the others as it is the only one that has a hole for the top screw.
Thank you Bob Donovan! I got already confused
-
-
-
Trenne das Kopfhörerkabel, indem du seinen Stecker gerade vom Logic Board hochhebelst.
Be very careful with this connector, pry from the bottom of the body, not from the side of the fan, as there is the next connector under it. Just be gentle and patient. Lifting it up to about 100 degrees is safe.
I ripped it. Game over. Is it?
-
-
-
Trenne den Sensor der Einschalttaste und der Touch ID, indem du seinen Stecker gerade vom Logic Board hochhebelst.
Pry this from the fan side (right side of the body) and be VERY careful, the cable is extremely thin. Lift it up gently under the previous cable. When putting it back, just work gently, it will snap easily into place if positioned correctly. Do not force it back.
On the reassembly this was a crucial part I have forgotten.
Without this, and NVRAM autoboot disabled my MBP wouldn’t start up and only show me the battery state.
-
-
-
Benutze einen T3 Torx Schraubendreher, um die 1,3 mm Schraube zu entfernen, mit der die Halterung für den Stecker des Touch Bar Digitalisierers befestigt ist.
Screw was stipped. I had to cut a flathead slot in the head with a Dremel cutting disk. It then came out OK.
My screw here was or became stripped just like Nicks. However, I didn't use a dremel or anything else to make a cut. I left the screw in and when the board was removed and started the adhesive removal, I layed the board over and supported it. This worked fine but keep a look out so that the ribbon isn't stretched. Assembled back without issues
-
-
-
Schiebe die Halterung mit einer Pinzette zur Seitenkante des MacBook Pro, bis sie aus der geschlitzten Haltelasche auf dem Logic Board heraus ist.
-
Entferne die Halterung.
When replacing the bracket make sure to loop it through the metal flange so it stays secure.
Lift it gently on the left, 10 degrees, then slide it to the right so that it is freed from the metal strip holding it from under the logic board. It will be obvious how to put it back once you have it out, it has a small cut on the right that has to go first in the metal strip from under the board, then let the left side down.
-
-
-
Trenne das Kabel des Touch Bar Digitalisierers, indem du es gerade vom Logic Board hochhebelst.
-
-
-
Benutze einen T3 Torx Schraubendreher, um die beiden 1,9 mm Schrauben zu entfernen, mit denen die Halterung des Touch Bar Displaykabelsteckers befestigt ist.
-
Entferne die Halterung.
Completely stripped the screws on this one - T3 seemed too small, but T4 was too big.. Any way to get replacement screws for this step?
T4 worked better for me than the T3. I would suggest trying both lightly as the T3 might strip the screw for you. be careful here… T3 almost stripped the screw.
T3 from the ifixit kit works fine for me
I used my T3 on my 2017 but I had to press a bit harder to get these to unscrew.
It is a very tight T3 - I stripped the head on one of these screws so be very careful here. (T4 wouldn't fit) I think this screw was welded in!
-
-
-
Trenne das Touch Bar Displaykabel, indem du seinen Stecker gerade vom Logic Board hochhebelst.
-
-
-
Benutze einen T3 Torx Schraubendreher, um die vier 1,3 mm Schrauben zu entfernen, mit denen die Abdeckungen des Thunderbolt-Flachbandkabels befestigt sind:
-
Zwei Schrauben links
-
Zwei weitere Schrauben rechts
Amazingly, the top right screw here was not a T3 at all but a T4.
Top screw head seems to be stripped. Tried various other sizes to no avail.
Top screw stripped for me. Stuck here. Can’t progress.
Noticed the screws of left bracket of the thunderbolt connector didnt tighten into place (after it goes in and tightens it freely rotates). The right one did. Although both are scecured and working.
When reassembling you need to push down snug to make sure the thunderbolt ports work.
-
-
-
Trenne das linksseitige Thunderbolt-Kabel, indem du es gerade vom Logic Board hochhebelst.
-
Heble von der Innenkante her, direkt beim Lüfter.
-
Schiebe den Flachbandkabelstecker vorsichtig zur Seite, damit er beim Ausbau des Logic Boards nicht im Weg ist.
Pry on the middle of the connector, not the sides, as it is pretty long. Be careful to position it correctly when putting it back and do not force it back.
-
-
-
Wiederhole diesen Vorgang, um den Thunderbolt-Kabelstecker auf der gegenüberliegenden Seite zu trennen.
-
Schiebe den Flachbandkabelstecker vorsichtig zur Seite, damit genug Platz da ist, um das Logic Board zu entfernen, ohne dass es hängen bleibt.
-
-
-
Trenne die beiden Lautsprecherstecker, indem du das flache Ende deines Spudgers bei ihren Steckern unter jedes Kabel schiebst.
-
Verdrehe den Spudger leicht, um beide Lautsprecher zu trennen.
DO NOT TWIST
The connectors are very delicate, you must use the spudger as a lever to lift the cable.
May be the worst part of the whole procedure
Both of the connector cables were secured with adhesive for me. Had to take my time and work gently to loosen.
Which ended up screwing me when reinstalling. The adhesive made it really tough to slide connector in. I ended up breaking the socket connection to board. No more left speaker!!! Argh!
I broke off the left speaker connector. I wonder if I can solder it back on. Anyone know??
When putting these back, these seem to just be pushed down from above, rather than slotting in from the back
Add me to the Broken Connector club ?. No right speaker for me. Have to think how I can soldier some pins on to fix the connector, or just leave it alone so I don’t make it worse. I should have read thru the instructions and all the comments. Oh well. Shoulda wouldas
By far the most delicate step. I suggest SLOWLY peeling away the adhesive until gone, then CAREFULLY pull the cable away from the connector.
The connector is NOT secured well, and you WILL break it off if you don’t proceed with extreme patience in this step. The cable pulls toward the sky. I held the connector down while I gently lifted the cable.
Very easy to snap back into place if you didn’t muck up the connector while removing it. Just finger press directly from the top and they snap right into place.
I used tweezers to carefully hold the sides of the connector as I slowly worked the cable out. Work under the adhesive by rocking the spudger forward and backward (not twisting). As you work toward the connector, gently pull the spudger out every so often and slide back under the cable till you eventually reach the connector. If you do it this way, have steady hands and patience! A magnifying glass helps too.
I heated a little bit the area and then used a spludger to keep the entire socket + connector in place, then SLOWLY and GENTLY introduced a spludger from the top under the cable to break the adhesive. Once the cable was free from the adhesive (3-5 degrees lift, not more!), then I used a spludger to keep the socket in place (it is a U shape with the bottom near the battery cell, I introduced another spludger under the cable from the opposite direction (from UP of the body if the battery is DOWN) and then pried UP the connector. It does not slide, it just pops out of the socket. Putting it back is very easy, just press it gently down and it will get in the socket with a small click sound.
Same on the other connector.
DO NOT rush the part where the cable is freed from the adhesive, that makes the operation much safer and simpler!
I used Dental floss threaded under and around the speaker cable to cut through the adhesive (really easy) and then one spudger on the circuit board and another to lift the connector out of the socket. Took me a while to workout what to do and the comments above really helped.
Mint flavor or just regular?
Tim -
The floss method worked perfectly! I threaded the floss under a metal trail close to the battery to guide the floss.
Mint flavored.
I use a blow dryer to heat it up and a thin string/floss to cut the glue. It worked well.
Anybody have a solution on how to resolder this connector now that mine no longer works?
-
-
-
Löse das Klebeband ab, das eventuell den Anschluss des Mikrofonkabelsteckers bedeckt.
-
-
-
Öffne den Sicherungsbügel am ZIF-Stecker des Mikrofonkabels, indem du ihn gerade vom Logic Board hochhebelst.
-
-
-
Trenne das Mikrofon, indem du sein Kabel in Richtung Lüfter ziehst, bis es sich aus seinem Anschluss löst.
-
Ziehe wenn möglich an dem Klebeband, das am Kabel befestigt ist, statt am Kabel selbst, um das Risiko einer Beschädigung zu verringern.
Be VERY careful fishing that circuit/cable back into the socket. I was using regular tweezers that have a sharp edge. It scratched the circuit under the black plastic sleeve (which is thin). That cable kills your internal mic (which Ifixit does sell a replacement for).
-
-
-
Benutze einen T5 Torx Schraubendreher, um die einzelne 2,9 mm Schraube zu entfernen, mit der das Antennen-Kabelbündel befestigt ist.
-
-
-
Löse alle drei Antennenkabel ab, indem du jedes einzelne gerade aus seinem Anschluss hochhebelst.
-
Schiebe eine Pinzette oder das flache Ende eines Spudgers unter jedes Kabel bis fast zum Anschluss und verdrehe das Werkzeug dann leicht, um das Kabel abzulösen.
That is the hardest part. Can’t get one of the three plugs back into position.
Stefan is right. Mine proved impossible and I think I smashed (yes, smashed) the “sockets” they are supposed to “snap” back into (they didn’t for me). For now, they are taped down (and wifi works well), but looking into soldering these if it won’t ruin the connection.
Takes quite a bit of realigntment repositioning to place these back.
These are VERY tricky to reconnect. ADVICE: Push down on these at and angle and then snap them in and slowly rotate them to get them to stick. It took me FOREVER to figure this out.
I had no problem getting these on. The trick is to come from just above the connector and pull back on the cable a little bit at the same time. A fully stretched cable will overshoot the connector so that’s why I pulled it back. I used the black spudger to snap it in place. Everything seems fine. There definitely is a slight snap.
I always worked from the cable towards the connector to pry it up, and then when putting it back, it can seem tricky, but I used to push the connector back a little (towards the cable side) before trying to gently press it down. This seems to align it better to the socket. DO NOT force it, but it needs a little force to hear the “click” if it connects properly.
Correct positioning before pressing down is the key here and it can get very frustrating, so be patient. A microscope /optical zoom would help.
Also, I advise to start with the longest cable, the one you disconnect first, as it is easier to maneuvre, to get a feeling of how the connector is positioned correctly. The move to the shorter cables.
After a frustrating 20 minutes, I tried with the longest one as suggested. Made a re-affirming click. The other two were a wresting match and just eased into place when it happened.
This was the hardest part of the entire process for me. I'd say I probably spent an hour on these. Have patience.
Jay -
I think it would help if there was a close-up photo directly above the connectors so you can see how much of the solder on the board is visible. That would help with the positioning of the plug.
-
-
-
Entferne folgende zehn Schrauben, mit denen die Logic Board Einheit befestigt ist:
-
Zwei 2,8 mm T3 Torx Schrauben
-
Fünf 2,9 mm T5 Torx Schrauben
-
Eine 3,7 mm T5 Torx Schraube
-
Eine 3,9 mm T8 Torx Schraube
-
Eine 3,8 mm T8 Torx Schraube
I needed a T9 for the green 3.9 mm “T8” Torx screw
My 3.9mm upper left screw (green) is T8 Torx, while the upper right 3.8mm (blue) screw is a T9 Torx. Note that both are not included in the kit sold by iFixit for this repair @jeffsu
EDIT: actually the T8 is included in the kit description but was not inside the one I got
I had 4 bits in my driver set that I got. One was the T8 that others seemed to have been missing. Maybe they realized this and added to the new kits.
No T8 in my kit. Now I have a half disassembled macbook pro I can’t finish. Sweet.
On my A1707, the Green and Blue are T10 (although T8 and T9 do ‘fit’ but with slack).
Don’t confuse the 3.9 torx8 (green) with the 3.8 torx8 (blue): the green one has a tapped hole for one of the two torx3 of step 29.
Reinstalling Note: I learned the hardway - Count (12 by my method) the number of connectors:
5 on the right edge.
4 on the left edge (I count 2 at the very top left, on under the other).
2 on the bottom edge near the center (NOTE: if you change a keyboard you will need the keyboard ribbon connector from the old case/keyboard).
1 cluster for antenna (3 wires & 1 ground screw)It's actually 15 connectors, as somebody else pointed out further down:
5 on the right edge (touchbar digitizer, thunderbolt, mic, touchbar, speaker)
4 on the left edge (power, touch id, thunderbolt, speaker)
4 on the bottom (trackpad, keyboard, batter power, battery data)
2 on the top (display, antenna bundle)
-
-
-
Löse die beiden Vibrationsdämpferstreifen aus Gummi von den Lüftern ab, entferne sie aber nicht.
-
Falls nötig, kannst du sie mithilfe eines iOpeners, eines Föns oder einer Heißluftpistole leicht erwärmen, um den Kleber aufzuweichen, damit sich die Gummidämpfer leichter ablösen lassen.
Only needs to be lifted from the fan, not from the heat pipe, and gently. If the rubber “end connector” comes out from underneath the heap pipe, do not worry, it can be easily positioned back in place when the logic board is out! Do not spend time trying to push it back now.
-
-
-
Entferne das Logic Board, indem du es von der linken Seite her anhebst.
This connection is VERY easy to forget when you reassemble. If you go to startup your computer and you see the battery icon but the computer will not start with the power button, this is the connection you missed when reassembly. Drove me nuts until I figured that one out!
Absolutely DO NOT lift the board by the cables as the picture might lead you to think!
Also, when lifting up the board, if you feel any resistence, make sure that:
- all the screws were removed!!
- move cables and connectors gently away in the area where you are lifting, they can easily catch the logic board and it feels immediately resisting the lift
After lifting the left side to be able to keep it between your fingers, work toward the middle and then the right, moving the connectors and cables away to free the board for lifting.
-
-
-
Kontrolliere die Ausrichtung der Vibrationsdämpfer aus Gummi und korrigiere sie wenn nötig.
-
Führe das Antennen-Kabelbündel durch den Spalt zwischen Logic Board und Kühlkörper, und achte darauf, dass es korrekt ausgerichtet ist, wenn du das Logic Board wieder einsetzt.
-
Achte darauf, dass beim Einsetzen des Logic Boards keine Kabel unter dem Logic Board eingeklemmt werden. Kontrolliere jeden markierten Bereich sorgfältig.
Start from the right, position it down in place and make sure the cables are not under the board, then get the antenna cables from beneath with tweezers, then work to the left, paying attention to get the cables away so the board can go down in place.
-
-
-
Entferne die beiden Schrauben, mit denen die Akkuplatine befestigt ist:
-
2016er und 2017er Modelle: Benutze einen T5 Torx Schraubendreher, um die beiden 3,5 mm Schrauben zu entfernen.
-
2018er und 2019er Modelle: Benutze einen P2 Pentalobe Schraubendreher, um die beiden 3,2 mm Schrauben zu entfernen.
On my mid 2018 15.3” i9 MBP the battery board screws were PL1
I second this. If your repair is time-sensitive, consider making sure you have a PL1 driver in advance. Seeing that IFixit doesn’t seem to sell them, I bought a german-made Wiha driver, hoping the quality would be high. You never want these things to strip!
On my mid 2018 15.3 i9 MBP the keyboard cable is farther to the left (as shown at Step 23)! When reinstalling, make sure it is under the battery cable and its connector sticking up between the battery cable and the aluminum battery frame.
So if I’ve understood correctly, almost all the above could have been skipped if apple just made these two screws accessible? Wow, just wow
The screws are accessible, but the ribbon is under the board...
Chi Wang -
Dear Chi Wang, which cables do we remove once the logic board has been lifted? In step 49 and further I can only see the keyboard cable (which needs not getting removed) and the battery board cable doesn't look like it is under the board...
P2 bit end broke unscrewing the second of these screws… Now I have a piece of the bit stuck in the screw head and a MacBook completely disassembled…
Same just happened to me a, but I could get the screw out with a small pair of pliers, and then remove the broken tip from it with some banging on the desk. Took me 5 min, but I wasn’t sure that it will work, so I was a bit nervous 😬
Eike R -
I bought the battery + "kit" pack here and it doesn't include p2 screws. wow.... it seems like you own people don't even know what tools is needed for this? wow... just wow...
I used P0.8 for my Mac 2018
I used P0.8 on my MacBook 2018
There is no P2 in the kit 😞
Pas de P2 dans le kit pour les 2 dernières vis, c’est inadmissible !!! Mon mac est en pièces et je ne peux pas finir !!! J’ai pourtant bien acheté le bon kit complet…
Bonjour @guillaumegerald, je suis désolée d'apprendre cela. Veuillez contacter notre service client au support@ifixit.com (pour la boutique américaine) ou au eustore@ifixit.com (pour la boutique européenne et française) en indiquant ce qui s'est passé et votre numéro de commande. Ce sera un plaisir de vous aider !
C'est possible qu'il y a un malentendu ? Je crois qu'on a seulement besoin du P2 pour les modèles 2018/2019 et il est inclut dans le kit pour ces modèles là : MacBook Pro 15" Retina (Mid 2018-2019) Battery. Par contre, il n'est pas inclut dans le kit pour les modèles plus vieux car pour ceux-ci, un Torx T5 suffirait ?
-
-
-
Lege ein Stück Alufolie zwischen das Display und die Tastatur, um dein Display während der Reparatur zu schützen.
-
Benutze zusätzlich Malerklebeband, um den Bereich unter dem Trackpad so gut wie möglich abzukleben. Du kannst außerdem eine Schicht saugfähiges Küchenpapier direkt unter den Bereich des Trackpads legen, um überschüssigen Klebstoffentferner aufzunehmen.
I didn’t have any solution and was hesitant to simply use an Isopropyl Alcohol solution of any concentration let along subject my electronics to liquid and aluminum foil, so I simply took a card (something between a metrocard and credit card… i used a rewards card) and brute forced the adhesive while dry (making sure to direct the bulk of the force laterally and not down into the screen below and mostly wiggle back and forth instead of straight on). About 10 minutes later with a sore hand it worked just fine and avoided steps 52-62. (You may want to try the string method detailed in step 62 if stubborn and after started with card.
The alu foil and the paint tape make it much safer, use them!
Also removing battery with adhesive remover is quite dangerous (I don't like the idea of liquids around my MacBook insides) so you can do it slowly a carefully with just some plastic cards (like in step 57) putting below the batteries (I used my old credit cards to do this).
-
-
-
Um den Fluss des Klebstoffentferners zu kontrollieren, solltest du die hintere Kante (die Kante mit dem Scharnier) deines MacBook Pro auf einem Buch oder einem Schaumstoffblock ein paar Zentimeter erhöht abstützen.
-
-
-
Dein MacBook Pro ist nun optimal vorbereitet, jetzt bist du an der Reihe.
-
Trage bei der Verwendung des Klebstoffentferners eine Schutzbrille. (Im Kit ist eine Schutzbrille enthalten.)
-
Trage keine Kontaktlinsen ohne eine Schutzbrille.
-
In deinem Kit sind auch Schutzhandschuhe enthalten. Um deine Hände vor eventuellen Reizungen zu schützen, solltest du sie jetzt anziehen.
-
-
-
Ziehe den schwarzen Gummistopfen von dem Fläschchen mit Klebstoffentferner ab.
-
Schneide die verschlossene Applikatorspitze mit einer Schere ab.
The latest Adhesive Remover arrives already with a tiny hole at the tip and the bottle cap and tip is now black instead of clear.
-
-
-
Träufle einige Tropfen des Klebstoffentferners gleichmäßig unter die beiden rechten Akkuzellen, beginne an dem Rand, der dem Lüfter am nächsten ist.
The bottle may (will!) squirt liquid. I used a bit of absorbant paper around the tip while turning the bottle upside down and putting the tip where it needs to go. Be especially careful not to drip liquid onto the speakers.
For this type of work I always have a roll of thick toilet paper nearby: its leaves are smaller than those of kitchen paper.
-
-
-
Träufle ein paar weitere Tropfen zwischen die beiden Akkuzellen auf der rechten Seite, so dass der Klebstoffentferner unter die untere Akkuzelle fließen kann.
-
Warte etwa 2 Minuten, bis der flüssige Klebstoffentferner unter die Akkuzelle eingedrungen ist und den Kleber aufgeweicht hat, bevor du mit dem nächsten Schritt fortfährst.
-
-
-
Nach ein paar Minuten kannst du die Ecke einer Kunststoffkarte unter den Akku schieben, fange dabei an der Unterkante der unteren ganz rechts liegenden Zelle an.
-
Bewege die Karte hin und her und schiebe sie ganz unter beide Akkuzellen.
-
Hebe die Zellen an, um sie ganz vom Kleber zu lösen, aber entferne sie noch nicht aus deinem MacBook Pro.
-
Lasse vorläufig eine Kunststoffkarte unter den Akkuzellen stecken, damit sich der Kleber nicht wieder verbinden kann, während du mit dem nächsten Schritt weitermachst.
I had a great deal of difficulty loosening the batteries. The solvent seemed to have little effect on the adhesive strips. Despite efforts, I deformed the batteries trying to get them free.
Took me three applications of adhesive remover. Think it really is about wiggling though.
It took me about 10 minutes or so to remove all battery modules. I used the adhesive remover as per the guide and also used the card with the corner doing most of the penetration instead of the blunt end. I also would gently wiggle the battery up and down while I applied more adhesive remover to allow it a better chance of getting underneath. BTW, my adhesive strips ran left to right and not back to front on the outer batteries, so I would think it would be more ideal to put the adhesive remover down the left and right sides of the outer batteries. The inner batteries (under trackpad) adhesive strips ran front to back. Keep this in mind when using the remover to loosen them up.
Once one of the packs is loose, stick a leaf of toilet paper under it, so that it cannot stick to the body again, while you are working on the other packs.
See my comment in Step 63. Might save you time and trouble. Putty knife to remove batteries, then hot dryer to get black strips off followed by de-solv-it (or the Ifix-it remover) to get off the adhesive junk.
I wanted to comment on what worked for me.
I did put some of the remover on like they showed.
I used the credit card plastic tool to kind of get underneath it.
Then I used plastic putty knife and slowly and carefully pried the batteries off. I take no responsibility here for you, but it worked for me. Also I used 99% isopropoyl to clean the adhesive off.
Also so you are probably reading this because it is hard, put the trackpad back like the other person said before you put the batteries in. I did that and it probably saved me time.
Also as you reassemble, make you go look at every connector and there are a bunch and make sure those leads are all coming up through the logic board. I don't want to tell you I thought I was done 2x when I found a small cable at the end I missed. If you do end up in that case, you can remove some of the screws, and use the curved tweezers to kind of snake the cable up top. I know you aren't there yet, but as someone ahead of you, you'll remember this tip.
The trick here was the use of a putty knife. As someone mentioned, the adhesive strips on mine also ran the direction of the width of the computer, not from the screen side down. Thus, putting the adhesive remover where the directions said only worked on the uppermost adhesive strip. The adhesive remover did nothing to help the process...
If you're very careful not to deform the packs, you can (ON THE SIDE PACKS ONLY) use the spudger to help gently push through stubborn adhesive. DO NOT use it on the middle packs though, because there are little squarish holes in the body that you could push the spudger through and end up gouging the hell out of your display. And then you'll be back here tomorrow praying there's a tut for that :)
-
-
-
Gehe zur linken Seite des MacBook Pro über und wiederhole die vorherigen Schritte, um zwei weitere Akkuzellen abzulösen.
-
Lasse auch hier vorläufig eine zweite Plastikkarte stecken.
-
-
-
Träufle ein paar Tropfen Klebstoffentferner an der Oberkante der beiden mittleren Akkuzellen entlang.
-
Achte auf Lecks und träufle wenn nötig mehr Klebstoffentferner auf die Seitenkanten.
-
-
-
Nach ein paar Minuten kannst du die erste Plastikkarte herausziehen und eine Ecke unter die Oberkante von einer der mittleren Akkuzellen schieben.
-
Bewege die Karte hin und her und schiebe sie unter die Akkuzelle, bis sich der gesamte Kleber löst.
Once you get the card edge under a cell, you can apply a couple of drops on top of the card and it will flow down to the working edge of the card. This will make moving the card back and forth a lot easier.
I'd consider looking at step 62 first.
-
-
-
Ziehe die zweite Plastikkarte heraus und wiederhole den vorherigen Schritt bei der übrigen mittleren Akkuzelle.
-
-
-
Wenn du Schwierigkeiten dabei hast, die Karte unter die Akkuzellen zu schieben, kannst du es auch mit einem Stück Zahnseide oder sehr dünnem Draht versuchen. Ziehe ihn mit einer Sägebewegung hin und her, um den Kleber zu durchtrennen.
Wouldnt the wire damage the underside of the cells?
Yes, but you should never re-use a glued-down battery after removing it like this. These batteries are not designed to be re-used, and can pose a fire risk even when removed carefully.
I used dental floss + pastic card for the middle part. Avoided using the adhesive remover for the middle ones.
I didn’t have to resort to this method, but if I did I would think some fishing line would be a good option. Put some candle wax on it if it starts to bind. I use this method to remove car dash phone holders that are siliconed down to the dash.
I used this method, (while waiting for the iFixIt glue dissolver kit: was over a weekend; so too late). Works well with a strong, doubled (with slight, about 1 turn per cm, twist) 25SWG (0.5mm, 0.02inch) copper wire, wrapped around spare small screwdriver handles. Ensure that the angle of the wire is _very_ _flat_ while ‘sawing’ slowly; take your time, quite a lot of force is required to sheer through the spongy pads in places. I started with the 2 larger central cells to refine the technique.
-
-
-
Hebe den Akku an und entferne ihn.
-
Größere Klebestreifen kannst du mit einer Pinzette oder deinen Fingern abziehen (trage dabei aber Handschuhe!).
-
Kleinere Klebereste kannst du mit einem Kunststoffwerkzeug abkratzen und dann den darunterliegenden Bereich mit Klebstoffentferner oder Isopropylalkohol reinigen. Wische immer nur in eine Richtung (und nicht hin und her) bis das Gehäuse sauber und gut für den neuen Akku vorbereitet ist.
Mine was very difficult to remove and clean. I spent forever trying to clean up the residue. However, I tried 70% isopropyl on two bays and the iFixit adhesive remover in the other two, and covered with food plastic wrap. Went to lunch and when I got back I used razor blade scraper (like used to remove stickers from glass), and it was pretty easily cleaned. Both chemicals worked just as well. Just soak and let the chemicals do the work.
I found the best way to do this was to put the hairdrier on the adhesive for a few seconds, then it just peeled off in one go. Wasted a lot of time trying to scratch them off before this.
SECOND THIS ADVICE!! Use a hairdryer it will save you a lot of time and the old adhesive will come off much, much cleaner
Yes, hairdryer and use the plastic card to push/scrape one end so you can grab it with your fingers, then peel off the adhesive strip.
Used a putty knife and removed the batteries, then hair dryer and removed the remaining black strips. Used De-Solv-it (my usual computer anti-glue) to get the gooey glue off. Went well and clean. New batteries in and reassembled.
By far the easiest way to remove the adhesive strips for me was to use tweezers. After removing the battery I had mostly large swaths of adhesive. first I used the tweezers, open, then laid it on an angle so the edge laid flat against the surface. Then scraped up side of the adhesive. I wedged up sufficient adhesive so that i could grab it angled (lengthwise not with the point) , Then i slowly pulled up the adhesive without a tear nearly every time, almost satisfying.
-
-
-
Wenn bei deinem Akku bereits Klebestreifen auf der Unterseite vorinstalliert sind, drehe ihn um und löse die Schutzfolien vorsichtig ab, um den Kleber freizulegen. Wenn dein Akku ohne Klebestreifen geliefert wurde, klebe dünnes doppelseitiges Klebeband wie zum Beispiel Tesa 61395 an den Akku, damit er befestigt werden kann.
-
Richte den Akku sorgfältig aus und setze ihn an seinen Platz.
-
Drücke jede Akkuzelle 5-10 Sekunden lang im unteren Gehäuse fest.
In this photo, the holes that are shown in Step 51, where it states, “2018-2019 models: Use a P2 Pentalobe driver to remove both 3.2 mm screws,” are in a different position, so that re-securing the battery board doesn’t seem possible.
Step 51 shows the correct procedure for two different models; this step shows only one model, because the procedure here works for both. Order the correct replacement battery for your model, and you’ll have no problem.
I strongly recommend re-installing the touchpad BEFORE installing the battery. Doing that and feeding the ribbon cable through the correct slot will ensure that you don’t block the path of the cable. I did not do this and had to cut some of the framing plastic away to give me just a bit more slack to be able to reconnect the cable.
After you have the touchpad back in, do a “dry” fit of the battery to make sure you see how the battery should go in so you don’t affect the ribbon cable. Then you can peel off the adhesive protection strips to secure the battery.
After reading this comment I went straight back to steps 19/20 and reversed them before installing the battery… will update if something is notable!
The version i got had the individual adhesives stuck to what look like tempered plastic that covered the whole battery. Removing the main plastic took off all adhesives at the same time. Its usefull to have another set of hands at this stage.
I had the same problem as others with the adhesive sticking harder to the plastic cover than to the batteries themselves. Another set of hands here would indeed be useful. This was actually the hardest step of the entire process as you cannot reposition the batteries once you set them down. Luckily it seems there is at least a little wiggle room in there. Make sure the power connection lines up with its screw holes as the number one priority.
I took off the top side full cover of plastic before sticking which meant all the individual cells were flopping about - leave it on until after sticking it down (as per the next step!).
Unsticking the packs is messy and dangerous since they may tear if too much force is applied, especially if swollen.
But do they need to be glued in?
The batteries should not move: in time that would damage the connections. Measuring carefully, the space between the unibody and its lower case is 8.2mm. The thinnest packs are 7.0mm: there is some room.
Instead of taking the protective sheets off the glue patches, I put bits of double-sided tape on top. The batteries are now easier to remove, but they cannot slide around.
However, after turning the machine upside up, they are in fact “hanging” from the “ceiling”! My office tape solution works, but the thinner packs might in time unstick and fall down.
It may be advisable to use the strong glue anyway, or else put some thermally conductive silicone sponge between them and the lower case.
The batteries are under the palms of your hands: they don’t get warm, leaving the protective sheets on should not have any effect. The unibody case there is 0.8mm thick.
Position the battery first with the back covers on it, to feel how it would fit in place (the battery logic board position is a good reference, and the relative distance to the two speakers). Only when you get a good feeling of the position, remove the adhesive covers and put it in place. SLOWLY, there are not many chances to pull it up again if you do it wrong!!
I pressed on the batteries for 5-10 seconds but they did not stay stuck after a few days.
The bettery didnt feet well and there are some part wich are a little bit left up uppon the unibody but there were no solution since the size didn t feet it is a problem ?
Looks like I have the new version too Tesa 61395 not needed?
-
-
-
Wenn dein Akku richtig ausgerichtet und einbaut ist, kannst du die durchsichtige Schutzfolie auf der Oberseite abziehen.
-
Kalibriere deinen neu eingebauten Akku: Lade ihn auf 100% auf und lasse ihn mind. 2 weitere Stunden am Ladegerät. Ziehe den Stecker und benutze dein Gerät normal, um den Akku zu entladen. Wenn die Ladeanzeige am Minimum ist, dann speichere deine Arbeit ab und lasse den Laptop an, bis er von selbst ausgeht. Warte mind. 5 Stunden und lade dann auf 100% auf.
In order to not remove everything, I reduce the procedure in following only steps 1 to 18 (until trackpad cable is pushed away).
Then I removed the “low “ screws of step 46 in order to losen the fixation of “bottom” of the motherboard, as there is no room to remove the battery board and its ribbons).
Then I removed the two screws of the step 50 (battery board). To take off the glued battery, I used twine or thread (e.g. as shown here: https://www.youtube.com/watch?v=fupkPz55...) but not acetone nor diluant.
Then I lifted very carefully the bottom of the motherboard both to push away the battery board and its ribbons and to reinsert the new battery board and ribbons.
Then I proceed backward to remount (step 50, step 46 then step 18 to 1).
Note: my “old” battery was so inflated that the two screws of the lower case near the trackpad were difficult to remove (sometimes, this leads to a malfunctioning…
Thank to Jeff for this overall procedure which helps me a lot.
Did they change the step numbers? You mention step 46 and 50, but now it looks like these are steps 47 and 51.
strells -
Hi Strells, in the english or french version, it seems that it is always step 50 (two screws for battery) and 46 (“lower” screws for motherboard).
jompo -
As Jompo Discovered, I also concur: LB removal not necessary. “removed the “low “ screws of step 46 in order to losen the fixation of “bottom” of the motherboard, as there is no room to remove the battery board and its ribbons)”
Be careful, I removed all screws from LB & disconnected speakers as well. .
Thanks @jompo! Great tip... no, awesome tip! Worked like a charm for me, and saved a ton of work/mess. I've never done the solvent method on any of the batteries I've replaced with the help of iFixIt's excellent guides; I use a plastic card with a 'sharpened' edge to work the batteries loose. Way, way easier than having to take all the innards out (and risk breaking something) and using the solvent.
Another tip: the best tool for removing the remaining double-sided adhesive tape is a #11 Xacto blade; it's basically a super sharp tiny 'paint scraper' shape, and removes the tape remnants beautifully.
Also, quick note to the great folks behind iFixIt: I finally wised up and am buying all my batteries from you now. I learned my lesson about buying cheap knock-offs on Amazon that had to be replaced again in a year. No more; from now on, you get all my business!
Huge thanks all around!
jiclark -
Thanks a lot jompo! Your approach worked like a charm and saved a lot of time (and me potentially breaking something :D). The bit of lifting the motherboard up to take out the battery ribbon was a bit of a fiddle but in the end was worth it. The twine and thread approach definitely is less risker as we can avoid liquid damage from the use of the adhesive remover.
wow, this was awesome. thanks whoever wrote it. very well described.
I did the same a @jumbo . So, I’d be happy to rewrite this into a much shorter and less hazard format as @jumbo suggests which works perfectly and has many fewer steps and less risk of injury to the trackpad, motherboard and connected components. I did this in about an hour on my MacBook Pro late 2016.
Did you ever rewrite this @marcemarc ? I have to do this ASAP and would love to cut out as many steps as possible.
roopesh -
I didn’t rewrite it but basically stopped at step 19, and could get the batteries out without solvents or crazy efforts. Heat, slow working with a good spudger and they pop out.
One thing really important was I found my battery data connector on the motherboard had a loose connection. I had tried three different batteries and it wat the data cable connect on the motherboard. So, that was touch to figure out but it did solve the problem. Bottom line, be careful when disconnecting or manipulating the battery data cable latch.
Marc -
Plastic liner is not releasing from the battery cells. If I hold the foam pad in place the plastic sheet rips the foam.
Newer batteries have foam protection that needs to be removed. The blue tape between the foam and the battery peels off from the battery. https://i.imgur.com/NDwhyVO.jpg
Missing one critical helpful notation and photo on the reassembly part - a checklist of all the cables and connectors that need to be checked to make sure they are not caught under the motherboard. I missed the keyboard cable and it cost me half an hour. I checked off all the ones I could remember to make sure they were clear, but just missed that one. A photo with circles and a checklist would be a big help to make sure everything is clear. Otherwise, everything was very well done.
That’s in Step 49. Easy to miss, but it’s there! I feel your pain though, I’ve made that same mistake.
I think that was the same cable I missed… at the bottom by the battery connector. I mentioned it to ifixit to add a checklist as well…. Who is responsible for editing this guide? Do you know?
robert -
That happened to me, as well. I agree that the list is implied in the instructions (working in reverse during re-assembly), but I also missed the two small cables on the upper left (headphone and touch-id cables). I had almost everything re-assembled by the time I realized my mistake and had to pull everything back apart again to fix the issue. I think that was just me being eager to finish, thinking the hard part was done. (But kudos to the authors for these instructions - my laptop battery is now working great, and everything is functional!!!)
dot1000 -
OK well, followed the instructions to the word, & pleased to say my problem has now been resolved. So very many thanks for the fix kit & cracking easy to follow instructions. The MacBookPro lives to fight another day.
in knapp 3h habe ich den Akku gewechselt gehabt, passt auf die Unterlegscheiben vom Trackpad auf… die gehen schnell verloren und das Tastaturkabel vergisst man auch mal ganz schnell. Der Guide ist eine super Hilfe gewesen und ohne den hätte ich sicher das MBP noch nicht mal aufbekommen.
that’s what I thought :D But as others mentioned it can be reduced to a nice amount of steps. but anyway: I think producers should make their products waaaay easier to restore those parts like accumulator, ram, HD or even processor cores.. long live the good old desktop pc with motherboards as big and heavy as macbook airs from nowadays ;)
Great instructions I finally got my mac book back alive! I am noticing that the battery settings do not show that it is charging even though it is plugged in…tried resetting the SMC still nothing indicating it is charging…I have no idea if it is calibrating correctly. Has been plugged in for about 2 hours but only indicates a 30% charge
This guide worked very well for me. Triple-checked all the connectors when reassembling. I was able to get everything inside the machine cleaned up very well including the fans and the fan ports. Very well done!
Got through and it worked perfectly! Then I realized the up arrow key was no longer working :(
Ended up sending it to Apple for a free keyboard replacement since it’s the notorious butterfly keyboard problem.
Hopefully it will come back with the same battery and they won’t mind I replaced it.
Very good guide, I didn’t remove the whole mother board tho (A1707) but this is not my first time replacing a battery of macbook.
I used alcohol 96% to get the glue off the battery and a old card.
The way to do it if you don’t want to take apart the whole laptop is to follow this guide to step 23 and unscrew the mother board screws then start to take out the battery and slide the cable while holding up the motherboard.
I FixIt 😎
Ho acquistato il kit completo per il mio mbp 15" touchbar 2018.
Ho seguito la guida fino al punto 18, poi il 46 Ed il 50.
Non ho usato il solvente adesivo per staccare la vecchia batteria ma mi sono aiutato con la scheda in plastica e con un filo di rame sottile che facevo passare sotto le batterie, una alla volta. Mi sono anche aiutato con un phon per far ammorbidire il nastro adesivo originale sotto le batterie.
L’unica accortezza sta nello stare attenti quando si toglie e poi si inserisce la scheda della batteria sotto la scheda madre. Io ci son riuscito senza problemi.
Ora il mbp è in carica: sto seguendo i consigli di ifixit per la calibrazione della batteria.
Comunque una guida perfetta, in ogni minimo dettaglio. Se avete pazienza, dimestichezza, seguitela ed avrete una batteria nuova in circa 1,5h di lavoro.
Uh oh I did this and now the machine won’t turn on. When I open the lid it shows the battery level for a second then it disappears. No amount of key presses seems to work. Any ideas here? I assume I messed up the keyboard or some other connection?
Ah I fixed it. Double check step 31, that was my issue. The connector for the power button is right below another one.
Same. Thanks .
For sure we need every step so its clear. One misstep and its game over. Shouldnt there be a note or step to work backwards after battery is installed?
-
Um dein Gerät wieder zusammenzubauen, folge den Schritten dieser Anleitung in umgekehrter Reihenfolge.
Entsorge deinen Elektromüll fachgerecht.
Lief die Reparatur nicht wie geplant? In unserem Antwortenforum kannst du Hilfe bei der Fehlversuche finden.
Um dein Gerät wieder zusammenzubauen, folge den Schritten dieser Anleitung in umgekehrter Reihenfolge.
Entsorge deinen Elektromüll fachgerecht.
Lief die Reparatur nicht wie geplant? In unserem Antwortenforum kannst du Hilfe bei der Fehlversuche finden.
Rückgängig: Ich habe diese Anleitung nicht absolviert.
105 weitere Nutzer:innen haben diese Anleitung absolviert.
Besonderer Dank geht an diese Übersetzer:innen:
100%
Diese Übersetzer:innen helfen uns, die Welt zu reparieren! Wie kann ich mithelfen?
Hier starten ›
71 Kommentare
This is an awesome guide. My girlfriend’s MacBook Pro was diagnosed with a logic board failure by the repair centre. The repair cost was going to be more than a new 6-core Mac Mini.
I tinkered with the device, and thanks to the help of the iFixit community, a battery fault was diagnosed. Installed a new battery and the problem was solved!
Everything went perfectly. Thanks for the great guide :)
Hello I bougth the battery on this site my model is A1707, I followed the procedure and when I turned it on it stays in 1% and says condition: Replace now… what can I do?
Hi Rafael, make sure you’ve calibrated your battery first. If that doesn’t fix anything and you’re using an iFixit battery, contact our customer support team and they’ll help you out. Otherwise you can post your question on the Answers Forum—there are a bunch of experts there that can offer advice.
My late 2016 model MBP’s battery had swollen after 3 years (2 months out of warranty). Apple wanted $850 to send it in and replace it. I purchased a new battery and it’s kit for a fourth of the price from iFixit. 2.5 hours later, and everything seems to be working smoothly. The guide was spot on.
Yep, same here except my MB Pro 2016 from Dec 2016 was out of warranty for about 7 months. I noticed that it rocked around when I had it on the desk typing. Finally, it worsened and worsened so I called Apple. They wanted $750+ to replace the battery. I went to my favorite site ifixit.com and searched and found this article/repair. I did as @jumbo suggests above which really streamlined the replacement to about an hour. It’s not charging right now so need to figure out the problem but guessing it’s the battery sensor cable which was tedious to get back in.
Marc -
https://support.apple.com/en-in/keyboard...
Check this please!!!, the key board replacement program can be there for 4 years, that means when they replace your keyboard, they are replacing battery and touchpad. Check your keyboard behaviour properly and report to apple through their Apple CHAT window. They will tell if your eligible, also take the MBP to a servicing centre with case study number (chat ).
Note: I see that you already opened the MBP, still try :(
naquash -
Hello. So, Iong story short. I replaced the battery on my MacBook pro. No problems at first. I followed the instructions for the calibration, and now, my book will not boot. When I was ready to set up my workspace again and reboot, I did notice it was booting up with the Apple logo and progress bar in several cycles, several times until, I finally unplugged the dongle from the USB-C that had my other external drives and external HDMI display. I tried the SMC, P-RAM as well and no luck. If I leave it charging, it feels very warm. And still nothing. Any ideas?
Update, (55 mins later) I unplugged the charger from the machine and still feels warm as if it is on. I put the fans to my ear, and it sounds like it is on, but no video, nor keyboard/touch bar lights. My assumption is to probably let it run out of juice before I attempt to open it up again? Thank you.
Just perfect! MacBook Pro 2017 after just 2.5 years with swollen battery successful repaired!!! Many thanks Jeff!!!
Hi. I replaced the battery using this guide. It’s detected, but I only see 1% and a message that says battery not charging. I tried resetting the smc, but nothing changed. I see the only other advice here is to calibrate the battery. I don’t know if I can actually do that since it’s not charging. Any help? Thanks.
In order to not remove everything, I reduce the procedure in following only steps 1 to 18 (until trackpad cable is pushed away).
Then I removed the “low “ screws of step 46 in order to losen the fixation of “bottom” of the motherboard, as there is no room to remove the battery board and its ribbons).
Then I removed the two screws of the step 50 (battery board). To take off the glued battery, I used twine or thread (as Jeff indicated) but not acetone nor diluant in order to not spoil motherboard or another component).
Then I lifted very carefully the bottom of the motherboard both to push away the battery board and its ribbons and to reinsert the new battery board and ribbons.
Then I proceed backward to remount (step 50, step 46 then step 18 to 1).
Note: my “old” battery was so inflated that the two screws of the lower case near the trackpad were difficult to remove (sometimes, this leads to a malfunctioning…
Thank to Jeff for this overall procedure which helps me a lot.
Used the abbreviated method you suggested (because I had used a similar method on another MBP several years ago) and it worked great. Most helpful tool was a gift card from Disney (thanks Mickey!) for loosening the battery adhesive- stiff enough to push under batteries but not as stiff and thinner than a credit card. Used no alcohol- too easy to mess other parts up. Heat old adhesive strips to remove left overs without alcohol. Touchiest part was removing the battery cables by prying up the motherboard as little as possible. Thanks for the procedure! Also big thanks to Jeff for the excellent guide!
I posted a response to @Buckley Robinson and @jumbo and @Dan. I dug into my replacement battery that didn’t work in more detail. The voltage at the pancake connect (to the Mac) is 2.2v but at the raw battery leads 11.5v. The central battery board (BMS?) had two sets of very very fragile glued copper dot connections. I suspect that either these connections or one of the BMS chips is not working. Again, haven’t gone into that much detail as I want my MB Pro back up. I’ve ordered one from Amazon to see if it differs and works.
So I ordered a battery from Amazon ($72.86 with prime delivery). I received it today and check it out a little before installing. Again 2.2v at the pancake connector. I was EXTREMELY careful this time to not jar/torque or angle the battery BMS and left and right wire assemblies. I also protected it from stray charges with plastic tape on the pancake connector until just before final assembly. I am letting it sit charging (hopefully) to see if it works. It has the same low battery and lightening bolt graphic on the main screen. I am also making sure I’m using the supplied Apple charge adapter. More to come.
I left the MB pro shutdown and on a charger to see if a slow trickle charge will revive the battery. At this point, it appears again that there must be a bad batch of batteries OR something new in the Mac OS X firmware that is making this replacement difficult. I’m going to dig into it in more detail once I return on the 6/22.
Please anyone out there with any info or details or work around would be greatly appreciated.
I thought I would add some final comments. I did receive the second battery from the Amazon seller. It was indeed not from the March 2019 batch. In fact it was from the 2018 batches (yes a 2+ year old battery). When installed, I didn’t get much different behavior although it almost booted up but then stopped as if unplugged.
I was working in NY city so took it by Rossmann Group to have it checked out. They told me that the solder connections to the battery com cable on the motherboard were loose. This would have ONLY been evident if you removed the motherboard as these are on the top side. This area isn’t very abused by the process of unplugging the battery and plugging in a new battery. It’s likely poor quality workmanship. They verified that the replacement battery was functional and for $275, my MB pro is back in service.
Bottom line, I suspect this is a flaky problem that has occurred many times. So, for the DIY battery replacement, I would advise inspection of the battery coms solder pts (step 11-12).
Awesome comment! Thanks for the follow-up, glad you got it sorted out.
Great guide! I was able to remove the battery without the use of the adhesive remover, just using a nylon fishing line to cut the adhesive. Note that the disassembly requires T8 and T9 bits which were not in the kit I got from iFixit.
Hallo FixIt Team
Mein 2016er MBP ist jetzt im fünften Jahr und die Batterie hat so langsam den Geist aufgegeben, jetzt habe ich die Batterie mit dem Werkzeug bei euch bestellt und die Batterie in ca. 3 Stunden gewechselt ohne Probleme, die Anleitung ist super, ich bin nur darüber verwundert warum ihr die Reparatur als schwer einstuft, ich fand es Easy.
Vielen Dank ans Team für die schnelle Lieferung (2 Tage) und die wirklich tolle Anleitung.
Wenn es Sterne bei euch gäbe würdet ihr 5 von 5 bekommen
Hallo egonwinter,
danke für deine Nachricht und wir freuen uns sehr darüber, dass du so gut durch die Anleitung gekommen bist. Viel Spaß und Laufzeit mit deinem MBP!
Lächeln, Fabian.
Do you really need to remove the logic board?
I did’nt. See my previous post. Just be careful wihen lifting the motherboard. ;-)
jompo -
Awesome guide. I followed jompos shortcuts and only did 1-18, 46 and 50-end. I used the plastic cards and a little force, to separate the battery from the adhesive.
Just a quick note: When I was done with the procedure my MBP said that the battery had 73% and was NOT charging. I was quite worried that I had to take it all apart again. CoconutBattery said everything was fine and the battery was charging. But the charging % kept on falling. When it was down to 58% I had an idea. I switched the power supply (a Lenovo 135 watt USBC PSU) to the original Apple charger and BOOM it started charging. I hope I can use the Lenovo one again when the calibration is over, because I like to have a charger in my backpack.
Great guide!
If you feel a little techy, you could save yourself a lot of work;
- Skip the entire fluid thing and use nylone string or dental floss thread, and saw your way through the glue.
- Skip unmounting the trackpad, only the cable obviously needs to be detached. The glue is easily sawed with the above mentioned thread.
- Skip unmounting the entire logic board process. You have to loosen the screws, and the loudspeaker cables though. After that it’s possible to lift the board enough to pull the battery mounting cables, and push the new one through the gap.
Be catious and use common sense and you save yourself a lot of work!
/FWIW
I just finished replacing the battery in my late 2016 MacBook pro with touchbar. Now I can’t get the thing to boot up all the way. When I push the power button or close and open the lid, a battery icon pops up with a percentage of the charge. The percent of charge started around 23% and the last time I tried it it was up to 74% so it’s making steady progress. I’m still very concerned about a full bootup not occurring. I’ve done the reset SMC steps with no difference that I can discern. Any ideas on what’s happening?
I figured out was is wrong. When reassembling the MBP I missed a cable. It is the power button and touch ID cable. However, it’s dang small that I haven’t been able to get it fastened to its connector on the logic board. I’m afraid I’ve messed up the connector on the cable. I hope not because I can imagine that’ll be an expensive repair. I’ve never felt so clumsy as this repair has made me feel. Oh well, what’cha gonna do…
Thank you so much! I had the same issue! I forgot it too and it wouldn’t boot, now everything works great!
I’m glad this worked out for you @Giulio Tedesco. I thought I was going to have to replace the logic board but I found out that the cable I need is replaceable by itself. Approx $25 w/shipping is much cheaper than replacing the logic board.
First battery received was damaged, however; iFixit was quick to ship out replacement and the process was spot on! Problem solved..no more ‘service required and 1% battery!’ I couldn’t be happier!
I successfully completed the battery replacement. I too, performed steps 1-18, loosened the logic board screws closest to the battery to provide enough room to remove and replace the battery board. I use sharp plastic prying tools to simultaneously lift the individual battery paks and cut the adhesive quickly. Then a razor blade tool to scape the edge of remaining adhesive and then pull the tape away in one piece. All in all, this job took about an hour to R&R the battery, an hour to drill out a stripped screw locked by the swelling on my drill press and an hour to R & R the bottom cover and other odds and ends. The battery was incredibly swollen, almost ½”. Interesting to read here of similar battery conditions for many reporting in and wonder whats up with this. I recently replaced the battery on my late 2013 15” macbook pro. The battery was 6 years old, no signs of expansion. I’ve replaced many other failing mac batteries over the years that had not swelled up either.
Instructions we’re straight forward. Jompos shortcuts and some careful work made it pretty easy to slide a battery in and out. Sawing that adheasive was probably the most time consuming.
New battery though is not being detected. I’ve reseated its cabling twice to make sure I had good connectivity and I’m still not reading any battery. Think its just a DOA battery or should I try something else before returning?
While re-connecting my ZIF connector for the third time the locking bracket fell off.. I’m not thinking this is too big of a deal but any thoughts on it?
Andy -
Why do you have to remove the logic board? Is it specifically to keep it protected when using the adhesive removing liquid? Or, is the l logic board PHYSICALLY in the way of something, and requires removal, to remove the battery? I only ask because I saw a tutorial online where someone used a piece of nylon string as a saw, to cut the glue between the battery and the case. That might be much easier than going through all of those additional steps, just to use solvent.
I cannot believe I did this — and my MacBook Pro 2016 15” Retina, touch bar computer is back up and working. I did not expect it to start ever again. I was certain that it would not have wireless because I was certain I had damaged one of the minute connectors on one of the three little wires for the wireless. But wireless is up. Using it now. So far I cannot find anything that is not working and I have been back up for about 40 minutes.
Am I glad I did this? YES, very. Would I recommend this? NO Never - just buy a new one.
The guide is EXCELLENT. (although I wish it had had tips for how to accomplish a few things, for instance a technique for being sure each screw gets back in the same hole. I labeled painters tape, wads of it, and that was successful. )
The difficulty is not the procedure itself, nor that there are over 65 steps. The difficulty is keeping hands and fingers steady trying to get many minutely tiny screws back in their holes.
-will continue-
-continued-
The tools are wonderful and include magnetically active drivers for picking up screws, plus tweezers, but it took more like ten hours to do because some of those screws are next to impossible to fit back into their holes - especially when there is a tiny protective plate that it has to go through first. My tip: use the fine point of the plastic spudger to at least hold the opposite hole centered and then just pray something will knock the screw into correct position. Then use a bare finger to rotate a first turn because the magnetism of the the (otherwise great) 3T Torx will pull the screw out before you can pin it down . Then finish with the Torx.
Before starting Tip: use the ONLINE guide with another device if you can because they have multiple pictures, sort of animated, so you can see before, during, and after. Very valuable. Printing it will lose that.
Professionals must have other sophisticated tools that can help with this unless it is all done by robotics. My fingers are still raw.
Instructions were clear and the battery appeared new (iFixtit).
However after putting everything back together the battery will not charge from any power supply I’ve tried. It’s almost as if the power connector is not making contact with the battery’s nodes, but it is. I must note the battery I ordered from iFixit was completely discharged and the ZIF connector looked tarnished.
Risky and possibly worth it fix, but I’m sending this thing into Apple. Not worth the amount of effort trying to try a new battery or trying to get a replacement.
It’s a shame Apple price gouges customers so hard, especially on premium laptops.
Logic board does NOT have to be removed. nor the trackpad. in fact 80% of these steps are not required. Maybe 5 years from now when you have perfectly normal looking batteries that are dead, will they be harder to remove, but for now, these computers mostly just need battery removal to get rid of swollen batteries. once you drain the battery, there is little contact left with aluminum.
the only thing under the logic board is the thin plastic piece that runs across. Simply remove all logic board screws or anything that attaches to board from fans down, like speakers, and you can pry up on logic board with plastic Uspudger and remove the battery. I had this done in 15 min first time. Caveat, this is NOT DYI stuff. take it to a shop.
Very nice guide! Two points though:
In step 46, the T-8 Torx 3.9mm screw in the top left corner of the logic board is indeed different from the T8 in the right hand corner, because it has a hole for the top screw of step 29! (I’ve never seen a more schizophrenic assembly, but that’s Apple)
The views of the machine are sometimes taken from opposite angles, be careful to observe where to look. This is a general point which should be taken into account fore future guides.
Despite all that, the report is that the battery does not charge. I did the procedure a second time (without battery removal of course) but to no avail. Anyone any suggestions?
The replacement guide for this late 2016 MBP was very straight forward and seemed to go smoothly but the battery will not take a charge. After being plugged in for several hours, when I press the start button on the touch pad all I get is the battery symbol with red at the left side. I think there may be other issues going on here. This is my daughters computer and she has been having issues for several weeks, Apple suggested it could likely be the battery. If anyone has thoughts I would be interested to discuss further. Thank you. I love iFixit!!
Thank you for the great tutorial! I believe the safest way to go is to follow all 65 steps, but I had to opt for the 1-18 then skip to 46 & 50 (see jumpo’s comment) because one of the installed screws was jammed! Removing the existing battery adhesives was the most difficult part for me…but it was all worth. :)
Great guide. Bought my new battery from iFixIt and everything went well EXCEPT when I turned on my MBP after the replacement, it showed battery not charging 1%. I reset the SMC and left it charging for half a day and still shows 1%. CoconutBattery shows the new battery is a 2016 Simplo battery with 1 Cycle. Has anyone found a solution for this problem other than replacing the battery again or Marc’s re-soldering of the battery connector? I still have my old battery but don’t want to pull the new one out if there are other things to try first. Would appreciate any thoughts you all have.
Went the the entire replacement process, the tried to turn it on and nothing. Checked all the connectors and everything looked good. Then I measured the voltage at the pancake connector and I see 0.000V (reassembled and left it plugged in for a while, but no change). Did I receive a bad battery pack?
An incredibly helpful guide. One important note: I used a T4 instead of a T3 in every step of this tutorial. The T4 was perfect; a T3 would have provided a loose fit.
I went fairly slowly with this to make sure I didn’t mess anything up, so spent 4 hours all up because there was also quite a bit of clean up of dust from fans, ducts and the mainboard which I took off with medical alcohol. I did trap one of the connectors when putting the mainboard back in (step 49), and I also managed to send all the tiny washers from the touchpad flying when putting that back in (in spite of the written warning, but by the time it came to putting it back in I thought “hey, I’d better check under the edges for dust before I slide it back in..”). It took me about 10minutes to prise off the old batteries, I mostly jimmied them with a plastic card and slid acetone nail polish down the wedge between the card and the battery. Great instructions! I also used an ice cube tray to sort the screws from different steps. All works well, just a bugger when you consider that changing battery on a Windows laptop can take all of 10 seconds…
Thanks for the guide. That was a lot of connectors to take off and put back on as well as a lot of small and slightly different screws to keep track of. I had doubts I could get it all back together correctly but the computer booted up and is working. Thanks for the detailed and correct instructions to follow.
Hi,
Replaced the battery of my MacBook Pro 15" Retina A1707 at the end of 2016-2017 according to the instructions.
New battery was charged, which was also displayed on the display. Unfortunately, the Mac will no longer start up while running on battery power. Tried all known keyboard shortcuts. Unfortunately without success. Connected to the power adaptor, it starts. Battery icon is missing, the battery is missing in System Preferences.
What else can I do?
I ordered a replacement battery for my 2015 MacBook Pro. I installed it fine, but when I booted up I get the dreaded 1% battery, “The battery isn’t functioning normally and requires service”. I just spent like 4 hours doing this and Im right back where I started. Now what can I do….
Peter and anyone else having this problem where you put in the replacement battery and it reports a problem just like you had prior to removing and replacing it - been there done that!
I too was puzzled and went through three - yes three replacement batteries before taking it into the repair shop in Manhattan. They checked it over and found that under the small battery communications connector on the motherboard, one (or more) of the connections was faulty. This appears to be a very weak area when working on the battery. I’m guessing I was just slightly too brutal when removing the battery communication lead. I didn’t think I was but giving Apple some credit. I do believe this is likely a very weak spot in the whole MB Pro battery replacement besides the horrific glue near the trackpad.
So, if you’re a techie, dig into the battery communications connector (underside) to make sure all the solders are solid and intact.
Marc -
I followed all the steps, but I could not get my mac to turn on at all. I rechecked all the connections, and I couldn’t find anything that’s not attached properly. Help?
Double check step 31, that was my issue. The connector for the power button is right below another one.
I just finished this repairment and everything went fine! Thank you so much for this detailled instuction, it is veeery accurate! Amazing! Just be careful with the batteries, getting them out, to not break them, besides that, keep your screws in order and the assembly is gonna work out perfectly!
Great guide! One criticism is that people would/should like to see steps on what to do with the old battery. How do we responsibly dispose of it?
Awesome guide. I was able to successfully complete the repair and my MacBook Pro 15" late 2016 model operates as normal. However :( I took the extra steps to clean out all the dust from fans and everywhere else. After reassembling laptop and working for a bit, I plugged in my external display. After awhile of working, I played a video on youtube. The computer crashed and I got the dreaded black screen that my computer unexpectedly shut down. At first, I thought some dust may have settled in one of the many connectors. I especially spent the time using a blower to clear out the USB-C connectors since this is where my display was attached. I am still having the same issue. It appears video running on an external display causes computer to crash. I have no idea how to troubleshoot this. After computer shuts down, Apple creates a dump of code to send off for diagnosis. I saved it but would have no idea how to decode it. If anyone can help out my situation it would be greatly appreciated.
Battery is charged at 100% but the computer will not boot up! I have no idea what to do at this point. I’ve checked the battery communications connector several times. It’s fine.
Someone please give me some direction I’m not a tech just really good with following directions.
I would try to boot up the MB Pro with it connected to the charger (on AC). First, connect the thunderbolt AC charge cord, ensure it is connect to live AC circuit (e.g. plug something into that plug first to verify it is live). Then, hold down the power button for at least 5 seconds and release. If you don't seen any activity in say 2-3 minutes, slightly press the power button like you would usually. This should start the compute from scratch.
Let me know,
Marc -
Thank you very much, the instructions were very clear.
I'm happy that I'm able to write this comment with the resurrected Macbook.
Outstanding guide.
The guide was great, I agree that the touchpad washer issue needs to be highlighted even more. I got it out without loosing anything, but when I picked it up for reassembly it dropped a half inch and almost all flew off. (grrr) The tape under the batteries didn't stick well to the case, I;m guessing once it warms up some that gets better. My bigger problem was it never turned on again after reassembly. I've carefully disassembled and verified every connector is seated right, but nothing. :( Thats probably just bad luck for me, I've done this before without problems and would still recommend iFixit without a moments hesitation.
Just replaced my battery again in about 20 minutes. Here's what I did the last three times instead of the huge undertaking of removing the track pad and motherboard.
Step 64: Loosen the motherboard fastening screws (probably needs a photo with circled screws to loosen). Basically it is all the screws near the front of the motherboard. I removed four screws and loosened the rest. I DID NOT REMOVE ANY CABLES OR THE TOUCHPAD!
Step 65: Place two spudgers under the motherboard, one to the left the small cut out in the stiffener and one on the same spot on the right. Slowly lift front edge of motherboard, leave the spudgers there, slowly work the battery connector out from under the motherboard. There is plenty of space to slip the flat cable under the motherboard and over the stiffener.
Step 66: Remove the old battery and place the new battery in place without allowing the adhesive to stick (I used wax paper). Gently slide the battery cable and small circuit under the motherboard. Attach and you're done.
I have MacBook Pro 15 late 2016 and replaced old battery with iFixit new battery following the above instruction. But this MacBook didn't boot up again after replacement. I followed instruction to tear up and reassemble twice but this computer didn't show any system of life. I'm charging it for one hour now but no sign yet.
What do I need to do?
I put my problem on replacement of old battery of my MacBook Pro 15 late 2016 on this sit yesterday. I finally found and fixed a problem which was caused by one mistake that I had put a screw on a wrong place. Now my laptop works well so far. It's a DAY 1 for the new battery. Thanks to All.
This is a laborious, time-consuming repair, but this AWESOME guide makes it doable for the average DIY dude. Thanks so much for putting it together Jeff! Two suggestions:
- You mention making sure to not put the logic board on top of any cables or connectors when re-assembling. That is extremely good advice. I went through the guide and thought I had enumerated all the connectors, but somehow I missed the keyboard connector which added 30+ minutes to my repair. Perhaps enumerating the cables and connectors would help.
- The blue and green T8 screws in Step 46 are quite different. The green screw actually contains a female-threaded threads for another screw inside its top to receive the 2.4mm T3 screw from Step 29!! This wasn't too difficult to discover but I was surprised that it wasn't mentioned, since it's the first time I've ever encountered this setup.
This guide was spot on accurate and easy to follow. I have a late 2016 15" MBP that Apple had already "fixed" (replaced swollen case and battery) during the warranty period and now that the batteries had started to swell again, I did this repair on my own. I couldn't be happier with the cost and the time involved.
Battery replacement went well and followed the alternative method of leaving logic board and trackpad in the laptop. See others comments on this. Interestingly for the battery calibration before calibration "about this mac"/system report/power was showing 6711mAh and afterwards it shows 6746mAh. Day 2 of battery replacement and all going well.
If you are reading this then you already know reading others comments before doing the work will help to identify potential pitfalls. Thank you to all those that did post comments as it is very helpful reading them before doing the work.
Is it required to remove the pad and board before I remove the old battery?
No. See my first post and some others. It suffices to disconnect the pad connector. Just be careful wihen lifting the motherboard. ;-)
jompo -


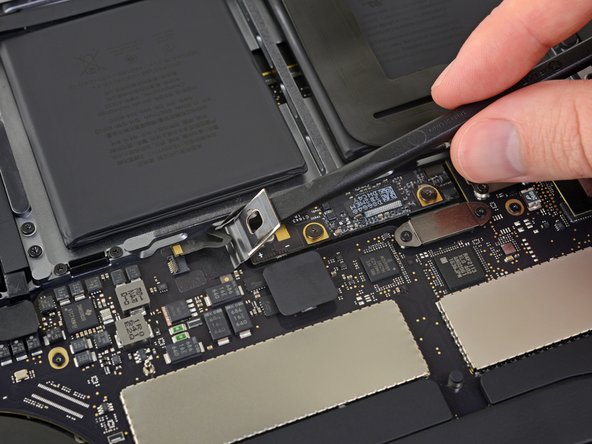
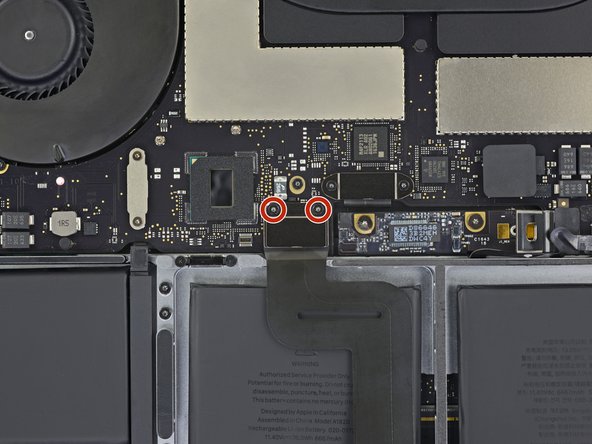


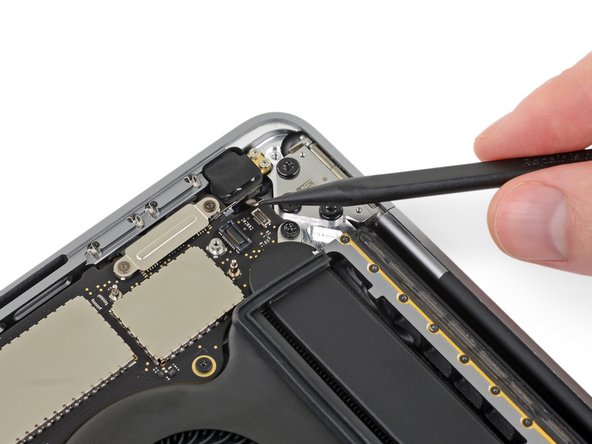


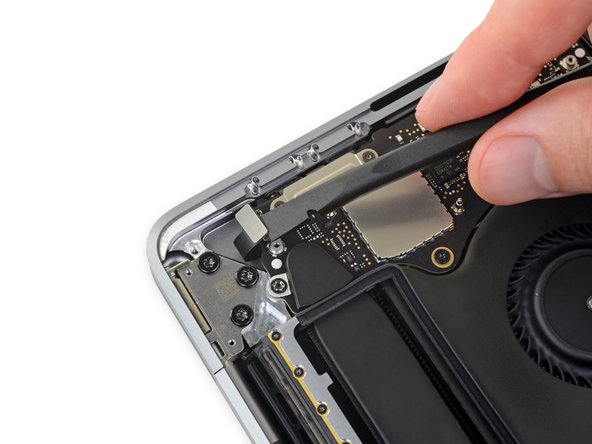


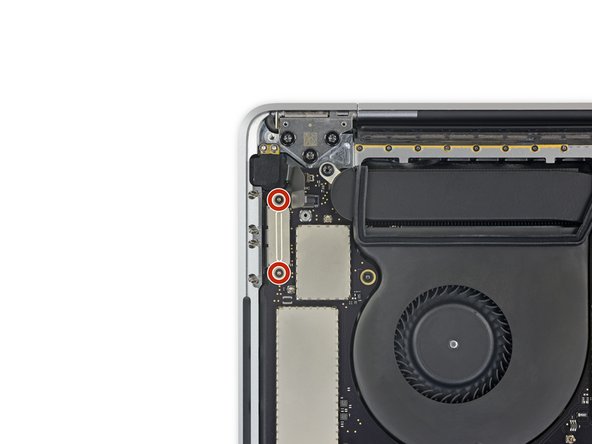


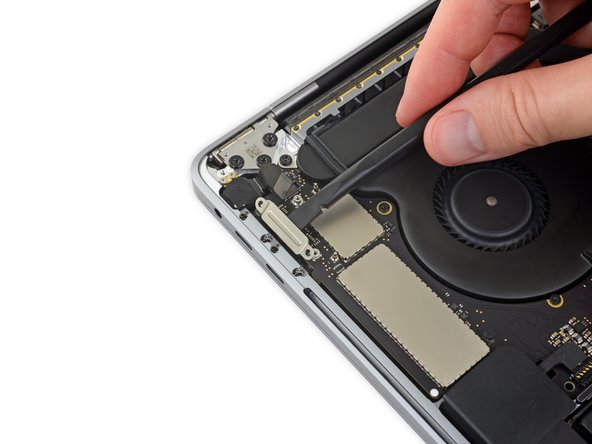
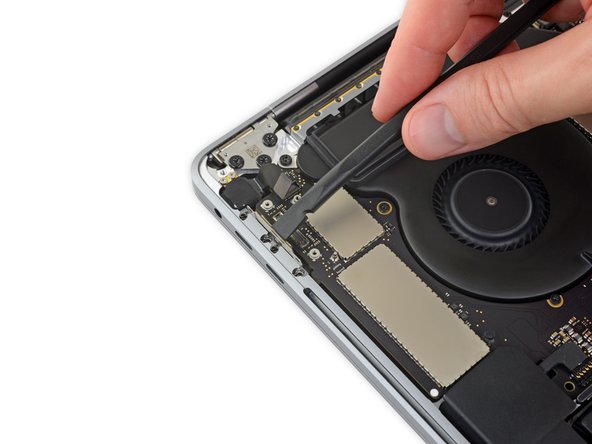


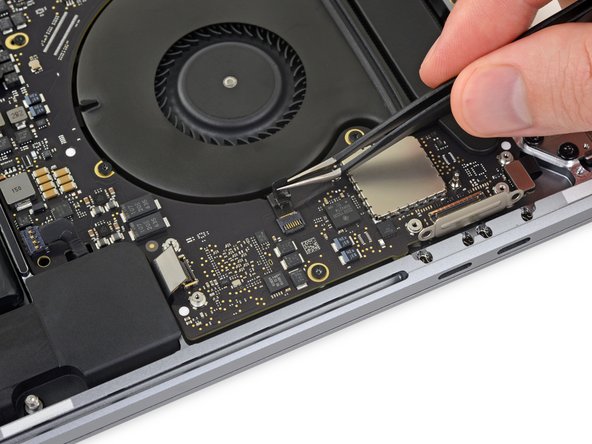

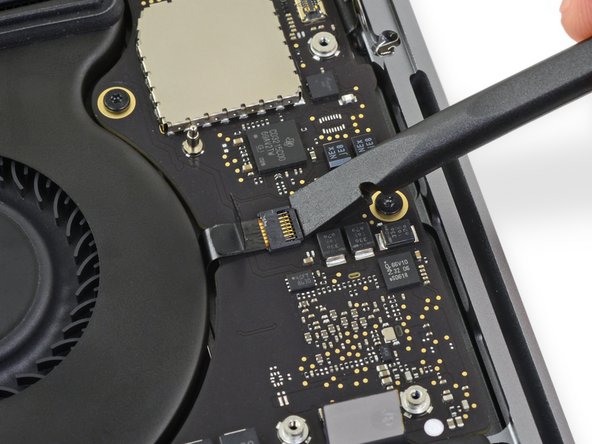
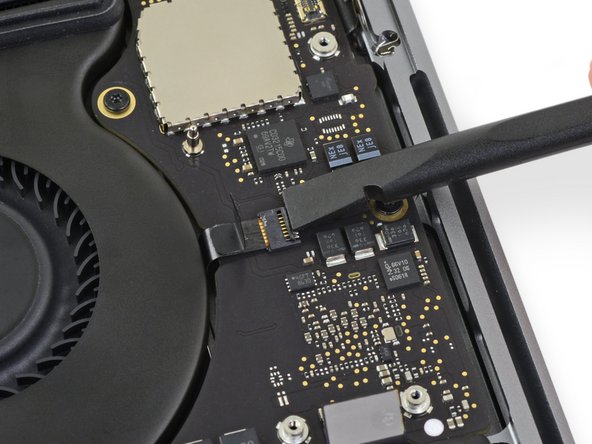

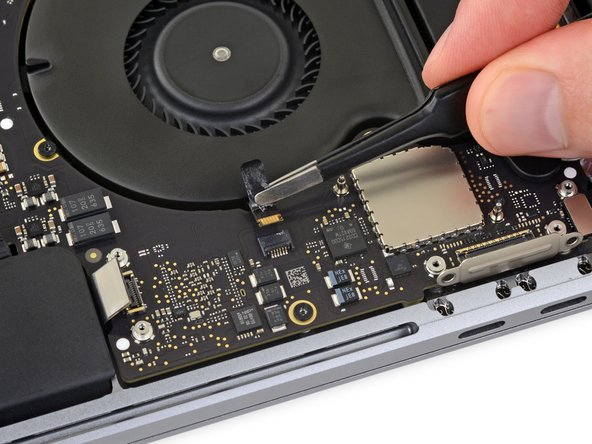


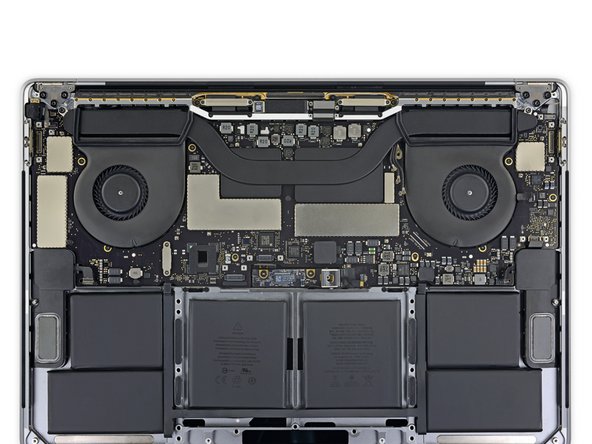


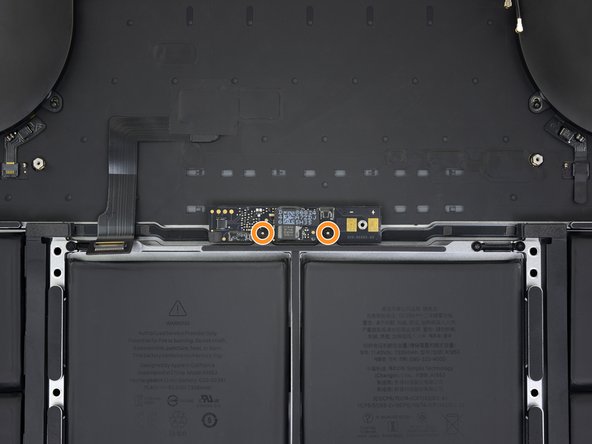

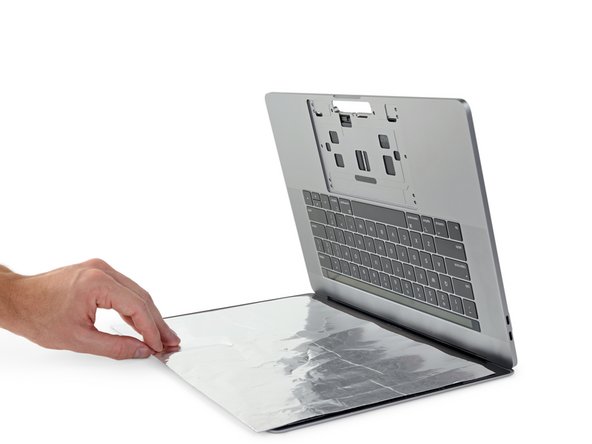
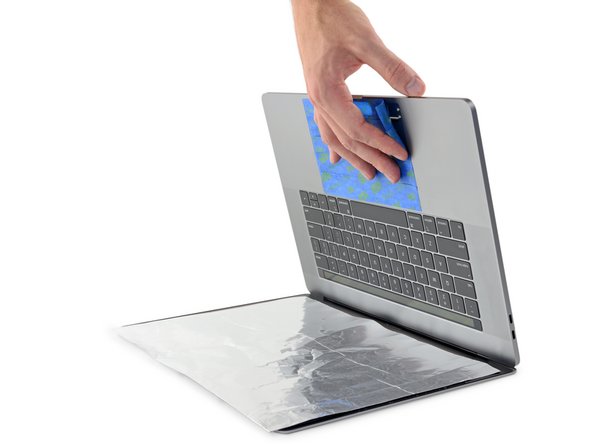

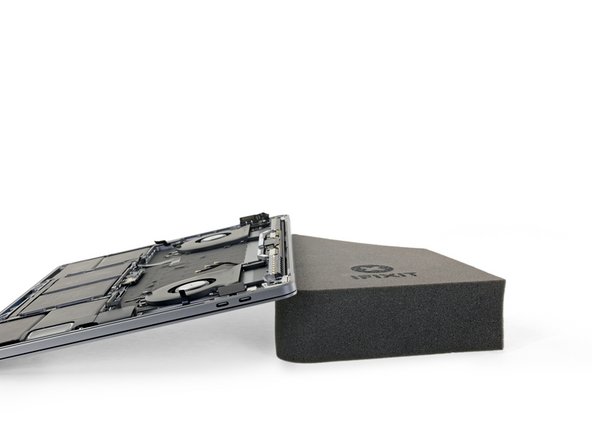


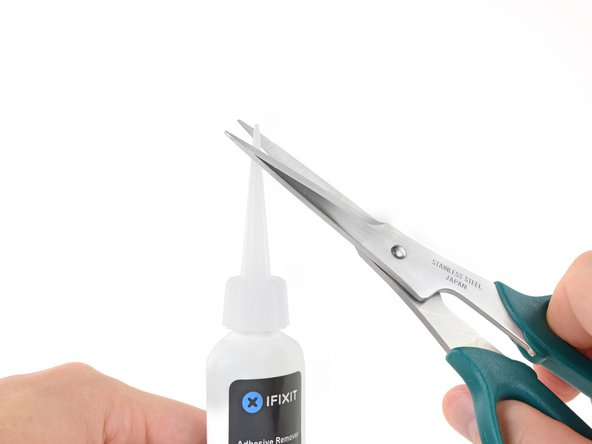
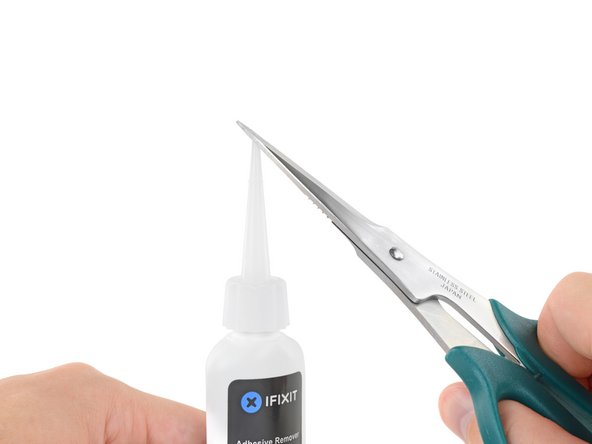


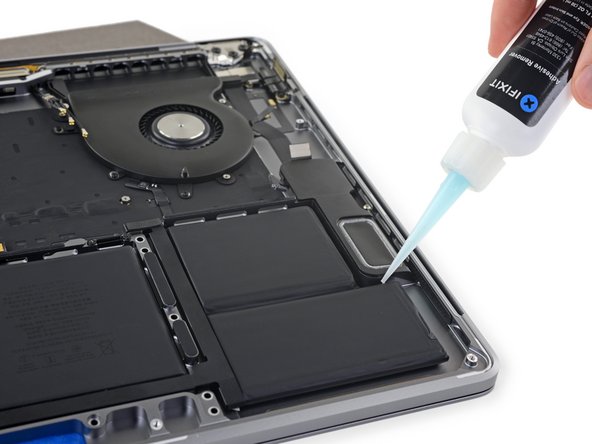

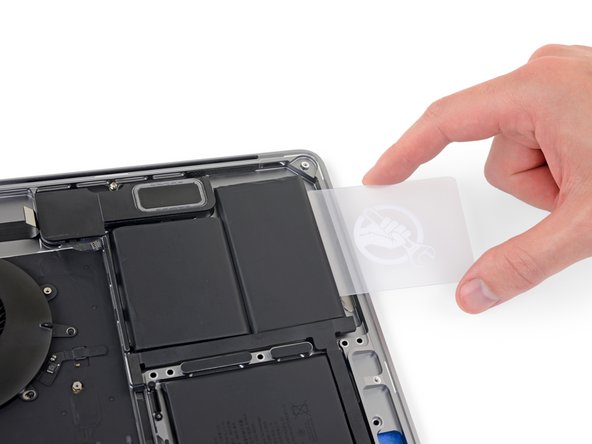


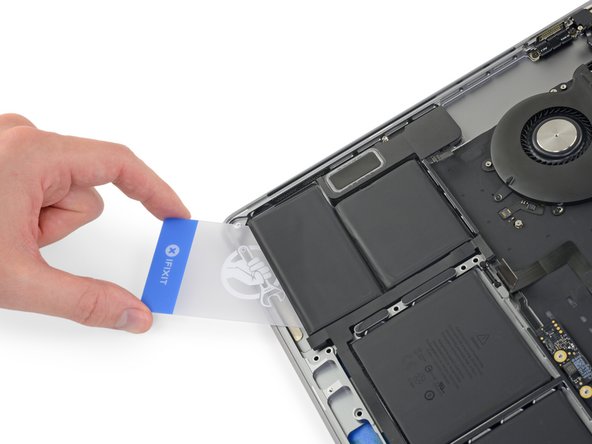
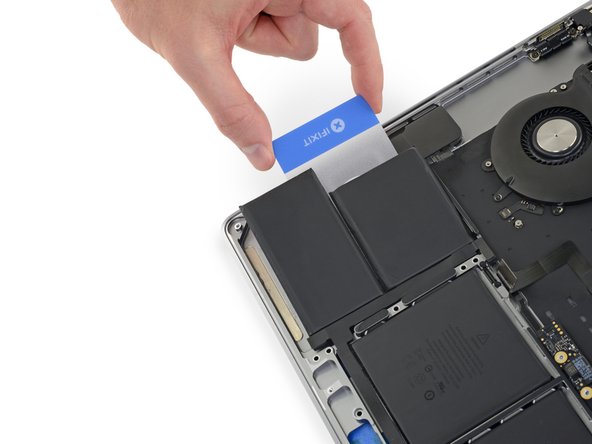


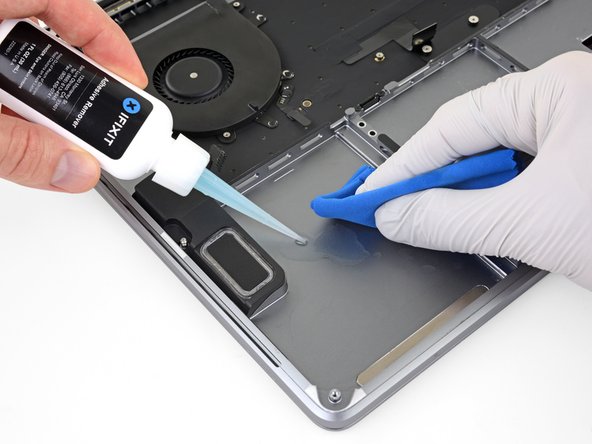


Is this step necessary? I can’t perform this step as I am attempting to repair water damage and need to remove logic board & most likely replace the battery.
Macrepair SF - Antwort
@mac_medic You definitely don’t want the power coming on while the board is wet. In your case, I think powering on the machine to disable Auto Boot would do more damage than it prevents. I agree, skip this step and be prepared to disconnect the battery quickly if the laptop automatically powers on. Good luck!
Jeff Suovanen -
Thats right! You don't want power running while working on your logic board.
Dan -
This did not work when running High Sierra.
Kyle B - Antwort
Tried this on a 2018 MBP 13” Touchbar (there’s no iFixit guide for this model yet). Need to replace a broken screen.
Luckily I managed to connect to an external screen (Cmd-Down Brightness to switch displays) and enter above command. Seems to work, but there’s another problem with this model - it powers up as soon as any key is pressed……. ffs <gnashes teeth>
Cool_Breeze - Antwort
I unscrew the battery first and wrap electrical tape over the logic board battery connector before attempting any repairs to the board. Haven’t had any problems yet and I’ve worked on about 10 of these models already. Also when you open the bottom case use a suction cup at the bottom and pull up then run a plastic spudger along the edges to disconnect the clips. Also only use a plastic spudger on the board. Saw a youtube video from a repair shop and he did not disconnect the power and used all metal tools during the entire process of removing the board. His last step was to disconnect the battery terminal.
Brian - Antwort
Is this step necessary if my mac can turn on? Battery fully dead(
Nursat b - Antwort
BEFORE YOU START: The included torx head stripped off before I was done (and you might need an additional T4) so stop now and go buy a good one. Also they fail to warn you above to get some blue threadlocker ahead of time.
Jason Sherron - Antwort
This command did not work for me and I read that sometime in later 2020 Apple stopped this command from working…any ideas on a work around?
Patrick Machacek - Antwort
Not able to do that with damaged screen
richardjgreen - Antwort
If you have a damaged screen you can still use a converter from thunderbolt (USB 3) to HDMI and plug your Macbook Pro to your TV as monitor display. Just make sure to chose the right Source (HDMI IN) in your TV. I did it and to make it work I unplug and plug again in my Macbook and so I could disable the Auto boot
Roberto Sanchez Bustos -
Hi. This does not work on 2018 13” MacBook Pro with Touch Bar. I did exactly this to disable auto boot. But when I check by using nvram -p it says: auto-boot true. Am I doing something incorrectly? I did everything step by step. Copied and pasted the sudo command, pressed enter and then entered my password. I have Big Sur 11.1 installed. Is there any other way since I need to replace the screen. Thank you. Adrian
Adrian Vizik - Antwort
Hi everyone. This is also a little pointless if you can’t see anything on the screen, and you don’t have a display adapter to USB C to display it. I agree with Brian about removing the back and disconnecting the battery cable before you even think about opening the lid of the MacBook. Applying the insulation tape is also a handy little tip that just makes sure there is no way to discharge from either the board or battery.
Roberto Enrieu - Antwort
running `nvram -p | grep 'AutoBoot'` in terminal verifies that it was accepted
result: `AutoBoot %00`
Marek Polák - Antwort
Running Big Sur 11.6.7 on a 2019 16" MBP, it's "auto-boot". So it's:
nvram -p | grep 'auto-boot'to display the current state, the default istrue- and then to change it,sudo nvram auto-boot=falsewhich turns it off.Ed Mechem -
This step is completely unnecessary if you follow the guide to disconnect the battery properly. Just put some tape between the battery and logic board connection to prevent it from accidentally touching and therefore powering on the laptop.
Grant Ormsby - Antwort
It took me a few tries to make this command work, as I was able to copy and paste the command into Terminal, but could not type in my laptop’s password. I finally typed my password into a text document, copied it (command C), and then pasted it into Terminal and it worked.
tommy404 - Antwort
I didn’t do this. Mine never auto-booted before I replaced the battery. Now it does.
hatuxka - Antwort
BEFORE YOU DO ANYTHING - CHECK THE BATTERY!
I-fixit sent me a bad battery, which I didn’t realize until it was already install. They sent me a new one, but I wasted hours uninstalling and reinstalled.
Get a volt meter and measure the voltage on the output of the battery pack. If it reads 0 V, SEND IT BACK. It should read over 2 V.
bcardanha - Antwort
I've just received my replacement battery and it reads 0,042V between the two main connectors. Do you think it's dead?
peter sussex -
When I did this from Terminal.app within Recovery Mode, the “sudo” was not recognized but I could invoke it without the sudo part. It seems to have been accepted when looking at “nvram -p”
johann beda - Antwort
When in Recovery Mode, you already have superuser powers. So you don't need to prefix commands with the sudo command to invoke them with root privileges; you already have them. Do a
pwd(print working directory) after opening Terminal in Recovery Mode, and you'll see that you're in the root user's directory.Ed Mechem -
I received the battery kit for my 2018 MacBook Pro and as per the above comment from bcardanha - Oct 12, 2021, I checked the voltage on the pads marked + and - . It was zero volts so I panicked a bit.
I sent a message on the iFixiT Facebook page and I got no reply. I finally found the customer service email for Ifixit Europe and sent them an email voicing my concern as I was not keen to work for couple of hours just to discover that the battery is faulty. I had an almost instant reply on the email (kudos to them) and they adviced me to go ahead and install the new battery as the voltage measured when battery is not connected is not relevant.
I took a leap of faith and after two hours… the new battery showed 50% charge and everything seems to be working just fine. I am happy it worked.
Mircea Comanici - Antwort
After removing the old battery and installing the new battery I powered up the MBP before screwing the bottom on. I discovered the my keyboard would not function. It took a few hours of investigation and frustration that I discovered the track pad power ribbon had become partially dislodged from the trackpad. I was able to see that this through the little machined slot where the battery sat. I had to remove the trackpad to reinsert the power ribbon back into the connector in the trackpad. after reassembling and reinstalling the battery etc the keyboard worked. Just food for thought if your run into the keyboard issue.
Ed Mease - Antwort
This should be the default. IMO I tell you to power on - not the lid.
G Sena - Antwort
Est ce que cela fonctionne sur un macbook pro 2017 sans touchbar ?
maël muzelet - Antwort
Bonjour Maël, oui, ce tutoriel concerne "les MacBook Pro 2016 (et plus récents) et les MacBook Retina 12" 2017 (et plus récents)"
Claire Miesch -
Excellent instructions. I was able to follow and install the new screen. I recommend that you get a good set of tools before you begin. I started with an inexpensive repair kit bought online. The Penta and torx bits failed. I bought an IFIXIT kit with quality bits and I was able to do everything I needed.
Tom Markham - Antwort
If you're not running an admin account the sudo command won't work (which honestly, you should not be running admin). Rather than logging in to your admin amount via the OS, in the terminal type "login [admin username]," then the password and you'll be able to do the sudo command as described above. Once you're complete, type "logout [admin username]" and you'll be good to go. Obviously replace [admin username] with whatever the account name for your admin user is.
arichard2401 - Antwort
For those unable to complete this step because the screen is too damaged I recommend leaving your macbook on until the battery dies.
Nicholas R Licato - Antwort
Just replaced my 2018 15" MBP battery. Running Sonoma.
I found no way to disable AutoBoot (The status can be checked in the Power section of system report).
Anyway, i left my battery completely drain before opening the MBP, and had no issues during the process.
Cédric Bontems - Antwort
After sending this command in terminal when I checked what happens if I now open the lid, instead the screen lit slightly up (still black) then a battery symbol showing the charging state showed up.
Now, after replacement of the battery, this is all I get to see.
No reset of NVRAM nor PRAM helped.
Currently the new battery charges (58% atm) and it feels like it‘s mocking me.
webrockers - Antwort
I suspected the keyboard or TouchID sensor wouldn’t work, so I went on and checked every connector.
I missed connecting the left TouchID sensor from step 31.
webrockers -