Einleitung
Anhand dieser Anleitung kannst du die gesamte Display-Einheit deines MacBook Pro auswechseln, wenn sie beschädigt oder defekt ist. Diese Baugruppe beinhaltet auch die integrierten Flachbandkabel für Display und Beleuchtung.
Obwohl wir dieses Verfahren erfolgreich mit originalen Apple Ersatzdisplays getestet haben, kann es vorkommen, dass der T2-Chip von Apple verhindert, dass Aftermarket-Displays einwandfrei funktionieren, und dein MacBook Pro dadurch möglicherweise nicht startet.
Zu deiner Sicherheit empfehlen wir dir, den Akku deines MacBook Pro auf unter 25% zu entladen, bevor du anfängst. Ein geladener Lithium-Ionen-Akku kann zu einem gefährlichen und unkontrollierbaren Feuer führen, falls er versehentlich perforiert wird.
Was du brauchst
-
-
Schalte deinen Mac ein und starte Terminal.
-
Kopiere den folgenden Befehl und füge ihn im Terminal ein (oder tippe ihn exakt so ein):
-
sudo nvram AutoBoot=%00
-
Drücke die Eingabetaste [return]. Wenn du dazu aufgefordert wirst, gib dein Administratorpasswort ein und drücke erneut [return]. Hinweis: die Return-Taste kann auch mit ⏎ oder "enter" gekennzeichnet sein.
-
sudo nvram AutoBoot=%03
-
-
-
Entferne sechs P5 Pentalobeschrauben, mit denen die Gehäuseunterseite befestigt ist. Sie haben folgende Längen:
-
Vier 3,7 mm Schrauben
-
Zwei 7,3 mm Schrauben
-
-
-
Drücke einen Saugheber nahe an der Vorderkante des unteren Gehäuses zwischen den Schraubenlöchern fest.
-
Ziehe den Saugheber soweit hoch, dass ein kleiner Spalt unter der Gehäuseunterseite entsteht.
-
-
-
Schiebe die Ecke eines Plektrums in den eben entstandenen Spalt an der Gehäuseunterseite ein.
-
Schiebe das Plektrum um die nächste Ecke herum und dann bis zur Seitenmitte des MacBooks hoch.
I recommend being careful while sliding as you can scratch the speaker. The actual clip is about halfway up the side, whereas the speaker is closer to the front (further from the hinge). So stay very shallow with just the tip of the pick until you get halfway up the side.
-
-
-
Wiederhole den vorherigen Schritt auf der anderen Seite. Nutze ein Plektrum, um die zweite Raste zu lösen.
Same advice that I gave for the other side — be careful not to scratch the speaker which is close to the bottom. Keep the pick shallow until you get halfway up the side.
-
-
-
Hebe die Vorderkante der Gehäuseunterseite (also die Kante gegenüber den Scharnieren) soweit an, dass du mit den Fingerspitzen hineingreifen und sie gut fassen kannst.
-
-
-
Ziehe die Gehäuseunterseite kräftig zur Vorderkante des MacBooks hin (also weg von den Scharnieren), so dass sich auch die letzte verbliebene Raste öffnet.
-
Ziehe zuerst an einer, dann an der anderen Ecke.
This was made a lot easier by using a lever in the hinge area in combination with pulling. The amount of force required was more than the grip I could get on the metal allowed for my macbook.
Thank you for this comment! 🙏
For me it was the same way, wasn't able to get enough grip to pull sufficiently - but gently levering near the hinge with a spudger to "push" the bottom panel away worked well!There is no pulling required. Use an opening pick or a spudger at the hinge area to gently and easily nudge the bottom panel off the clips. It should be effortless.
If you do pull on the bottom case be careful of where you place the hand supporting the Mac, otherwise you'll make a blood sacrifice to the Mac gods! I placed my other hand too close to the feet on the bottom case and while removing it, the sharp edge of the bottom case sliced into my thumb.
-
-
-
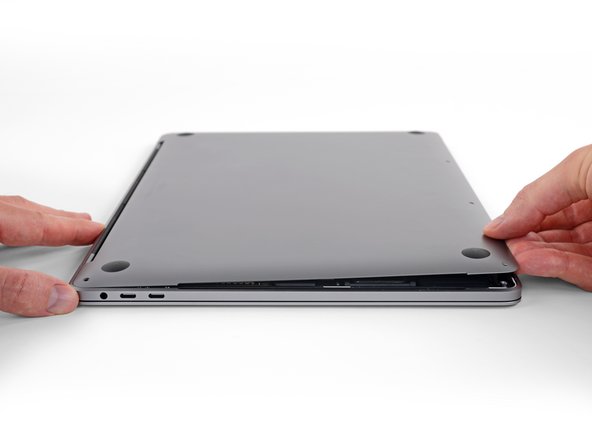
Entferne die Gehäuseunterseite.
-
Lege es passend hin und richte die Rasten zum Einschieben nahe an den Displayscharnieren aus. Drücke nach unten und schiebe den Deckel in Richtung der Scharniere. Er sollte nach dem Einrasten anhalten.
-
Wenn die Rasten fest sitzen und die Gehäuseunterseite gut ausgerichtet ist, dann drücke die Gehäuseunterseite fest nach unten, bis die vier verborgenen Rasten einschnappen. Du solltest diesen Vorgang hören und fühlen können.
-
-
-
Zur Isolation ist ein Aufkleber über der Akkuplatine an der Kante des Logic Boards direkt beim Akku angebracht. Ziehe ihn ab.
-
Wenn sich der Aufkleber nicht leicht lösen lässt, dann erwärme ihn leicht mit einem iOpener, einem Haartrockner oder einem Heißluftgebläse. Wenn der Kleber weich ist, versuche es erneut.
-
-
-
Ziehe alle eventuell vorhandenen Klebestreifen vom Datenkabel zur Akkuplatine ab.
-
-
-
Klappe behutsam den Sicherungsbügel am ZIF-Verbinder des Datenkabels zur Akkuplatine hoch.
-
-
-
Schiebe das Datenkabel zur Akkuplatine aus dem Anschluss auf dem Logic Board heraus und trenne es ab.
-
-
-
Löse das Klebeband über dem Stecker des Akkuplatinen-Datenkabels ab.
-
Heble die Sicherungsklappe des Steckers am anderen Ende des Akkuplatinen-Datenkabels hoch und trenne ihn ab.
I’ve seen versions of this battery board that the cable goes around and to the back of the board, so this step is not always necesary.
-
-
-
-
Schiebe das Akkuplatinen-Datenkabel aus seinem Anschluss auf der Akkuplatine heraus und trenne es ab.
I’ve seen versions of this battery board that the cable goes around and to the back of the board, so this step is not always necesary.
Putting a mark on the cable will be helpful when reinstalling so you don't put it backwards or upside down.
This isn't necessary for many repairs, such as the Screen Replacement. I just lift the cable out of the way enough to do the next few steps and leave it attached.
-
-
-
Entferne die 6,7 mm T5 Torx Flachkopfschraube, mit der der Akkusstecker befestigt ist.
-
-
-
Hebe den Akkustrom-Stecker vorsichtig mit einem Spudger hoch, und trenne so den Akku.
-
-
-
Entferne die beiden 3,5 mm Torx T3 Schrauben, mit denen die Abdeckung über dem Flachbandkabel zur Displayplatine befestigt ist.
-
Entferne die Abdeckung des Flachbandkabels zur Displayplatine.
Thats actually T4
Maybe your T4 is worn? I had to use T3. For the next step too.
T3 for me as well.
-
-
-
Entferne die beiden 1,7 mm Torx T3 Schrauben, mit denen die Abdeckung über dem Stecker am Flachbandkabel zur Displayplatine befestigt ist.
-
Entferne die Abdeckung am Stecker des Flachbandkabels zur Displayplatine.
-
-
-
Heble das Flachbandkabel zur Displayplatine gerade aus seinem Anschluss nach oben aus der Displayplatine heraus.
-
-
-
Drehe die vier 2,0 mm Torx T3 Schrauben aus den Scharnierabdeckungen heraus (also zwei auf jeder Seite).
-
-
-
Entferne die einzelne 2,9 mm Torx T5 Schraube, welche das Antennenkabelbündel befestigt.
-
-
-
Heble jedes der drei Antennenkabel senkrecht aus seinem Anschluss hoch und trenne es ab.
-
Schiebe die Pinzette oder das flache Ende des Spudgers unter jedes Kabel nahe an den Anschluss heran, drehe dann behutsam oder heble, bis es sich löst.
-
-
-
Entferne die vier 3,3 mm Torx T5 Schrauben, mit denen die Displayplatine befestigt ist.
-
Achte darauf, dass das Flachbandkabel zur Displayplatine über der Platine verläuft und nicht darunter eingesperrt ist.
Needed a T4, not T5 on mine. It’s unclear if it’s my bits or my laptop that disagree with this step’s directions. If your T5 doesn’t fit though, don’t force it. See if a T4 fits. If it’s like mine, it will fit perfectly with no play.
It was T5 for me
T4 for mine.
-
-
-
Entferne die sechzehn 1,5 mm P2 Pentalobeschrauben, mit denen die Antenneneinheit befestigt ist (acht auf jeder Seite).
Before this step, note those two yellow circles (copper) towards the inside of the laptop and next to the red circles around the antenna screws. They are the result of two T4s that were removed.
You can see the black screw heads in Step 24 and they’re just copper rings with no screw in Step 25.
There are two additional screws along this row which will need to be removed. Once done, the assembly they were holding down will be loose and your antenna assembly will also feel more free. Gently pry it upwards. It will not require much force. Significantly less than I was trying to apply to it before realizing the instructions were wrong.
If your antenna assembly won’t budge after following the directions, this is what’s missing.
Hey James! I'm not sure which screws you’re talking about. Are these screws in addition to the four already marked in Step 24?
The instruction is correct, these strip easily! Use a lot of light and care!
I stripped one of the 16 screws and that was the end of that fastening point, I had to use physical force to break it off the assembly. Miraculously, the assembly appears to be still functional
-
-
-
Heble die Antenneneinheit mit einem Plektrum hoch und trenne sie vom MacBook Pro ab.
-
-
-
Entferne vorsichtig die Antenneneinheit und führe gleichzeitig das Antennenkabelbündel unter dem Kühlkörper heraus.
When reassembling this, don't forget to have the display board's cables that go to the display be under the antenna assembly. I screwed in 16 screws before realizing this!
-
-
-
Entferne die vier 3,9 mm Torx T3 Schrauben, Schraubendreher, mit denen die Federabdeckungen des Displaykabels befestigt sind.
-
-
-
Entferne zwei 5 mm Torx T8 Schrauben von jedem Scharnier (also insgesamt vier).
-
-
-
Entferne die beiden 1,5 mm Torx T3 Schrauben, mit denen die Abdeckhalterung der Touch Bar und des Öffnungswinkelsensors befestigt ist.
-
-
-
Schiebe die Halterung mit einer Pinzette zur Seitenkante des MacBooks hin, bis sie sich aus der geschlitzten Haltelasche auf dem Logic Board löst.
-
Entferne die Halterung.
-
-
-
Heble das Kabel zum Öffnungswinkelsensor gerade nach oben und trenne es vom Logic Board ab.
-
-
-
Entferne die 1,9mm lange Schraube, die den Öffnungswinkelsensor befestigt, mit einem P2 Pentalobe Schraubendreher.
-
-
-
Ziehe den Öffnungswinkelsensor mit einer Pinzette oder deinen Fingern vom Rahmen und löse ihn von der Halterung.
-
Entferne den Öffnungswinkelsensor.
-
-
-
Wenn du dein Display wiederverwendest, öffne es und klebe etwas Klebeband auf das Glas direkt über jedem Scharnier. So wird vermieden, dass das Glas in den folgenden Schritten verkratzt wird.
-
Öffne das Display vollständig und stelle das MacBook Pro auf eine Seitenkante.
-
-
-
Benutze einen T8 Torx Schraubendreher, um die beiden übrigen 5 mm Scharnierschrauben zu entfernen (eine von jedem Scharnier).
-
Entferne die oberste Schraube zuletzt, und stütze dabei die beiden Hälften des MacBook Pro mit einer Hand ab, um sicherzustellen, dass sie sich nicht voneinander lösen und umkippen.
I perform this step, with all my MacBook screen replacements, with the main body keyboard down on my workbench, and the screen assembly hanging off and supported by my legs. This way, when I take the screws out, I don't need to worry about the main body of the laptop, and the screen assembly does not go anywhere. I have much finer control over lifting and removing the screen assembly. This prevents any instability and prevents the hinges from accidentally hitting any components on the logic board, which can cause severe damage on some models.
-
-
-
Drücke beide Hälften des MacBook Pro zusammen, sodass die Scharniere aus ihren Vertiefungen im Rahmen herausgehoben werden können.
-
Drücke den Hauptteil des MacBook Pro von dir weg und ziehe das Display gleichzeitig zu dir hin, um die beiden Teile voneinander zu trennen.
-


Vergleiche dein neues Ersatzteil mit dem Originalteil. Möglicherweise musst du einzelne Komponenten übertragen oder Schutzfolien vom neuen Teil entfernen, bevor du es einbaust.
Folge dann den Schritten in umgekehrter Reihenfolge, um dein Gerät wieder zusammenzubauen.
Entsorge deinen Elektroschrott fachgerecht.
Die Reparatur verlief nicht wie geplant? In unserem Antwortenforum hilft man dir sicher gern bei der Fehlersuche.
Rückgängig: Ich habe diese Anleitung nicht absolviert.
41 weitere Nutzer:innen haben diese Anleitung absolviert.
Besonderer Dank geht an diese Übersetzer:innen:
100%


Diese Übersetzer:innen helfen uns, die Welt zu reparieren! Wie kann ich mithelfen?
Hier starten ›


20 Kommentare
Anybody know the screen part# or where to find it?
Ou est ce qu’on trouve l’écran ?
Ou est ce qu’on trouve l’écran ?
Is it possible to boot up the machine without the screen attached (and use external displays only)?
yes USBC to HDMI
jim -
Great guide, covers the details nicely. I would add that the nvram command no longer works as of firmware in Big Sur. We don’t have too much trouble with that, however. Shut down the machine, and make sure to not open the lid or do anything else until the battery is disconnected.
I will also note that we’ve never had a T3 screwdriver not strip unless we cut the tip off the torx; the screws Apple uses never seem to be happy until that is done. Haven’t see anyone else complain about that, though, so maybe it’s just us!
In case anyone is wondering: as long as your part is OEM, it shouldn’t give any issues with the T2 chip. Most assemblies are not sold with the screen angle sensor, however, so that needs to be transferred to the new assembly. That’s just a matter of unscrewing the one screw that holds it to the clutch and then attaching it to the new one in the same way.
My screen gets glitch lines but only if I open it up past 25-30 degrees. So I’m thinking it is something mechanical with the hinge and the connecting wires. any insight?
I started getting horizontal lines 2 mm apart on my screen. Lines would vanish when screen was closed to a smaller angle (30 degrees) and then reappear, when opening wider. Also experienced occasions ghosting of images or overlapping app windows. Took the MBP 16 to the Apple Store for further diagnosis. Techs indicated that it could be a loose display cable. They offered to check for a possible loose display cable and re-seat it. If not resolved, said display would have to be replaced. For what it’s worth. (Apple offline and online diagnostics performed all indicated no other hardware problems, with the GPU, etc. Problem seemed to be diagnosed. Attaching an external display is also helpful in diagnostic of the GPU. The Apple Store near me, quoted $599 for the Apple display and $79 for install.
freaman -
Great guide. It doesn't include the replacement of the lid angle sensor. I had to disconnect it from the old screen and re-attach it to the new one. I also got really worried because it didn't turn on when I first tried to restart. I had to plug it in and hold the power button for a few seconds before it came back on. Definitely gave me a freight.
Good morning all !
the screen of my Macbook Pro 16 "from 2019 has just given up. The screen remains black despite all the attempts by Apple technicians. I would like to use it without the original one, leaving it hanging as I used to habit on my two external screens. Do you think it is possible to start it without its screen connected and at the same time take advantage of the speakers, the USB C sockets, the touch bar, and the trackpad Thank you in advance!
Good repair guide! I just swapped out my display with no issues. I'd consider adding the step to swap out the screen angle sensor, as mine (and most replacement displays, apparently) didn't come with a new one and it had to be swapped over. FWIW my screen was showing as over-saturated with blown-out highlights, some ghosting of background windows through the front window, strange shadows from smaller windows--tilting the screen to mostly closed would make it better, but not fix it entirely. Brand New display sourced from Ebay ($550) fixed it right up. Thanks for the great guide!
Are there any apple boobytraps like they have done with the serialization of the iPhone parts?
I followed the guide to the letter but now the machine won’t turn on. Obviously I think somethings wrong with the battery connect but I have no idea what. Any suggestions?
When I finished mine I had the same issue, and was very worried that I would have to take it apart again. But I held the power button down for a bit longer than usual, and it eventually turned on. Maybe yours will do the same.
I bought the "Apple MacBook Pro A2141 16" 2019 LCD Screen" on EBay for $300 USD.
I bought the "GogoFix Precision Pro Aluminum Alloy Screwdriver Tool Kit" on Amazon for $20 USD. (ALL the tools you need).
You do NOT need the "TR8 Torx Security Screwdriver". The regular "T8 Torx" screwdriver in the kit above is what you need.
These instructions are truly amazing, and I want to thank the author very much! <3
My only advice is buy 15 small baggies, and label them with the step number of the instructions as you place screws in the bags.
An ice cube tray or bead sorting tray is an easy way to keep track of the screws.
Is this step necessary? I can’t perform this step as I am attempting to repair water damage and need to remove logic board & most likely replace the battery.
Macrepair SF - Antwort
@mac_medic You definitely don’t want the power coming on while the board is wet. In your case, I think powering on the machine to disable Auto Boot would do more damage than it prevents. I agree, skip this step and be prepared to disconnect the battery quickly if the laptop automatically powers on. Good luck!
Jeff Suovanen -
Thats right! You don't want power running while working on your logic board.
Dan -
This did not work when running High Sierra.
Kyle B - Antwort
Tried this on a 2018 MBP 13” Touchbar (there’s no iFixit guide for this model yet). Need to replace a broken screen.
Luckily I managed to connect to an external screen (Cmd-Down Brightness to switch displays) and enter above command. Seems to work, but there’s another problem with this model - it powers up as soon as any key is pressed……. ffs <gnashes teeth>
Cool_Breeze - Antwort
I unscrew the battery first and wrap electrical tape over the logic board battery connector before attempting any repairs to the board. Haven’t had any problems yet and I’ve worked on about 10 of these models already. Also when you open the bottom case use a suction cup at the bottom and pull up then run a plastic spudger along the edges to disconnect the clips. Also only use a plastic spudger on the board. Saw a youtube video from a repair shop and he did not disconnect the power and used all metal tools during the entire process of removing the board. His last step was to disconnect the battery terminal.
Brian - Antwort
Is this step necessary if my mac can turn on? Battery fully dead(
Nursat b - Antwort
BEFORE YOU START: The included torx head stripped off before I was done (and you might need an additional T4) so stop now and go buy a good one. Also they fail to warn you above to get some blue threadlocker ahead of time.
Jason Sherron - Antwort
This command did not work for me and I read that sometime in later 2020 Apple stopped this command from working…any ideas on a work around?
Patrick Machacek - Antwort
Not able to do that with damaged screen
richardjgreen - Antwort
If you have a damaged screen you can still use a converter from thunderbolt (USB 3) to HDMI and plug your Macbook Pro to your TV as monitor display. Just make sure to chose the right Source (HDMI IN) in your TV. I did it and to make it work I unplug and plug again in my Macbook and so I could disable the Auto boot
Roberto Sanchez Bustos -
Hi. This does not work on 2018 13” MacBook Pro with Touch Bar. I did exactly this to disable auto boot. But when I check by using nvram -p it says: auto-boot true. Am I doing something incorrectly? I did everything step by step. Copied and pasted the sudo command, pressed enter and then entered my password. I have Big Sur 11.1 installed. Is there any other way since I need to replace the screen. Thank you. Adrian
Adrian Vizik - Antwort
Hi everyone. This is also a little pointless if you can’t see anything on the screen, and you don’t have a display adapter to USB C to display it. I agree with Brian about removing the back and disconnecting the battery cable before you even think about opening the lid of the MacBook. Applying the insulation tape is also a handy little tip that just makes sure there is no way to discharge from either the board or battery.
Roberto Enrieu - Antwort
running `nvram -p | grep 'AutoBoot'` in terminal verifies that it was accepted
result: `AutoBoot %00`
Marek Polák - Antwort
Running Big Sur 11.6.7 on a 2019 16" MBP, it's "auto-boot". So it's:
nvram -p | grep 'auto-boot'to display the current state, the default istrue- and then to change it,sudo nvram auto-boot=falsewhich turns it off.Ed Mechem -
This step is completely unnecessary if you follow the guide to disconnect the battery properly. Just put some tape between the battery and logic board connection to prevent it from accidentally touching and therefore powering on the laptop.
Grant Ormsby - Antwort
It took me a few tries to make this command work, as I was able to copy and paste the command into Terminal, but could not type in my laptop’s password. I finally typed my password into a text document, copied it (command C), and then pasted it into Terminal and it worked.
tommy404 - Antwort
I didn’t do this. Mine never auto-booted before I replaced the battery. Now it does.
hatuxka - Antwort
BEFORE YOU DO ANYTHING - CHECK THE BATTERY!
I-fixit sent me a bad battery, which I didn’t realize until it was already install. They sent me a new one, but I wasted hours uninstalling and reinstalled.
Get a volt meter and measure the voltage on the output of the battery pack. If it reads 0 V, SEND IT BACK. It should read over 2 V.
bcardanha - Antwort
I've just received my replacement battery and it reads 0,042V between the two main connectors. Do you think it's dead?
peter sussex -
When I did this from Terminal.app within Recovery Mode, the “sudo” was not recognized but I could invoke it without the sudo part. It seems to have been accepted when looking at “nvram -p”
johann beda - Antwort
When in Recovery Mode, you already have superuser powers. So you don't need to prefix commands with the sudo command to invoke them with root privileges; you already have them. Do a
pwd(print working directory) after opening Terminal in Recovery Mode, and you'll see that you're in the root user's directory.Ed Mechem -
I received the battery kit for my 2018 MacBook Pro and as per the above comment from bcardanha - Oct 12, 2021, I checked the voltage on the pads marked + and - . It was zero volts so I panicked a bit.
I sent a message on the iFixiT Facebook page and I got no reply. I finally found the customer service email for Ifixit Europe and sent them an email voicing my concern as I was not keen to work for couple of hours just to discover that the battery is faulty. I had an almost instant reply on the email (kudos to them) and they adviced me to go ahead and install the new battery as the voltage measured when battery is not connected is not relevant.
I took a leap of faith and after two hours… the new battery showed 50% charge and everything seems to be working just fine. I am happy it worked.
Mircea Comanici - Antwort
After removing the old battery and installing the new battery I powered up the MBP before screwing the bottom on. I discovered the my keyboard would not function. It took a few hours of investigation and frustration that I discovered the track pad power ribbon had become partially dislodged from the trackpad. I was able to see that this through the little machined slot where the battery sat. I had to remove the trackpad to reinsert the power ribbon back into the connector in the trackpad. after reassembling and reinstalling the battery etc the keyboard worked. Just food for thought if your run into the keyboard issue.
Ed Mease - Antwort
This should be the default. IMO I tell you to power on - not the lid.
G Sena - Antwort
Est ce que cela fonctionne sur un macbook pro 2017 sans touchbar ?
maël muzelet - Antwort
Bonjour Maël, oui, ce tutoriel concerne "les MacBook Pro 2016 (et plus récents) et les MacBook Retina 12" 2017 (et plus récents)"
Claire Miesch -
Excellent instructions. I was able to follow and install the new screen. I recommend that you get a good set of tools before you begin. I started with an inexpensive repair kit bought online. The Penta and torx bits failed. I bought an IFIXIT kit with quality bits and I was able to do everything I needed.
Tom Markham - Antwort
If you're not running an admin account the sudo command won't work (which honestly, you should not be running admin). Rather than logging in to your admin amount via the OS, in the terminal type "login [admin username]," then the password and you'll be able to do the sudo command as described above. Once you're complete, type "logout [admin username]" and you'll be good to go. Obviously replace [admin username] with whatever the account name for your admin user is.
arichard2401 - Antwort
For those unable to complete this step because the screen is too damaged I recommend leaving your macbook on until the battery dies.
Nicholas R Licato - Antwort
Just replaced my 2018 15" MBP battery. Running Sonoma.
I found no way to disable AutoBoot (The status can be checked in the Power section of system report).
Anyway, i left my battery completely drain before opening the MBP, and had no issues during the process.
Cédric Bontems - Antwort
After sending this command in terminal when I checked what happens if I now open the lid, instead the screen lit slightly up (still black) then a battery symbol showing the charging state showed up.
Now, after replacement of the battery, this is all I get to see.
No reset of NVRAM nor PRAM helped.
Currently the new battery charges (58% atm) and it feels like it‘s mocking me.
webrockers - Antwort
I suspected the keyboard or TouchID sensor wouldn’t work, so I went on and checked every connector.
I missed connecting the left TouchID sensor from step 31.
webrockers -