Zum Hauptinhalt wechseln

MacBook Pro (13 Zoll, Anfang 2013, Retina Display) rechten Lüfter austauschen

Was du brauchst

  1. MacBook Pro (13 Zoll, Anfang 2013, Retina Display) rechten Lüfter austauschen, Unteres Gehäuse: Schritt 1, Bild 1 von 1
    In diesem Schritt verwendetes Werkzeug:
    Magnetic Project Mat
    $19.95
    Kaufen
    • Entferne die folgenden zehn Schrauben, mit denen das untere Gehäuse am oberen Gehäuse befestigt ist:

    • Zwei 2,3 mm P5 Pentalobe Schrauben

    • Acht 3,0 mm P5 Pentalobe Schrauben

    • Halte während der ganzen Reparatur deine Schrauben gut geordnet und achte darauf, dass sie genau an ihren alten Platz zurück kommen, sonst könnte dein Gerät beschädigt werden.

    If don’t have one of those neat project mats, then you can use small pieces of flattened blu-tack to hold the screws. If you arrange them in the shape of your mac book cover, and put the screws down methodically, you can get a one-to-one mapping of the screws to the correct screw holes.

    Toby Thurston - Antwort

    Or you can use an ice tray where you put the screws and the parts in separate bays in the same order as they come in the instructions.

    timofej.se -

    This is great! I used a small magnetic white board, and wrote on it to identify the parts as I went. This whole process, from the fast shipment to the great instructions to the complete, high quality, tool kit has been great. I’m typing this comment on my resurrected laptop. Thank you! Sue

    Susan Greer - Antwort

    It would be a good idea if people recorded in the comments which screws go where so that, if someone lost their screw positions, they could recover them from the comments.

    Raymond Shpeley - Antwort

  2. MacBook Pro (13 Zoll, Anfang 2013, Retina Display) rechten Lüfter austauschen: Schritt 2, Bild 1 von 1
    • Versuche mit den Fingern zwischen das obere und das untere Gehäuse zu kommen.

    • Ziehe das untere Gehäuse behutsam vom Oberen weg.

    • Entferne das untere Gehäuse und lege es zur Seite.

  3. MacBook Pro (13 Zoll, Anfang 2013, Retina Display) rechten Lüfter austauschen: Schritt 3, Bild 1 von 3 MacBook Pro (13 Zoll, Anfang 2013, Retina Display) rechten Lüfter austauschen: Schritt 3, Bild 2 von 3 MacBook Pro (13 Zoll, Anfang 2013, Retina Display) rechten Lüfter austauschen: Schritt 3, Bild 3 von 3
    • Drücke beim Wiederzusammenbau das untere Gehäuse in der Mitte leicht an, damit die beiden Plastikklammern wieder einrasten.

    • Das untere Gehäuse ist in der Mitte durch zwei Plastikklammern mit dem oberen Gehäuse verbunden.

  4. MacBook Pro (13 Zoll, Anfang 2013, Retina Display) rechten Lüfter austauschen, Akkuanschluss: Schritt 4, Bild 1 von 1
    • Entferne die Plastikabdeckung über der Platine des Akkuanschlusses.

    The replacement cover doesn't seem to have the formed pads attached. I re-installed the original.

    Adrien - Antwort

  5. MacBook Pro (13 Zoll, Anfang 2013, Retina Display) rechten Lüfter austauschen: Schritt 5, Bild 1 von 1
    • Entferne die folgenden Schrauben, mit denen die Platine des Akkuanschlusses am Logic Board befestigt ist:

    • Zwei 2,8 mm T6 Torx Schrauben

    • Eine 7,0 mm T6 Torx Paß-Schulterschraube

  6. MacBook Pro (13 Zoll, Anfang 2013, Retina Display) rechten Lüfter austauschen: Schritt 6, Bild 1 von 2 MacBook Pro (13 Zoll, Anfang 2013, Retina Display) rechten Lüfter austauschen: Schritt 6, Bild 2 von 2
    • Mit einer Pinzette kannst du die Plastikabdeckung rechts an der Platine des Akkuanschlusses entfernen.

    Is adhered to screw beneath, so lift firmly and slowly.

    Andrew - Antwort

    when doing this with metal tweezers as instructed in the video, it was difficult to get off and apparently while i was trying to do it, the tweezers went too far under and i believe made contact with the screw underneath? there was a zzz noise, an orange flicker and a little stream of smoke that came out. i freaked out and put everything back together to see if the laptop even still worked, it turned on and everything but died right away (i drained it before doing the repair anyway, so i was surprised it turned on at all).

    i finished the battery repair and did several other things while in there. i have charged it all the way as recommended and will use it later on to see how everything is, im hoping that it’s a okay, but could someone explain to me what happened and the possible consequences?

    Kait D - Antwort

  7. MacBook Pro (13 Zoll, Anfang 2013, Retina Display) rechten Lüfter austauschen: Schritt 7, Bild 1 von 1
    • Entferne die 6,4 mm T6 Torx Breitkopfschraube, mit der die Platine des Akkuanschlusses am Logic Board befestigt ist.

    When reinstalling, be careful that the board lines up correctly and is completely seated in order for this screw to thread properly.

    Adrien - Antwort

  8. MacBook Pro (13 Zoll, Anfang 2013, Retina Display) rechten Lüfter austauschen: Schritt 8, Bild 1 von 2 MacBook Pro (13 Zoll, Anfang 2013, Retina Display) rechten Lüfter austauschen: Schritt 8, Bild 2 von 2
    • Ziehe die Platine des Akkuanschlusses vorsichtig vom Logic Board ab.

    • Es empfiehlt sich, die Batteriekabel nur leicht zu biegen, um die Platine über dem Logic Board und aus dem Weg zu halten.

    • Du solltest die Platine nicht vollständig umklappen oder gar die Kabel falten, denn dies könnte den Akku beschädigen.

  9. MacBook Pro (13 Zoll, Anfang 2013, Retina Display) rechten Lüfter austauschen, Platine des Akkuanschlusses: Schritt 9, Bild 1 von 2 MacBook Pro (13 Zoll, Anfang 2013, Retina Display) rechten Lüfter austauschen, Platine des Akkuanschlusses: Schritt 9, Bild 2 von 2
    • Schnapp dir den Interposer mit einer Pinzette.

    • Ein Interposer ist eine Schnittstelle, die eine elektrische Verbindung mit einer anderen verbindet. Bei dieser Reparatur ist es die Platine, die den Akku mit dem Logic Board verbindet.

    • Hebe den Interposer aus dem Logic Board heraus und entferne ihn.

    • Durch das Entfernen der Platine kannst du sicher gehen, dass der Akku während der Reparatur nicht mehr angeschlossen ist und so auch verhindern, dass der Computer versehentlich angeschaltet wird. Es ist auch deshalb eine gute Idee, die Platine herauszunehmen, weil sie sonst aus Versehen herausfallen könnte.

    How can I remove interposer I m not able to remove it

    Raunak - Antwort

    you must lift it absolutely vertically, or it fouls against the locator pin in the corner- you can easily get the impression that it won’t come over the end of this pin- almost like it’s rivetted in. it isn’t. get a good grip on it with the tweezers in the centre hole & one of the sides, & lift it STRAIGHT up.

    duncan rmi -

    I would recommend to use plastic tweezers in order to reduce risk of damage.

    Martin Sippel - Antwort

    Second that. If you have thin heat shrink tubing, form some over the tweezer tips. If the tubing is thin and small enough in diameter you’ll see the serrations of the tweezer tips.

    Raymond Shpeley -

    wat is the model this SSD

    thierry.wilow - Antwort

  10. MacBook Pro (13 Zoll, Anfang 2013, Retina Display) rechten Lüfter austauschen, Kühlkörper-Einheit: Schritt 10, Bild 1 von 1
    • Entferne folgende Schrauben, welche den Kühlkörper an der Einheit des Logic Boards befestigen:

    • Eine 2,4 mm Kreuzschlitzschraube #00

    • Eine 3,4 mm Torx T5 Schraube

    • Vier 2,7 mm Torx T5 Schrauben

    Hi,

    found 4 rubber spacers on the 4 2,5mm screws

    ddagonetroppo - Antwort

    Also found the rubber caps on the 4x2.7mm - didn't bother to replace the caps and didn't have any problems with them.

    Rand Bell - Antwort

  11. MacBook Pro (13 Zoll, Anfang 2013, Retina Display) rechten Lüfter austauschen: Schritt 11, Bild 1 von 2 MacBook Pro (13 Zoll, Anfang 2013, Retina Display) rechten Lüfter austauschen: Schritt 11, Bild 2 von 2
    • Hebe den Kühlkörper von der Logic Board Einheit weg und entferne ihn.

    • Vergiss nicht, beim Einbau des Kühlkörpers eine neue Schicht Wärmeleitpaste aufzutragen. Wenn du das noch nie gemacht hast, hilft dir unsere Anleitung dabei.

  12. MacBook Pro (13 Zoll, Anfang 2013, Retina Display) rechten Lüfter austauschen, I/O Board Datenkabel: Schritt 12, Bild 1 von 2 MacBook Pro (13 Zoll, Anfang 2013, Retina Display) rechten Lüfter austauschen, I/O Board Datenkabel: Schritt 12, Bild 2 von 2
    • Heble die rechte Seite des Steckers am I/O Board Datenkabel mit dem flachen Ende des Spudgers aus seinem Anschluss auf dem I/O Board.

    • Wenn du am Stecker des I/O Board Datenkabels hebelst, dann achte darauf, dass du nur am Stecker hebelst, nicht am Anschluss. Wenn du am Anschluss hebelst könntest du das I/O Board irreparabel beschädigen.

  13. MacBook Pro (13 Zoll, Anfang 2013, Retina Display) rechten Lüfter austauschen: Schritt 13, Bild 1 von 2 MacBook Pro (13 Zoll, Anfang 2013, Retina Display) rechten Lüfter austauschen: Schritt 13, Bild 2 von 2
    • Schiebe das flache Ende des Spudgers unter die linke Seite des Steckers am I/O Board Datenkabel.

    • Verdrehe den Spudger vorsichtig, um den Stecker des I/O Board Datenkabels aus seinem Anschluss auf dem Logic Board zu lösen.

  14. MacBook Pro (13 Zoll, Anfang 2013, Retina Display) rechten Lüfter austauschen: Schritt 14, Bild 1 von 1
    • Hebe das I/O Board Datenkabel an und entferne es aus dem MacBook Pro.

  15. MacBook Pro (13 Zoll, Anfang 2013, Retina Display) rechten Lüfter austauschen, Rechter Lüfter: Schritt 15, Bild 1 von 3 MacBook Pro (13 Zoll, Anfang 2013, Retina Display) rechten Lüfter austauschen, Rechter Lüfter: Schritt 15, Bild 2 von 3 MacBook Pro (13 Zoll, Anfang 2013, Retina Display) rechten Lüfter austauschen, Rechter Lüfter: Schritt 15, Bild 3 von 3
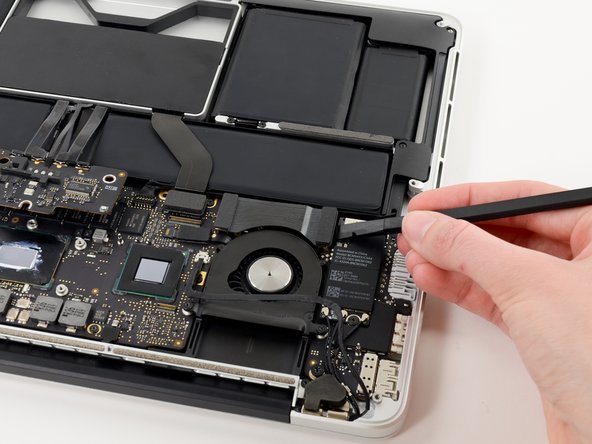
    • Klappe den Sicherungsbügel am ZIF Verbinder am Flachbandkabel des rechten Lüfters mit der Spudgerspitze hoch.

    • Achte darauf, dass du nur an dem scharnierartigen Sicherungsbügel hebelst, nicht am Sockel selbst.

    • Ziehe vorsichtig das Flachbandkabel zum rechten Lüfter aus seinem Sockel auf dem Logic Board.

    Hey! You skipped a step!

    What about the cable (don't know what it does) that runs right across the fan, interfering with pulling the fan out.

    It's still in place in Step 14, but here in Step 15 it's magically removed itself, and can be seen resting luxuriously on top of the Airport card.

    How do we get that outta there?

    Victor Gavenda - Antwort

    Like @victorgav mention, Just need a step before this one, which is to remove the cable that goes across the top of the fan.

    David Borjas - Antwort

    Thanks for bringing this up! It looks like the guide was missing the iSight cable disconnection steps. I’ve added the missing steps.

    Arthur Shi -

    This cable simply plugs into its silver connection housing. So to remove simply wiggle it out gently with a pair of tweezers

    Wasim - Antwort

  16. MacBook Pro (13 Zoll, Anfang 2013, Retina Display) rechten Lüfter austauschen: Schritt 16, Bild 1 von 1
    • Entferne die drei 3,1 mm Torx T5 Schrauben, welche den rechten Lüfter an der Logic Board Einheit befestigen.

  17. MacBook Pro (13 Zoll, Anfang 2013, Retina Display) rechten Lüfter austauschen: Schritt 17, Bild 1 von 1
    • Hebe den rechten Lüfter hoch und entferne ihn aus dem oberen Gehäuse.

Abschluss

Um dein Gerät wieder zusammenzusetzen, folge den Schritten in umgekehrter Reihenfolge.

2 weitere Nutzer:innen haben diese Anleitung absolviert.

Besonderer Dank geht an diese Übersetzer:innen:

en de

100%

Diese Übersetzer:innen helfen uns, die Welt zu reparieren! Wie kann ich mithelfen?
Hier starten ›

Sam Goldheart

Mitglied seit: 10/18/12

465.602 Reputation

538 Anleitungen geschrieben

Team

iFixit Mitglied von iFixit

Staff

135 Mitglieder

16.718 Anleitungen geschrieben

Ein Kommentar

hi i found my fans rightside show 6100 rpm in dashboard and mac goes slow

pmedia4u - Antwort

Kommentar hinzufügen

Seitenaufrufe:

Letzte 24 Stunden: 0

Letzte 7 Tage: 9

Letzte 30 Tage: 20

Insgesamt: 3,939