Einleitung
Hier erfährst du, wie du das linke Scharnier tauschen kannst.
Was du brauchst
-
-
Entferne die folgenden 10 Kreuzschlitz-Schrauben, die die Gehäuse-Unterseite des MacBook Pro 13" Unibody befestigen:
-
Sieben 3 mm Schrauben.
-
Drei 13,5 mm Schrauben.
-
-
-
Hebe die Unterseite vorsichtig an und drücke sie Richtung Rückseite des Laptops, um die Halterungsclips zu lösen.
In the introduction you should link fixers to this excellent doc: https://www.ifixit.com/Misc/HD_Software_...
It is really critical, super easy, and free(!) to clone your existing drive onto the new one you will install. I ran into one error, but SuperDuper! support replied immediately on how to fix it...Thanks ifixit and SuperDuper! (I ponied up the $28 for the software anyway, I was so impressed!)
Long story short: I drank the AppleKoolAid back in 1984 and have always left the guts of my machines up to Apple - until recently when I needed to swap the SATAs from my original MacDaddy (2009 13" MBPro that I killed in 2018 - coffee + blackout = OOOOPS) into a pristine 2009 MBPro from a Goodwill in North Carolina through eBay. I need the files from iCal and MacMail that can't be opened in my newer machines.
Well . . . I ain't never done nuttin' like that, before!
Enter Luke Miani on YouTube. He raves about you guys! So, I watched everything I could, read your site, bought the right tools and at the ripe old age of 72, I sat down, this morning and did the work. Now my original MacDaddy lives in MacDaddy2.0.
Am I allowed to cry?
Seriously, I can't thank you enough for your bitchen site and killer tools. I wish I'd'a been turned on to this shizzle 30+ years ago.
IFIXIT - IDIGIT!
HAHAHAHAHAHAHAHAHAHA.
That was a brilliant read.
Yes, I came across ifixit a few years ago. Totally helped me out on several occasions.
Glad your Mac repair journey worked out.
:)
Cary B -
-
-
-
Löse mit der Kante eines Spudgers den Akkuanschluss nach oben, weg vom Sockel auf dem Logic Board.
How do you get that battery connector back on? Do you just press it in back in place after you're done?
yes. I usually plug it in before I screw it down so I can lift the battery a bit and have enough slack to be able to go straight down on the connector, otherwise it comes in on a bit of an angle, which can't be good (though not necessarily bad).
This step almost finished me, and I did extensive damage to the battery plug. Fortunately, I later replaced the battery, and the replacement came with a new plug! :) Newbies need to know - 1. The battery plug is like a thin lip on a thicker lip, so you need to pry BETWEEN 2 thin lips to get it off, else you are trying to yank out the socket. 2. Mine was initially VERY tight, and trying to get it out broke the plastic on all sides of plug, even though I was as careful as possible. Luckily, this didn't hurt functionality and I later replaced the battery. AFTER disconnecting once, it was never so tight again,
-
-
-
Heble den Stecker vom Subwoofer/rechten Lautsprecher mit dem flachen Ende des Spudgers aus seinem Sockel auf dem Logic Board.
Please Be Carefully With This Step, Because I Had To Resolder It Back To The Logic Board. But There Is A Black Foam Piece Over The Cable You Have To Pry Up, Lift The Foam Piece And Then Try To CAREFULLY Pry Cable Connector
-
-
-
Löse das Kamerakabel, indem es gerade aus seinem Sockel herausziehst.
-
Wenn du ein kleines Stück Plastik am Logic Board findest, das das Kamerakabel am herausrutschen hindert, löse es vorsichtig vom Logic Board. Erhitze es im Zweifel mit einem Fön oder einer Heißluftpistole, um den Kleber zu lösen. Versuche nicht, das Kabel über das Plastikstück zu ziehen.
-
Wenn du trotzdem Probleme hast, nutze die Spitze eines Spudgers und drücke abwechselnd an beiden Seiten des Anschlusses, um ihn langsam aus dem Sockel zu holen.
This step is unnecessarily tricky. I’ve tried to make it better by adding images highlighting the plastic stopper thingy and showing a clear arrow of the direction the cable should be pulled.
However, simply pulling the cable may not be enough to remove it. It sure wasn’t for me. I think there ought to be a close-up of the two little nubbins on the sides of the plug which one uses to wiggle it loose from the connector by gently prying with a tiny flathead screwdriver. I didn’t add that tip because (a) it would have made the instructions longer, (b) I didn’t think to take a photo of it, and (c) using a screwdriver carelessly next to the logic board could scratch or break components on the motherboard. A guitar pick or very small spudger might work.
@hackerb9 Thanks for your edits and comments! I took some additional shots and tried to clean this up a little for everyone. There should be a lot less confusion now. Interestingly, neither of the two MacBook Pros used for these guides had the plastic retainer piece you folks mentioned, but I left that image in a link so everyone can still see what it looks like if needed.
Thanks for incorporating some of my edits and for taking new photos.
Are you the one who took the original photographs? If so, you did originally have the hard plastic retainer as it was in those photos, just obscured by your thumbnail. The glue on the retainer allows it to shift a bit, so it's possible you took out the cable and knocked off the retainer without noticing it.
Your two frame animation of pulling out the plug is helpful to show the proper direction. Given the number of people who have destroyed their MacBooks from this procedure, I think we should do even better. The instruction would be clearer if it said, “Disconnect the camera cable by sliding it horizontally out of its socket.”
Also, if you can post a link to a picture without fingers in the shot, I will add an arrow showing the proper direction. (I would have added it to the original, but visually it would have gone through your fingers.)
P.s. this isn't as important, but where did you hear the tip about the hairdryer? I'd leave that out as firmly peeling it up works fine.
hackerb9 -
Negative, I’m not the original photographer. You’re right, I do see the retainer in some of the previous photos, although it wasn’t in any of the images for this particular step. May have been an oversight on the part of the original author! So I’m glad you caught it. I updated the verbiage as you requested. Don’t worry about adding arrows—at this point, if someone ignores both the images and the multiple warnings in the text, that’s no longer a fault with the guide. The heat/hairdryer tip is standard practice for anything that’s secured with adhesive—I hardly ever work on a MacBook of any vintage without using a heat gun at least a couple times. It may not be strictly necessary, but the result is much cleaner and it reduces the risk of accident.
-
-
-
Entferne folgende Kreuzschlitzschrauben, welche das Kameradatenkabel und den rechten Lautsprecher an der Gehäuseoberseite befestigen:
-
Zwei 8 mm Schrauben
-
Eine 4 mm Schraube
-
Schiebe die Halterung des Kamerakabels unter dem Subwoofer hervor und entferne sie vom Computer.
-
-
-
-
Fasse die Plastikzuglasche an, welche an der Sicherung des Displaydatenkabels befestigt ist, und drehe sie zur Seite des Computers mit dem Gleichstromeingang (DC-In).
-
Ziehe den Stecker des Displaydatenkabels gerade aus seinem Sockel heraus.
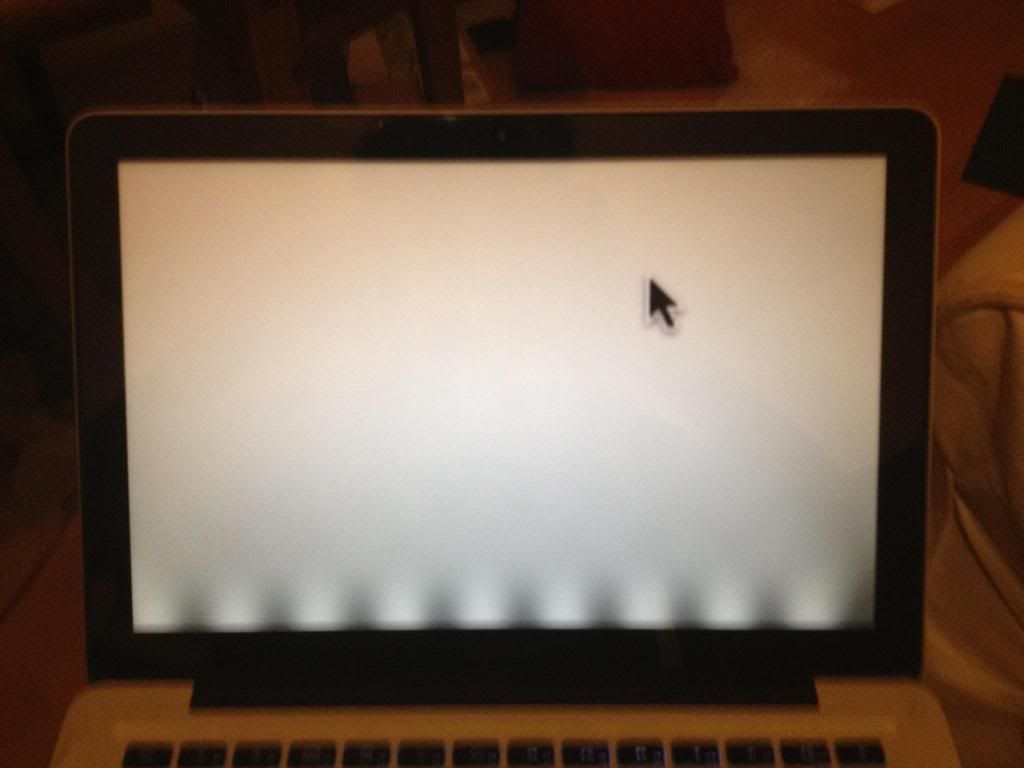
Well, my display ended up looking like this after the repair:
http://i1106.photobucket.com/albums/h366...
As you can see, there was a light/dark banded pattern along the bottom of the screen, corresponding to the LCD's backlight. In my case it was also accompanied by a constant high pitched whistling noise. I swear to anything that's holy, it was not coming from the fan or the speaker, but rather the motherboard itself.
Anyway, both these problems went away when I disconnected and reconnected the connector at this stage. I'm saying this on the off chance it helps someone else.
It's not to clear but there is a piece of spring steel that rotates away from the main (circuit board side) of the connector....this piece sort of hugs the parameter of the screen cable locking it to the circuit board...both arms wrapped around your brother....looking closely (10x magnifier) at this cable one of the gold connections is slightly oxidized---my display arbitrarily flickers and this symptom is lessened as the temperature increases...I suspect this is the cuase of the screen flashing on/off
-
-
-
Entferne die folgenden beiden Kreuzschlitzschrauben, welche die Halterung des Displaydatenkabels am Gehäuseoberteil befestigen:
-
Eine 7 mm Schraube
-
Eine 5 mm Schraube.
-
Hebe die Halterung des Displaydatenkabels aus dem Gehäuseoberteil.
-
-
-
Entferne die beiden äußeren 6,5 mm Torx Schrauben, welche jede der beiden Displayhalterungen am Gehäuseoberteil befestigen (also vier insgesamt).
Hey folks, regarding the screw/driver sizes: there are separate guides for the Mid 2010 model with the T8 screws. Always use the correct guide for your model to avoid confusion, stripped screws, etc. Hope this helps!
-
-
-
Öffne das MacBook, so dass das Display senkrecht zum Gehäuseoberteil steht.
-
Stelle das geöffnete MacBook so wie gezeigt auf den Tisch.
-
Halte das Display und das Gehäuseoberteil mit der linken Hand fest. Entferne dann die letzte 6,5 mm Schraube von der unteren Displayhalterung mit einem Torx Schraubendreher.
-
-
-
Entferne die letzte 6 mm Schraube mit einem Torx Schraubendreher, welche das Display noch am Gehäuseoberteil festhält.
Removing the screen assembly this way, with the computer standing on edge, is needlessly risky and difficult. By the 5th or 6th time I did this procedure (of perhaps a hundred), it dawned on me that there’s a way, way easier method for the whole lid removal job: 1. After removing the bottom cover and disconnecting power, hang the open laptop, keyboard down, facing away, over the edge of your work table with the lid assembly hanging down, monitor facing toward the table and pushed against the table edge. (If you’re klutzy, tape the main body to the table so it can’t slide around.) 2. With the unit positioned this way, you can easily disconnect the various cables & remove the 6 hinge screws. Now the lid assembly will just be hanging, easy to lift away from the main body without difficulty or danger. 3. Reverse this to put it back together.
Nice tip, Clinton! I’ll have to try that next time. Do you have photos of how it is done so this guide can be updated?
hackerb9 -
-
-
-
Fasse das obere Gehäuse mit der rechten Hand an und drehe es etwas in Richtung Oberkante das Displays, so dass sich die obere Displayhalterung vom Rand des Gehäuseoberteils löst.
-
Drehe das Display ein wenig vom Gehäuseoberteil weg.
-
-
-
Hebe das Display hoch und weg vom Gehäuseoberteil. Achte dabei darauf, dass sich keine Klammern oder Kabel verfangen.
May be in the wrong place but then please direct me. At this step, can I just take off the upper half (meaning the screen, LCD, and top housing shell in one) and simply replace it with another upper half of the same edition???
Yes, you can. Thanks what I'm doing now. :)
-
-
-
Fasse die Verschlussabdeckung wie gezeigt an an und schiebe sie zur rechten Displayseite.
i've found this impossible to get back on correctly.
i cant get the plastic to slide back that 1/4" it needs to fit properly
Does anyone know any tricks? :(
I was replacing a clutch cover that had cracked into a few pieces. I found the replacement didn’t slide to the left on installation. On further investigation I found the tabs from the old one were broken off inside where the cover slides. Once they were removed the install wen much better.
I found my replacement cover on Amazon.ca in case someone needs a Canadian source.
-
-
-
Rüttle die Verschlussabdeckung vorsichtig auf ihrer langen Achse vor und zurück und ziehe sie dabei vom Display weg.
-
Führe dieses auf ganzer Länge der Verschlussabdeckung durch, bis du sie aus dem Rahmen heben kannst, mit dem sie am Display befestigt ist.
-
-
-
Entferne die Verschlussabdeckung vom Display.
The flat face goes on the bottom edge of the display. The display and wifi cables must be routed below the hinges in the display, that is, closer to the bottom edge of the display.
-
-
-
Entferne die einzelne 5,2 mm Torx T6 Schraube, mit der das linke Scharnier in der Nähe des Displayglases befestigt ist.
-
-
-
Entferne die anderen beiden 5,2 mm Torx T6 Schrauben, mit denen das Scharnier am Display befestigt ist.
-


Um dein Gerät wieder zusammenbauen, folge den Schritten in umgekehrter Reihenfolge.
Um dein Gerät wieder zusammenbauen, folge den Schritten in umgekehrter Reihenfolge.
Rückgängig: Ich habe diese Anleitung nicht absolviert.
11 weitere Nutzer:innen haben diese Anleitung absolviert.
Besonderer Dank geht an diese Übersetzer:innen:
100%

Diese Übersetzer:innen helfen uns, die Welt zu reparieren! Wie kann ich mithelfen?
Hier starten ›

Compare the short screws carefully before reinstalling them. The shouldered screws go in the holes on the front edge.
David Kilbridge - Antwort
Before I started removing any screws I took a piece of paper and drew the bottom of the laptop and put a piece of double-sided tape in the spot where each screw goes. That way when I took out the screws, I could put them on the tape so I knew exactly which screw went in which spot. I did the same thing for dismantling the inside on another sheet of paper, then a third sheet for the screen after getting the front glass off.
mastover - Antwort
I use a similar technique: I print out the iFixit manual for the job, and Scotch-tape down the screws/brackets/cables I remove at each step next to the component descriptions. That way, when I'm reassembling, the bits are taped right next to the photo of where they came from.
adlerpe -
That's exactly what I do for all my repairs! It's the best way to keep track of all of the parts ' original location and to make sure that you don't miss any parts during reassembly.
joyitsjennie -
Great idea and one I use often
Thomas Overstreet -
Excellent idea! Thanks for sharing it here.
Laura Sharkey -
I used a 00 that fit but the screws were very tight so I used a tiny paintbrush with some wd40 on it and put it around the edges of the screws. Worked like a charm
valentinedhdh - Antwort
I use a magnetic mat and place the screws in order on that :)
Cary B - Antwort