Einleitung
Hast du Probleme mit der Konnektivität? Folge dieser Anleitung, um die AirPort Karte zu tauschen.
Was du brauchst
-
-
Entferne die folgenden P5-Pentalobe-Schrauben, mit denen das Gehäuseunterteil am MacBook Pro befestigt ist:
-
Acht 3,0 mm Schrauben
-
Zwei 2,3 mm Schrauben
-
-
-
Hebe das Gehäuseunterteil von der Kante aus, die der Kupplungsabdeckung am nächsten liegt, vom MacBook Pro ab.
-
Lege das Gehäuseunterteil beiseite.
-
-
-
-
Heble den Akkuanschluss mit dem flachen Ende eines Spudgers vorsichtig aus seiner Buchse auf dem Logic Board heraus.
-
Biege die Akkukabel nach hinten und aus dem Weg, so dass der Akkuanschluss nicht versehentlich mit dem Logic Board in Kontakt kommt.
-
-
-
Benutze die Spitze eines Spudgers, um die drei Antennenkabelverbinder aus ihren Sockeln auf der AirPort Karte zu lösen.
-
-
-
Enterne die 2,9 mm T5 Torx Schraube, die die AirPort Karte am Logic Board befestigt.
-
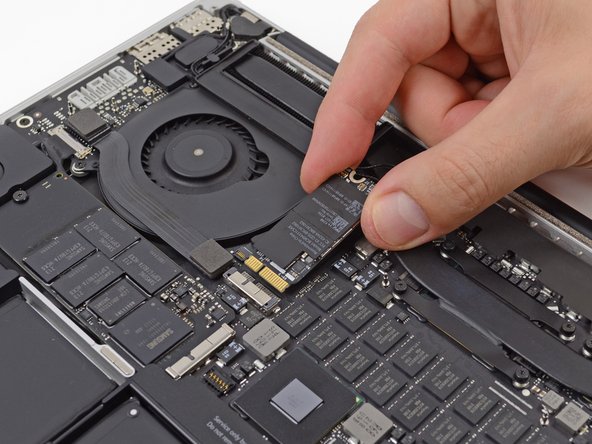
Greife die Ecken der Karte und ziehe sie aus der Buchse.
-
Hebe die AirPort Karte an und entferne sie.
-


Um dein Gerät wieder zusammenzubauen, folge den Schritten in umgekehrter Reihenfolge
Um dein Gerät wieder zusammenzubauen, folge den Schritten in umgekehrter Reihenfolge
Rückgängig: Ich habe diese Anleitung nicht absolviert.
19 weitere Nutzer:innen haben diese Anleitung absolviert.
Besonderer Dank geht an diese Übersetzer:innen:
100%


Diese Übersetzer:innen helfen uns, die Welt zu reparieren! Wie kann ich mithelfen?
Hier starten ›


8 Kommentare
This tutorial worked perfectly for me and I have never, ever, considered working on my computer before. I ordered the tools from ifixit.com and it was a breeze!!!! Everything works perfectly -thank you so very much!
Everything worked great, took me about 30 minutes to complete. I replaced my working adapter with an 802.11ac module (BCM94360CSAX), cost me $12 on Ebay. I now have 802.11ac (instead of just 802.11n) and with working 802.11v support provided by the new adapter, I can now unlock my MBP with my apple Watch! Thank you.
The required hardware seems correct -- I needed a T5 bit and a P5 Pentalobe, as well as a spudger. I used the flat end of the spudger to gently press the antenna connectors together. They make a distinctive "snap" when they connect.
When you replace the Airport card, (or at least if you’ve upgraded it to a newer but compatible 802.11ac/BT4.0 card) any apps you downloaded from the App Store won’t launch, but complain that they were downloaded on a different Mac. You’ll either need to authenticate with your Apple ID for each one, or reinstall them.
Success here using this tutorial to upgrade to an Airport card that supports 802.11ac/BT4.0. It took 30 minutes, and with the upgraded card I can now unlock my MacBook Pro with my Apple Watch.
As Alan mentions above, some of my App Store purchases have prompted me for my AppleID password. The bigger correction was that upon starting up my computer I had to System Preference >> Date & Time to update the calendar and clock. All I had to do was click the lock at the bottom left of the dialog box, enter my MacBook Pro password, and it auto-updated.
Then to get it to recognize my Apple Watch I went to System Preferences >> Security & Privacy and checked the box for “Allow your Apple Watch to unlock your Mac.” Then I clicked the lock in the bottom left to lock it, quit out of System Preferences, and I was good to go.