Einleitung
Dies ist eine interne grundständige Anleitung und sollte unveröffentlicht bleiben.
Was du brauchst
-
-
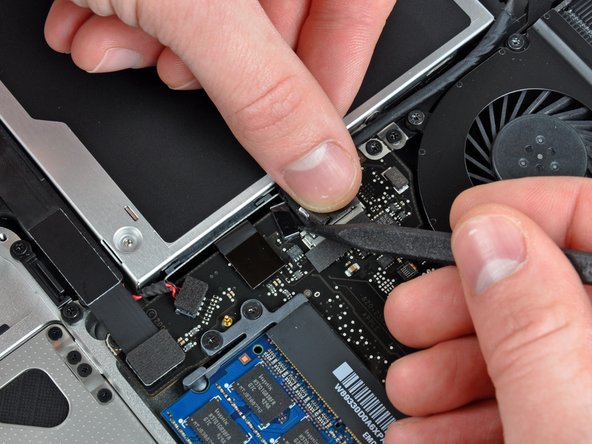
Halte ein Ende des Kabelhalters mit einem Finger nach unten, während du das andere Ende mit der Spudgerspitze etwas anhebst und vom Kamerakabelstecker wegdrehst.
-
-
-
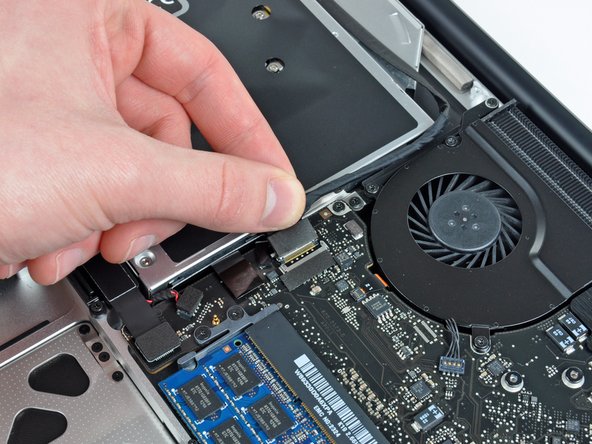
Ziehe das männliche Ende des Kamerakabels gerade vom Anschluss weg, um es zu trennen.
I would recommend leaving the camera cable plugged into the motherboard, and simply sliding the optical drive out from underneath it carefully. If you mistakenly life this connector straight up (as I did) you can damage either the cable connector or the motherboard socket. I damaged the connector on the cable and now the wifi antenna doesn't work. Replacing this damaged cable is about 10X more of a pain (in time and money) than the effort to slide the optical drive out from beneath this cable instead of disconnecting it.
Totally agree here, my wifi card is no longer recognized by the computer. Not sure what to do now.
-
-
-
Löse das Kamerakabel aus der Klebeverbindung zum optischen Laufwerk.
When reassembling, which adhesive should be used to reattach the camera cable?
-
-
-
-
Ziehe das männliche Ende des Bluetooth-Kabels gerade aus seinem Anschluss heraus und trenne es ab.
-
Heble das Bluetooth-Antennenkabel mit dem flachen Ende des Spudgers aus seinem Anschluss auf der Platine.
How can I determine if I have an antiglare display?
Thanks!
Dan
If you have the part in step 10, you do. If you don’t, you don’t (looks like pic in step 9).
As already pointed out in a comment to step 8, it is possible to slide carefully out the drive from underneath the bluetooth board without touching it, and to insert the replacement drive in the same way, avoiding to perform this step and the next one.
-
-
-
Entferne die beiden 8 mm Kreuzschlitzschrauben, mit denen der Halter des Bluetooth/Kamerakabels am oberen Gehäuse befestigt ist.
-
Hebe die Haltereinheit des Bluetooth/Kamerakabels aus dem oberen Gehäuse heraus.
-
-
-
Heble den Stecker des optischen Laufwerks mit dem Spudger gerade vom Logic Board weg.
-
-
-
Die innere Seite des optischen Laufwerks ist mit einer einzelnen 3,5 mm Kreuzschlitzschraube am oberen Gehäuse befestigt. Drehe sie heraus.
-
-
-
Die äußere Seite des optischen Laufwerks ist mit zwei 3,5 mm Kreuzschlitzschrauben am oberen Gehäuse befestigt. Drehe sie heraus.
When installing the HD bay, the screws here will not go back. Not sure if the bracket/holes are somehow different. After completing the install, everything seems secure. Does anyone think not having these screws is critical beyond securing the drive?
-
-
-
Hebe das optische Laufwerk am linken Rand an und ziehe es aus dem oberen Gehäuse heraus.
-


Um dein Gerät wieder zusammenbauen, folge den Schritten in umgekehrter Reihenfolge.
Um dein Gerät wieder zusammenbauen, folge den Schritten in umgekehrter Reihenfolge.
Besonderer Dank geht an diese Übersetzer:innen:
100%


Diese Übersetzer:innen helfen uns, die Welt zu reparieren! Wie kann ich mithelfen?
Hier starten ›

I found it quite easy to carefully remove the drive from under the camera cable without disconnecting it, and guide the new drive back in under. It saved time and the danger of damaging those fragile connectors.
Glenn Richards - Antwort