Was du brauchst
-
-
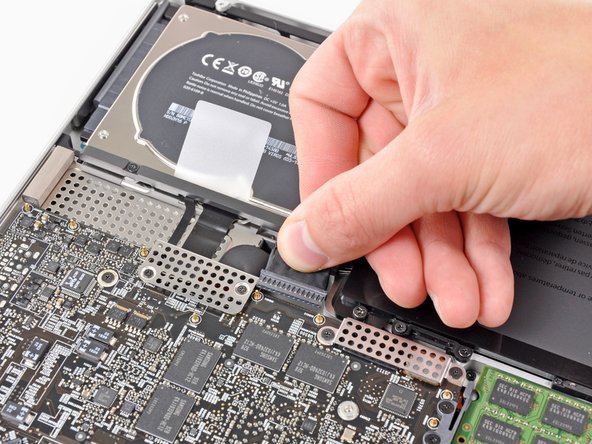
Falls vorhanden, ziehe die kleine Plastiklasche am Akkustecker gegen die Vorderkante des Geräts. Bei Modellen von Ende 2011 hat der Stecker keine Lasche und ist einfach direkt im Motherboard eingesteckt. In diesem Fall ziehe den Stecker gerade nach oben, um ihn zu entfernen.
-
-
Arbeite die Schritte in umgekehrter Reihenfolge ab, um dein Gerät wieder zusammenzubauen.
Arbeite die Schritte in umgekehrter Reihenfolge ab, um dein Gerät wieder zusammenzubauen.
Rückgängig: Ich habe diese Anleitung nicht absolviert.
Ein:e weitere:r Nutzer:in hat diese Anleitung absolviert.
Besonderer Dank geht an diese Übersetzer:innen:
100%
Diese Übersetzer:innen helfen uns, die Welt zu reparieren! Wie kann ich mithelfen?
Hier starten ›


This step is a little difficult in reverse, that is, when re-attaching the battery. It helps to tilt the laptop up so you can see the edge of the board that accepts the plug. It may look like there are two slots for it, it goes in the bigger slot that is further away from the board.
yary hluchan - Antwort
Is this step really necessary? It is not part of the instructions how to replace the HDD in Apple's User Manual of the 2011 17" MBP.
Tobias Hahn - Antwort
As it says in the step: "Whenever working near the logic board, it is always wise to first disconnect the battery to avoid short circuits." It is not required, but it is simple insurance to avoid a $1000+ repair should you accidentally short components on the board with something metal.
Andrew Bookholt -
There was no tab on my model. Battery is affixed to board and screws must be removed.
bhodges2 - Antwort
Mine also, and looks as if removing connector could damage motherboard.
Stephen -
The battery on my 17” mid-2010 (MC024LL/A -A1297 ) is held by 3 specialty screws CR-V1 (3-wings similar to Mercedes-Benz tri-star)
It has a tab which I pulled straight up
The connector to the motherboard came away easily by pulling toward the front edge.
Peter Grierson -
* There is no tab on the A1297 (late 2011) model's battery connector. Be careful with the connector, it chips off the edges easily! Otherwise the same as bhodges2 & Stephen's notes.
** (Pleas also include the exact Model and Part numbers like P/N: MD311D/A; Mod.: A1297 in the comments and notes for your MBP)
Pingumann - Antwort
Why are there no guides for the Late 2011 17" MacBook Pro A1297 (2.4GHz i7 quad core, MD311LL/A)??? I just replaced the RAM in mine and discovered that not only is there no tab on the battery connector, but the connector pulls straight up, perpendicular to the logic board, rather than parallel. I almost ripped the wires out of the connector by trying to pull it out parallel to the logic board like this guide instructed! After finally getting it out, my advice to those with the Late 2011 model is to use a spudger to loosen the edges of the connector then lift the connector straight up to get it out safely.
Dave - Antwort
I replaced the display on my late 2011 model and noticed that it was quite different than the tutorial given here so I detailed all the differences to help others with late-2011 models on my blog: http://johnfixesstuff.blogspot.com/2014/...
jmueller -
I just put an SSD in a model #A1297 - MC226LL/A and the battery connector had to be removed by pulling it parallel to and away from the logic board — in other words, not up. I was definitely a bit confused when I tried to pull it up.
Doug Hogg - Antwort
With some dexterity and carefulness, the MagSafe could be removed from its place without the need to remove the whole logic board!
Phil Boy - Antwort
Same here, I used a head-band light to see it and got it done without removing anything but the battery connection, the charging port and the display data cable. Then I had to do it again because amazone sent me the wrong charging port, the board has different width between screw holes, and on closer look, different components soldered on, also. AND, one is labeled 2008, the other 2009… make sure you get the correct one, the other ( “wrong”? ) might work, but I’m not risking it! So why does the 2008 fit in my 17” macbook pro(5,2) mid-2009 and the one labeled 2009 does not fit ? It is what it is…
Tom Seaman -
The battery on my 17” mid-2010 (MC024LL/A -A1297 ) is held by 3 specialty screws CR-V1 (3-wings similar to Mercedes-Benz tri-star)
It has a tab which I pulled straight up
The connector to the motherboard came away easily by pulling toward the front edge.
Peter Grierson - Antwort