Einleitung
Nutze diese Anleitung, um ein Defektes Trackpad zu ersetzten.
Was du brauchst
-
-
Lege die Oberseite des Gehäuses mit geschlossener Klappe auf eine glatte Oberfläche.
-
Drücke den Verschlusshebel auf der geriffelten Seite der Klappe in das Gehäuse des MacBooks, bis du den Verschlusshebel auf der anderen Seite greifen kannst.
-
Öffne den Verschlusshebel so weit, dass er senkrecht steht.
-
-
-
Die Bodenklappe sollte nun ein kleines Stück offen stehen.
-
Die Klappe kann nun nach oben aus dem Gehäuse des MacBooks genommen werden.
-
-
-
Ziehe an der weißen Plastiklasche und damit den Akku gerade nach oben und aus dem Laptop.
Great tutorial ! great step !
-
-
-
Entferne die im Bild gezeigten acht Schrauben, die die Bodenplatte mit dem Rest des Gehäuses verbinden:
-
Eine 3 mm Kreuzschlitzschraube.
-
Drei 13,5 mm Kreuzschlitzschrauben.
-
Vier 3,5 mm Kreuzschlitzschrauben.
Make sure you have a good quality Phillips screwdriver. Mine had removable tips and had a small play at the connection. As a result I didn't have a good feel and damaged my screws (those securing the fan and the top left in step 23). Game over for me installing new thermal paste...
Be very carefull with your screws! Especially those on the inside.
You can get away with a Phillips #00 for many of the screws involved but the 4 at the bottom case split are likely to strip if you don’t use a JIS #00 or, in a pinch, a Phillips #000.
I used the Phillips #00 tip from my Pro Tech Toolkit, and it worked well enough. But yes, maybe #000 might have been better on the lower row of screws. Note to myself: Always read the comments first.
When replacing these screws, the order to replace them in is as follows:
1, Top left
2. Top right
3. Top center-left
4. Top center-right
5. Bottom center-right
6. Bottom center-left
7. Bottom right
8. Bottom left
I hope this information is helpful.
I followed my usual process of putting in all the screws loosely, then tightening them gradually in distributed pattern, to help ensure that the panel settles in place evenly. But maybe some orders are better.
-
-
-
Hebe die Bodenplatte mit beiden Händen an und entferne sie vom oberen Gehäuse.
Thanks for the guide!
It's implicit in the two photos, but worth mentioning because it blocked my progress in this step for a bit: You have to put the release latch back into its horizontal, closed position before you can lift off the lower-case panel.
-
-
-
Entferne die vier 10,3 mm Kreuzschlitzschrauben, die die Trennwand im Gerät befestigen.
-
-
-
-
Entferne die beiden 5 mm Kreuzschlitzschrauben, mit denen die Tastatur-Flexhalterung am oberen Gehäuse befestigt ist.
-
Hebe die Tastatur-Flexhalterung aus dem Gehäuseoberteil.
-
-
-
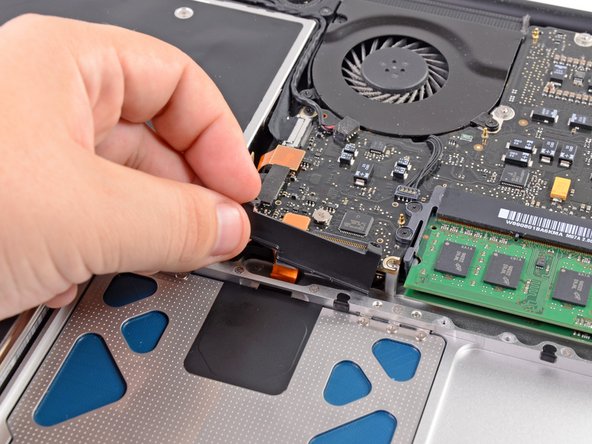
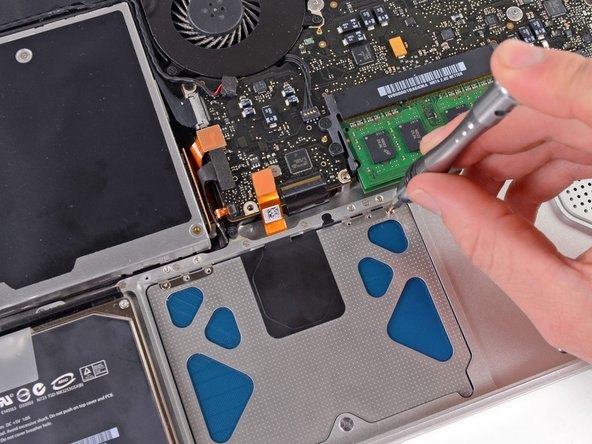
Verwende das flache Ende eines Spudgers, um den Trackpad-Steckverbinder gerade vom Logicboard abzuhebeln.
-
-
-
Entferne die sechs 1,4 mm Y0 Tri-Point-Schrauben, die das Trackpad am oberen Gehäuse befestigen.
These screw heads/slots are nasty small! I ordered the special screw driver with the trackpad because I didn’t have it, but it really doesn’t seem to be small enough to do the job properly. I guess I’ll blame Apple for the screws, but be warned that it is a stretch to get these screws out with the driver. I stripped 2 of the screws and had to drill the heads off them. Fortunately I had 4 left to reassemble the trackpad! Maybe iFixit should provide some of these screws, since they are so easily damaged.
-
-
-
Löse vorsichtig den Rand des Trackpads, der der Tastatur am nächsten liegt, aus seiner Aussparung im Gehäuseoberteil, indem du es von den am Gehäuseoberteil angebrachten Halterungen wegdrückst.
-
Leite das Trackpad-Kabel durch den Schlitz im Gehäuseoberteil.
-
-
-
Ziehe das Trackpad von der Außenkante des Gehäuseoberteil weg.
-
Entferne das alte Trackpad und lege es beiseite.
Immediately after step 12, it is possible to replace the two brackets that secure the upper edge of the trackpad in the top case of the MacBook (from which the six 1.4 mm Y0 tri-point screws were removed in step 10). My replacement trackpad was supplied with spare brackets, so I was able to replace one that was bent out of shape.
-
-
-
Führe vorsichtig das Kabel von deinem neuem Trackpad durch den Schlitz im Gehäuseoberteil.
-
Halte das Trackpad-Kabel mit einer Hand fest, während du die beiden Haltelaschen an der Außenkante des Trackpads unter der Lippe am Gehäuseoberteil einführst.
-
Ziehe das Trackpad-Kabel beim Einsetzen des Trackpads in den Hohlraum im Gehäuseoberteil.
-
-
-
Setze eine 1,4 mm Tri-Point-Schraube in jedes der in das Trackpad gebohrten äußeren Löcher ein (insgesamt zwei Schrauben).
-
-
-
Während du ständig versuchst, auf dein Trackpad zu klicken, ziehe die Dreipunkt-Einstellschraube vorsichtig an, bis die Klicks wieder das ursprüngliche "Gefühl" haben.
-
-
-
Als nächstes drehe das Gehäuseoberteil um, damit die Tastaturseite nach oben zeigt.
-
Richte das Trackpad so aus, dass es in der Mitte des Lochs liegt.
-
-
-
Ziehe die beiden äußeren Schrauben entlang der Innenkante des Trackpads fest und überprüfe die Ausrichtung des Trackpads auf der Außenseite des Gehäuseoberteils.
-
Wenn die Ausrichtung gut aussieht, bringe die restlichen Dreipunktschrauben entlang der Innenkante des Trackpads an.
-
Vergewissere dich vor dem Wiederzusammenbau deines Geräts, dass die Stellschraube immer noch in einer Position installiert ist, in der die Maus korrekt klickt.
Overall this helped me alot. I was using the iFixit tool kit to make this repair. The Y-drive in this kit (only one in kit) was too small for the battery removal screws. I also made the mistake of tightening the trackpad screw too tight (Step 15) the first time and then had to take it apart and reassemble again. Overall very good descriptive procedure. Our A1278 was a 2011 model and had a few holders and guides that were slightly different than these directions but it still was very informative. Cheers and thanks. Peter V.
-


Um dein Gerät wieder zusammenzubauen, folge den Schritten dieser Anleitung in umgekehrter Reihenfolge.
Um dein Gerät wieder zusammenzubauen, folge den Schritten dieser Anleitung in umgekehrter Reihenfolge.
Rückgängig: Ich habe diese Anleitung nicht absolviert.
59 weitere Nutzer:innen haben diese Anleitung absolviert.
Besonderer Dank geht an diese Übersetzer:innen:
100%

Diese Übersetzer:innen helfen uns, die Welt zu reparieren! Wie kann ich mithelfen?
Hier starten ›

12 Kommentare
The one thing I would be interested in: Where can I get the screwdriver this person is using in step 15? By this I am not referring to the low quality tools that are advertised alongside the tutorial.
--> can answer my own question. This is it: [verlinktes Produkt fehlt oder ist deaktiviert: IF145-072]
Before going to the trouble and expense of removing the trackpad make sure you don't just have a problem with the battery. My trackpad was giving me fits by not responding or needing excessive pressure, etc. The only problem was that the battery was swollen and putting pressure up on the trackpad. Replaced the battery and the problem was solved.
I agree with Rich M - check the battery first! Swollen battery will impede the trackpad.
awesome instructions, thank you!
Moin,
mein Vorgänger sollte seinen Hut essen, derY0 Tri-Point passt einwandfrei!
Es ist eine großartige Anleitung, ich habe lediglich eine halbe Stunde benötigt!!! Vielen Dank!
If you have a Harbor Freight Tools near you, they carry a kit that includes the Y0 Tri-Point:
Great guide - took me about 25 minutes to replace my trackpad. I didn't follow step 13 as I simply kept the existing Y1 tri-point screw in place without any adjustment and the click felt fine. Routing the cable through the slot in step 14 requires a little care to avoid damage but isn't too tricky. At step 15, I noted that my trackpad was well aligned, so I replaced and fully tightened all of the screws and skipped steps 16 onwards, simply re-assembling all the other components in the order I took them out.
This is not a a1278 unibody MacBook Pro. A1278 MacBooks backs are one solid metal piece not two separate pieces. This guide is for a different MacBook Pro.
Brad Burgeson - Antwort
This guide isn’t for a pro; it’s a MacBook unibody.
Nicholas -
So, it turns out that Apple used the model code A1278 for quite a few different Mac models, including both Pro and non-Pro versions! This guide is for the non-Pro Macbooks. There’s also one for the Pro models with the same A1278 identifier.
tempelmann - Antwort