Zum Hauptinhalt wechseln
Gemeinsam reparieren - Jetzt registrieren

Mad Catz Dual Force 2 Pro Vibration Motors Replacement

Was du brauchst

  1. Mad Catz Dual Force 2 Pro Vibration Motors Replacement, Remove Cover: Schritt 1, Bild 1 von 1
    • Unscrew the six 7 mm Phillips screws from the rear cover.

    Frag FixBot

    Kommentar hinzufügen

  2. Mad Catz Dual Force 2 Pro Vibration Motors Replacement: Schritt 2, Bild 1 von 1
    • Gently pry off the back of the controller from the front piece and lift it away.

    • The controller has no loose parts, so you can open it confidently without worrying about anything falling out.

    Frag FixBot

    Kommentar hinzufügen

  3. Mad Catz Dual Force 2 Pro Vibration Motors Replacement: Schritt 3, Bild 1 von 1
    • Unscrew the two 7 mm screws on the green circuit board.

    Frag FixBot

    Kommentar hinzufügen

  4. Mad Catz Dual Force 2 Pro Vibration Motors Replacement: Schritt 4, Bild 1 von 2 Mad Catz Dual Force 2 Pro Vibration Motors Replacement: Schritt 4, Bild 2 von 2
    • Grip the sides of the motor you wish to replace and lift up.

    • Be careful not to tear the motor wires that are soldered to the motherboard.

    Frag FixBot

    Kommentar hinzufügen

  5. Mad Catz Dual Force 2 Pro Vibration Motors Replacement, Remove the Screw: Schritt 5, Bild 1 von 1
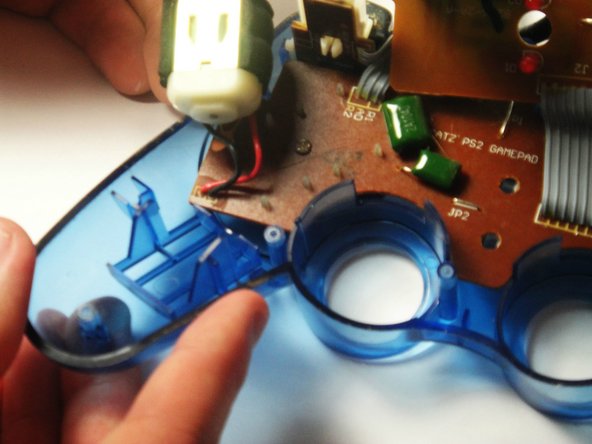
    • Use a soldering iron to de-solder both vibration motor wires from the motherboard.

    • The positive (red) wire connects to the nearest the edge of the motherboard.

    • If you do not know how to solder, see the soldering guide for instructions. Also when soldering on circuit boards, be sure not to overheat the connection as permanent damage may result.

    Frag FixBot

    Kommentar hinzufügen

  6. Mad Catz Dual Force 2 Pro Vibration Motors Replacement: Schritt 6, Bild 1 von 1
    • If necessary, repeat the previous two steps for the other vibration motor.

    Frag FixBot

    Kommentar hinzufügen

Abschluss

To put your device back together, just follow these steps in reverse order. Take your e-waste to an R2 or e-Stewards certified recycler.

Rückgängig: Ich habe diese Anleitung nicht absolviert.

Team

USF Tampa, Team 7-2, Remmell Winter 2015 Mitglied von USF Tampa, Team 7-2, Remmell Winter 2015

USFT-REMMELL-W15S7G2

4 Mitglieder

10 Anleitungen geschrieben

0 Kommentare zur Anleitung

Kommentar hinzufügen

Seitenaufrufe:

Letzte 24 Stunden: 0

Letzte 7 Tage: 1

Letzte 30 Tage: 32

Insgesamt: 693