Zum Hauptinhalt wechseln

Mantis Tiller 7940 (2017) Worm Shaft Replacement

Was du brauchst

  1. Mantis Tiller 7940 (2017) Worm Shaft Replacement, Turn off the ignition switch: Schritt 1, Bild 1 von 1
    • Before starting any repair, ensure the ignition switch is in the "off" position, as shown.

  2. Mantis Tiller 7940 (2017) Worm Shaft Replacement, Remove the spark plug housing: Schritt 2, Bild 1 von 1
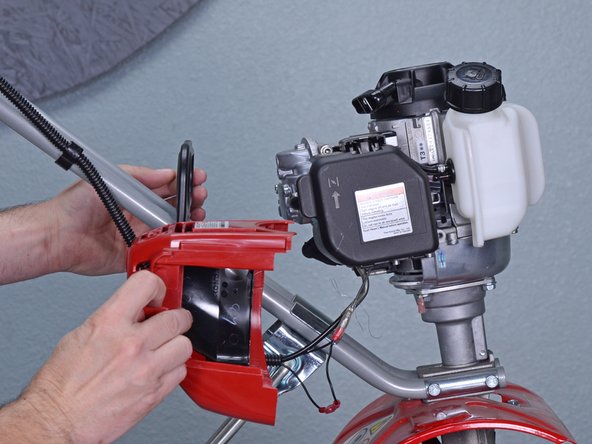
    • Use a 4 mm hex wrench to remove the bolt securing the spark plug housing.

    • Throughout this repair, keep track of each screw and make sure it goes back exactly where it came from.

  3. Mantis Tiller 7940 (2017) Worm Shaft Replacement: Schritt 3, Bild 1 von 3 Mantis Tiller 7940 (2017) Worm Shaft Replacement: Schritt 3, Bild 2 von 3 Mantis Tiller 7940 (2017) Worm Shaft Replacement: Schritt 3, Bild 3 von 3
    • Remove the spark plug housing from the engine.

  4. Mantis Tiller 7940 (2017) Worm Shaft Replacement, Disconnect the spark plug: Schritt 4, Bild 1 von 3 Mantis Tiller 7940 (2017) Worm Shaft Replacement, Disconnect the spark plug: Schritt 4, Bild 2 von 3 Mantis Tiller 7940 (2017) Worm Shaft Replacement, Disconnect the spark plug: Schritt 4, Bild 3 von 3
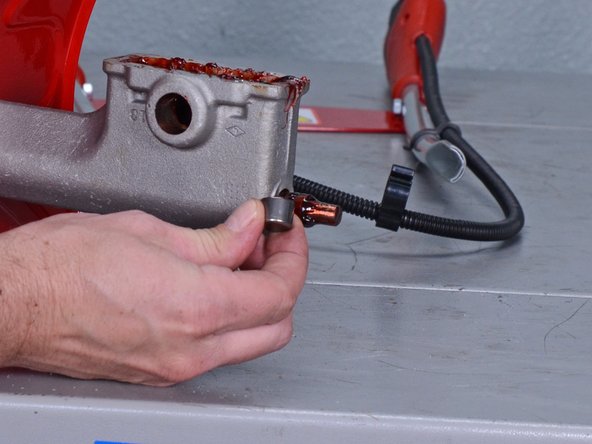
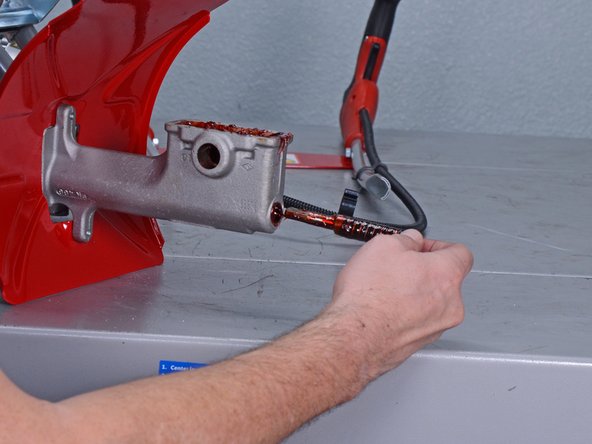
    • Grab the rubber housing at the end of the spark plug wire.

    • Pull firmly to disconnect the wire from the spark plug.

  5. Mantis Tiller 7940 (2017) Worm Shaft Replacement, Unfasten the upper handle assembly: Schritt 5, Bild 1 von 1
    • Twist and remove the knobs and acorn nuts from either side of the handle assembly.

  6. Mantis Tiller 7940 (2017) Worm Shaft Replacement, Set aside the upper handle assembly: Schritt 6, Bild 1 von 2 Mantis Tiller 7940 (2017) Worm Shaft Replacement, Set aside the upper handle assembly: Schritt 6, Bild 2 von 2
    • Remove the upper handle assembly from the lower handle assembly.

    • Do not pull the upper handle assembly too far from the rest of the tiller as it is still connected to the engine via the throttle cable.

    • Un-clip the throttle cable from the cable clips on either side of the handle assembly and set the upper handle assembly aside.

  7. Mantis Tiller 7940 (2017) Worm Shaft Replacement, Remove the tine assemblies: Schritt 7, Bild 1 von 2 Mantis Tiller 7940 (2017) Worm Shaft Replacement, Remove the tine assemblies: Schritt 7, Bild 2 von 2
    • Slide off and remove the tine retaining pin from the outer face of each tine assembly.

    • Caution: Take care when handling the sharp tines to prevent injuring yourself. Wear work gloves if necessary.

    • The tine assemblies can slide freely once their respective retention pins are removed. Do not let the assemblies fall off the tine shaft as this may damage them or result in injury.

  8. Mantis Tiller 7940 (2017) Worm Shaft Replacement: Schritt 8, Bild 1 von 2 Mantis Tiller 7940 (2017) Worm Shaft Replacement: Schritt 8, Bild 2 von 2
    • Slide off and remove both tine assemblies from the tine shaft.

  9. Mantis Tiller 7940 (2017) Worm Shaft Replacement, Remove the gear housing cover: Schritt 9, Bild 1 von 1
    • Use a Phillips #2 screwdriver to remove the four screws securing the gear housing cover.

  10. Mantis Tiller 7940 (2017) Worm Shaft Replacement: Schritt 10, Bild 1 von 3 Mantis Tiller 7940 (2017) Worm Shaft Replacement: Schritt 10, Bild 2 von 3 Mantis Tiller 7940 (2017) Worm Shaft Replacement: Schritt 10, Bild 3 von 3
    • Remove the gear housing cover.

  11. Mantis Tiller 7940 (2017) Worm Shaft Replacement, Remove the worm housing gasket: Schritt 11, Bild 1 von 2 Mantis Tiller 7940 (2017) Worm Shaft Replacement, Remove the worm housing gasket: Schritt 11, Bild 2 von 2
    • Remove the gear housing cover gasket.

    • We suggest you replace this gasket during reassembly every time you open the worm gear housing to prevent any grease from leaking from the worm drive.

    • During reassembly, refill the worm gear housing with an adequate amount of lithium grease before installing the gasket and housing cover to ensure smooth operation of the worm drive.

  12. Mantis Tiller 7940 (2017) Worm Shaft Replacement, Remove the tine shaft: Schritt 12, Bild 1 von 2 Mantis Tiller 7940 (2017) Worm Shaft Replacement, Remove the tine shaft: Schritt 12, Bild 2 von 2
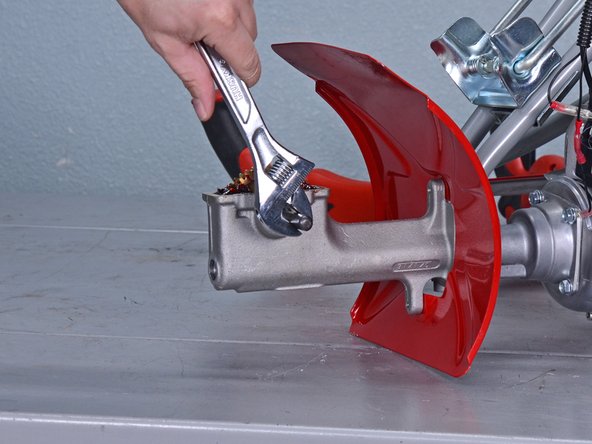
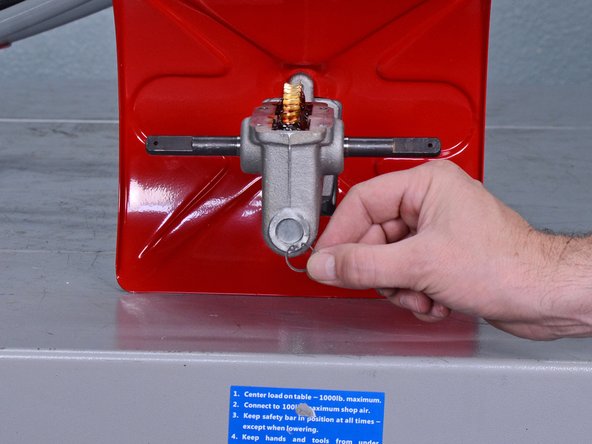
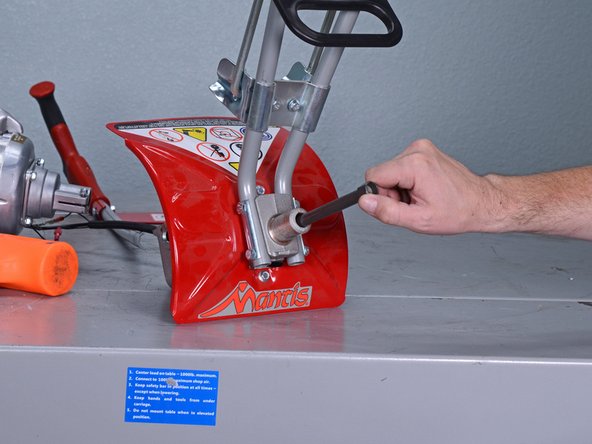
    • Use an adjustable wrench to turn the right half (in the orientation pictured) of the tine shaft clockwise, as shown.

    • Continue to turn the shaft clockwise until it is unthreaded from the worm gear inside the housing.

  13. Mantis Tiller 7940 (2017) Worm Shaft Replacement: Schritt 13, Bild 1 von 2 Mantis Tiller 7940 (2017) Worm Shaft Replacement: Schritt 13, Bild 2 von 2
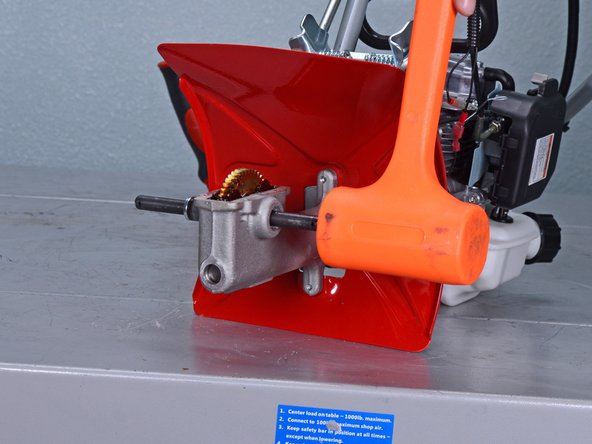
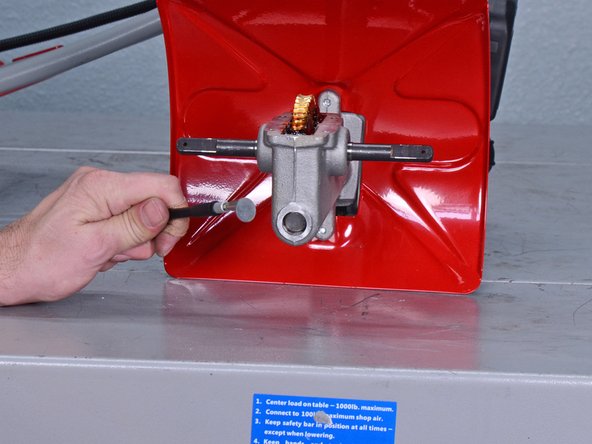
    • Use a dead blow hammer to tap the right half of the tine shaft towards the worm housing until it can be removed.

    • If the shaft won't budge with the dead blow hammer, you can try using a ball-peen hammer instead.

  14. Mantis Tiller 7940 (2017) Worm Shaft Replacement: Schritt 14, Bild 1 von 1
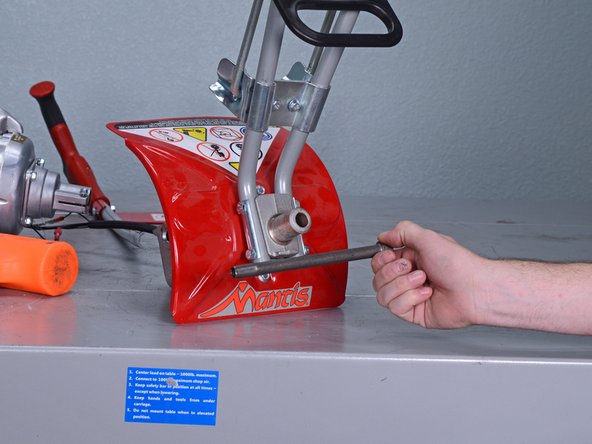
    • Slide the tine shaft assembly out from the left side of the worm housing and remove it.

  15. Mantis Tiller 7940 (2017) Worm Shaft Replacement, Remove the worm gear: Schritt 15, Bild 1 von 3 Mantis Tiller 7940 (2017) Worm Shaft Replacement, Remove the worm gear: Schritt 15, Bild 2 von 3 Mantis Tiller 7940 (2017) Worm Shaft Replacement, Remove the worm gear: Schritt 15, Bild 3 von 3
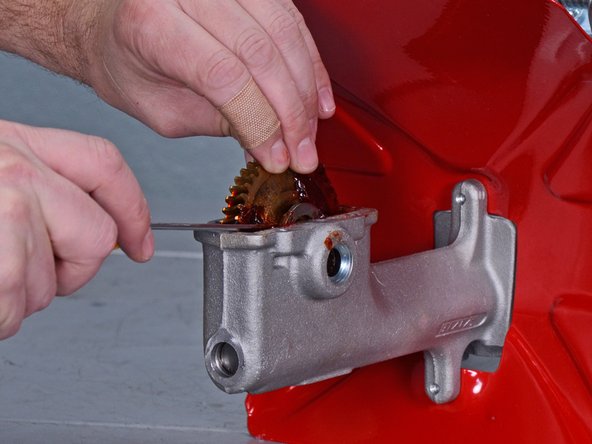
    • Slide the worm gear up out of the worm gear housing about 1 cm.

    • Use a flat head screwdriver to separate the right worm gear thrust washer from the worm gear.

  16. Mantis Tiller 7940 (2017) Worm Shaft Replacement: Schritt 16, Bild 1 von 2 Mantis Tiller 7940 (2017) Worm Shaft Replacement: Schritt 16, Bild 2 von 2
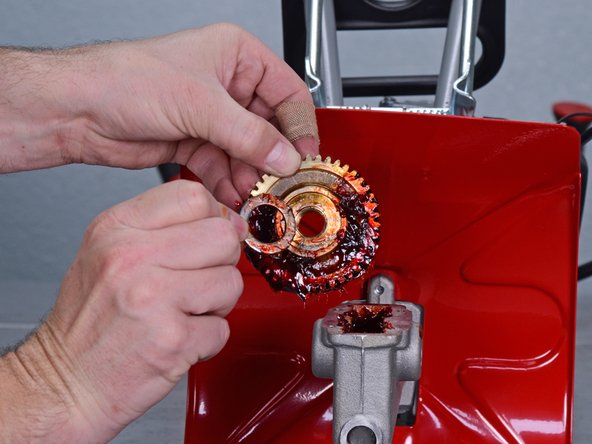
    • Remove the worm gear and left worm gear thrust washer from the worm housing.

    • Separate the left thrust washer from the worm gear.

    • During reassembly, insert the worm gear into the housing before inserting the thrust washers next to it on either side. All three will be aligned properly once the tine shaft is reinserted.

  17. Mantis Tiller 7940 (2017) Worm Shaft Replacement: Schritt 17, Bild 1 von 1
    • Remove the right worm gear thrust washer from the worm gear housing.

  18. Mantis Tiller 7940 (2017) Worm Shaft Replacement, Remove the retaining ring: Schritt 18, Bild 1 von 2 Mantis Tiller 7940 (2017) Worm Shaft Replacement, Remove the retaining ring: Schritt 18, Bild 2 von 2
    • Though the worm gear and tine shaft are shown to be installed in these photos, they should already be removed from your tiller by this point in the procedure.

    • Use a pair of snap ring pliers to remove the retaining ring from the bottom of the worm housing.

    • During reassembly, ensure the worm shaft is sufficiently tapped up into the worm housing before reinstalling the worm disk and retaining ring so that the ring properly sits into its recess.

  19. Mantis Tiller 7940 (2017) Worm Shaft Replacement, Remove the worm disk: Schritt 19, Bild 1 von 2 Mantis Tiller 7940 (2017) Worm Shaft Replacement, Remove the worm disk: Schritt 19, Bild 2 von 2
    • Though the worm gear and tine shaft are shown to be installed in these photos, they should already be removed from your tiller by this point in the procedure.

    • Use a magnet to remove the worm disk from the worm gear housing.

  20. Mantis Tiller 7940 (2017) Worm Shaft Replacement, Remove the engine: Schritt 20, Bild 1 von 1
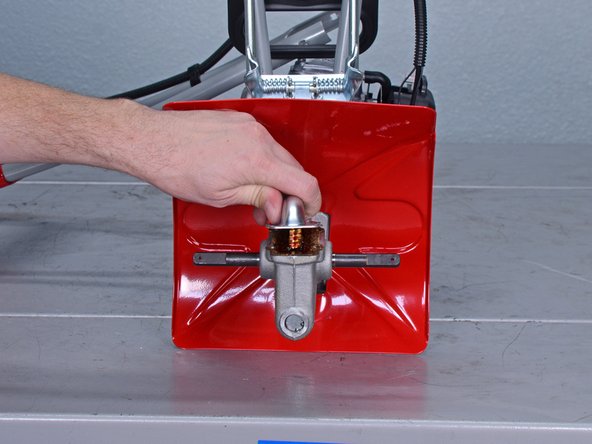
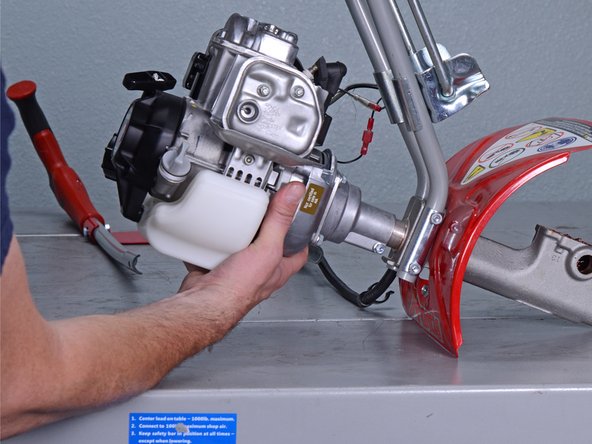
    • Use a socket wrench with an 8 mm socket to loosen the 3/4 inch-long flange bolt from the engine flange. It is not necessary to completely remove the flange bolt.

  21. Mantis Tiller 7940 (2017) Worm Shaft Replacement: Schritt 21, Bild 1 von 3 Mantis Tiller 7940 (2017) Worm Shaft Replacement: Schritt 21, Bild 2 von 3 Mantis Tiller 7940 (2017) Worm Shaft Replacement: Schritt 21, Bild 3 von 3
    • Remove the engine from the worm gear housing.

  22. Mantis Tiller 7940 (2017) Worm Shaft Replacement, Remove the drive shaft: Schritt 22, Bild 1 von 3 Mantis Tiller 7940 (2017) Worm Shaft Replacement, Remove the drive shaft: Schritt 22, Bild 2 von 3 Mantis Tiller 7940 (2017) Worm Shaft Replacement, Remove the drive shaft: Schritt 22, Bild 3 von 3
    • Remove the driveshaft from the worm gear housing.

  23. Mantis Tiller 7940 (2017) Worm Shaft Replacement: Schritt 23, Bild 1 von 1
    • Insert a properly sized bushing driver into the top of the worm gear housing.

    • If your bushing driver is too short to reach the worm shaft or too large to fit into the housing, You can use a socket extension or large punch instead/in addition the the bushing driver.

  24. Mantis Tiller 7940 (2017) Worm Shaft Replacement, Tap out the worm shaft assembly: Schritt 24, Bild 1 von 3 Mantis Tiller 7940 (2017) Worm Shaft Replacement, Tap out the worm shaft assembly: Schritt 24, Bild 2 von 3 Mantis Tiller 7940 (2017) Worm Shaft Replacement, Tap out the worm shaft assembly: Schritt 24, Bild 3 von 3
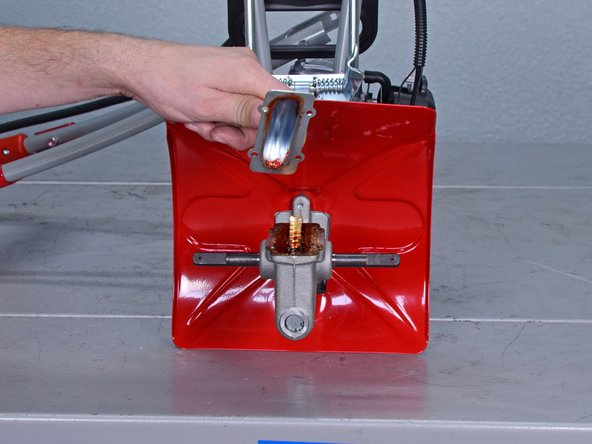
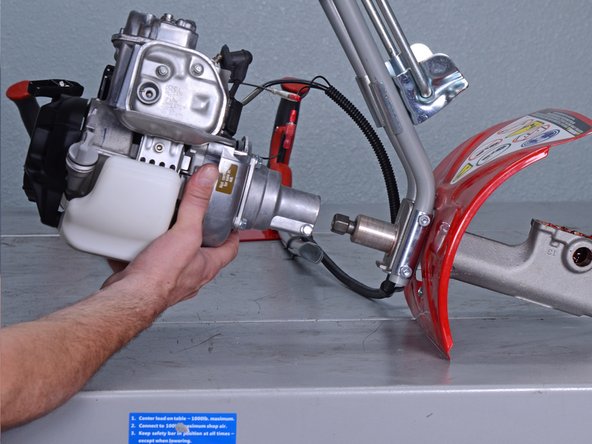
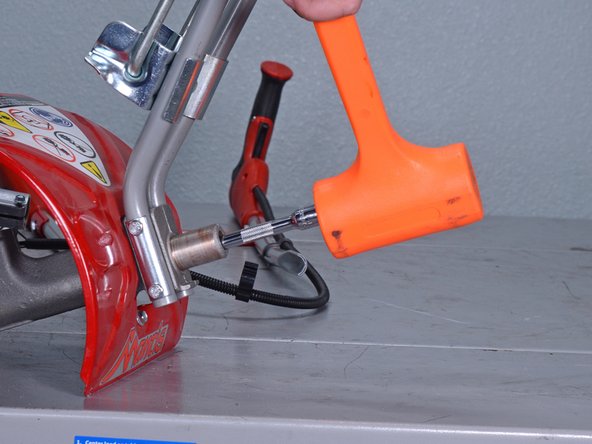
    • Use a dead blow hammer to gradually tap the worm shaft assembly out the bottom of the worm gear housing.

    • If the shaft won't budge with the dead blow hammer, you can try using a ball-peen hammer instead.

  25. Mantis Tiller 7940 (2017) Worm Shaft Replacement, Remove the lower roller bearing.: Schritt 25, Bild 1 von 2 Mantis Tiller 7940 (2017) Worm Shaft Replacement, Remove the lower roller bearing.: Schritt 25, Bild 2 von 2
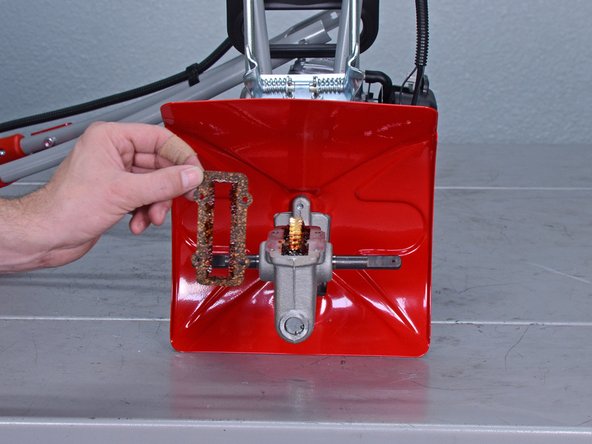
    • Remove the lower worm shaft roller bearing from the worm shaft.

    • During reassembly, install the lower roller bearing onto the worm shaft before using a bushing driver and dead blow hammer to tap the worm shaft assembly, from the bottom, up back into place.

  26. Mantis Tiller 7940 (2017) Worm Shaft Replacement, Remove the worm shaft: Schritt 26, Bild 1 von 2 Mantis Tiller 7940 (2017) Worm Shaft Replacement, Remove the worm shaft: Schritt 26, Bild 2 von 2
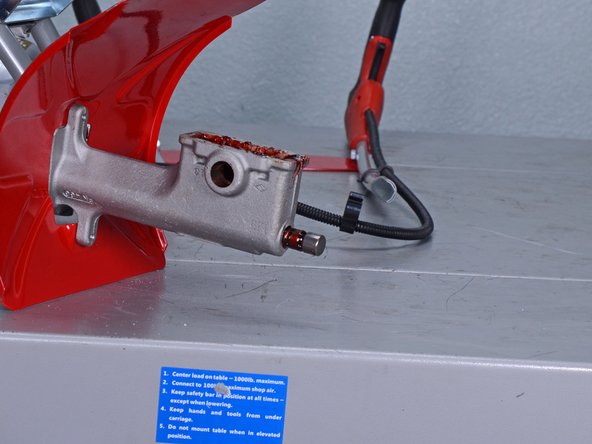
    • Remove the worm shaft from out the bottom of the worm gear housing.

Abschluss

To reassemble your device, follow these instructions in reverse order.

Ein:e weitere:r Nutzer:in hat diese Anleitung absolviert.

Tarun Thiruma

Mitglied seit: 11/20/19

35.289 Reputation

134 Anleitungen geschrieben

0 Kommentare

Kommentar hinzufügen

Seitenaufrufe:

Letzte 24 Stunden: 3

Letzte 7 Tage: 18

Letzte 30 Tage: 49

Insgesamt: 1,937