Zum Hauptinhalt wechseln

Mattel Loopz Speaker Replacement

Was du brauchst

  1. Mattel Loopz Speaker Replacement, Batteries: Schritt 1, Bild 1 von 1
    • Use a No. 2 Phillips head screwdriver to take out the 1/4" screw that holds the battery cover in place on the bottom of the device.

  2. Mattel Loopz Speaker Replacement: Schritt 2, Bild 1 von 1
    • Take out the 4 AA Batteries.

  3. Mattel Loopz Speaker Replacement, Speaker: Schritt 3, Bild 1 von 1
    • Remove red screw covers (13 total) using spudger.

  4. Mattel Loopz Speaker Replacement: Schritt 4, Bild 1 von 1
    • Remove the thirteen 12.7mm screws with a #1 Phillips screwdriver.

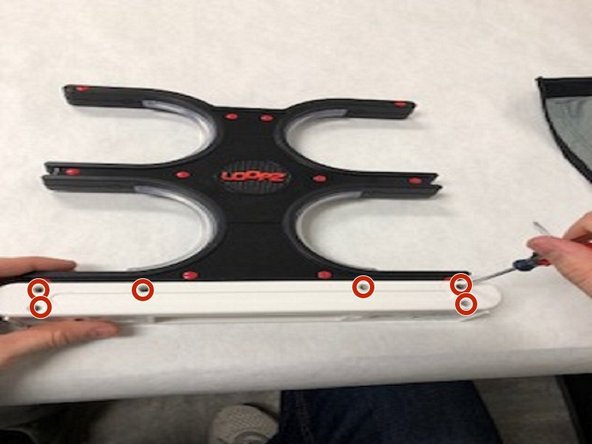
  5. Mattel Loopz Speaker Replacement: Schritt 5, Bild 1 von 1
    • Remove 6 white caps using spudger to reveal screws underneath.

  6. Mattel Loopz Speaker Replacement: Schritt 6, Bild 1 von 1
    • Remove the six 16mm screws with a #1 Phillips screwdriver.

  7. Mattel Loopz Speaker Replacement: Schritt 7, Bild 1 von 1
    • Remove the white cover. Be sure to remove the front and the back.

  8. Mattel Loopz Speaker Replacement: Schritt 8, Bild 1 von 1
    • Remove the black, plastic cover to reveal the internal electronics as shown.

  9. Mattel Loopz Speaker Replacement: Schritt 9, Bild 1 von 1
    • Remove the two 6.4mm screws with a #1 Phillips screwdriver.

  10. Mattel Loopz Speaker Replacement: Schritt 10, Bild 1 von 1
    • Remove the speaker as shown.

  11. Mattel Loopz Speaker Replacement: Schritt 11, Bild 1 von 1
    • Use a soldering iron to desolder the red and black speaker wires from the speaker.

Abschluss

To reassemble your device, follow these instructions in reverse order.

Ein:e weitere:r Nutzer:in hat diese Anleitung absolviert.

Team

IUPUI, Team S1-G2, Freund Spring 2018 Mitglied von IUPUI, Team S1-G2, Freund Spring 2018

IUPUI-FREUND-S18S1G2

3 Mitglieder

5 Anleitungen geschrieben

0 Kommentare

Kommentar hinzufügen

Seitenaufrufe:

Letzte 24 Stunden: 0

Letzte 7 Tage: 1

Letzte 30 Tage: 12

Insgesamt: 415