Diese Version enthält möglicherweise inkorrekte Änderungen. Wechsle zur letzten geprüften Version.
Was du brauchst
-
Dieser Schritt ist noch nicht übersetzt. Hilf mit, ihn zu übersetzen!
-
Remove the two plastic strips off the bottom of the main Kinect housing using the metal spudger's sharper side.
-
Peel off the two Xbox 360 stickers from the bottom of the case to reveal two hidden screws.
-
-
Dieser Schritt ist noch nicht übersetzt. Hilf mit, ihn zu übersetzen!
-
Unscrew the six 12mm T10 Torx screws.
-
-
Dieser Schritt ist noch nicht übersetzt. Hilf mit, ihn zu übersetzen!
-
Remove the top portion of the case from the rest of the body.
-
Detach the side portions of the case from the body.
-
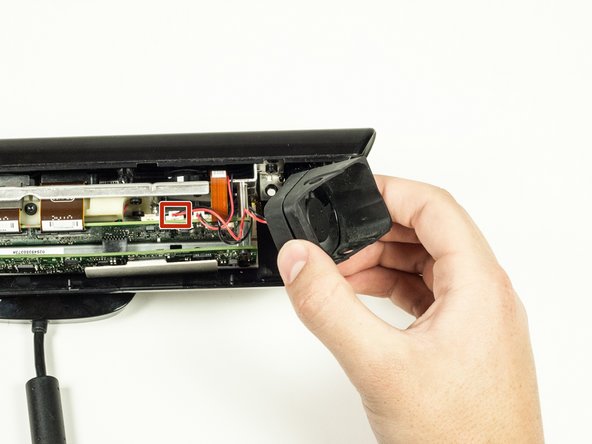
Remove the fan piece from the side of the body. Unplug it from the logic board to fully remove it.
-
-
Dieser Schritt ist noch nicht übersetzt. Hilf mit, ihn zu übersetzen!
-
Remove the bottom portion of the case by sliding it out from under the body.
-
-
Dieser Schritt ist noch nicht übersetzt. Hilf mit, ihn zu übersetzen!
-
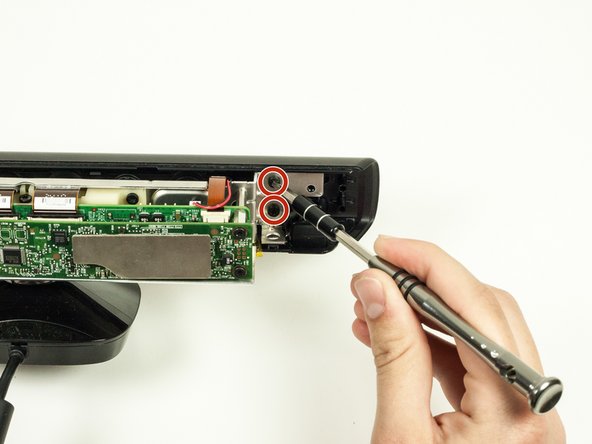
Remove the four 7mm T10 Torx screws (two on each side of the metal body).
-
-
-
Dieser Schritt ist noch nicht übersetzt. Hilf mit, ihn zu übersetzen!
-
Remove the front portion of the case containing the lens coverings for the cameras.
-
The LED component is connected to the front portion of the case. To disconnect it, just pull it out of its plastic connector.
-
-
Dieser Schritt ist noch nicht übersetzt. Hilf mit, ihn zu übersetzen!
-
Unplug the microphone from motherboard.
-
-
Dieser Schritt ist noch nicht übersetzt. Hilf mit, ihn zu übersetzen!
-
Pull off the microphone panel and snake the cable that was connected to the motherboard through the hole on the camera panel.
-
-
Dieser Schritt ist noch nicht übersetzt. Hilf mit, ihn zu übersetzen!
-
Unscrew the seven 6.5mm T10 Torx screws.
-
-
Dieser Schritt ist noch nicht übersetzt. Hilf mit, ihn zu übersetzen!
-
Disconnect the bridge connecting the first and second layer of the motherboard.
-
Pull the first layer of the motherboard off.
-
-
Dieser Schritt ist noch nicht übersetzt. Hilf mit, ihn zu übersetzen!
-
Unplug the LED cable from the motherboard.
-
-
Dieser Schritt ist noch nicht übersetzt. Hilf mit, ihn zu übersetzen!
-
Unscrew the three 16.5mm screws using the 5mm Nut Driver.
-
Unscrew the one 6.5mm T10 Torx screw.
-
-
Dieser Schritt ist noch nicht übersetzt. Hilf mit, ihn zu übersetzen!
-
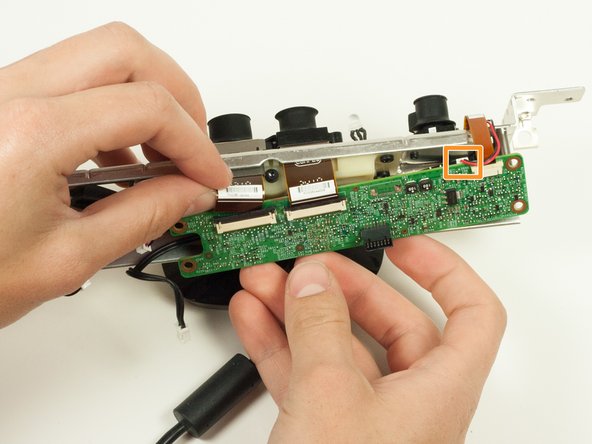
Remove the three ribbon cables.
-
Disconnect the left most camera from the motherboard.
-


Rückgängig: Ich habe diese Anleitung nicht absolviert.
2 weitere Nutzer:innen haben diese Anleitung absolviert.
Team

Cal Poly, Team 14-7, Amido Spring 2015 Mitglied von Cal Poly, Team 14-7, Amido Spring 2015
CPSU-AMIDO-S15S14G7
4 Mitglieder
6 Anleitungen geschrieben