Zum Hauptinhalt wechseln

Microsoft Lumia 640 XL Motherboard Replacement

Was du brauchst

  1. Microsoft Lumia 640 XL Motherboard Replacement, Battery: Schritt 1, Bild 1 von 3 Microsoft Lumia 640 XL Motherboard Replacement, Battery: Schritt 1, Bild 2 von 3 Microsoft Lumia 640 XL Motherboard Replacement, Battery: Schritt 1, Bild 3 von 3
    • Place left palm on screen and right palm on the back.

    • Press down with fingertips and pull to separate the back from the screen.

    • You may hear cracking and popping.

  2. Microsoft Lumia 640 XL Motherboard Replacement: Schritt 2, Bild 1 von 2 Microsoft Lumia 640 XL Motherboard Replacement: Schritt 2, Bild 2 von 2
    • Lift the battery away from the phone with the flat side of a spudger.

    • Be careful not to damage the battery.

  3. Microsoft Lumia 640 XL Motherboard Replacement, Headphone Jack: Schritt 3, Bild 1 von 3 Microsoft Lumia 640 XL Motherboard Replacement, Headphone Jack: Schritt 3, Bild 2 von 3 Microsoft Lumia 640 XL Motherboard Replacement, Headphone Jack: Schritt 3, Bild 3 von 3
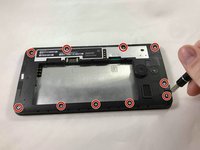
    • Remove all ten T3, 4.09 mm screws.

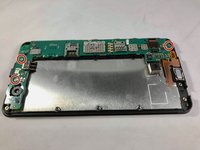
    • Lift mid-frame assembly from phone with flat side of a spudger.

  4. Microsoft Lumia 640 XL Motherboard Replacement: Schritt 4, Bild 1 von 3 Microsoft Lumia 640 XL Motherboard Replacement: Schritt 4, Bild 2 von 3 Microsoft Lumia 640 XL Motherboard Replacement: Schritt 4, Bild 3 von 3
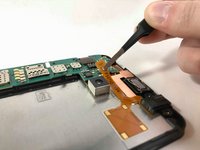
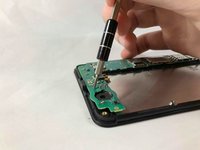
    • Lift and peel connector away from phone using tweezers.

    • To re-attach you may need E6000 Adhesive Glue.

  5. Microsoft Lumia 640 XL Motherboard Replacement, Motherboard: Schritt 5, Bild 1 von 2 Microsoft Lumia 640 XL Motherboard Replacement, Motherboard: Schritt 5, Bild 2 von 2
    • Remove all three T3, 2.66 mm screws.

  6. Microsoft Lumia 640 XL Motherboard Replacement: Schritt 6, Bild 1 von 3 Microsoft Lumia 640 XL Motherboard Replacement: Schritt 6, Bild 2 von 3 Microsoft Lumia 640 XL Motherboard Replacement: Schritt 6, Bild 3 von 3
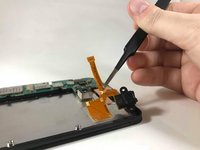
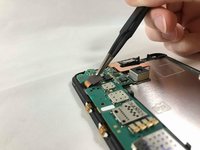
    • Lift off connector with tweezers.

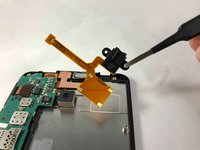
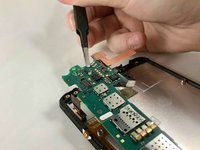
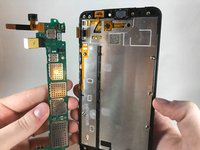
    • Lift motherboard off with tweezers and pull away with fingers.

Abschluss

To reassemble your device, follow these instructions in reverse order.

2 weitere Nutzer:innen haben diese Anleitung absolviert.

Ein Kommentar

Thanks, It was super

Yasmany - Antwort

Kommentar hinzufügen

Seitenaufrufe:

Letzte 24 Stunden: 0

Letzte 7 Tage: 1

Letzte 30 Tage: 2

Insgesamt: 678