Einleitung
Diese Anleitung zeigt dir, wie du den Akkupack austauschen kannst.
Was du brauchst
-
-
Drehe das Tablet vorsichtig um, sodass der Bildschirm nach unten zeigt.
-
Ziehe die unteren Ecken nach oben, um den Standfuß zu öffnen.
-
Siehe die Bilder.
-
-
-
Finde die beiden 5.08 mm Torx T5 Schrauben links und rechts vom Aufsteller.
-
Sei vorsichtig und beschädige beim Aufdrehender nicht die Schraubenköpfe.
-
Wackle vorsichtig am Aufsteller hin und her, bis ihn der Hebel in der Mitte freigibt.
-
-
-
-
Löse die im Bilder markierten kleinen Blenden mit einem Spudger oder ähnlichem Flachwerkzeug ab. Löse die Abdeckleiste an der Kamera mit dem Flachwerkzeug ab.
-
-
-
Entferne als Nächstes die zehn 5,92 mm Torx T5 Schrauben unter dem Aufsteller.
-
Entferne die sieben 5,87 mm Torx T5 Schrauben unter dem Kameragehäuse. Die zweites Schraube von links ist von einem Aufkleber verdeckt.
-
Setze in den Spalt zwischen Rückabdeckung und restlichem Gerät einen Spudger ein und trenne die beiden Teile.
-
Arbeite dich weiter um die Ecken herum und löse alle Rasten, bis die Rückabdeckung frei ist.
-
-
-
Drehe das Gerät um 180 Grad, so dass die unteren Seite zu dir zeigt.
-
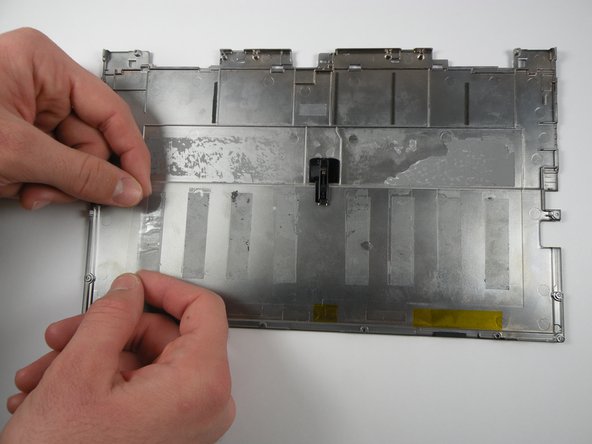
Ein Flachbandkabel verbindet den Akku an der Rückabdeckung mit der Hauptplatine. Hebe den Boden der Rückabdeckung langsam hoch, bis du das Flachbandkabel sehen kannst.
-
Entferne das Flachbandkabel, indem du es mit einem Spudger von der Hauptplatine weg schiebst, parallel zur Hauptplatine.
-
Hebe die Rückabdeckung hoch und trenne sie vom Gerät.
-
-
-
Schiebe den Spudger vorsichtig unter eine Akkuseite, bewege ihn dann um alle Seiten vor und zurück, bis sich der Akku von der Rückabdeckung löst.
-


Um dein Gerät wieder zusammenzusetzen, folge den Schritten in umgekehrter Reihenfolge.
Um dein Gerät wieder zusammenzusetzen, folge den Schritten in umgekehrter Reihenfolge.
Rückgängig: Ich habe diese Anleitung nicht absolviert.
43 weitere Nutzer:innen haben diese Anleitung absolviert.
Besonderer Dank geht an diese Übersetzer:innen:
100%
VauWeh hilft uns, die Welt in Ordnung zu bringen! Wie kann ich mithelfen?
Hier starten ›
Team

Cal Poly, Team 17-23, Forte Winter 2013 Mitglied von Cal Poly, Team 17-23, Forte Winter 2013
CPSU-FORTE-W13S17G23
5 Mitglieder
17 Anleitungen geschrieben
12 Kommentare
An excellent guide, i would have thought i was going to break the surface if it wasn't for this guide simply showing how to remove certain items that are just clipped in place. Highly recommend obtaining a set of plastic prising tools, available from auction sites under i-phone repair tools else you will damage the plastic covers.
I have a Surface RT and the battery stopped charging. Eventually, it completely drained and was no longer useable. The charger was definitely working but connecting the charger to the Surface RT did not allow functionality.
Disconnecting and reconnecting the battery solved my issue. RT now is working. Thanks! This helped me avoid replacing the power supply.
I have been scouring the internet these past few days for a solution to the same problem you had. I have been wondering if the problem was poorly attached cables or a dead battery. Yours is the first comment I've read suggesting "yes" to incorrect cable attachment. Just to clarify: you detached and re-attached your Surface RT battery cable? You did not replace the battery with a new battery?
dw97459 -
I have a Microsoft Surface, in trying to change the battery the Surface was reassembled with glue.
Could I open it to replace the battery and then reassemble it?
Thank you.
This is only for the Surface(1516) NOT the Surface 2 (1572) need S by S for 1572 battery.
In attempting to plastic spudge my Surface RT 1516 batteries out in order to use in another Surface RT I am worried about how much the spudging is flexing and bubbling up the battery itself as though it is clay inside a flexible aluminum covering. Is this OK? Is changing it's flat shape via spudging causing any damage to the otherwise working battery? Should I press it down to regain the flat shape prior to installing?
Thanks for any technically accurate details.
Craig
In response to Hapa Latina and dw97459:
My charger indicator light would not come on so I figured the charger or battery was bad. Checked the charger with a volt meter: it was working.
Taking a clue from Hapa’s post, I followed these excellent instructions but only detached and then reattached the battery and SUCCESS!
Yikes, merely detaching and reattaching battery and my charger light came on and battery now seems to be recharging. So, something got reset.
Note to others: I had never used a spudger tool before. Never even heard of it. But they are only a couple of bucks and the spade/shovel style worked well. I watched some youtube videos and took my time. Gently working the thing open.
I will not post further if my Surface takes the charge and returns to normal.
Good luck to all and thank you to the original author and to Hapa
My wife naught me a surface 2 tablet that does the same thing only difference is I never have taken it out of the house beciuae it wouldn't hold a charge sence day one Cord keeps it running so I May try a few of your ideas thank you
Thanks for that. I was about to bin the Surface. Your solution prompted me to open it up and it transpired that the ribbon cable connector for the battery had come loose. Once I got it back in place, everything was fine.
Thanks again……Mike….
I never buy Microsoft surface again. spent 2k and only for 1 year use. After warranty period, it completely dead. Spend $350 for repair with no warranty. After 1 week, it dead again.
Tenho um tablet windows rt surface o conector da bateria estragou quero fazer jumper
Preciso de ajuda
Thes instructions should include publish date and which generation of Surface they are based on. It’d be unfortunate if lead someone to disassemble a device that has changed.
BigMo - Antwort