Einleitung
Follow this guide to replace the battery on your Microsoft Surface Pro 4.
If your battery is swollen, take appropriate precautions.
There is a significant chance that you may break the unreinforced and fragile display panel during this procedure. Be sure to apply adequate heat and be extremely careful while slicing through the adhesive. Wear safety glasses in case the glass shatters.
Applying new thermal paste during reassembly may improve the performance of your Surface. If you wish to do that, make sure you have new thermal paste and either high-concentration isopropyl alcohol or a specialized thermal paste cleaner.
Was du brauchst
-
-
If your screen glass is cracked, keep further breakage contained and prevent bodily harm during your repair by taping the glass.
-
Lay overlapping strips of clear packing tape over the Surface’s screen until the whole face is covered.
-
Do your best to follow the rest of the guide as described. However, once the glass is broken, it will likely continue to crack as you work, and you may need to use a metal prying tool to scoop the glass out.
-
-
-
Heat an iOpener and apply it to the right edge of the Surface's screen for two minutes.
I have done dozens of Surface Pro tablet repairs; if your screen is cracked or chipped AT ALL, you WILL make it worse. Plan on replacing it. Even if it's not cracked or chipped, the likely hood of removing this screen without damage (LCD separation or heat marks in the corners) is very low. Ive tried everything from hot plates to heat mats and the iOpener and nothing is reliable enough. I found that using my Warner heat gun set at 800*c and working on half an edge at a time with a LOT of 91% alcohol in a drip bottle along the edge, along with a very thin guitar pick (not the ones sold here, they are too thick) is the trick to loosening the glue. Work on the side and bottom first. The top is going to be the hardest as the adhesive will stick to the wifi/bluetooth antenna and you WILL tear them (Ive had to replace a fair amount of them). There's a delicate trick to doing it, but it's too hard to describe. If you've never done this repair before, I do not recommend it; find a professional.
Hi, thanks for the information, Very valuable.
I'm about to do this because my battery and fan aren't working.
There's no way anybody can fix it properly near me. Got any other tip to try not to break the screen and or any flex?
I've done works like this on small tablets and phones, but never this pc. I'll try to go slow.
Thanks again for your experience information.
-
-
-
Take note of the screen adhesive layout before continuing:
-
These areas only contain adhesive and are safe to cut.
-
The display board and flex cables sit here close to the edge. Cut carefully and don't insert the pick more than 1/8 inch (3 mm).
-
Fragile antenna cables lie under this part of the screen. Carefully follow the procedure in step 13 to avoid damaging them. The adhesive is also the thickest here.
The bottom red section is narrow and not as thick as the bevel indicates. I went too deep with my tool and cut through a ribbon thinking that I could send my tool as deep as the black bevel edge. its like half that.
I did a screenshot of this image to always see it while progressing through the steps and did exactly the same mistake. I read every comment in the steps below but yours only now :( On my device it's 5mm from the edge of the screen glass to the ribbon.
I cut through as well, but was able to carefully solder the edges together enough to make a connection - works fine.
-
-
-
Insert an opening pick into the top-right speaker cutout on the screen and slide the pick between the glass and speaker grille.
-
-
-
Rotate the pick toward the bottom of the Surface to slide it underneath the lower edge of the speaker cutout.
-
-
-
Slide the pick down the right edge of the Surface to slice through the adhesive under the screen.
-
Leave this opening pick in the right edge to prevent the adhesive from resealing.
-
-
-
Reheat your iOpener and apply it to the bottom edge of the Surface's screen for two minutes.
-
-
-
Insert a new opening pick into the bottom-right corner and slide it around the corner toward the bottom edge.
-
Slide the pick along the bottom edge of the Surface to cut through the screen adhesive.
-
Leave this pick in the bottom edge to prevent the adhesive from resealing.
Yep. I scratched the corner of the LCD with the pick. Take the warning seriously folks! It’s really easy to do.
The warning says to not insert it more than 12mm but it should be not more than 5mm. There is a ribbon/display connection at the bottom and i damaged it.
-
-
-
Reheat your iOpener and apply it to the left edge of the Surface's screen for two minutes.
-
-
-
Insert a new opening pick into the bottom left corner and slide it around the corner toward the left edge.
-
Slide the pick along the left edge of the Surface to cut through the screen adhesive.
-
Leave this pick in the left edge to prevent the adhesive from resealing.
-
-
-
Reheat your iOpener and apply it to the top edge of the Surface's screen for two minutes.
-
-
-
Round the left corner with the opening pick and slide it along the top edge of the Surface. Stop when the pick is 2.75 inches (70 mm) away from the left edge.
The right antenna is kind of P shaped (rotated 90° to the right) with the small end facing the middle. I'd suggest to stop at the middle when loosening the left antenna and to do the same thing coming from the right.
-
-
-
Insert the point of a pick under the screen where you just stopped cutting. Don't insert the pick deeper than the edge of the bezel.
-
Carefully roll the pick to the right, pressing the long edge of the pick into the screen adhesive underneath the bezel, cutting the adhesive as you go. Don't slide the pick along the edge of the Surface.
-
Repeat this motion of inserting the point of the pick where you just cut, and rolling to the right all along the top edge of the Surface, until the pick is 2.5 inches (64 mm) from the right edge of the Surface.
Bij mijn exemplaar bleek het onmogelijk om de bovenrand volgens de aanwijzingen los te maken. Ik heb de boel vele keren opgewarmd en ben meerdere malen met het plectrum langs de rand gegaan. Maar er beleef iets hardnekking vastplakken. Ik moest uiteindelijk de lijmverbindingen los maken zoals bij de andere randen. Achteraf bleek dat bij het gedeelte waar de antennes zaten het frame en het scherm volledig met elkaar verlijmd zaten met de antennes er tussen. Dat kostte me uiteindelijk de antennes. Gelukkig geen schade aan andere zaken. Niet zo'n grote ramp want ik kon nog antennes bestellen. Maar hou er rekening mee.
-
-
-
Once you cut the adhesive over the antennas (8.5 inches, or 22 cm, from the left edge), slide the pick the rest of the way along the top edge of the surface and round the top right corner to slice through any remaining adhesive.
-
-
-
Very slowly lift the screen assembly away from the Surface case. If you encounter any resistance, stop and check that all the adhesive is separated.
-
Use an opening pick to cut through any remaining adhesive.
-
-
-
Lift the top of the screen assembly away from the case while sliding the bottom of the screen closer to the motherboard display connectors.
-
Gently lay the screen down on the case with the connectors facing up. Take care to avoid creasing the display cables.
-
-
-
Use one tip of a pair of angled tweezers to pry up the EMI shield from the gaps between the "teeth."
-
Repeat this procedure at different points around the perimeter of the shield until it is free.
-
-
-
Use your tweezers to remove the two EMI shields covering the display cable connectors.
-
-
-
Pry up with the flat end of a spudger to disconnect each display cable from the motherboard.
-
-
-
Remove the screen from the Surface.
-
During reassembly, pause here and follow this guide to replace the screen adhesive.
-
-
-
-
Use a T5 Torx screwdriver to remove the four 4.5 mm screws securing the antenna support bracket.
This screw bit was not included in the battery replacement kit. Only Philips and Flathead were included.
This Torx bit was not included in the battery replacement kit. Only a Philips and Flathead bit
-
-
-
Carefully remove the antenna support bracket.
I had ripped through 2 of the 3 antennas when cutting through the top adhesive. Not sure how anyone removes this display without ruining at least one of them.
I saw on Reddit this post: https://www.reddit.com/r/techsupportmacg...
It works perfectly! My wifi was one that was cut. It’s now made of aluminum foil and is pulling down 147Mbps and pushing 80.88Mbps up.
A ce stade il semble important de faire attention au micro. Pour ma part, il avait un résidu de colle entre celui-ci et le support à retirer.
On my device the mic is glued to the antenna board. I'd recommend to detach it's ribbon cable from the motherboard before removing the antenna board
-
-
-
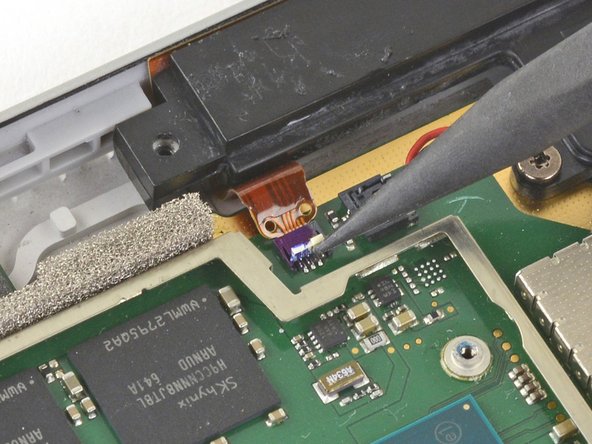
Insert one point of a pair of pointed tweezers into a gap in the corner of the EMI shield covering the heat sink.
-
Use the tweezers to pry the EMI shield away from the motherboard as much as you can without bending it. Do not remove it yet.
-
-
-
Repeat the last step at various locations around the perimeter of the EMI shield covering the heat sink.
-
Remove the CPU shield.
-
-
-
Use a T3 Torx screwdriver to remove two screws from the heat sink:
-
One 2.4 mm screw along the top of the rectangular plate covering the battery.
-
One 2.2 mm screw along the bottom of the rectangular plate covering the battery
La première vis de 2,4 est une Torx 4, pour ce qui me concerne et non pas une Torx 3.
Attention la deuxième vis est bien une TORX 3
Remarque : La boite à outil "Essentiel electronics Toolkit - Grade B (ref EU145571-1)" ne contient pas l'embout T3
Pour ma part j'ai utilisé donc le T4 en forçant un peu. Pas cool ;-(
-
-
-
Use a Phillips screwdriver to remove three 2.4 mm screws securing the fan.
-
Use a T5 Torx screwdriver to remove the final 4.4 mm screw securing in the fan cover.
These screws were in a different area on my Surface, Pro 4 bought at release. The fan was visible and attached to the heat sink. Remove the two torx screws on the fan housing. No need to remove the Philips head screws that secure the fan.
Sorry I’m super brand new to the game. I don’t know the difference between 1.5mm Torx T4 and 3.0mm Torx T4. I look under tools I need to buy, and the tool kits only say Torx T4 or T5, without the milimeters dimensions.
Je fais écho au commentaire de vennic, les longueurs indiqués en mm sont les longueurs des vis et n’impactent pas les tournevis à utiliser. Bien ranger les vis par longueur permets de mettre les bonnes vis aux bons endroits lors du remontage de l’appareil.
Cajuteq -
The fan connector on mine was held in place by a white clamp on the side closest to the middle of the chassis. The long edge toward the middle flips up to vertical. That frees up the fan connector. Likewise for the black “wire” connector right beside it.
As previously mentioned, the fan should be disconnected (look at step 36) BEFORE you remove the fan/heat sink assembly. Ive done DOZENS of these repairs and the fan has always been part of the heat sink assembly.
I did all of this, now surface won't turn on. Any ideas?
-
-
-
Use a T5 Torx screwdriver to remove the heat sink screws surrounding the CPU in the following pattern, one turn at a time, until they're free.
-
Screw 1
-
Screw 2
-
Screw 3
-
Screw 4
These screws were T5 Torx in mine, not T3 as in the instructions.
T5 Torx screwdriver is correct.
T4 Torx for me.
What does one turn at a time mean?
One turn for the "red" screw, one for the orange, one for the yellow, then green and now again one turn red, orange, yellow, green ... This cross pattern distributes the pressure evenly .
VauWeh -
I think I need a T6 torx screw the screwdriver is not working for these screws
-
-
-
Use the flat end of a spudger to gently pry the heat sink straight up and off of the CPU.
-
-
-
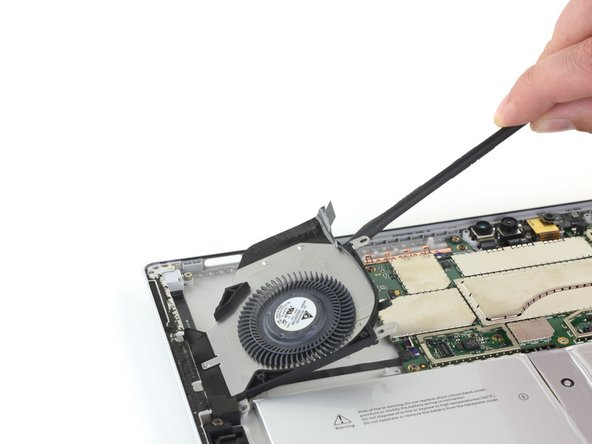
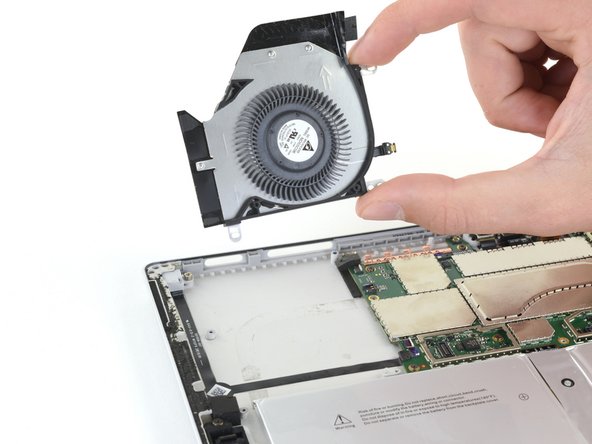
Insert the pointed end of a spudger into a screw hole in the fan shield and lift up to separate it from the fan.
The fan should be disconnected (look at step 36) BEFORE you remove the fan/heat sink assembly. Ive done DOZENS of these repairs and the fan has always been part of the heat sink assembly.
These instructions were correct for my Surface. The fan cover was attached to the heatsink but the fan was not.
-
-
-
Carefully remove the heatsink.
-
-
-
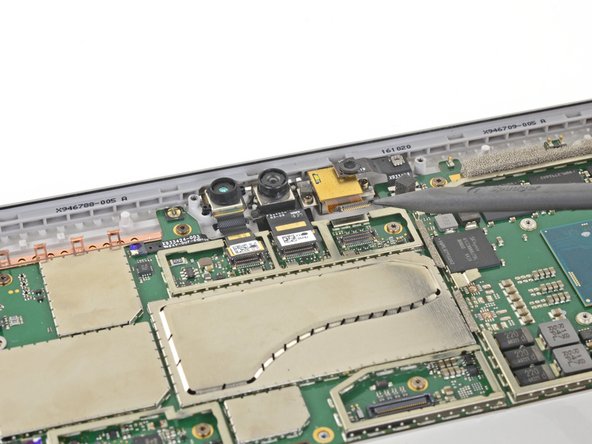
Insert one point of a pair of pointed tweezers into a gap in the corner of the EMI shield covering the camera connectors.
-
Use the tweezers to pry the EMI shield away from the motherboard as much as you can without bending it.
-
Remove the EMI shield.
-
-
-
Pry up with the pointed end of your spudger to disconnect all three camera cables from the motherboard.
Missing the part to disconnect the ribbon to the left of the cameras, luckily, it disconnected by itself when I removed the motherboard.
Yes that's very important (white and blue socket on photo) !
I forgot to reconnect it on reassembly (unluckily, it doesn't reconnect by itself ;o)
Phil68 -
-
-
-
Use the pointed end of your spudger to unlock the ZIF connector securing the volume/power button cable.
-
Gently slide the volume/power button cable out of the ZIF connector.
While you're here, you'll want to disconnect the ZIF connector directly opposite from this one, which can be seen in the lower right of these photos, nearer the camera cable connection points. The guide doesn't mention removing that cable, but you'll need it removed before you can lift out the motherboard.
-
-
-
Slide the pointed end of a spudger between the speaker wires and the motherboard until it is resting against the speaker wire connector.
-
Carefully pry straight up on the speaker wire connector to disconnect it from the motherboard.
1. the picture can be misleading
2. use the flat end instead or you might damage the plastic part of the connector. see Microsoft Surface Pro 4 linken Lautsprecher tauschen
-
-
-
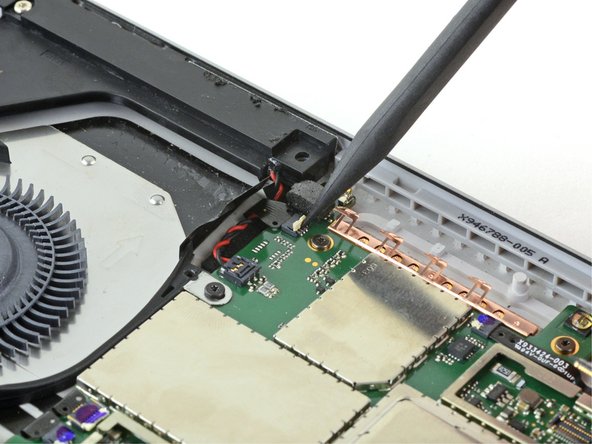
Use the pointed end of your spudger to unlock the fan and headphone jack ZIF connectors.
The fan should be disconnected when you removed the fan/heat sink assembly in Step 29 (which is NOT mentioned).
-
-
-
Use the pointed end of your spudger to gently slide the fan and headphone jack cables out of their ZIF connectors.
The fan should be disconnected when you removed the fan/heat sink assembly in Step 29 (which is NOT mentioned).
-
-
-
Use a T3 Torx screwdriver to remove the following screws from the fan:
-
One 2.5 mm screw with coarse threads
-
Two 2.4 mm screws
I didn't realize that one screw (red) here was different, and it looks like I put it in a different place during assembly, and the remaining screw, of course, did not hold. Be careful with the screws!
I have a question: can I buy a set of these screws for Surface Pro 4 to change the spoiled ones? I noticed that sometimes they get damaged on top and it is difficult to screw them on afterwards.
-
-
-
Use a spudger to lift one side of the fan.
-
Pick up the fan and remove it.
-
-
-
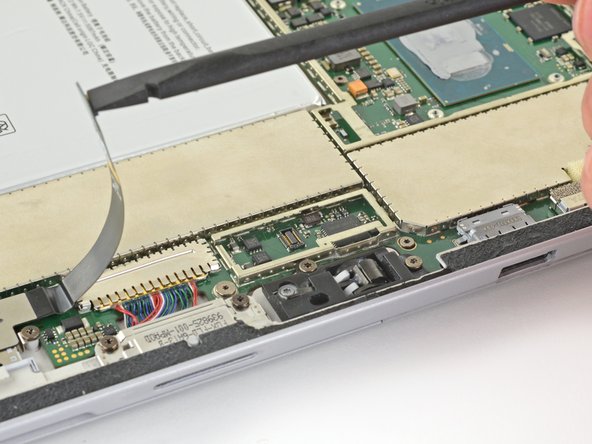
Insert one point of a pair of tweezers into a gap in the edge of the EMI shield covering the microSD card reader cable and connector.
-
Use the tweezers to pry the EMI shield away from the motherboard as much as you can without bending it.
-
Remove the shield.
-
-
-
Use the flat end of your spudger to lift the microSD card reader's connector straight up out of its socket.
-
Lift the microSD card reader cable up and out of the way of the EMI shield covering the charging assembly.
It's probably best to remove the microSD card reader at this point. The guide never states to remove it, but it eventually disappears from the photos. Two T5 screws are all that are holding it down. Easier to take those out and remove the assembly than to try to remove the EMI shield underneath while also holding the ribbon cable out of the way.
Not necessary to remove the reader. When reinserting the motherboard, you can slide it easily enough underneath it. It may make it easier, but isn't necessary.
A ce stade, la nappe était coller sur le blindage. Pour ne pas trop plier la nappe, j'ai poussé la spatule. La colle n'était pas trop résistante.
-
-
-
Insert one point of a pair of tweezers into a gap in the edge of the EMI shield covering the charging assembly cable connector.
-
Use the tweezers to pry the EMI shield away from the motherboard as much as you can without bending it.
-
Remove the shield.
-
-
-
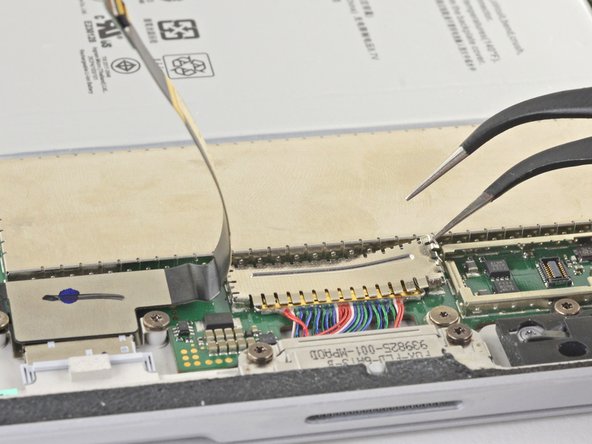
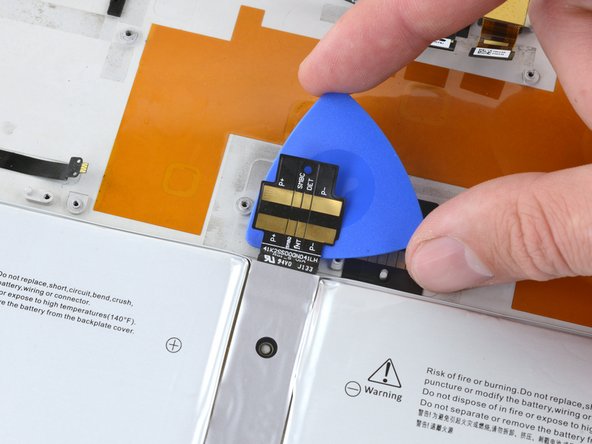
Use the flat end of a spudger to flip up the retaining lock securing the charging assembly cable connector.
-
-
-
Use the tip of a spudger to carefully push on each side of the connector.
-
Alternating from one side to the other, gently "walk" the connector out of its socket.
-
-
-
Use a T5 Torx screwdriver to remove the two 3.1 mm screws securing the microSD card reader.
-
-
-
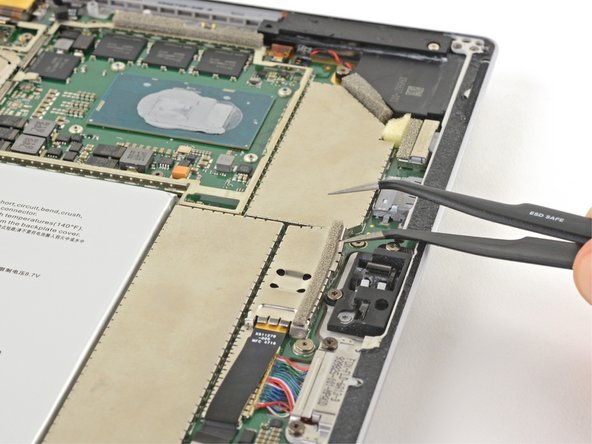
Use the pointed end of your spudger to unlock the ZIF connector between the processor and right speaker.
-
Disconnect the cable from the ZIF connector.
This one broke during reassembling, so I could not fix the connector properly. I tried to find out what it is, but the only hint I found was, that it is some kind of antenna. I could not find out what kind of antenna. Anyway, after completion everything I needed worked fine: Bluetooth and Wireless LAN. I appreciate any hint about the purpose of this antenna.
That's my question too
Mj Ro -
Perhaps one of the two WiFi frequencies (2.4 or 5 GHz)?
Phil68 -
-
-
-
Slide the pointed end of a spudger between the right speaker wires and the motherboard until it is resting against the speaker wire connector.
-
Carefully pry straight up on the speaker wire connector to disconnect it from the motherboard.
-
-
-
Use a T3 Torx screwdriver to remove the following screws from the fan and motherboard:
-
Ten 2.4 mm screws
-
Two 2.2 mm screws
-
Use a T5 Torx screwdriver to remove the two screws securing the right speaker:
-
One 4.2 mm screw
-
One 6.0 mm screw
Use a T5 Torx screwdriver to remove screw in left and right speaker.
BE CAREFUL! Use a T5 Torx screwdriver to remove an ADDITIONAL screw on the top corner of the right speaker. It should not take a tremendous amount of force to remove the speaker.
This screw is in the frame of the SP4. Mine was a T3.
An additional screw has been marked up and added to the original photo regarding the issues with the right fan removal. Thanks to the community for the feedback!
-
-
-
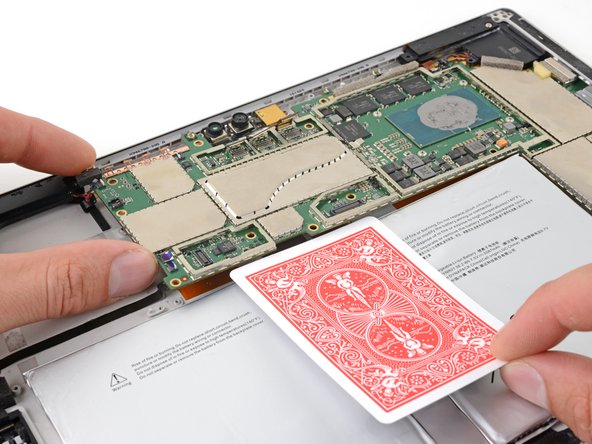
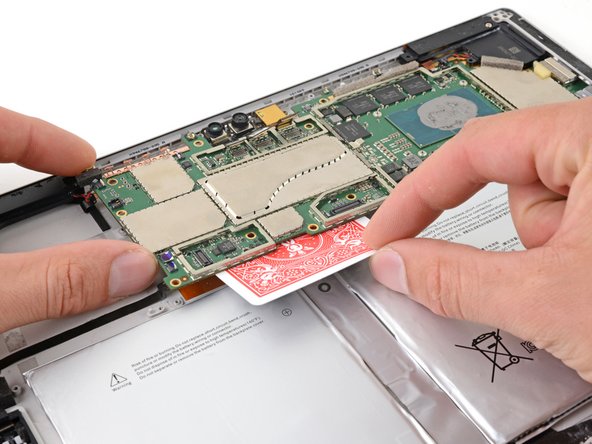
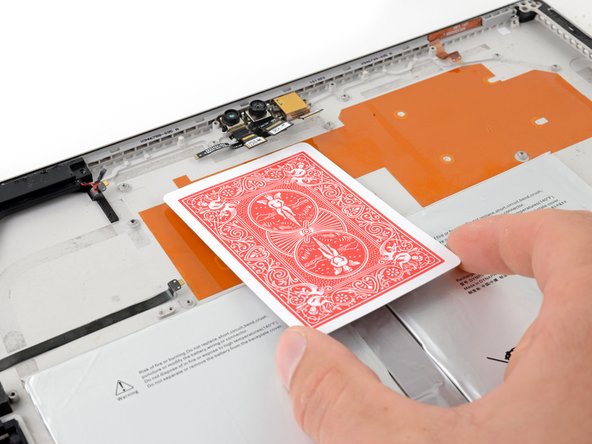
Slightly lift the left edge of the motherboard.
-
Insert a playing card or similar object between the battery connector and the motherboard.
-
-
-
Grip the narrow section of the right speaker box and lift it up slightly.
-
Slide the right speaker back out of the chassis.
-
Remove the right speaker.
I didn’t read about the other T5 (about 6 mm) holding down the right speaker. It needs to be removed prior to this step.
You also need to remove a screw in the top right corner of the speaker
Yup there is an unmentioned t5 screw that the other comments catch
-
-
-
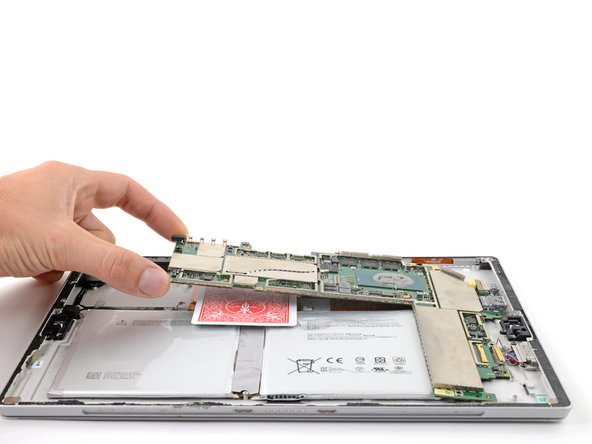
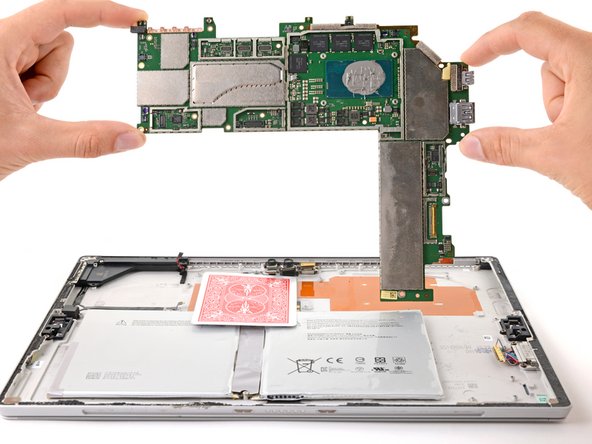
Remove the motherboard by first lifting the left side until it is at roughly a 30 degree angle.
-
Gently slide the I/O ports on the motherboard out from their openings and remove the motherboard.
There seems to be an additional ZIF connector by the Left most camera that also needs to be disconnected. Beware.
Also, the micro SD reader obstructs a little bit (at bottom right )as you remove the motherboard.
-
-
-
Remove the playing card from the battery connector.
-
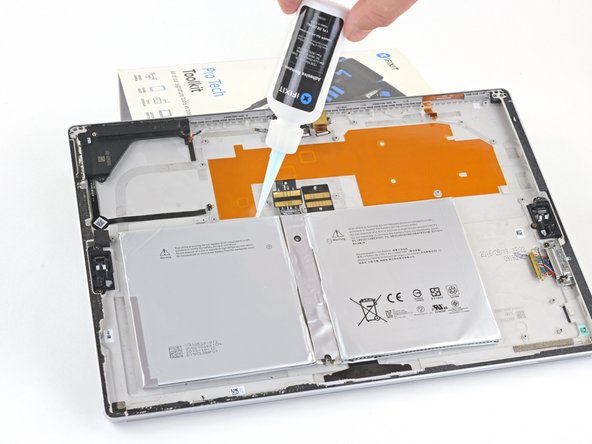
Heat an iOpener and apply it to the battery connector for two minutes to soften the adhesive securing the connector to the case.
-
-
-
Starting at the edge furthest from the battery, slide an opening pick under the battery connector to separate the adhesive underneath.
-
-
-
Prop the top edge of the Surface up a couple inches so the whole Surface slopes towards the bottom edge.
-
Drip adhesive remover or high-concentration (90% or higher) isopropyl alcohol under the top edge of the battery.
-
Let the solvent sit and soak into the adhesive for 2-3 minutes before continuing.
Probably obvious to all except dolts like me… After soaking the batter in the solvent, set it flat again on the work surface before using the card to start working on the adhesive… I impatiently starting hacking on the adhesive while the Surface was still propped up… and promptly put a bend in the previously flat metal backplate.
I tried multiple applications of iFixIt adhesive remover on my SP4 and it seems to be doing absolutely nothing. The glue won't budge even by millimeter
It took 6 rounds and pretty serious push.
-
-
-
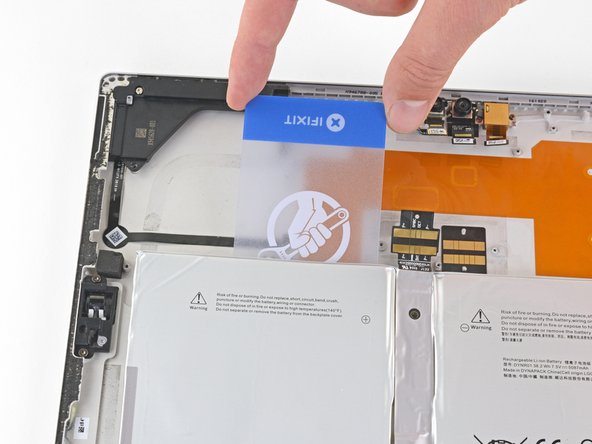
Slide a plastic card under the left side of the top edge of the battery.
-
Slide the card side to side under the upper left battery cell to slice through the adhesive underneath.
-
-
-
Fully insert your plastic card under the left battery cell and pry up to separate it from the chassis.
Take your time and do not use force. Soak repeatedly with IPA and move the card back and forward to free. I was a little forceful and the battery poach had visible signs from the card. No leak but better safe than sorry. I would also tape the batterie terminals , just in case.
-
-
-
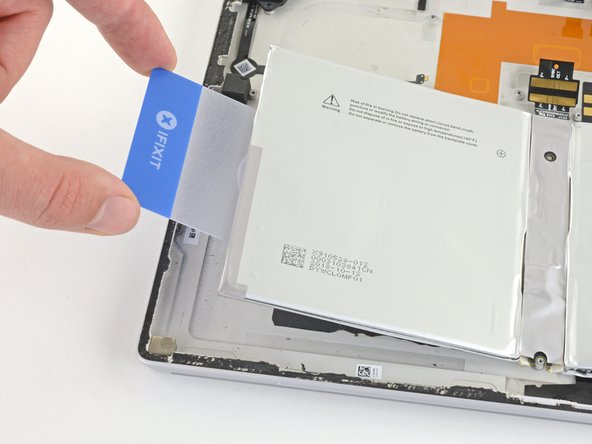
Insert your card under the right battery cell and pry up to separate it from the chassis.
-
-
-
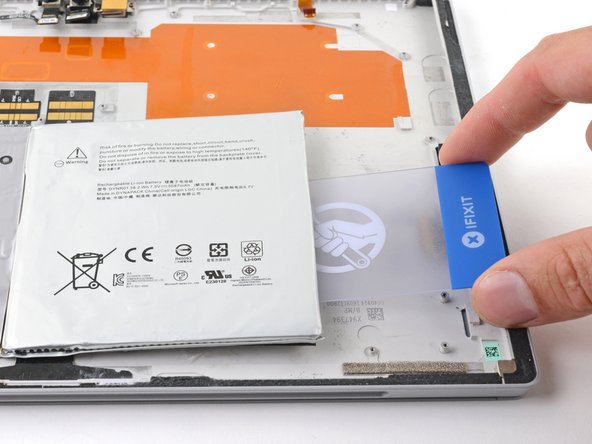
Gently lift the battery out of the chassis.
-
Peel and remove the old adhesive from the chassis.
-
Clean any adhesive residue with highly-concentrated isopropyl alcohol (over 90%) and a microfiber or lint-free cloth.
-
Place your replacement adhesive strips onto the chassis where the old adhesive was located and remove the liner from the battery connector.
-
Orient the new battery using the alignment posts and press it firmly into place.
A la pose de la nouvelle batterie, la languette semble trop longue pour se positionner dans son emplacement (si l'on veut immédiatement faire correspondre tous avec les trous de positionnement). En fait :
Poser et coller la batterie sans retirer la pellicule de l'adhésive de la languette.
Ensuite, prendre soin de plier la languette de raccordement en suivant le profil de l'épaisseur de la batterie.
Retirer la pellicule de l'adhésive de la languette qui, du coup, se présente bien à sa place .
-


For optimal performance, calibrate your newly installed battery after completing this guide.
To reassemble your device, follow the above steps in reverse order.
Take your e-waste to an R2 or e-Stewards certified recycler.
Repair didn’t go as planned? Try some basic troubleshooting, or ask our Answers community for help.
Rückgängig: Ich habe diese Anleitung nicht absolviert.
149 weitere Nutzer:innen haben diese Anleitung absolviert.

78 Kommentare
thanks for this, use my surface pro 4 all the time, batteries are a disposable item and really need to be user replaceable
(if a company doesn't have a battery replacement service as good as apple's that is)
Bit of hassle but glad it can be done, zero idea where to get a replacement battery from though )-:
excellent presentation. I’d never try it myself. But I came here with what appears to be a battery problem. If you accept it as a bit offtopic: my battery icon reads 100%. when I am connected to my adaptor. When I remove the aadaptor plug, the screen goes to only a faint outline…to faint to read what % the battery is reading at. Any thoughts? I’m in a rural area of South West Thailand. So, v difficult to get to a reliable repair shop. Thanks !
This is probably too late for you now, you’ve probably solved this. But for anyone else experiencing this issue, it COULD be the power options. Windows automatically changes the screen brightness when you unplug, you could’ve accidentally set it right down. Go to Control Panel (Small Icons view) > Power Options. There should be options in there for what to do when removing the power adapter. Sorry I can’t be more specific, I’m on a desktop so it doesn’t have the right options to explain it fully.
Thanks for the tutorial. Managed to break a display cable anyway T_T. Just broke itself… The rest was almost a piece of cake.
Seriously WHY so much shields on the motherboard, its insane… As a Mac Technician for almost two decades never saw such a mess (well except the powerbook 12” maybe).
That being said, I love my Surface !
I believe it is shielding EMF/EMI from the LCD, since everything is mounted right behind the LCDin extremely close proximity, electromagnetic interference can distort the picture, at least that’s the theory. On a Mac or traditional laptop, the LCD is well away from the current carrying portions of the laptop
Glen D -
+ 30 just for the 12” Powerbook comment!
Anyone knows if the Surface Pro is able to run without battery? Connected to power supply of cause.
I was not able to run it with the dead battery, even plugged in. It would start to boot, but once the OS kicked in with all the graphics, it would die. I managed to get Ubuntu Linux to work on it a little better, but I would not suggest it. It did not work well enough to use, and Ubuntu didn’t have drivers to run the pen or touch screen very well. Ultimately, replacing the battery worked, and I am now enjoying my Surface Pro 4 again!
I would also be very interested to know. Any feedback from your question ?
I have two under my belt now.
First was a broken screen, very difficult getting the screen off without leaving shards of glass attached to the adhesive. Replaced all adhesive with new.
Second was a battery that was expanding lifting the left side of the screen. Since the left side was lifted this made getting it started for easier. Screen came off intact. The speaker wire (Red/Black) is very fragile, I pulled the pins out of the holder when trying to remove. I was able to put them back. I would avoid it if you can as you only have to lift the mother board high enough to get the battery out and back in. There is enough slack, so I would recommend only removing if absolutely necessary. Followed tip to remove and replace thermal paste (Cleaner and paste (~$15). Had to replace the adhesive under the batter, just ran several stripes of the 2mm adhesive that I used for the display.
This site was a great guide.
Thank you for this teardown and instructions! I just finished repairing my Surface Pro 4 after it sat for a year as a brick when the battery died. (I couldn’t get it to reliably boot up - and stay up - with a bad battery, even when it was plugged in.) I purchased all of the suggested equipment but ended up having to use a razor to shave off some of the aluminum case - near the indentation where the speakers are - in order to get the opening pick under the screen. The pictures were very helpful. Mine had a fan attached to the heat sink on the left side of the device, which meant there were a couple more screws to remove, but otherwise, the teardown was spot on.
Which part of the screen is the actual touch screen connection? I just did all of this and my touch is off a bit. I touch one place and it moves one other place. The pen isn’t accurate anymore either. My guess is it’s that housed connection on the back of the screen itself? I can take this thing apart again and just try it; just wanted to see if anyone had the exact connections..
Thanks
Kinda strange that they take the hear directly to the battery…. I might be paranoid but it smells a little fishy to me!
Also they should make battery replacements way easier! Surface pros are almost a disposable tablet. I didn’t buy one purely cause of this, but I love them so much!
Super !!! Vielen Dank für die Anleitung. Ich habe mir zwar ein wenig mehr Zeit gelassen aber alles funktioniert ;-) der neue Akku läd wieder und mein Surface Pro 4 läuft wieder. Danke noch mal. Achso und es gab noch gleich eine größere SSD =)
Viele Grüße,
Michael
my pro 4 is not working with the replaced battery, only works when plugged in. please what can i do?
It was challenging for me to get the contacts in the right place. Aside from that, could be a bad diode. https://www.aonemobiles.com.au/2020/03/m...
vennic -
hallo, kann man das Sur face auch zur Reparatur schicken?
I change the battery on mine (twice !!!) and it doesn’t charge the new battery.
However, the old battery is charged when plugged in.
If anyone has any info..
Thanks
I seem to be having a similar issue. I have yet to find out what is wrong. If you ever find out what is wrong let me know; I have heard it could be a blown resistor but have yet to find one that does not give a voltage readout.
Be careful around the antenna when removing the display. I sheared the antenna sticker in half and needed to wait 30 days for a new antenna (25$).
Otherwise, the repair was very doable once the screen is off. The recommended adhesive (tesa), does make the display sit lower than original, giving the border a slight sharp edge all around. I would recommend a slightly thicker adhesive for reassembly.
Hallo,
kann man das Surface auch ohne Akku, nur mit dem Netzteil, betreiben ?
Ja, das geht
I have purchased and successfully follow the guide to replace my battery. But it seems that i am not able to restore charge amount of time when at 100% it’s only report 1 hour and a half approx.. when on the new battery. Is there any tool or calibration to restore this new battery that I purchased from ifixt to full capacity?.
It look the new battery is original here is what it shows using battery only power:
Description Value
Battery Name X910527
Manufacture Name SMP
Power State Discharging
Current Capacity (in %) 80.4%
Current Capacity Value 26,092 mWh
Full Charged Capacity 32,445 mWh
Designed Capacity 38,152 mWh
Battery Health 85.0%
Voltage 7,896 millivolts
Charge/Discharge Rate -6,480 milliwatts
Chemistry Lithium Ion
Low Battery Capacity (1) 983 mWh
Low Battery Capacity (2) 3,244 mWh
Number of charge/discharge cycles 229
Remaining battery time for the current activity (Estimated) 03:37:46
Full battery time for the current activity (Estimated) 04:30:48
Remaining time for charging the battery (Estimated)
Thanks for this information and useful comments.
I need to add that my Pro4’s heat tube has a cooling fan , so I needed to disconnect the fan cable connector by the power switch connector.
ahhhh This has been a nightmare trying to perform. The shields are such a pain in the ass!
CAUTION! I completed this process to replace the battery on mine, and there is one IMPORTANT step that should be on this guide. Before removing the battery, a plastic card should be inserted between the battery contacts and the underside of the mainboard to isolate the battery from the contacts on the underside of the mainboard. When I was working the adhesive on the battery contacts from the chassis, the connections crossed and shorted something and burned out the IT8528VG chip. I contacted a repair shop regarding replacement of this part and they said it requires a hot air station to remove and micro soldering to replace. They said they see this common error when repairing. Now my Surface is a paperweight. Please add this crucial step to these instructions.
It is very frustrating to have performed this long, difficult process perfectly, with an intact Surface screen at the end, only to have irreparably destroyed it because of one important missing step.
This can happen because of a blown battery.
Iam still searching why my pro4 isn't running from the battery only with the power connector.
READ ALL STEPS AND COMMENTS FIRST BEFORE STARTING!!!
My surface would not charge the battery and would go dead if unplugged, then would go dead on reboot unless given a hard restart. New battery fixed the issue.
Step 18 is incomplete without reading the comments first, you could apparently brick your device if you don’t remove the old battery using a step that is not included in the guide. Also the guide gives NO guidance on detaching the battery contact strip from the shell, or how to properly install the new battery, which is odd, considering the title of the article. I (and others) wrote some comments on step 18 that should be helpful. The rest of the guide was great, but as is, incomplete.
I recently attempted this repair but with a new battery installed the device now won’t power on. The old battery was severely swollen and despite being as careful as possible I tore the outer foil wrapper and even tore the connector on the battery during removal (the battery did not smoke or seem that it had shorted). Regardless, it’s pretty clear that the device is shorted and is now bricked, right? Is there any remedy or is the motherboard “fried”?
I wish I would have seen the comments on step 18 about putting an insulator (paper) between the old battery and motherboard when removing. This may have saved my device.
Just finished replacing the antenna and the battery on Surface Pro4. I highly recommend ignoring the steps to remove the battery without removing the motherboard (mb). Removing the mb is less difficult than trying to get the battery ribbon in and out. As many have learned, you can brick your mb, and, like me not get it aligned properly causing “no battery detected”. After removing the mb, I was able to realign the battery ribbon properly and all worked great. This video is great at removing the mb. Don’t worry about removing the buttons, left speaker, or SSD (they won’t interfere).
Youtube video number: n74Pc_luSGI (How to Take Apart the Microsoft Surface Pro 4)
Once mb is removed, remove the battery, and install the new battery, insuring the battery ribbon is on the plastic locator pin (not in instructions), place adhesive under ribbon to hold in proper place for contacts on the mb.
I purchased these and both work great:
Battery (Amazon ASIN): B08595GYBN
Antenna (Amazon ASIN): B08PV8SZ3R
Please add a disclaimer about how to AVOID shorting out the motherboard!!!
This is some kind of sick joke, right? I just got through this and took out my battery. I do not know how the heck I’m going to get this thing back together.
What’s this paste where the old battery terminal connection was and how the heck am I supposed to get the new battery into place
Did anyone have to use an adhesive to reseat the screen or did you just reheat the original adhesive?
You need new adhesive
This worked great for me except I’m now having a problem with my computer not wanting to start up when I have the screen in place. If I hold it by the edges just above the computer, it boots up fine. There must be something touching that shouldn’t and cause it to turn off. Anyone have this problem or have an idea of how I can troubleshoot it?
I would HIGHLY suggest removing the entire motherboard when performing this repair. It’s just another few screws and a few ribbon cables to take it out, and it will make removing and installing the new battery 10 times easier and allow you to align it properly. The guide is not kidding about the adhesive holding the back of the battery in place - it is very strong! I ended up using a heat gun on the back side of the device (underneath the kickstand) to help soften it a little bit, and an old credit card to help pry the battery out.
A few thoughts, having done this over the weekend:
First, get yourself one of those sets of three plastic putty knives from the hardware store (the ones that have 3 different sizes). The middle size was the same size as the battery, and made removal of the battery while heating the back of the case a breeze.
Second, remove the tiny screws (two on each side) holding the kickstand to the hinges. It’ll let you fold it all the way back, which makes heating the backside much easier.
Third, while you’re in there, scrape out the copious and ill-applied thermal paste from on and around the CPU dies, and put on something decent. I did, and my Pro 4 is running much cooler now.
Last, TAKE YOUR TIME. I managed to remove and replace my screen without issue, but it took me a bit more than two hours to get it removed, and then remove the adhesive from the case and the back of the screen. I started in the upper-right corner, used the iFixIt Jimmy, and kept the heat gun around the bezel only, just slightly ahead of the Jimmy
I have a Surface Pro 4 with a swollen battery. actually it’s the second time the battery has swollen. I have a question: Is it possible to remove the battery and just plug the device in whenever I want to use it? Does Surface Pro 4 work without battery?
It does work without the battery. I had no problem plugging it in and testing it without the battery connected.
I just finished doing this repair yesterday and I have a few tips for people trying this repair. First of all, when removing the display, be really careful on the sides of the camera assembly, because this is where the antennas are located. These antennas are sandwiched between the adhesive that holds the display on and the frame of the device, so it is very easy to break them when you are opening up the device. I actually did end up breaking one of the antenna “flex cable” style pcb’s, but luckily I didnt break any of the traces and my antennas seem to work fine. Also, test the antennas, and make sure the device is able to charge at least a few percent before gluing the display back in place, as the battery might not be able to charge if the connectors to the battery aren’t all connected. This is a very difficult repair, and it feels like Microsoft tried to make the battery one of the most difficult parts to replace. Getting the display off is hard, but it is only the first step.
I just finished doing this repair yesterday and I have a few tips for people trying this repair. First of all, when removing the display, be really careful on the sides of the camera assembly, because this is where the antennas are located. These antennas are sandwiched between the adhesive that holds the display on and the frame of the device, so it is very easy to break them when you are opening up the device. I actually did end up breaking one of the antenna “flex cable” style pcb’s, but luckily I didnt break any of the traces and my antennas seem to work fine. Also, test the antennas, and make sure the device is able to charge at least a few percent before gluing the display back in place, as the battery might not be able to charge if the connectors to the battery aren’t all connected. This is a very difficult repair, and it feels like Microsoft tried to make the battery one of the most difficult parts to replace. Getting the display off is hard, but it is only the first step.
It does work without the battery. I had no problem plugging it in and testing it without the battery connected.
hooo, ok that is interested. Thanks for sharing. So the battery case empty ?
Super erklärt und es funktioniert auch!! Schade dass wir so eine Wegwerfgesellschaft geworden sind, aber so kann man als Firma eben Umsatz machen! Top Anleitung!!
“No battery detected” after install.. :-(
Habe den Akku erfolgreich getauscht und konnte das Surface anschließend auch wieder starten. Allerdings wird seitdem das Ladekabel (hat vorher einwandfrei funktioniert) nicht mehr erkannt. Jetzt habe ich das Problem dass der Akku nicht geladen wird und auch kein Netzbetrieb möglich ist. Damit ist nun ein neuer Akku drin, benutzen kann ich das Surface aber leider weiterhin nicht :-(. Hat jemand eine Idee was ich ncoh machen könnte?
It’s nuts to me that, knowing full and well that blowing a backlight fuse is so %#*@ easy when accidentally hitting a power on input while servicing the device, that manufacturers willingly make the battery the last thing you can unplug. Great breakdown.
Thanks for the detailed tutorial.
IMHO it’s better to fully remove the motherboard (what I personnaly did), this has the following advantages:
- no shortcircuit risk when ungluing the battery flex-pcb.
- better access to the right side of the battery to remove it.
- easier to precisely stick the flex-pcb on the case after replacing the battery.
Thanks for the tutorial. An excellent presentation on how to carefully access and replace the battery in a Surface Pro 4. I was able to complete this procedure without breaking the display glass and successfully replaced the battery in my old Surface Pro 4 with an iFixIt battery. I used iFixIt tools available from the iFixIt site. The only suggestion I would make would be to use a dental pick to remove the EMI shields from the Surface Pro. The supplied tweezers in the iFixIt tool kit was not strong enough and the tips bent. Also recommend carefully cleaning the glass surface of the display below the camera openings to ensure the cameras have a clear view once all the adhesive is removed, before the display is reattached to the case.
If you prefer to watch a video of disassembly/reassembly, I have successfully completed the whole process ;) You can see it here:
.
Microsoft Surface Pro 4 - screen bulge fixed, battery replaced, SSD upgraded! (https://www.youtube.com/watch?v=3eEbdCMr...)
.
So you can see non-broken screen removal and reattachment, motherboard removal, battery replacement, SSD replacement etc. I even managed to keep the screen intact after all was said and done! ;)
And as few people mentioned, avoid temptation to skip motherboard removal unless you know exactly what you’re doing (and if you’re reading this, you’re probably not). It is a bit more hassle to disconnect a bunch of stuff on the motherboard, but it makes it A LOT easier and more importantly SAFER to remove and reinstall the battery. Shorting motherboard is a real thing, and fixing that problem would be a whole lot more difficult than removing the motherboard. So just do it the right way, you will be thankful later ;)
It was described perfectly but my question is going to be related with what is the max capacity as MAH for the battery of my MSP4 to make the battery life last longer and stronger. I mean is it possible to make it bigger which will be helping us that we will be using it for more hours than before. If it is possible or if there is any other option to do it please just let me know. I do love my MSP4 and I just wanna use it more without the charger I will be able to use it more than 2 -3 hours for each time I turn it on. Even giving me more suggestions will be appropriate for making a new solution for my problem.
Don't do this repair. It really isn't worth it. I managed to get everything done, but I was already replacing a faulty screen and figured "why not replace the battery while I'm in here?!"
Well... why not? Because it's way more work, everything is fiddley and easy to break, and the battery is a PAIN to get out.
I just replaced my battery in my Surface Pro 4. I followed an online replacement video that wasn't iFixit. Now my surface doesn't charge or power on. Reading some comments from others that are looking at the same problem after they changed their batteries, there appears to be a problem with Microsoft using a "Zero Ohm" resister that can be taken out by just lifting the board to remove the old battery. iFixit's video that shows removing the whole motherboard, I think that would have eliminated the problem I am now facing. Something should have been noted with the replacement battery that iFixit supplies, recommending that the entire motherboard be re-moved would have helped in avoiding this potential failure. I am onboard with the whole concept of 'Right To Repair', and the number of people that commented on the iFixit site that had the same scenario problem, makes me think that iFixit wasn't quick enough to acknowledge the problem or simply recommend with a note supplied with the replacement part.
hello, I was replacing the battery. when lifting up the motherboard this thing popped out of somewhere. and have no idea where this should go during assembly—image on the link. can someone please help me out?
It is the fixation on the heat dissipation rod from the battery to the CPU near the battery plate, see picture step 30 or the upper screw on step 25. It also happened to me :-).
A great detailed tear down description.
HOWEVER please note that on my Surface Pro 4 you can't lift the screen up as described as they are too short and it tore one on the ribbon cables! A better way is to lift the screen up just enough to prise off the aluminum covers and disconnect the cable connectors first.
Thanks for this tutorial, really great! I managed to replace the battery and the device works just fine after.
Anyway, everybody talks about sustainability these days. The battery in the MS surface is a great example about how to avoid sustainability and make "one-way" devices... :-/ . I like working with the surface a lot, but the experience of changing the battery leaves a bit of an aftertaste on Microsoft's hardware.
Hello.
I completely agree with this comment about programmed obsolescence. It's obvious that the MS Surface tablet was designed to be almost impossible to dismantle and therefore to be throw away in the event of a breakdown. Despite this precious tutorial and the use of the iOpener, it was impossible for me to remove the touch screen without breaking it. I had the same misfortune with the wifi and Bluetooth antennae on the top part, the metal strips were completely amalgamated with the adhesive and I had to sacrifice them to remove the pieces of glass. So, a word of warning to the next (very) brave troubleshooting adventurers: replacing the battery on a pro surface is a very very... delicate operation. Good luck!
Phil68 -
Mein altes Akku hatte sich 2 Wochen vor der ersten Klausurphase so stark aufgebläht, dass sich das Display in der unteren linken Ecke gelöst hat und ich war von meinem Microsoft Surface Pro 4 angewiesen.
Dank der detaillierten Anleitung mit Bild und Text, konnte ich leichter den Akku mit weiteren Toolkits von iFixit mit einer Wärmeleitpaste wechseln.
Die Tipps waren auch in der Anleitung sehr hilfreich.
Es sind schon 2 Monate nach dem Akku-Wechsel und ich habe bis jetzt keine Probleme feststellen können.
Das einzige (was ich auch verkraften kann) ist, dass mein Tablet nach herunterfahren sich trotzdem entlädt. Ich weiß nicht woran das liegt.
Aber unter Einstellung > System > Strom und Akku sieht man eine ausführliche Information der Akkustände in der letzten 24h.
Man kann sehen wieviel Prozent in der Stunde (z.B. im ausgeschalteten Zustand) entladen wird.
So weiß ich ungefähr wann das Tablet (im ausgeschalteten Zustand) wieder aufgeladen werden muss.
Vielen Dank an dem iFixit-Team😀👍🏼⭐⭐⭐⭐⭐
This was an excellent guide. I was able to replace the battery and it's charging now and no broken or lost parts! For some unknown reason, the Surface could not find the battery the first time I installed it. I did it over and made sure the battery connection was properly located and I bent the motherboard prongs a little for better contact. Not sure which one was the issue but it works now. It was not too difficult to remove the glass since the swollen batteries had completely unfastened the left side of the screen. I used a heat gun and took it easy. The correct labeling and storage of the small screws was easy using a magnetic board. The Ifixit kit had all the needed supplies. I bought a static strap and the magnetic board to make the job easier. Hopefully I can get a few more years out of it. The Surface Pro 4 works really well as a travel computer.
Spoke too soon. Battery charges to 100% but surface only operates when plugged in with charging cable.
I had the expanded batteries that made me think screen removal was fairly easy and I was already over the hump. I had not read the warnings about the antenna tape so I was not as delicate there as I should have been. Made it through the disassembly and reassembly. Struggled with one micro connector to the right of the camera bank that I may not have needed to unplug - I don't think it was in the instructions and I don't have any confidence in the way it went back in.
Unit went back together, booted from battery, recognized me (camera works), but now no keyboard/touchpad. Not sure if these keyboards are bluetooth, but I couldn't get it to recognize a bluetooth speaker either. Touch works fine. The pen works fine. Wifi is fine.
Primarily wanted to rescue it as a drawing tablet, and avoid buying an iPad. This may work as a drawing tablet for a bit but it wasn't a pleasant experience and I wouldn't risk it again.
Hola. buenas. Hace 1 año se me infló la batería de mi surface pro 4. Hace un año la envié a reparar, pero decidí por diversas circunstancias usarla sin bateria. Ahora quiero ponerle una nueva. Mi pregunta es ¿puedo ponerle alguna otra batería de mayor capacidad?
Muchas gracias.
Hello. hello good. 1 year ago the battery of my surface pro 4 inflated. A year ago I sent it in for repair, but decided for various reasons to use it without a battery. Now I want to put a new one on it. My question is, can I put another battery with a higher capacity?
Thank you very much.
getting the screen off w/o breaking it or damaging the ribbon cables on either side of the camera are the most difficult parts of this process.
The tutorial was easy to follow. The overall experience to me was pretty good. Most of it not difficult at all. Having the right tools helps ofcourse. I only encountered one problem and that had nothing to do with the quality of the tutorial. When releasing the screen from the frame I had problems in the antenna area. At the end I had no other choise then use some more force then I wanted to. Ending up destroying the antenna. When the screen was seperated I could see why. Parts of the antenna were glued to the screen and parts of the antenna were clued to the frame. No amount of heat was enough to get the antenna released from the screen. And even after the screen was released I had difficulties cleaning the screen from the remains of the antennas.
Thank you for this guide. I was successful in getting the new battery installed. I received the Surface Pro 4 from my boss because it was getting retired. It now will gain a second life in the field during our customer estimates. I had two problems. The adhesive torn the copper on the wifi antenna cover in two spots. Instead of replacing it I used silver glue over the torn area and it's working fine. The wifi ribbon I screwed up and bought a replacement, along with a new SSD since I had it opened up. I've built computers since I was 13 in the early 90s. Not a hard fix but a time consuming one.
A great set of instructions! I had only one slip up (foil antenna cut- but was able to fix this). It took 3 hours to disassemble, remove battery and clean. Took a lunch break, then 1 hour to reassemble, test and reattach screen. The touch screen was intact, but the touch portion was damaged as the battery had swelled and bent the screen. I now have a small band near the screen top that does not respond to touch. everything else works as it did when new. Thanks to you and well done!
Excellente aide au démontage de la Surface, très bien pour la qualité du texte et ds photos ! bravo !
Followed this guide, laboriously and slowly, and successfully replaced the battery. I went around the screen with my pick and a hot air gun, very slowly working out the adhesive. I did break one of the antenna, but replaced it with some copper tape I had in the shed (slug tape!). Not the easiest thing to do, but I couldn't have done it without this guide. Thanks!
If I have a screen protector on the screen should I remove it? Will it interfere with the heating process?
IronJoker - Antwort