Einleitung
Diese Anleitung zeigt, wie du die Hauptplatine im Microsoft Surface Pro 4 austauschen kannst.
Leider kann es leicht passieren, dass das nicht verstärkte und empfindliche Displaypanel während der Reparatur bricht. Achte darauf, dass du gut erwärmst und sei sehr vorsichtig, wenn du denn Kleber auftrennst. Ziehe eine Schutzbrille auf, damit keine Splitter dein Auge verletzen können.
Neue Wärmeleitpaste kann die Leistung deines Surfaces verbessern. Wenn du sie ersetzen willst, dann halte neue Paste bereit und benutze entweder hochkonzentrierten Isopropylalkohol oder einen speziellen Reiniger zum Entfernen von Wärmeleitpaste, um die entsprechenden Flächen vorher zu reinigen.
Was du brauchst
-
-
Wenn das Displayglas zerbrochen ist, dann überklebe das Glas mit Klebeband, damit die Scherben zusammenbleiben, und du dich nicht so leicht verletzen kannst.
-
Überklebe das Display komplett mit überlappenden durchsichtigen Klebestreifen.
-
Befolge die Anleitung so genau wie möglich. Wenn das Glas zerbrochen ist, kann es natürlich trotzdem vorkommen, dass es während der Reparatur weiter splittert. Dann musst du die Splitter mit einem Metallwerkzeuge behutsam herausholen.
-
-
-
Erwärme einen iOpener und lege ihn zwei Minuten lang auf die rechte Kante des Displays.
I have done dozens of Surface Pro tablet repairs; if your screen is cracked or chipped AT ALL, you WILL make it worse. Plan on replacing it. Even if it's not cracked or chipped, the likely hood of removing this screen without damage (LCD separation or heat marks in the corners) is very low. Ive tried everything from hot plates to heat mats and the iOpener and nothing is reliable enough. I found that using my Warner heat gun set at 800*c and working on half an edge at a time with a LOT of 91% alcohol in a drip bottle along the edge, along with a very thin guitar pick (not the ones sold here, they are too thick) is the trick to loosening the glue. Work on the side and bottom first. The top is going to be the hardest as the adhesive will stick to the wifi/bluetooth antenna and you WILL tear them (Ive had to replace a fair amount of them). There's a delicate trick to doing it, but it's too hard to describe. If you've never done this repair before, I do not recommend it; find a professional.
Hi, thanks for the information, Very valuable.
I'm about to do this because my battery and fan aren't working.
There's no way anybody can fix it properly near me. Got any other tip to try not to break the screen and or any flex?
I've done works like this on small tablets and phones, but never this pc. I'll try to go slow.
Thanks again for your experience information.
-
-
-
Sieh dir genau das Layout der Klebestreifen am Display an:
-
In diesen Bereichen befinden sich nur Klebestreifen, die problemlos durchgeschnitten werden können.
-
Displayplatine und Flachbandkabel befinden sich hier nahe an der Kante. Schneide vorsichtig und setze dein Plektrum nicht tiefer als 3 mm ein.
-
Unter diesem Teil des Displays befinden sich empfindliche Antennenkabel. Folge der Prozedur in Schritt 13 ganz genau, um sie nicht zu beschädigen. Hier ist der Kleber am dicksten.
The bottom red section is narrow and not as thick as the bevel indicates. I went too deep with my tool and cut through a ribbon thinking that I could send my tool as deep as the black bevel edge. its like half that.
I did a screenshot of this image to always see it while progressing through the steps and did exactly the same mistake. I read every comment in the steps below but yours only now :( On my device it's 5mm from the edge of the screen glass to the ribbon.
I cut through as well, but was able to carefully solder the edges together enough to make a connection - works fine.
-
-
-
Setze ein Plektrum in die Öffnung für den oberen rechten Lautsprecher im Display und schiebe es zwischen Glas und Lautsprechergitter.
-
-
-
Drehe das Plektrum in Richtung der Unterkante des Surface, um es unter die untere Kante der Lautsprecheröffnung zu schieben.
-
-
-
Schiebe das Plektrum an der rechten Kante des Surface nach unten und durchtrenne so den Kleber unter dem Display.
-
Lasse das Plektrum in der rechten Kante stecken, damit sich der Kleber nicht wieder verbinden kann.
-
-
-
Erwärme den iOpener erneut und lege ihn zwei Minuten lang auf die Unterkante des Surface Displays.
-
-
-
Setze ein neues Plektrum in die untere rechte Ecke ein und schiebe es um die Ecke herum zur Unterkante.
-
Schiebe das Plektrum an der Unterkante des Surface entlang und durchtrenne so den Kleber.
-
Lasse dieses Plektrum in der Unterkante stecken, damit sich der Kleber nicht wieder verbinden kann.
Yep. I scratched the corner of the LCD with the pick. Take the warning seriously folks! It’s really easy to do.
The warning says to not insert it more than 12mm but it should be not more than 5mm. There is a ribbon/display connection at the bottom and i damaged it.
-
-
-
Erwärme erneut deinen iOpener und lege ihn zwei Minuten lang auf die linke Kante des Surface Displays.
-
-
-
Setze ein neues Plektrum in die untere linke Ecke ein und schiebe es um die Ecke herum zur linken Kante.
-
Schiebe das Plektrum an der linken Kante des Surface entlang, um den Displaykleber zu durchtrennen.
-
Lasse dieses Plektrum in der linken Kante stecken, damit sich der Kleber nicht wieder verbinden kann.
-
-
-
Erwärme erneut deinen iOpener und lege ihn zwei Minuten lang auf die Oberkante des Surface Displays.
-
-
-
Fahre mit dem Plektrum um die linke Ecke und schiebe es an der Oberkante des Surface entlang. Halte 70 mm von der linken Kante entfernt an.
The right antenna is kind of P shaped (rotated 90° to the right) with the small end facing the middle. I'd suggest to stop at the middle when loosening the left antenna and to do the same thing coming from the right.
-
-
-
Setze die Spitze eines Plektrums unter das Display, und zwar da, wo du mit dem Schneiden aufgehört hattest. Setze das Plektrum nicht tiefer als die Kante der Einfassung ein.
-
Drehe das Plektrum vorsichtig nach rechts, und drücke die lange Kante des Plektrums in den Displaykleber unter der Einfassung und durchtrenne so den Kleber. Schiebe das Plektrum nicht an der Kante des Surface entlang.
-
Wiederhole diese Vorgehensweise (Spitze einsetzen und nach rechst rollen) an der Oberkante des Surface, bis das Plektrum 64 mm von der rechten Kante des Surface entfernt ist.
Bij mijn exemplaar bleek het onmogelijk om de bovenrand volgens de aanwijzingen los te maken. Ik heb de boel vele keren opgewarmd en ben meerdere malen met het plectrum langs de rand gegaan. Maar er beleef iets hardnekking vastplakken. Ik moest uiteindelijk de lijmverbindingen los maken zoals bij de andere randen. Achteraf bleek dat bij het gedeelte waar de antennes zaten het frame en het scherm volledig met elkaar verlijmd zaten met de antennes er tussen. Dat kostte me uiteindelijk de antennes. Gelukkig geen schade aan andere zaken. Niet zo'n grote ramp want ik kon nog antennes bestellen. Maar hou er rekening mee.
-
-
-
Wenn du den Kleber über den Antennen durchtrennt hast (22 cm von der linken Kante entfernt), schiebe das Plektrum die restliche Oberkante entlang und um die obere rechte Ecke herum, um den restlichen Kleber zu durchtrennen.
-
-
-
Hebe die Displayeinheit sehr langsam vom Gehäuse des Surface ab. Wenn du irgendeinen Widerstand spürst, halte an und kontrolliere, ob der gesamte Kleber durchtrennt ist.
-
Benutze ein Plektrum, um etwaigen Kleber zu durchtrennen.
-
-
-
Hebe die Oberkante der Displayeinheit vom Gehäuse weg und schiebe gleichzeitig die Unterkante des Displays näher an die Displaystecker auf der Hauptplatine heran.
-
Lege das Display mit den Steckern nach oben behutsam auf dem Gehäuse ab. Vermeide es, die Displaykabel zu knicken.
-
-
-
Setze eine Spitze einer abgewinkelten Pinzette in die Lücken zwischen den "Zähnen" ein und heble die EMI-Abschirmung nach oben.
-
Wiederhole dieses Verfahren an verschiedenen Stellen rundum an der Abschirmung, bis sie sich abgelöst hat.
-
-
-
-
Entferne die beiden EMI-Abschirmungen auf den Displaysteckern mit einer Pinzette.
-
-
-
Heble jedes der Displaykabel mit dem flachen Ende des Spudgers nach oben und trenne es von der Hauptplatine ab.
-
-
-
Entferne das Display vom Surface.
-
Halte beim Zusammenbau an dieser Stelle an und ersetze die Displayklebestreifen mit Hilfe dieser Anleitung.
-
-
-
Entferne die vier 4,5 mm Torx T5 Schrauben, mit denen die Antennenhalterung befestigt ist.
This screw bit was not included in the battery replacement kit. Only Philips and Flathead were included.
This Torx bit was not included in the battery replacement kit. Only a Philips and Flathead bit
-
-
-
Entferne vorsichtig die Antennenhalterung.
I had ripped through 2 of the 3 antennas when cutting through the top adhesive. Not sure how anyone removes this display without ruining at least one of them.
I saw on Reddit this post: https://www.reddit.com/r/techsupportmacg...
It works perfectly! My wifi was one that was cut. It’s now made of aluminum foil and is pulling down 147Mbps and pushing 80.88Mbps up.
A ce stade il semble important de faire attention au micro. Pour ma part, il avait un résidu de colle entre celui-ci et le support à retirer.
On my device the mic is glued to the antenna board. I'd recommend to detach it's ribbon cable from the motherboard before removing the antenna board
-
-
-
Setze eine der Spitzen einer abgewinkelten Pinzette in den Spalt an der Ecke der EMI-Abschirmung über dem Kühlkörper ein.
-
Heble die Abdeckung soweit wie möglich von der Hauptplatine weg, ohne sie zu verbiegen. Entferne sie noch nicht.
-
-
-
Wiederhole den letzten Schritt an mehreren Stellen rund um die EMI-Abschirmung über dem Kühlkörper.
-
Entferne die CPU-Abschirmung.
-
-
-
Entferne zwei Torx T3 Schrauben vom Kühlkörper:
-
Eine 2,4 mm lange Schraube oben an der rechtwinkligen Platte über dem Akku
-
Eine 2,2 mm lange Schraube unten an der rechtwinkligen Platte über dem Akku
La première vis de 2,4 est une Torx 4, pour ce qui me concerne et non pas une Torx 3.
Attention la deuxième vis est bien une TORX 3
Remarque : La boite à outil "Essentiel electronics Toolkit - Grade B (ref EU145571-1)" ne contient pas l'embout T3
Pour ma part j'ai utilisé donc le T4 en forçant un peu. Pas cool ;-(
-
-
-
Entferne die drei 2,4 mm Kreuzschlitzschrauben, mit denen der Lüfter befestigt ist.
-
Entferne die letzte 4,4 mm Torx T5 Schraube, mit der die Lüfterabdeckung befestigt ist.
These screws were in a different area on my Surface, Pro 4 bought at release. The fan was visible and attached to the heat sink. Remove the two torx screws on the fan housing. No need to remove the Philips head screws that secure the fan.
Sorry I’m super brand new to the game. I don’t know the difference between 1.5mm Torx T4 and 3.0mm Torx T4. I look under tools I need to buy, and the tool kits only say Torx T4 or T5, without the milimeters dimensions.
Je fais écho au commentaire de vennic, les longueurs indiqués en mm sont les longueurs des vis et n’impactent pas les tournevis à utiliser. Bien ranger les vis par longueur permets de mettre les bonnes vis aux bons endroits lors du remontage de l’appareil.
Cajuteq -
The fan connector on mine was held in place by a white clamp on the side closest to the middle of the chassis. The long edge toward the middle flips up to vertical. That frees up the fan connector. Likewise for the black “wire” connector right beside it.
As previously mentioned, the fan should be disconnected (look at step 36) BEFORE you remove the fan/heat sink assembly. Ive done DOZENS of these repairs and the fan has always been part of the heat sink assembly.
I did all of this, now surface won't turn on. Any ideas?
-
-
-
Entferne die vier Schrauben am Kühlkörper um die CPU, wobei du sie nacheinander in folgender Reihenfolge jeweils eine Umdrehung weit mit einem T5 Torx Schraubendreher aufdrehst, bis sie ganz abgelöst sind:
-
Schraube 1
-
Schraube 2
-
Schraube 3
-
Schraube 4
These screws were T5 Torx in mine, not T3 as in the instructions.
T5 Torx screwdriver is correct.
T4 Torx for me.
What does one turn at a time mean?
One turn for the "red" screw, one for the orange, one for the yellow, then green and now again one turn red, orange, yellow, green ... This cross pattern distributes the pressure evenly .
VauWeh -
I think I need a T6 torx screw the screwdriver is not working for these screws
-
-
-
Heble behutsam den Kühlkörper mit dem flachen Ende des Spudgers senkrecht nach oben von der CPU weg.
-
-
-
Setze einen Spudger mit der Spitze in eines der Schraubenlöcher an der Lüfterabschirmung und hebe sie hoch, bis sie sich vom Lüfter löst.
The fan should be disconnected (look at step 36) BEFORE you remove the fan/heat sink assembly. Ive done DOZENS of these repairs and the fan has always been part of the heat sink assembly.
These instructions were correct for my Surface. The fan cover was attached to the heatsink but the fan was not.
-
-
-
Entferne vorsichtig den Kühlkörper.
-
-
-
Setze eine Spitze einer abgewinkelten Pinzette in die Lücke in der Ecke der EMI-Abschirmung über den Kamerasteckern.
-
Heble die Abdeckung mit der Pinzette soweit wie möglich von der Hauptplatine weg, ohne sie zu verbiegen.
-
Entferne die EMI-Abschirmung.
-
-
-
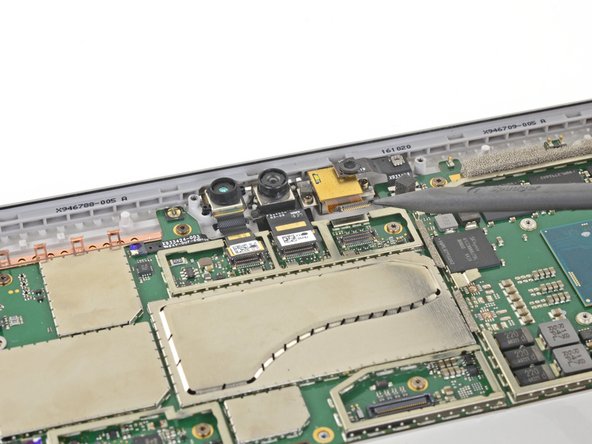
Heble alle drei Kamerakabel mit der Spudgerspitze nach oben und trenne sie von der Hauptplatine ab.
Missing the part to disconnect the ribbon to the left of the cameras, luckily, it disconnected by itself when I removed the motherboard.
Yes that's very important (white and blue socket on photo) !
I forgot to reconnect it on reassembly (unluckily, it doesn't reconnect by itself ;o)
Phil68 -
-
-
-
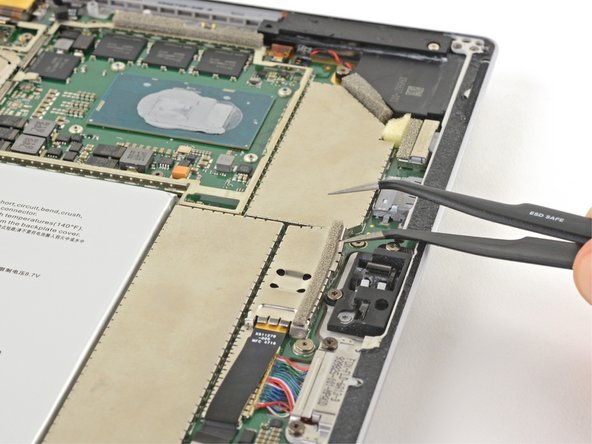
Klappe den Sicherungsbügel am ZIF-Anschluss der Lautstärke/Einschalttaste mit der Spudgerspitze hoch.
-
Schiebe das Lautstärke/Einschaltastenkabel vorsichtig aus dem ZIF-Anschluss heraus.
While you're here, you'll want to disconnect the ZIF connector directly opposite from this one, which can be seen in the lower right of these photos, nearer the camera cable connection points. The guide doesn't mention removing that cable, but you'll need it removed before you can lift out the motherboard.
-
-
-
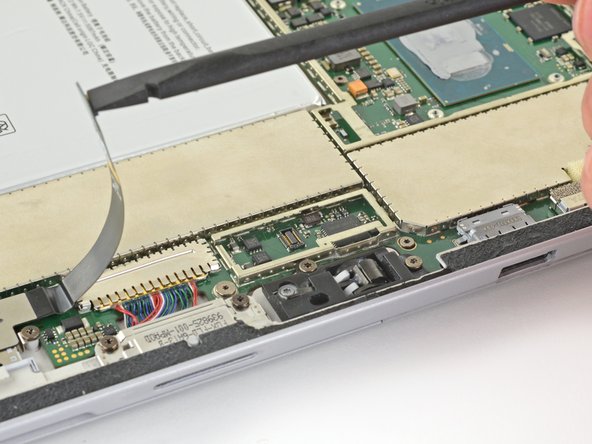
Schiebe die Spudgerspitze zwischen die Lautsprecherkabel und die Hauptplatine, bis sie unter dem Stecker am Lautsprecherkabel liegt.
-
Heble den Stecker am Lautsprecherkabel behutsam nach oben, bis er von der Hauptplatine abgetrennt ist.
1. the picture can be misleading
2. use the flat end instead or you might damage the plastic part of the connector. see Microsoft Surface Pro 4 linken Lautsprecher tauschen
-
-
-
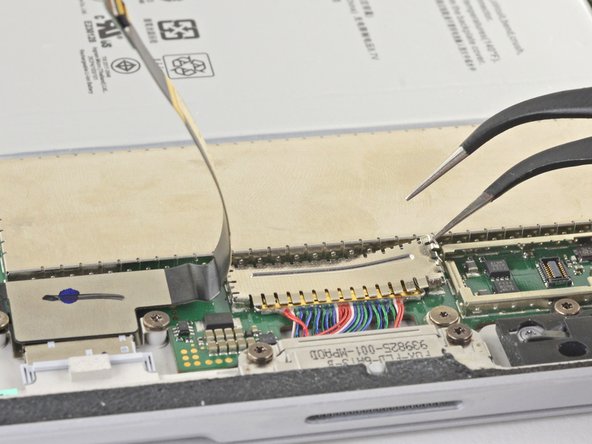
Öffne mit der Spudgerspitze die ZIF-Anschlüsse am Lüfterkabel und am Kabel zur Lautsprecherbuchse.
The fan should be disconnected when you removed the fan/heat sink assembly in Step 29 (which is NOT mentioned).
-
-
-
Schiebe mit der Spudgerspitze behutsam die Kabel zur Lautsprecherbuchse und zum Lüfter aus den ZIF-Anschlüssen heraus.
The fan should be disconnected when you removed the fan/heat sink assembly in Step 29 (which is NOT mentioned).
-
-
-
Entferne folgende Torx T3 Schrauben, mit denen der Lüfter befestigt ist:
-
Eine 2,5 mm Schraube mit Grobgewinde
-
Zwei 2,4 mm Schrauben
I didn't realize that one screw (red) here was different, and it looks like I put it in a different place during assembly, and the remaining screw, of course, did not hold. Be careful with the screws!
I have a question: can I buy a set of these screws for Surface Pro 4 to change the spoiled ones? I noticed that sometimes they get damaged on top and it is difficult to screw them on afterwards.
-
-
-
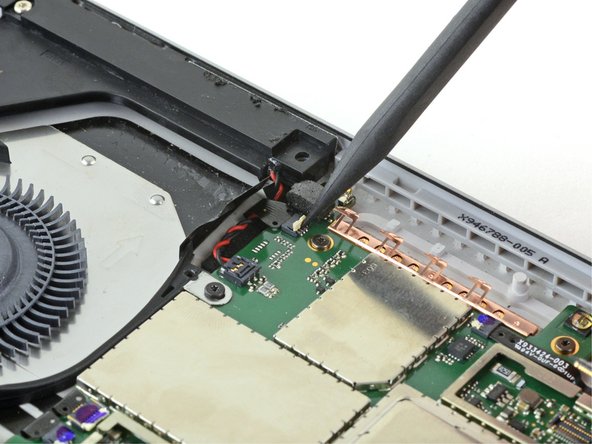
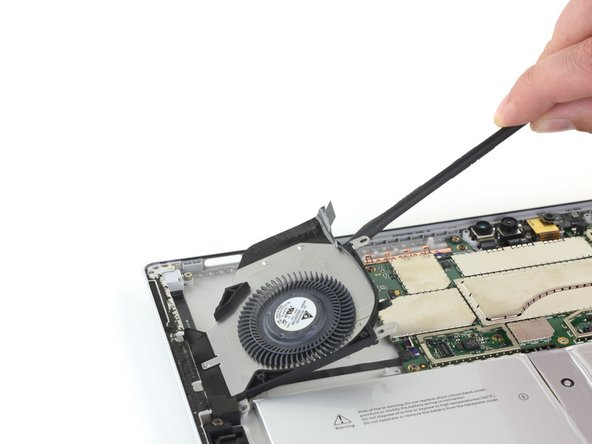
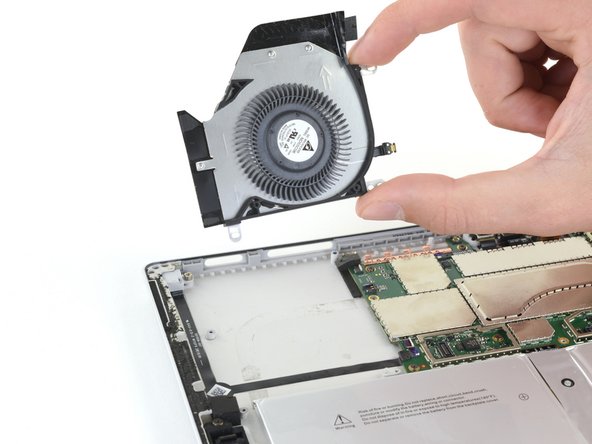
Hebe den Lüfter an einer Seite mit dem Spudger hoch.
-
Fasse den Lüfter und entferne ihn.
-
-
-
Setze eine Spitze einer abgewinkelten Pinzette in die Lücke in der Ecke der EMI-Abschirmung über den microSD Kartenleserkabel und - stecker.
-
Heble die EMI-Abschirmung mit der Pinzette soweit wie möglich von der Hauptplatine weg, ohne sie zu verbiegen.
-
Entferne die EMI-Abschirmung.
-
-
-
Hebe den Stecker des microSD-Kartenlesers mit dem flachen Ende des Spudgers aus seinem Anschluss heraus.
-
Hebe das Kabel zum microSD-Kartenleser hoch, so dass es nicht mehr im Weg für die EMI-Abschirmung über der Ladeeinheit steht.
It's probably best to remove the microSD card reader at this point. The guide never states to remove it, but it eventually disappears from the photos. Two T5 screws are all that are holding it down. Easier to take those out and remove the assembly than to try to remove the EMI shield underneath while also holding the ribbon cable out of the way.
Not necessary to remove the reader. When reinserting the motherboard, you can slide it easily enough underneath it. It may make it easier, but isn't necessary.
A ce stade, la nappe était coller sur le blindage. Pour ne pas trop plier la nappe, j'ai poussé la spatule. La colle n'était pas trop résistante.
-
-
-
Setze eine Spitze einer abgewinkelten Pinzette in die Lücke im Rand der EMI-Abschirmung über dem Kabelstecker der Ladeeinheit.
-
Heble die Abdeckung mit der Pinzette soweit wie möglich von der Hauptplatine weg, ohne sie zu verbiegen.
-
Entferne die EMI-Abschirmung.
-
-
-
Klappe den Sicherungsbügel am Kabelstecker der Ladeeinheit mit dem flachen Ende des Spudgers hoch.
-
-
-
Schiebe den Stecker an jeder Seite behutsam heraus.
-
Schiebe abwechselnd an den beiden Seiten, so dass der Stecker allmählich herauswandert.
-
-
-
Entferne die beiden 3,1 mm Torx T5 Schrauben, mit denen der microSD-Kartenleser befestigt ist.
-
-
-
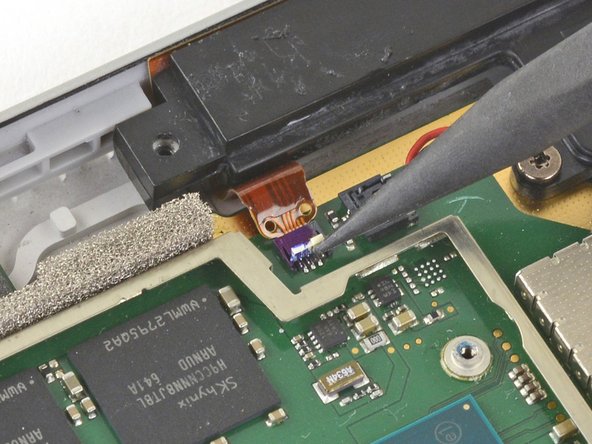
Klappe den Sicherungsbügel am ZIF-Anschluss zwischen dem Prozessor und dem rechten Lautsprecher hoch.
-
Löse das Kabel aus dem Anschluss heraus.
This one broke during reassembling, so I could not fix the connector properly. I tried to find out what it is, but the only hint I found was, that it is some kind of antenna. I could not find out what kind of antenna. Anyway, after completion everything I needed worked fine: Bluetooth and Wireless LAN. I appreciate any hint about the purpose of this antenna.
That's my question too
Mj Ro -
Perhaps one of the two WiFi frequencies (2.4 or 5 GHz)?
Phil68 -
-
-
-
Schiebe den Spudger so zwischen den Kabeln zum rechten Lautsprecher und der Hauptplatine ein, dass seine Spitze am Lautsprecherkabelstecker anliegt.
-
Heble den Lautsprecherkabelstecker behutsam hoch und trenne ihn von der Hauptplatine ab.
-
-
-
Entferne folgende Torx T3 Schrauben vom Lüfter und der Hauptplatine:
-
Zehn 2,4 mm Schrauben
-
Zwei 2,2 mm Schrauben
-
Entferne die beiden Torx T5 Schrauben, mit denen der rechte Lautsprecher befestigt ist:
-
Eine 4,2 mm Schraube
-
Eine 6 mm Schraube
Use a T5 Torx screwdriver to remove screw in left and right speaker.
BE CAREFUL! Use a T5 Torx screwdriver to remove an ADDITIONAL screw on the top corner of the right speaker. It should not take a tremendous amount of force to remove the speaker.
This screw is in the frame of the SP4. Mine was a T3.
An additional screw has been marked up and added to the original photo regarding the issues with the right fan removal. Thanks to the community for the feedback!
-
-
-
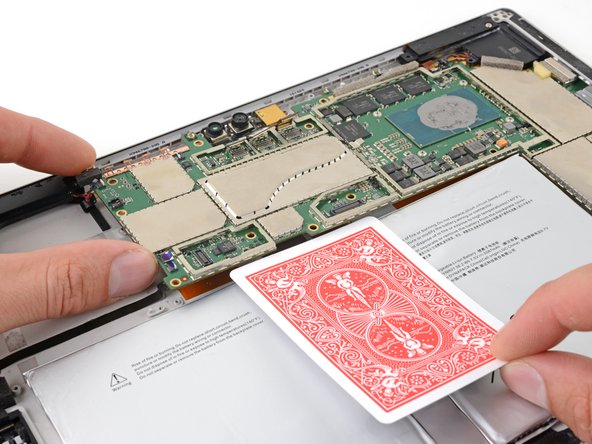
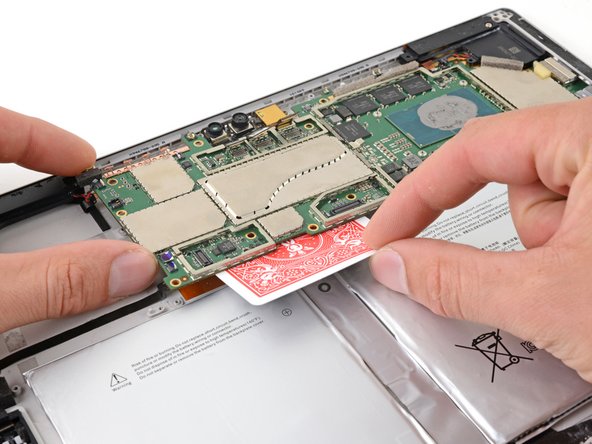
Hebe die Hauptplatine an der linken Kante leicht hoch.
-
Setze eine Spielkarte oder etwas Ähnliches zwischen den Akkustecker und der Hauptplatine ein.
-
-
-
Fasse den rechten Lautsprecher an der schmalen Stelle und hebe ihn leicht hoch.
-
Schiebe den Lautsprecher nach hinten aus dem Rahmen heraus.
-
Entferne den rechten Lautsprecher.
I didn’t read about the other T5 (about 6 mm) holding down the right speaker. It needs to be removed prior to this step.
You also need to remove a screw in the top right corner of the speaker
Yup there is an unmentioned t5 screw that the other comments catch
-
-
-
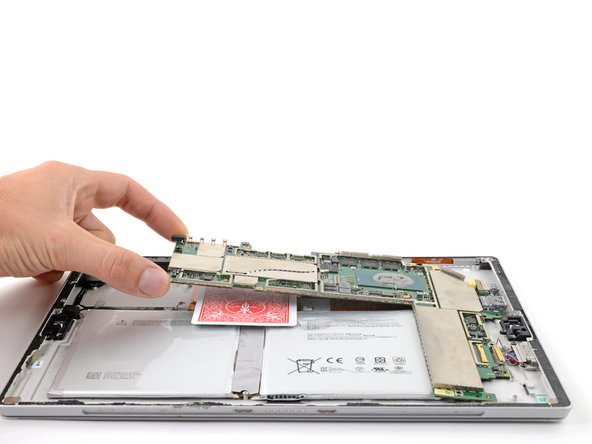
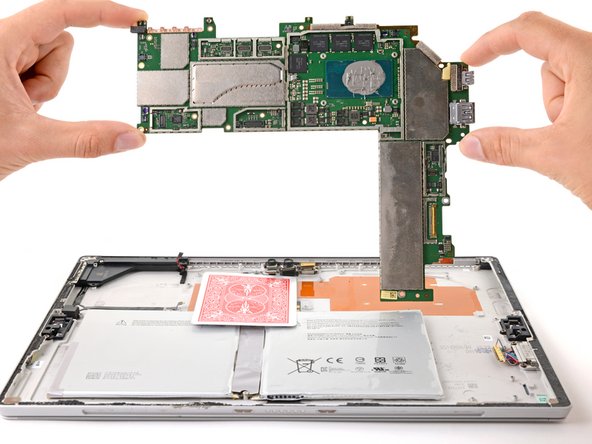
Hebe die Hauptplatine zuerst am linken Rand hoch, bis sie in einem Winkel von etwa 30° steht.
-
Schiebe die Anschlüsse auf der Hauptplatine aus ihren Öffnungen heraus und entferne die Hauptplatine.
There seems to be an additional ZIF connector by the Left most camera that also needs to be disconnected. Beware.
Also, the micro SD reader obstructs a little bit (at bottom right )as you remove the motherboard.
-


Um dein Gerät wieder zusammenzubauen, folge den Schritten dieser Anleitung in umgekehrter Reihenfolge.
Entsorge deinen Elektromüll fachgerecht.
Lief die Reparatur nicht wie geplant? Versuche es mit einigen grundlegenden Lösungsvorschlägen. Ansonsten findest du in unserem Forum Hilfe bei der Fehlersuche.
Rückgängig: Ich habe diese Anleitung nicht absolviert.
3 weitere Nutzer:innen haben diese Anleitung absolviert.
Besonderer Dank geht an diese Übersetzer:innen:
100%

Diese Übersetzer:innen helfen uns, die Welt zu reparieren! Wie kann ich mithelfen?
Hier starten ›

3 Kommentare
awesome info; used it to strip four "broken" tablets and reassemble as three working tablets (Schottky diodes and bad batteries)
Un genio, paso por paso, muy didactico como pracico! Gracias por toda tu informacion me he dado cuenta que es un trabajo muy meticuloso y no es para andar a la apuradas! Realmente muchas gracias
If I have a screen protector on the screen should I remove it? Will it interfere with the heating process?
IronJoker - Antwort