Einleitung
This guide will go over how to replace the charging port on the Microsoft Surface Pro 5, also known as the Microsoft Surface Pro (2017). The iOpener is used in this guide, but a hair dryer or heat gun could also be used. See instructions for the iOpener here.
Was du brauchst
-
-
Use a spudger to flip up the small locking flaps on the display cable ZIF connectors.
-
-
-
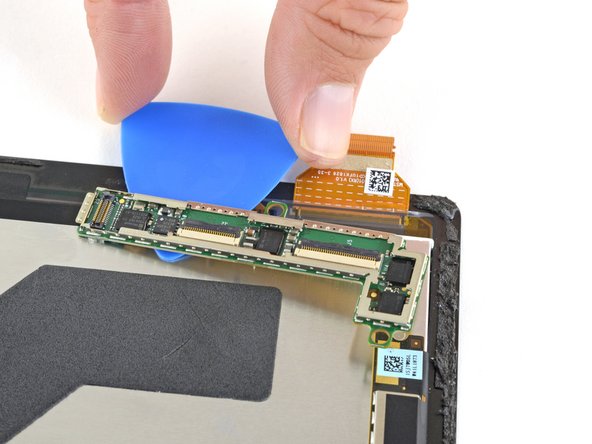
Use tweezers to slide the display cables straight out of their sockets on the display board.
-
-
-
Slide an opening pick under the display board to separate the adhesive holding it onto the back of the screen.
-
-
-
Remove the display board.
-
To ensure correct positioning, plug in both display connectors before adhering the board to the display.
-
-
-
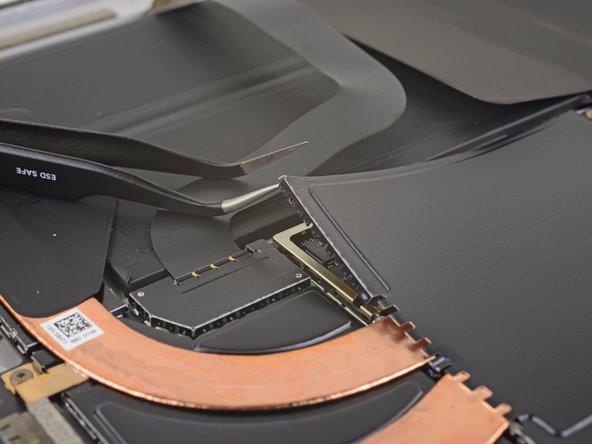
Insert one point of a pair of pointed tweezers into a gap in the corner of the EMI shield covering the heat sink.
-
Use the tweezers to pry the EMI shield away from the motherboard as much as you can without bending it. Do not remove it yet.
-
-
-
-
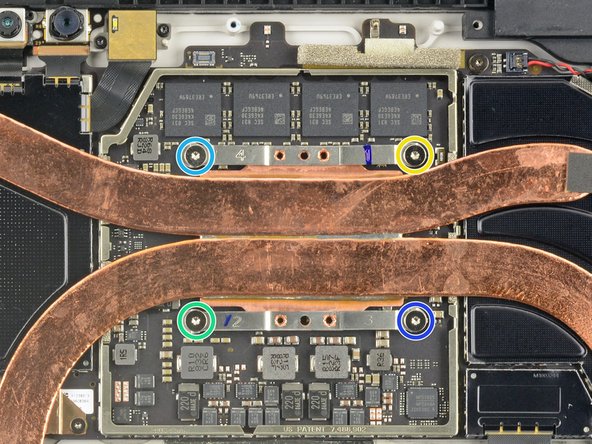
Remove the ten Torx screws securing the heat sink:
-
Five 2.6 mm-long T3 screws
-
Four 3.3 mm-long T5 screws
-
Screw 1
-
Screw 2
-
Screw 3
-
Screw 4
-
-
-
Use the flat end of a spudger to gently pry the heat sink straight up and off of the CPU.
-
-
-
Pry up the metal cover on the motherboard using either the nylon spudger or plastic opening tool.
-
-
-
Use a T4 Torx driver to remove the two 3mm screws from the ribbon holder on top of the colored cables.
-
-
-
Use a T4 Torx driver to remove the two 3mm screws holding the charging port assembly to the case.
-
-
-
Use the nylon spudger to pop off the ribbon connector for the ribbon going over the charging port connection.
-
-
-
Grab the opened clamp on the charging port connecting cables and disconnect it by pulling back.
-
-
-
Remove the charging port by pulling the connector in the direction of the batteries.
-


To reassemble your device, follow these instructions in reverse order.
To reassemble your device, follow these instructions in reverse order.
Rückgängig: Ich habe diese Anleitung nicht absolviert.
5 weitere Nutzer:innen haben diese Anleitung absolviert.
Team

Cal Poly, Team S15-G3, Livingston Fall 2017 Mitglied von Cal Poly, Team S15-G3, Livingston Fall 2017
CPSU-LIVINGSTON-F17S15G3
3 Mitglieder
17 Anleitungen geschrieben
3 Kommentare
I just ordered this one. https://www.amazon.com/gp/product/B07RT9...
I will post an update when I get it and install it.
Is there instructions how to assemble it?