Zum Hauptinhalt wechseln

Minolta QTsi Maxxum Eyelet Straps Replacement

Was du brauchst

  1. Minolta QTsi Maxxum Eyelet Straps Replacement, Eyelet Straps: Schritt 1, Bild 1 von 1
    • The battery compartment is located on the bottom panel of the camera.

    • Use a coin to open the battery compartment of the camera.

    • Twist the coin counterclockwise in order to release the latch.

  2. Minolta QTsi Maxxum Eyelet Straps Replacement: Schritt 2, Bild 1 von 1
    • Once the compartment is open, grab the batteries and pull them out of the compartment.

    • There should be two batteries inside the battery compartment.

  3. Minolta QTsi Maxxum Eyelet Straps Replacement: Schritt 3, Bild 1 von 1
    • With a screwdriver, remove the (7) black Phillips #00 5mm screws on the bottom of the camera.

    • The screws are located on the outer edge of the bottom panel.

    • Be careful when removing the screws from the panel because they are easy to lose.

    • Once all the screws are removed, the panel should easily come off.

  4. Minolta QTsi Maxxum Eyelet Straps Replacement: Schritt 4, Bild 1 von 1
    • Once the bottom panel is removed, the one screw at the bottom of the battery compartment should be visible.

    • Remove the (1) black Phillips #00 5mm screw from the battery compartment.

  5. Minolta QTsi Maxxum Eyelet Straps Replacement: Schritt 5, Bild 1 von 1
    • Press the release button on the side panel to pop open the back piece of the camera.

  6. Minolta QTsi Maxxum Eyelet Straps Replacement: Schritt 6, Bild 1 von 1
    • Once the back panel is open, the chamber containing one screw should be visible.

    • Remove the (1) black Phillips #00 5mm screw inside.

  7. Minolta QTsi Maxxum Eyelet Straps Replacement: Schritt 7, Bild 1 von 2 Minolta QTsi Maxxum Eyelet Straps Replacement: Schritt 7, Bild 2 von 2
    • Take out the (2) Phillips #00 5mm screws on the right side panel of the camera.

    • Remove the (1) Phillips #00 5mm screw on the left side panel of the camera.

    • Remove the side panels from the camera and set them aside .

    • Be careful when removing side panels. There is a plastic piece and spring underneath the left side panel that could get lost.

  8. Minolta QTsi Maxxum Eyelet Straps Replacement: Schritt 8, Bild 1 von 1
    • When looking at the back of the camera, there should be a single screw on each side of the viewfinder.

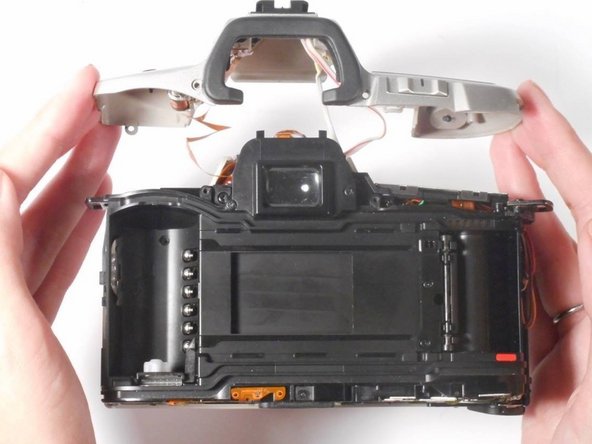
    • Remove these (2) silver Phillips #00 5mm screws from each side of the viewfinder.

  9. Minolta QTsi Maxxum Eyelet Straps Replacement: Schritt 9, Bild 1 von 1
    • When looking at the top of the camera, the flash hood is visible.

    • Lift the flash hood and remove the (1) silver Phillips #00 5mm screw.

  10. Minolta QTsi Maxxum Eyelet Straps Replacement: Schritt 10, Bild 1 von 2 Minolta QTsi Maxxum Eyelet Straps Replacement: Schritt 10, Bild 2 von 2
    • The top panel of the camera should now be easy to pop off. If it is not, make sure that all screws listed in steps 3-9 are removed.

    • Lift the top panel away from the rest of the camera.

    • Be careful when removing the top panel because there are wires connected to it.

  11. Minolta QTsi Maxxum Eyelet Straps Replacement: Schritt 11, Bild 1 von 1
    • Once all parts of the camera are removed, both eyelet straps should be visible on the top left and right sides.

    • Unscrew the (4) black Phillips #00 5mm screws to remove each eyelet strap holder and replace them.

Abschluss

To reassemble your device, follow these instructions in reverse order.

3 weitere Nutzer:innen haben diese Anleitung absolviert.

Team

Sam Houston State, Team 12-4, Blackburne Fall 2016 Mitglied von Sam Houston State, Team 12-4, Blackburne Fall 2016

SHSU-BLACKBURNE-F16S12G4

4 Mitglieder

5 Anleitungen geschrieben

0 Kommentare

Kommentar hinzufügen

Seitenaufrufe:

Letzte 24 Stunden: 1

Letzte 7 Tage: 6

Letzte 30 Tage: 11

Insgesamt: 349