Einleitung
Diese Anleitung zeigt, wie das Motorola Moto Z geöffnet wird, um einen alten oder kaputten Akku zu ersetzen.
Lade vor Reparaturbeginn Motorolas Rescue and Smart Assistant App herunter. Du kannst damit einen Backup deines Geräts machen und feststellen, ob dein Problem von der Hard- oder der Software verursacht wird.
Die Displayeinheit ist extrem zerbrechlich und ist nicht verstärkt. Es kann leicht passieren, dass du das Display beschädigst. Gehe beim Umgang mit der Displayeinheit langsam und methodisch vor.
Entlade deinen Akku vor Beginn der Reparatur auf unter 25%. Ein geladener Lithium-Ionen-Akku kann Feuer fangen und/oder explodieren, falls er versehentlich perforiert oder anderweitig beschädigt wird.
Wenn dein Akku aufgebläht ist, musst du entsprechende Vorsichtsmaßnahmen treffen.
Was du brauchst
-
-
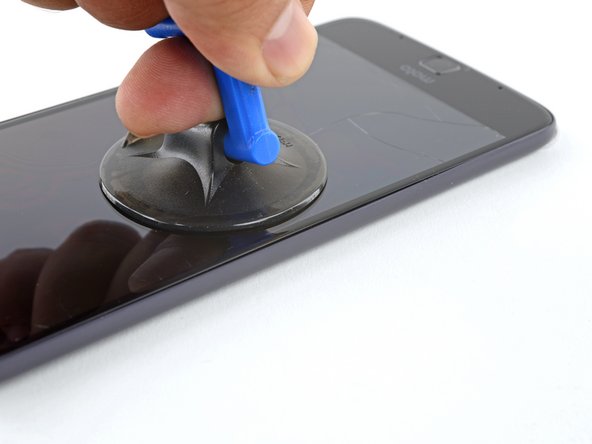
Erwärme einen iOpener und lege ihn mindestens 90 Sekunden lang auf die linke Kante des Smartphones.
-
-
-
In den nächsten Schritten wird der Kleber um die Kante des Smartphones herum durchtrennt.
-
Um Schäden zu vermeiden, musst du folgende Bereiche aussparen:
-
Das OLED Panel
-
Den Home Button
-
Den Blitz
-
-
-
Befestige einen Saugheber so nahe wie möglich an der erwärmten Kante.
-
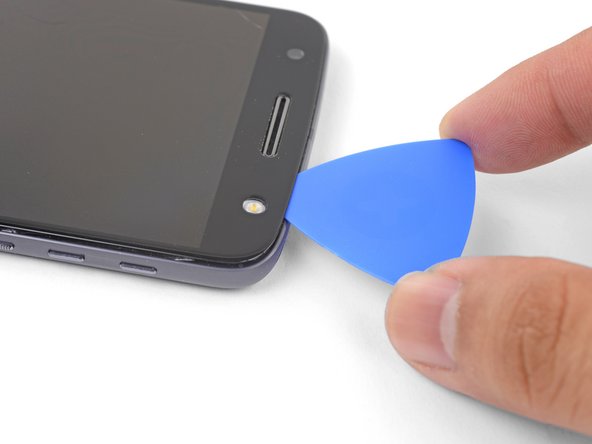
Hebe den Saugheber an und setze die Spitze eines Plektrums in den Spalt.
-
-
-
Schiebe die Spitze des Plektrums vorsichtig an der Seite nach unten und nach oben und achte darauf, dass es nie tiefer als 1,5 mm hereinrutscht.
-
Wenn du den Kleber gelöst hast, lasse ein Plektrum in der Seite stecken, damit sich der Kleber nicht wieder verbindet.
-
-
-
Wiederhole die Schritte (Erwärmen, Anheben, Schneiden) auf der anderen Längsseite des Smartphones.
-
-
-
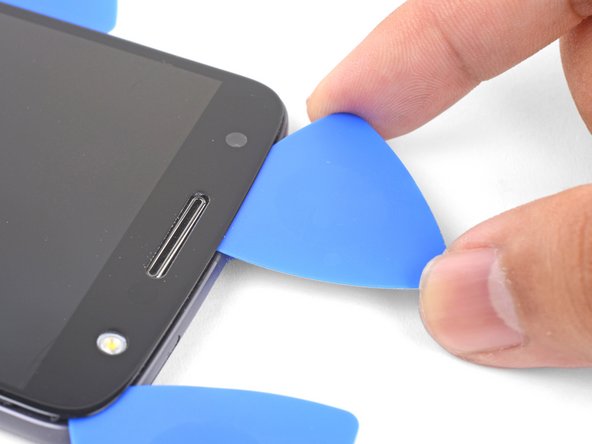
Setze ein Plektrum in die Ecke beim Blitz ein und schneide vorsichtig um ihn herum.
-
Wenn du fertig bist, lasse ein Plektrum in der Ecke stecken, damit sich der Kleber nicht wieder verbindet.
-
-
-
Setze ein Plektrum in die andere obere Ecke ein.
-
Durchtrenne vorsichtig den restlichen Kleber an der Oberkante.
-
-
-
-
Lege einen erwärmten iOpener für mindestens 90 Sekunden auf die Unterkante des Smartphones.
-
-
-
Setze ein Plektrum in die untere Ecke und schiebe es in Richtung Home Button, halte an, bevor du beim Home Button angelangt bist.
-
Wenn die Ecke erledigt ist, lasse dort ein Plektrum stecken, damit sich der Kleber nicht wieder verbindet.
-
Wiederhole diesen Vorgang an der anderen unteren Ecke.
-
-
-
Drehe das erste Plektrum leicht, um den Kleber an der Kante abzulösen. Gehe dabei vorsichtig vor.
-
Wiederhole diesen Vorgang für alle übrigen Plektren: Bewege sie und drehe sie leicht, um den Kleber zu lösen.
-
-
-
Hebe das Display an dem Ende mit dem Ohrhörer-Lautsprecher hoch, um an die Displaykabel heranzukommen.
It says lift home button end of display but the photo shows lifting the earpiece end.
Good catch! I have fixed the step.
When I finally got mine opened, all I see is a white piece of metal. Nothing like you photo…UhOH…
Oh no! It sounds like a different model! Motorola phones are notorious for their similar sounding naming conventions.
-
-
-
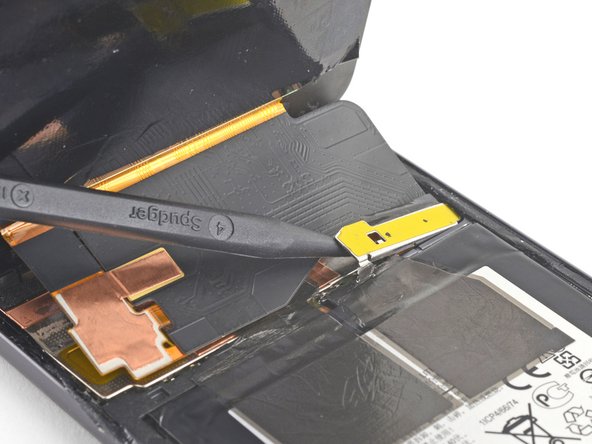
Heble die Displaykabel-Abschirmung mit der Spudgerspitze hoch.
-
Entferne die Displaykabel-Abschirmung.
-
-
-
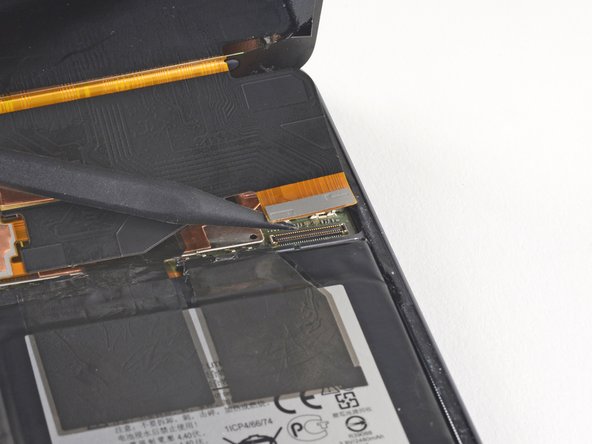
Hebe und löse den Displaykabelstecker mit der Spudgerspitze aus seinem Anschluss.
-
-
-
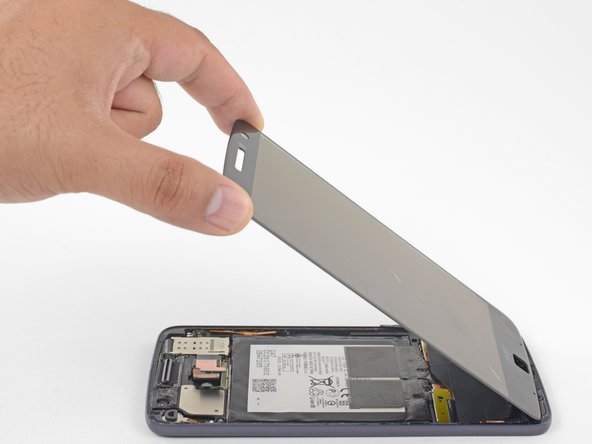
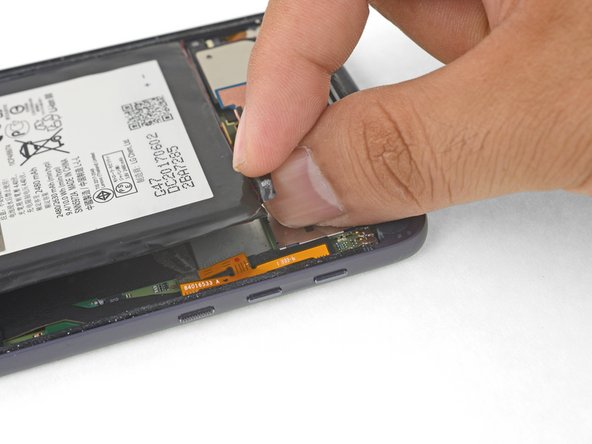
Entferne die Displayeinheit.
-
Sobald alle Klebereste und eventuelle Glassplitter vom Rahmen entfernt sind, reinige die Bereiche, an denen der neue Klebestreifen angebracht wird nochmal mit 90%igem (oder noch höherkonzentriertem) Isopropylalkohol und einem fusselfreien Tuch oder Kaffeefilter.
By removing the traces of glue from the frame, you will also remove the protective covers of the microphone and whatnot at the home button side,, as well as the speaker cover at the other side, because the glue does its duty…
-
-
-
Ziehe das schwarze Klebeband, mit dem der Akku am Rahmen befestig ist, mithilfe einer Pinzette ab.
Well. ithis is multilayer tape - at least three *very* thin layers. Expect ugly results, if any.
-
-
-
Lege einen erwärmten iOpener für mindestens 90 Sekunden wie im Bild auf die Rückseite des Smartphones.
-
-
-
Fasse die schwarze Akku-Zuglasche mit einer Pinzette oder deinen Fingern und ziehe sie langsam nach oben, bis sich die Ecke löst.
-
-
-
Setze einen Spudger unter die Unterkante des Akkus und heble langsam die Ecke hoch.
-
-
-
Klappe den Akku vorsichtig auf die rechte Seite.
-
Lege den Akku flach auf die Arbeitsfläche und achte darauf, dass das Akkukabel nicht gespannt wird.
-
-
-
Heble die Halterung des Akkusteckers mit der Spudgerspitze hoch.
-
Entferne die Halterung des Akkusteckers.
-
-
-
Entferne den Akku.
-
Entferne alle Klebereste vom Smartphone und reinige die entsprechenden Bereiche mit Isopropylalkohol und einem fusselfreien Tuch.
-
Setze vorgestanzte Klebestreifen oder doppelseitiges Klebeband auf den frei liegenden silberfarbenen Teil des Akkugehäuses, jedoch nicht auf die schwarze Schaumstoffschicht.
-
Drücke den Akku 5-10 Sekunden lang fest hinein.
Really need to include how to apply the adhesive for this device, I had to go find a video on youtube which happened to be an iphone 6 video that gave me an idea on what to do, but even then, it was still guess work.
Check out the link to the adhesive card guide in the last step—that should you a pretty good idea of how to prep the phone and battery for installation and how to use our pre-cut adhesive card and apply the adhesive. Let us know if we can change something to make it easier to use!
Only just noticing the reply now since I am redoing the adhesive on a second Moto Z I have (screen adhesive failed on its own) and while that guide is pretty good (and something I may well use now on the original one if it fails again!), I was more thinking about how to apply the display adhesive that comes within the kit. There were no instructions on how to use that.
Hi Andrew,
Here’s a guide you can use as a guideline! Hope that helps!
-


Vergleiche dein neues Ersatzteil mit dem originalen Teil. Du musst vor dem Einbau unter Umständen Komponenten übertragen oder Schutzfolien abziehen.
Um dein Gerät wieder zusammenzubauen, folge den Schritten dieser Anleitung in umgekehrter Reihenfolge.
Nach Abschluss dieser Anleitung sollte der neu eingebaute Akku kalibriert werden.
Bitte entsorge deinen Elektroschrott sachgerecht.
Lief die Reparatur nicht wie geplant? In unserem Motorola Moto Z Antwortenforum findest du Hilfe bei der Fehlersuche.
Rückgängig: Ich habe diese Anleitung nicht absolviert.
31 weitere Nutzer:innen haben diese Anleitung absolviert.
Besonderer Dank geht an diese Übersetzer:innen:
100%


Diese Übersetzer:innen helfen uns, die Welt zu reparieren! Wie kann ich mithelfen?
Hier starten ›


27 Kommentare
Kindly link me to the suitable adhesive tape for sticking back the screen…
Thank you
Hi Anwesh,
You can use Tesa tape for that purpose.
I have a Moto Z Droid from Verizon. You have instruction for the Moto Z and Moto Z Droid Force. Battery replacement on the Droid Force is much easier. How do I know which one I have?
Hi Budbradley,
According to Phonearena, it looks like one easy way to tell is the rear camera:
The Z has a 13MP camera, while the Z Force Droid has a 21MP rear camera.
The built-in internal storage are also different:
The Z has 32GB while the Z Force Droid has 64GB.
Hopefully you can check your specs with those and figure out which version you have.
The hardest step in this guide is when you remove adhesive glue behind the LCD panel.
Second is clean residue glue [For this i use lint-free cloth soak with alcohol and rub on glue]
One more note - Moto original battery is su..k. Mine is degrade in 6 moths.
The hardest part about this repair was definitely removing the screen ( the rest is easy once you’ve opened the phone). I believe I would not have ruined my screen had I used a heat gun rather than the iOpener provided in the kit. The iOpener did not properly heat the adhesive and caused me to have to pry a little harder than I would have had to if I used a heat gun. That little extra force causes a big difference when the screen is so thin. On this particular repair, save yourself the money and don’t buy the whole kit. Buy the battery somewhere cheap and use a heat gun like I should have. Paying the extra money for the kit also cost me the price of a new screen $100+… not a happy camper.
The hardest part for me is sourcing a battery that is the right thickness for an xt1650-03!
I am on the 3rd different gv30 manufacturer/ brand --on 2 different xt…-03 and they're all too thick. My last hope was a “Cam…Sin…” brand that was 3.3mm thick. Noooooope; that still didn’t work!
Please help!
P.S. the heatgun did make the prying WAY easier (especially if you drop the extra repair money on some suction-cup-pliers) —BUT— if you heat it too long (or even graze the inside of the semi-opened phone), you seriously risk “scorching" the screen, wilting the speaker diaphram, and/ or the mic screens.
…like i did the first time.
I have the exact smae problem. On my battery, it says it is an original Motorola Part. So did the seller on eBay. Model-Number and Code are exactly the same, so is capacity. Still, the new battery is to think and has a slighlty different design. This is really annoying, the phone works again, but I cannot glue it back together.
Can you check if your original battery is actually thinner than 3.3 mm? If so, I’ll need to look into the guide to see if something needs to be fixed.
I have to change the battery of my xt1650-03, too. All sellers on a|_iexpress have negative comments from at least one or more buyers complaining that the battery is a few mm too thick. How can I find the right one?
This phone starts to annoy me so bad… it dies at 60 ish percent when drawing too much power…
You can order a battery from iFixit here. We actually sell OEM Motorola parts, and this would be an OEM battery. If it doesn’t work out, we have great customer service! Plus, I would be interested to hear if the OEM battery is for some reason non-compatible.
I followed the instruction, and I could replace the battery, but no image is shown on the screen. When I push the power switch, the mobile vibrates, so I think battery is Okay. Did I damage the screen when I remove the screen from my mobile?
The screen was connected to the mobile but not glued with adhesive tape yet. Is that the reason why?
Hi Takeo,
The screen does not need to be glued in before you test the phone. I would suggest checking the display connector, re-connecting it to see if that helps. Otherwise, it may be a broken screen.
Thank you very much for your reply. I re-connected the screen three times, but there’s no change, no image is shown on the screen. I followed the instruction, but I may have applied strong force to the screen when I remove it from the mobile? It was really hard to remove the screen because the heater does not heat the mobile to soften the glue. I will replace the screen and see the result.
I replaced old screen with new one, put the connector and turn on the switch without installing home button, but that does not work, no image is shown on the screen. I removed the battery and re-installed it, check all the connectors & wires, and I could not find any problem. What is the cause of the problem? mother board has been broken?
Hi!
Did you find out what was the problem?
The problem my moto Z had in the past is, battery charge immediately decreased from more than 80% to 0% when I started an app. I thought this problem was related to the battery, but it was not?
Hi, I’ve replaced the battery as instructed above. The batteries match. Phone will turn on, but not the screen. I’ve removed and reattached it several times but nothing shows on the screen. It worked fine prior to replacing the battery.
Jason
Hi Jason,
Sorry to hear that! Here are some general troubleshooting ideas that may resolve the issue.
Yeah, this repair *is* difficult. I broke the LCD (not the gorilla glas) and ripped the cables. The glue really is strong! So why does the Moto Z have an Ifixit score of 7? Even removing those small plastic and metal clips is hard as you don’t find which is the recommended way of removal.
My moto Z had same symptoms as Takeo Otani’s. Never over-used it, kept it cool, no drops, no scratches, clean USB port.
I am also convinced, bad battery was the problem: phone indicated a full charge after just 20 mins of charging. battery life just ~2 h in standby. Energy-intensive apps like camera, let phone re-boot. After rebooting a fully charged phone (over night), it was <30% charged.
MY BATTERY REPLACEMENT ATTEMPT TODAY BROKE THE DISPLAY, ALTHOUGH, I WAS EXTREMELY CAREFUL with plektra tools, hair dryer and suction pad, even dipped tools in isoprop, which helped a bit to “cut” the glue threads.
Half way of removal (>1 h), noticed a little thin crack (in the back-layer, from bottom-right corner to 2 cm above moto logo)
Took another 1 h, until front was removed.
Last switch-on try: VIBRATES, but SCREEN is DARK -> VIBRATE reboot loop. Dis/Re-connected display twice. no change.
MOTO Z NOT SERVICE-FRIENDLY AT ALL!
Not tried new battery! Will not buy new display nor moto!
BE MOST CAREFUL WITH BOTTOM 4 cm REMOVAL!
This was a complete disaster. I was so careful, took tons of time with it. But near the bottom, as many have stated, the screen cracked a hairline crack and separated from the glass. This is more than difficult, because it requires some kind of finesse in some specific way that you can’t explain on this site or even a video. Following instructions exactly and being beyond careful does not give one the knowledge or finesse to do this repair successfully. I ordered a new screen and I hope that the battery I put in works. There’s no way to know until I get the new screen, and then hope that there isn’t something else wrong that happened in some specific way with the connectors or cables or electrical contacts in there. Disaster. And the tools are subpar too. Broke the smudger tip trying to pry off the bracket. Bent the tweezers too.
I’m sorry to hear about your experience! The screen is unfortunately heavily glued onto the phone, making repairs difficult. As for the bent spudgers and tweezers, please contact our customer support and we’ll get it sorted for you!
Exactly what I was afraid of happened. I installed the new screen and it’s not working. I just get a black screen. After plugging into a charger for several minutes, holding down the power button and hearing vibrations, I determine that the phone must be on. But screen is just black. No damage was done to this screen. It was brand new and I put it in. But something somewhere went wrong. How could I know what that was going to be? Is something not plugged in right? Did it get “fried” like someone said in another post?
Unless there’s an easy fix for what’s going on that I can try, this entire attempt to fix has been a complete disaster.
I do not have time to wait for another screen, nor do I want to pay for another screen that could just as easily not work either after I try to put it in.
I understand your frustration! Thanks for bravely giving this difficult repair a chance. You may be able to test the display this way: leave the battery out, carefully reconnect the display to the phone, and plug the charging cable into the phone. Then, try to power on the phone. If the phone vibrates and the display does not light up, then either the display or something on the motherboard is bad. Again, I’m really sorry for the bad repair experience.