Diese Übersetzung enthält möglicherweise noch nicht die neuesten Änderungen der Original-Anleitung. Hilf mit, die Übersetzung zu aktualisieren oder sieh dir die Original-Anleitung an.
Einleitung
Mithilfe dieser Anleitung kann die kaputte oder gesplitterte Displayeinheit eines Moto Z ersetzt werden. Die Displayeinheit beinhaltet das Frontglas sowie das AMOLED Display.
Die Displayeinheit ist extrem zerbrechlich und ist nicht verstärkt. Gehe beim Umgang mit der Displayeinheit langsam und methodisch vor.
Falls deine Displayeinheit gesplittert ist, klebe das Glas mit Klebeband ab, damit es nicht weiter bricht oder du dich an den Glassplittern verletzt.
Was du brauchst
-
-
Erwärme einen iOpener und lege ihn mindestens 90 Sekunden lang auf die linke Kante des Smartphones.
-
-
-
In den nächsten Schritten wird der Kleber um die Kante des Smartphones herum durchtrennt.
-
Um Schäden zu vermeiden, musst du folgende Bereiche aussparen:
-
Das OLED Panel
-
Den Home Button
-
Den Blitz
-
-
-
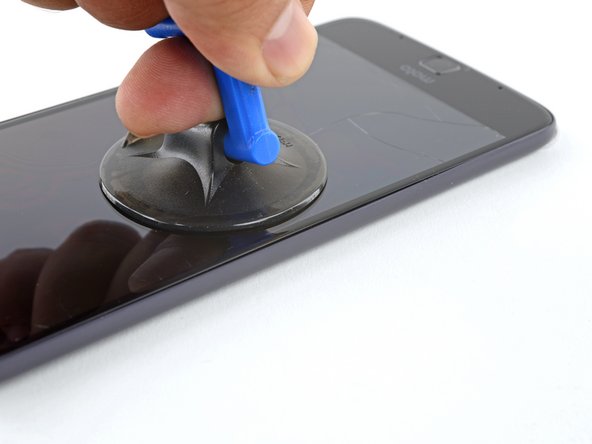
Befestige einen Saugheber so nahe wie möglich an der erwärmten Kante.
-
Hebe den Saugheber an und setze die Spitze eines Plektrums in den Spalt.
-
-
-
Schiebe die Spitze des Plektrums vorsichtig an der Seite nach unten und nach oben und achte darauf, dass es nie tiefer als 1,5 mm hereinrutscht.
-
Wenn du den Kleber gelöst hast, lasse ein Plektrum in der Seite stecken, damit sich der Kleber nicht wieder verbindet.
-
-
-
Wiederhole die Schritte (Erwärmen, Anheben, Schneiden) auf der anderen Längsseite des Smartphones.
-
-
-
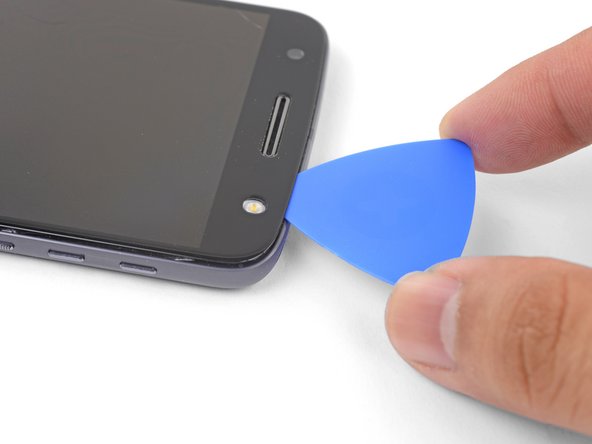
Setze ein Plektrum in die Ecke beim Blitz ein und schneide vorsichtig um ihn herum.
-
Wenn du fertig bist, lasse ein Plektrum in der Ecke stecken, damit sich der Kleber nicht wieder verbindet.
-
-
-
-
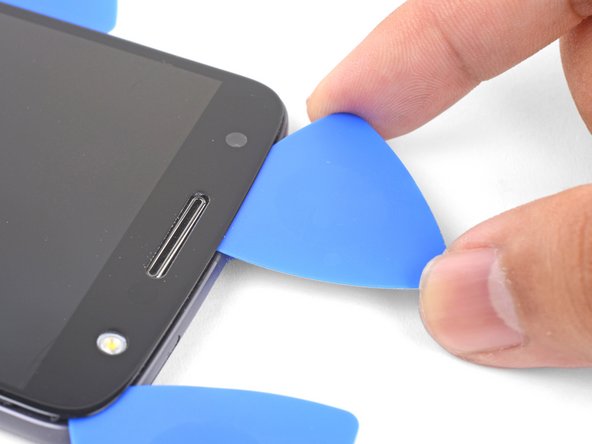
Setze ein Plektrum in die andere obere Ecke ein.
-
Durchtrenne vorsichtig den restlichen Kleber an der Oberkante.
-
-
-
Lege einen erwärmten iOpener für mindestens 90 Sekunden auf die Unterkante des Smartphones.
-
-
-
Setze ein Plektrum in die untere Ecke und schiebe es in Richtung Home Button, halte an, bevor du beim Home Button angelangt bist.
-
Wenn die Ecke erledigt ist, lasse dort ein Plektrum stecken, damit sich der Kleber nicht wieder verbindet.
-
Wiederhole diesen Vorgang an der anderen unteren Ecke.
-
-
-
Drehe das erste Plektrum leicht, um den Kleber an der Kante abzulösen. Gehe dabei vorsichtig vor.
-
Wiederhole diesen Vorgang für alle übrigen Plektren: Bewege sie und drehe sie leicht, um den Kleber zu lösen.
-
-
-
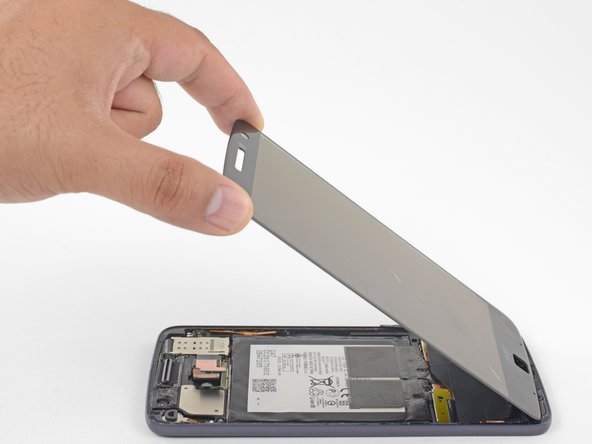
Hebe das Display an dem Ende mit dem Ohrhörer-Lautsprecher hoch, um an die Displaykabel heranzukommen.
It says lift home button end of display but the photo shows lifting the earpiece end.
Good catch! I have fixed the step.
When I finally got mine opened, all I see is a white piece of metal. Nothing like you photo…UhOH…
Oh no! It sounds like a different model! Motorola phones are notorious for their similar sounding naming conventions.
-
-
-
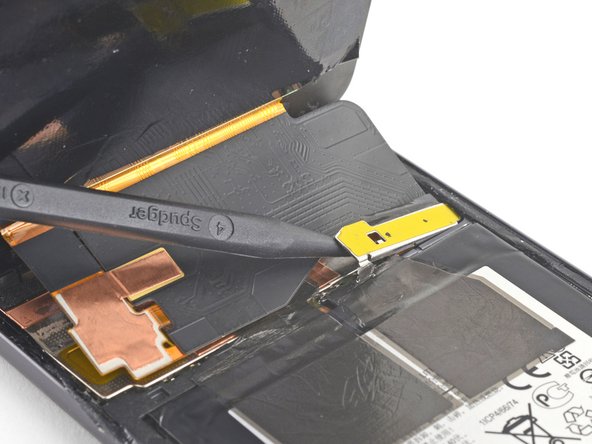
Heble die Displaykabel-Abschirmung mit der Spudgerspitze hoch.
-
Entferne die Displaykabel-Abschirmung.
-
-
-
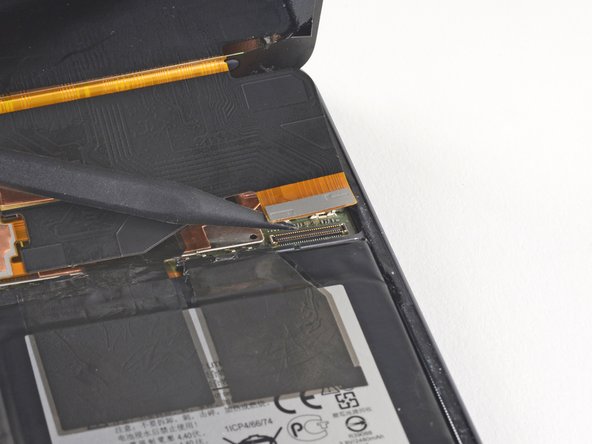
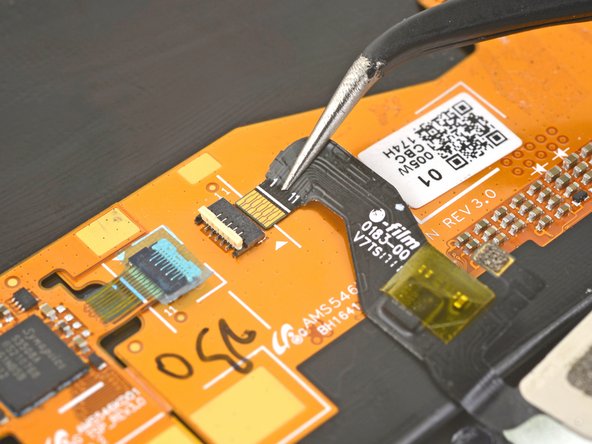
Hebe und löse den Displaykabelstecker mit der Spudgerspitze aus seinem Anschluss.
-
-
-
Entferne die Displayeinheit.
-
Sobald alle Klebereste und eventuelle Glassplitter vom Rahmen entfernt sind, reinige die Bereiche, an denen der neue Klebestreifen angebracht wird nochmal mit 90%igem (oder noch höherkonzentriertem) Isopropylalkohol und einem fusselfreien Tuch oder Kaffeefilter.
By removing the traces of glue from the frame, you will also remove the protective covers of the microphone and whatnot at the home button side,, as well as the speaker cover at the other side, because the glue does its duty…
-
-
-
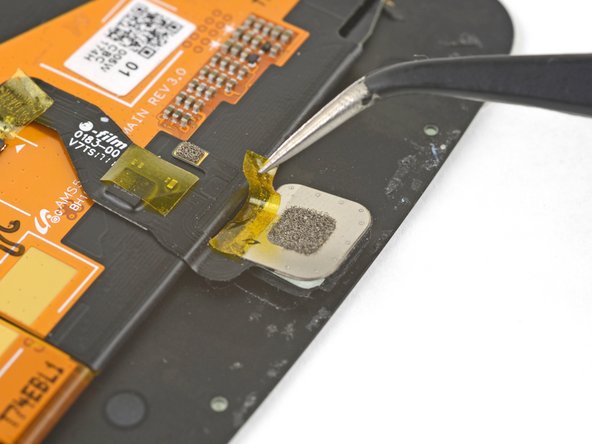
Ziehe alles Klebeband, das sich eventuell auf dem Home Button Stecker und dem Home Button befindet, mit einer Pinzette ab.
-
-
-
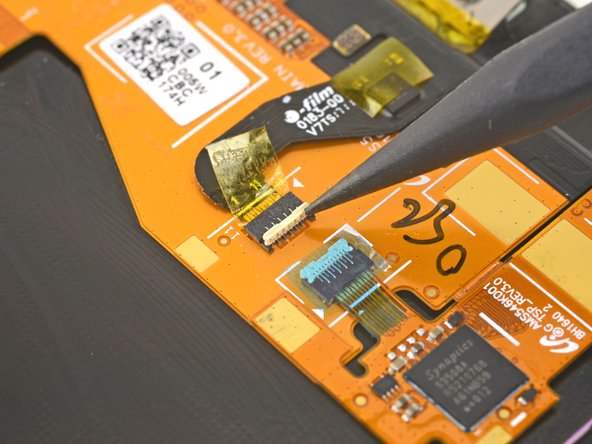
Klappe die Verriegelung am Stecker des Home Buttons mit der Spudgerspitze hoch.
-
-
-
Ziehe das Home Button Kabel vorsichtig mit einer Pinzette gerade aus seinem Anschluss heraus.
-


Vergleiche dein neues Ersatzteil mit dem originalen Teil. Du musst vor dem Einbau unter Umständen Komponenten übertragen oder Schutzfolien abziehen.
Um dein Gerät wieder zusammenzubauen, folge den Schritten dieser Anleitung in umgekehrter Reihenfolge.
Entsorge deinen Elektromüll fachgerecht.
Lief die Reparatur nicht wie geplant? In unserem Motorola Moto Z Antworten Forum findest du Hilfe bei der Fehlersuche.
Rückgängig: Ich habe diese Anleitung nicht absolviert.
18 weitere Nutzer:innen haben diese Anleitung absolviert.
Besonderer Dank geht an diese Übersetzer:innen:
75%


Diese Übersetzer:innen helfen uns, die Welt zu reparieren! Wie kann ich mithelfen?
Hier starten ›


14 Kommentare
Watch the youtube video it’s a lot better also instead of sending a sticker that connects the phone and the screen they should’ve added adhesive to the new screen.
Hi Jonathan,
Unlike aftermarket screens that may have adhesive pre-attached, we are an authorized Motorola reseller and sell OEM Motorola parts. In this case, the OEM screen comes without adhesive pre-attached.
For the most part this was a helpful guide, but what about the flash? When following the directions the flash comes off with the screen/digitizer, and it appears to have happened to the author as well. There is no mention or help in reattaching this component or needing to purchase a new flash component prior to beginning the repair. It will be too late for me, but any insight might help others.
Hey Joe,
You’re right—depending on the part you order, you may need to transfer the flash lens from your original back cover to the replacement part. This involves prying the original off and sticking it back onto the replacement cover. I’ll add a note to one of the steps.
You have to reattach the flash lens wires directly to the underside of the OLED screen, not the ‘back cover.’ It sticks directly to the OLED screen. That’s where it was on the old screen. Was this wrong?
Hello,
Somehow in the middle of the process to replace my Moto Z screen and battery, I lost the display cable shield. I assemble the display without it, but the touch won’t work. AIs this because I lost the part, or the replacement part is faulty?
Also, the adhesive tapes on the battery are also gone. Is it going to a problem?
Thank you
Hi Farshad,
It is possible, though unlikely that the missing display cable shield is the culprit for the touch. I would double-check the wide display connector to make sure it is fully seated. Connect the display, place a non-conducting sheet between the display and the rest of the phone, and power it up to see if the digitizer works. If it does, there’s a grounding issue. The black tape on the battery mainly helps dissipate heat, but may also help electrically insulate certain parts.
Hello
I have tried to use a piece of folded aluminium foil as the shield, but it won’t work. I used it because I failed to find this small part online, on the other hand, I find in comments after my story that the shield may not be of touch function value, so, I am wondering what else could be the issue. I also ordered two more display assemblies because I thought they may be faulty, but nothing changed. Any idea?
Everything went great but I forgot to replace the Display Cable Shield, found it when I was cleaning up. Hope it’s OK without it?!
Hi Randall,
If you already sealed the phone and it works, that’s fine!
Hi Randall
Is the phone fully functional? I have lost the display cable shield and when I assemble the device, there’s no touch.
The screen is super sensitive and I messed up the volume and power buttons.