Einleitung
To remove the speaker you will need to remove the battery, open the phone and remove the motherboard. Be ready to use a plastic opening tool, T5 Torx Screwdriver and a spudger.
Was du brauchst
-
-
Insert a spudger or plastic opening tool into the small notch at the base of the battery.
-
Lift the battery out of the phone.
-
-
-
Remove the four 5.0 mm T5 Torx screws from the corners of the phone.
-
Remove three 5.5 mm T5 Torx screws from the back of the phone.
-
Lift up the black rubber flap near the SD card slot.
-
Remove the single 5.5 mm T5 Torx screw beneath the flap.
-
-
-
Remove the back case of the phone by gently lifting the tabs located on top of the phone near the lock button.
-
Use the case opener or spudger in these small areas because the plastic tabs can be easily broken.
-
Lift the tabs located on the bottom of the phone to continue removing the back cover.
-
-
-
-
Slide an opening tool between the gap from the back of the case to the front.
-
After separating the sides, make sure there is a noticeable gap between the back case and the rest of the phone.
-
After detaching the tabs and sliding down the sides, there should be a noticeable gap between the front and back cases.
-
-
-
Carefully separate the back case from the rest of the phone by lifting it away from the phone.
-
-
-
Disconnect the antenna from its housing on the motherboard by gently lifting beneath it.
-
-
-
Ease the antenna from out of its guide along the side of the phone
-
Once the antenna is detached, remove the back case and the antenna from the phone
-
-
-
To remove the motherboard, first dislodge the right side of the motherboard, where the external connections are located, from the rest of the phone.
-
This can be done by placing a spudger in between the two ports on the phone, between the black plastic and motherboard, and prying out.
-
The motherboard should be able to be easily lifted upwards after dislodging it.
-
If the white rubber piece moves, replace it where it came from upon reassembly.
-
-
-
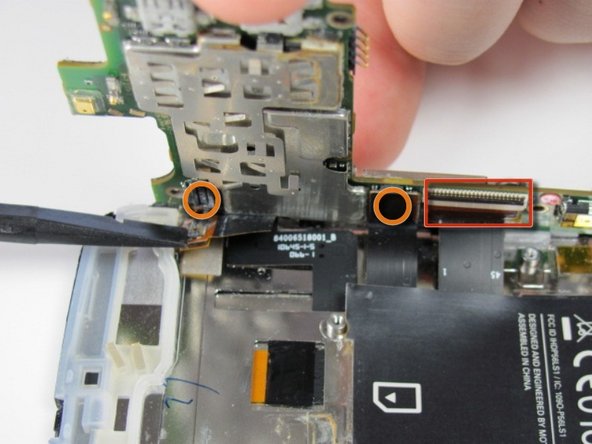
First, several connections must be disconnected to completely separate the motherboard from the rest of the phone.
-
The connection highlighted with a red box must be pulled down instead of out.
-
Using the spudger tool, separate the two connections on the motherboard highlighted with orange circles by pulling them out.
-
The black switch on top of this connection acts as a lock. Push it forwards to unlock the connection.
-
-
-
After disconnecting the motherboard, there should be five distinct and separate parts of the phone: back cover, back case, front case, battery, and motherboard.
-
-
-
The speaker can be found on the bottom of the inside of the back case and is held in by glue.
-
Use a spudger or case opener tool to pry out the speaker by sliding it in the crack between the two pieces of black plastic.
-


To reassemble your device, follow these instructions in reverse order.
To reassemble your device, follow these instructions in reverse order.
Rückgängig: Ich habe diese Anleitung nicht absolviert.
2 weitere Nutzer:innen haben diese Anleitung absolviert.
Team

Cal Poly, Team 9-42, Regan Spring 2012 Mitglied von Cal Poly, Team 9-42, Regan Spring 2012
CPSU-REGAN-S12S9G42
6 Mitglieder
15 Anleitungen geschrieben