Zum Hauptinhalt wechseln

Motorola C168 Front Panel Replacement

Was du brauchst

  1. Motorola C168 Front Panel Replacement, Battery: Schritt 1, Bild 1 von 2 Motorola C168 Front Panel Replacement, Battery: Schritt 1, Bild 2 von 2
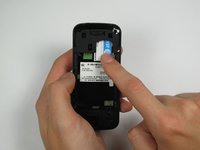
    • Turn the phone so its back is facing you.

    • Press the release button on the back cover, while simultaneously pulling the cover down.

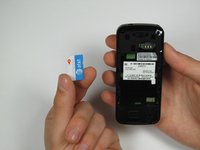
    • Remove the back cover.

  2. Motorola C168 Front Panel Replacement: Schritt 2, Bild 1 von 2 Motorola C168 Front Panel Replacement: Schritt 2, Bild 2 von 2
    • Pinch the sides of the bottom of the battery and pull upward.

  3. Motorola C168 Front Panel Replacement, SIM Card: Schritt 3, Bild 1 von 2 Motorola C168 Front Panel Replacement, SIM Card: Schritt 3, Bild 2 von 2
    • Press and slide the SIM card down.

    • Remove the SIM card.

  4. Motorola C168 Front Panel Replacement, Front Panel: Schritt 4, Bild 1 von 2 Motorola C168 Front Panel Replacement, Front Panel: Schritt 4, Bild 2 von 2
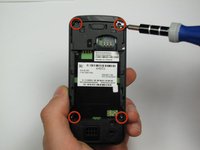
    • Orient the phone so its back is facing you.

    • Using a Torx T-4 screwdriver, carefully remove the 4 screws located at the corners of the phone.

    • Note: If you are using iFixit's screwdriver toolkit, look for the smallest T-screwbit.

  5. Motorola C168 Front Panel Replacement: Schritt 5, Bild 1 von 2 Motorola C168 Front Panel Replacement: Schritt 5, Bild 2 von 2
    In diesem Schritt verwendetes Werkzeug:
    Spudger
    $3.99
    Kaufen
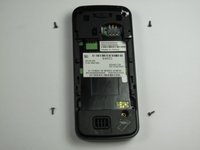
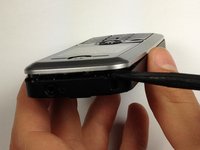
    • Lodge a spudger in between the front panel and the main frame of the phone.

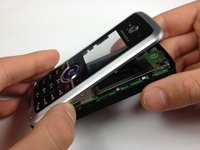
    • Using a good amount of torque, pry the front panel from the phone.

Abschluss

To reassemble your device, follow these instructions in reverse order.

Ein:e weitere:r Nutzer:in hat diese Anleitung absolviert.

Team

Cal Poly, Team 12-40, Regan Spring 2012 Mitglied von Cal Poly, Team 12-40, Regan Spring 2012

CPSU-REGAN-S12S12G40

4 Mitglieder

8 Anleitungen geschrieben

0 Kommentare

Kommentar hinzufügen

Seitenaufrufe:

Letzte 24 Stunden: 0

Letzte 7 Tage: 0

Letzte 30 Tage: 1

Insgesamt: 1,018