Diese Anleitung enthält neuere Änderungen. Wechsel zur neuesten unüberprüften Version.
Einleitung
This guide will take you through the delicate process of removing the rear case of the Motorola Droid 2.
Was du brauchst
-
-
Slide the battery cover toward the bottom edge of the phone.
-
Remove the battery cover from the rear of the phone.
-
-
-
Lift the battery out of the Droid 2 from the edge closest to the bottom of the phone.
-
Remove the battery from the Droid 2.
-
-
-
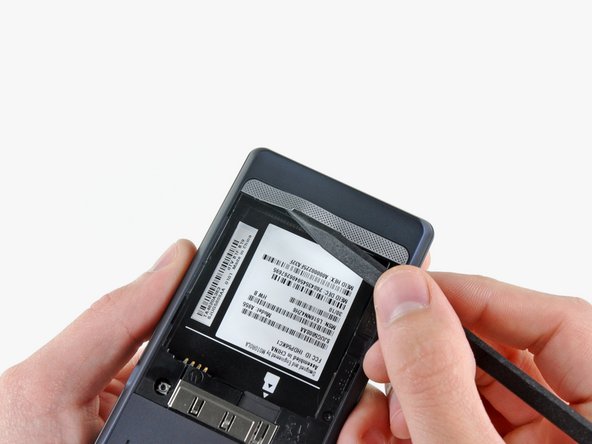
Using the tip of a spudger, peel up one corner of the silver ribbon below the battery compartment.
-
Peel the ribbon off the phone.
-
-
-
Insert the flat end of a spudger and pry the plastic camera cover up off the phone.
-
-
-
-
Remove the seven 5.5 mm T5 Torx screws securing the rear case to the inner case.
-
-
-
Insert the flat end of a spudger and pry downwards to release the plastic tab holding the rear case to the motherboard screw.
-
-
-
Gently insert a spudger between the rear case and front case at the top of the phone, near the audio jack.
-
Carefully pry the top edge of the rear case up from the rest of the phone.
-
-
-
With the spudger still inserted between the rear case and front case, slide the spudger along the right edge of the device, moving toward the bottom, prying as you go.
-
Continue prying along the bottom edge of the device from right to left, freeing it from the front panel.
-
-
-
Continue prying the rear case from the front case along the left side, moving from bottom to top.
-
Lift the rear case up out of the phone.
-


To reassemble your device, follow these instructions in reverse order.
To reassemble your device, follow these instructions in reverse order.
Rückgängig: Ich habe diese Anleitung nicht absolviert.
3 weitere Nutzer:innen haben diese Anleitung absolviert.
