Einleitung
This guide will show you how to replace the main camera of your Motorola Moto G 3rd Generation. Replacing this part requires disassembling much of the phone.
Was du brauchst
-
-
Use your fingernail to pry under the notch on the bottom of the phone and remove the back cover.
-
-
-
Evenly apply heat to the edges of the touchscreen to loosen the adhesive. Continue to Step 3 once the edge of the screen is warm to the touch.
-
-
-
As the adhesive loosens, pry up an edge of the screen with a plastic opening tool or an opening pick. A suction cup may also be useful here.
-
Use an opening pick to hold that edge in place and continue this process around the entire screen, applying more heat as necessary.
-
-
-
Use a plastic opening tool to flip up the lock on the display cable ZIF connector.
-
Pull the display cable from its socket on the motherboard.
-
-
-
-
Remove the ten 2.4 mm T4 screws from the sides of the motherboard.
-
Remove the four 4.5 mm T4 screws from the top and bottom of the motherboard.
-
-
-
If adhesive residue is holding the motherboard in place, use a Jimmy to cut the adhesive between the motherboard and the back of the phone.
-
Carefully lift the right edge of the motherboard from the phone.
-
-
-
Use a plastic opening tool to disconnect the battery wires from the motherboard.
-
-
-
Remove the three 2.4 mm T4 screws from the right side and bottom of the SIM/SD card panel.
-
-
-
Pry off the main camera from its base using a plastic opening tool.
-
-
-
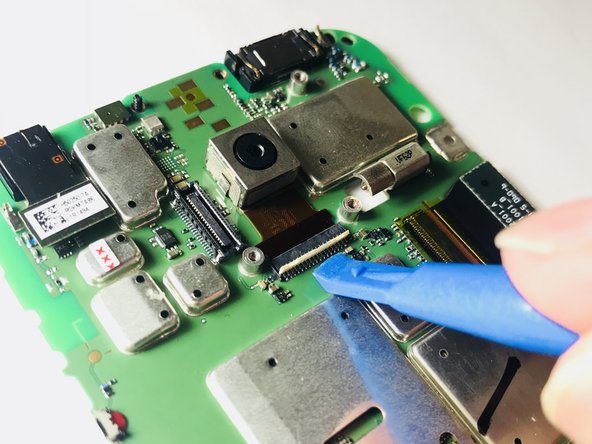
Use a plastic opening tool to flip up the lock on the camera cable ZIF connector.
-


To reassemble your device, follow these instructions in reverse order.
To reassemble your device, follow these instructions in reverse order.
Rückgängig: Ich habe diese Anleitung nicht absolviert.
3 weitere Nutzer:innen haben diese Anleitung absolviert.
Team

USF Tampa, Team 1-3, Nance Spring 2016 Mitglied von USF Tampa, Team 1-3, Nance Spring 2016
USFT-NANCE-S16S1G3
4 Mitglieder
21 Anleitungen geschrieben