Einleitung
Diese Anleitung zeigt dir, wie du den Akku austauschen kannst. Wenn dein Akku aufgebläht ist, dann treffe entsprechende Vorsichtsmaßnahmen.
Hole dir vor Reparaturbeginn Motorolas Rescue und Smart Assistant App. Sie hilft dir beim Backup deines Gerätes und der Diagnose, ob ein Hard- oder Softwarefehler vorliegt.
Entlade zu deiner Sicherheit den eingebauten Akku auf unter 25% bevor du anfängst. Das reduziert das Risiko eines Brandschadens , wenn der Akku während der Reparatur versehentlich kurzgeschlossen wird.
Was du brauchst
-
-
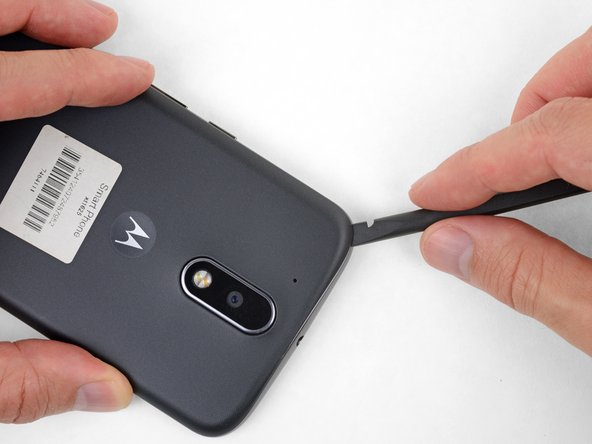
Setze einen Fingernagel oder einen Spudger in die Vertiefung an der Unterkante nahe der Ladebuchse ein.
-
Verdrehen ihn leicht, damit sich ein kleiner Spalt zwischen Rückabdeckung und dem Smartphone bildet.
-
Lasse das Werkzeug (oder den Fingernagel) im Spalt zwischen Rückabdeckung und Smartphone eingesetzt und schiebe es um die Ecke herum. Löse so die Rasten , mit denen die Rückabdeckung befestigt ist.
-
-
-
Schiebe das Werkzeug an der Seite entlang, um noch mehr Rasten zu lösen, mit denen die Rückabdeckung befestigt ist.
-
-
-
Halte das Werkzeug weiter leicht unter der Rückabdeckung eingesetzt und schiebe es um die obere Ecke herum.
-
Wenn nötig, schiebe es auch noch um die anderen Kanten herum, bis sich die Rückabdeckung löst.
-
-
-
-
Heble den Stecker des Kamerablitzes mit einem Spudger gerade nach oben und löse ihn ab.
-
-
-
Drehe die neunzehn identischen 3,1 mm Torx T3 Schrauben heraus, mit denen der Mittelrahmen befestigt ist.
In my kit, the T3 Torx bit came in the ‘repair part’ box, while a T5 Torx bit was in the ‘repair tools’ box.
my phone had t4, not t3
unable to remove 8 of the screws. any suggestions?
My T4 is the tool that fit. I can see why people strip these. They were dam tight for such little screws.
I also had a tough time getting them out of the socket once loose. Magnet in the tool was not very strong. I used my tweezers, and scratch the screw heads. That means they are real soft steel, and strip easy.
-
-
-
Setze einen Spudger in der oberen linken Ecke des Mittelrahmens ein und verdrehe ihn vorsichtig, damit sich der Mittelrahmen vom restlichen Smartphone löst.
-
-
-
Entferne den Mittelrahmen.
During the midframe removal, be careful and do not put too much torsional stress on the loudspeaker pickup wires (to the right of the main camera). It’s not that difficult to crush or shear the pickups there. Doing so will render your phone silent.
Exactly what happened to me. Both contacts broke off and if just loosely put where they were, they can't make proper contact anymore.
There should be a warning about this in the guide itself!
-
-
-
Ziehe jegliches Klebeband ab, das den Akku mit der Hauptplatine verbindet, und entferne es.
-
-
-
Setze eine dünne Spitze (z.B. einer Pinzette) unter die roten und schwarzen Akkudrähte und schiebe sie unter den Akkustecker.
-
Heble vorsichtig hoch und trenne den Akku ab.
Before detaching the connector, you may want to take a photo to remember which way the red and black wires go. Mine were the same way as in this photo, but when looking at the tiny connector of the replacement battery it wasn’t easy to be sure which way to insert it.
What can you do if you break the socket??? Will anyone email me an idea, Or- is it simply ruined-??? My email address is jeffrey_f4@yahoo.com. THANKS in advance, IF- anyone will take the time to email me about this-!!!!!!!! :)
So you have bare copper wires and you’re sticking a metal tip tweezer in the vicinity.
And yes, the battery is discharged as far as you can, but,………
Maybe an idea to snip the wires somewhere further up before doing this ?
-
-
-
Schiebe die Akkuanschlussdrähte zum Akku hin, so dass sie sich aus der schwarzen Halterung auf der Hauptplatine lösen.
-
-
-
Ziehe langsam, aber fest, an der schwarzen Lasche am oberen Ende des Akkus, so dass sich der Akku aus der Klebeverbindung löst.
-
Wenn die Zuglasche reißt, kannst du mit einem Spudger oder einer alten Kreditkarte vorsichtig an den Kanten des Akkus hebeln, bis er herauskommt.
-
-
-
Entferne den Akku.
-


Vergleiche dein Ersatzteil sorgfältig mit dem alten Teil. Entferne alle Schutzfolien, bevor du den neuen Akku einbaust.
Um dein Gerät wieder zusammenzusetzen, folge den Schritten in umgekehrter Reihenfolge.
Nach Abschluss dieser Anleitung sollte dein neu eingebauter Akku kalibriert werden.
Entsorge deinen Elektromüll fachgerecht.
Hat die Reparatur nicht den gewünschten Erfolg gebracht? Auf unserem Antwortenforum kannst du Hilfe finden.
Rückgängig: Ich habe diese Anleitung nicht absolviert.
45 weitere Nutzer:innen haben diese Anleitung absolviert.
Besonderer Dank geht an diese Übersetzer:innen:
100%

Diese Übersetzer:innen helfen uns, die Welt zu reparieren! Wie kann ich mithelfen?
Hier starten ›


17 Kommentare
Bought the battery from Ifixit because I’ve enjoyed your videos. I changed the battery, all seemed well, but now I get no sound out of the speakers! They are not mentioned on any of the topics. Help!?
See the comment on this step. Make sure the two little copper prongs on the back of the speaker make good contact with their respective pads on the back of the midframe. It’s okay to (very gently) bend them up slightly if needed.
bought battery and kit from ifixit. replacement went pretty well. Careful with those tiny little screws. They do not like to come out after loosening. I worked over a small tray and still had two get away from me. I also had some tape on the sim card side of battery not mentioned in instructions. I tore it pulling it back. Was concerned as it seemed to be foil faced on back side which sepperated when pulling up. All works though so no worries.
Bonjour,
Etes-vous sûr pour le modèle du tournevis ?
J’ai échoué avec le Torx T3, mais réussi avec le Torx T4
It definitely should be a T3, but not all driver kits are created equal. If a T4 works better for you, go with that ;)
Def T3, it’s the one not in “The Essentials” kit
I encountered two large adhesive pads affixing the battery to the metal frame. A couple drops of IPA weren’t enough. Gentle levering at the camera side of the battery and a slow injection of IPA with a syringe eventually did the trick. Take it slow and let the IPA do its thing.
What is “IPA” , mentioned as a lubricate ?
Lester -
my battery worked fine but after charging the phone the first time it wont turn on it has been plugged in for 12 and a half hours
At end of Moto G4 battery replacement instructions , it says “ After completing this guide, calibrate your newly-installed battery. “
Don’t see any furthur explanation of this reference or how to calibrate ?
lestertmurphy@gmail.com 3/21/2020
Bonjour,
Déjà à la lecture, le tuto est très clair, détaillé. Il met en confiance pour acquérir le kit de réparation. Les illustrations par photo sont très utiles. Un seul tout petit bémol, mais vraiment tout petit à l’étape 13, au remontage, le connecteur de la batterie (qui est vraiment très petit) est quand même assez contre-intuitif. D’un côté on aperçoit 2 petits trous où le cuivre apparaît et de l’autre côté, non. Et c’est ce côté, sans cuivre apparent qu’il faut clipser. J’ai effectué plusieurs tentatives du mauvais côté avant de consulter le tuto et surla photo très claire on voit bien dans quel sens il faut mettre le connecteur.
J’espère que la batterie tiendra mieux…
Merci.
I didn't find your instructions when I first opened the back cover. Followed an instruction on youtube that suggests T4 screwdriver. Now 5 screws were stripped. Can't take them out. Can you post the size of the screws? I may have to drill the screws. Thanks
Hi Ruby,
I’m sorry to hear this! From my experience, there has been quite a bit of variation and manufacturing tolerances with the screws Motorola uses, and as a result, T3 works for some and T4 works for others. I can’t tell you much about these screws other than that they are 3.1 mm long.