Einleitung
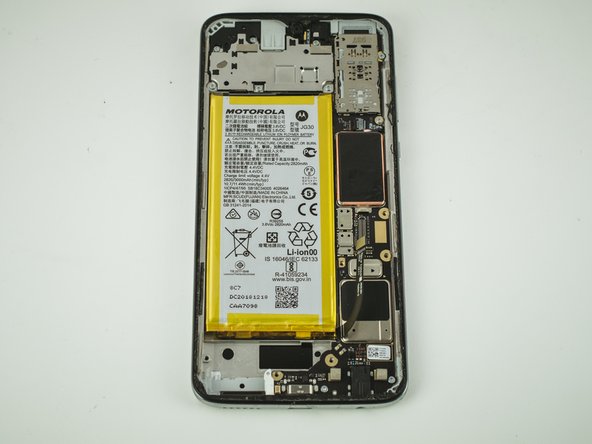
Die Hauptplatine ist das Herzstück des Smartphones. Auf ihr befinden sich der Prozessor, die Graphikkarte, der RAM und andere wichtige Teile. Bei größeren Schäden muss die Hauptplatine ausgetauscht werden. Vor dem Ausbau der Hauptplatine müssen erst andere Komponenten, wie Display, Lautsprecher und Kameras. Sei vorsichtig bei der Reparatur und stich den Akku nicht an.
Hole dir vor Reparaturbeginn Motorolas Rescue and Smart Assistant App. Sie hilft dir beim Backup deines Gerätes und der Diagnose, ob ein Hard- oder Softwarefehler vorliegt.
Was du brauchst
-
-
Benutze iFixit Öffnungswerkzeuge, um das Display sorgfältig vom Rest des Geräts zu lösen.
-
-
-
Benutze einen Spudger, um vorsichtig die Metallblende zu entfernen, die mit den Schrauben befestigt war.
-
Eine weitere Metallblende ist unter der ersten versteckt. Entferne auch diese vorsichtig mit dem Spudger.
This would also be a good place to disconnect the battery connector, which is right under the display connector.
there is one more piece to remove here. 3 black screws (T3 but longer) and the part visible above the battery on the last image above. Empty space on the top of the image in step 5.
-
-
-
-
Entferne die sechs 2,7 mm Torx T3 Schrauben vob der Metallplatte oberhalb des Akkus.
-
Zwänge einen Spudger zwischen den SD-Einschub und die Platte. Heble die Platte dann mit sanfter Gewalt hoch.
-
-
-
Trenne die beiden schwarzen und weißen Stecker links und rechts von der Kamera mit einem Spudger ab.
-
Entferne die Kamera vom Smartphone.
-
-
-
Entferne drei 3,7 mm Torx T3 Schrauben unten am Smartphone.
-
Hebe den Lautsprecher behutsam mit dem Spudger aus dem Smartphone heraus.
Super, und womit klebe ich das jetzt wieder zusammen??
-
-
-
Heble den Stecker des Fingerabdrucksensors mit dem Spudger hoch und löse ihn von der Hauptplatine ab.
The circled part is not the connector, it’s the cable. The connector is just above what the picture shows.
-
-
-
Entferne die vier 2,3 mm Torx T3 Schrauben an der unteren und rechten Seite des Smartphones.
Don’t forget to disconnect the ribbon cable above the screw second from the right!
-
-
-
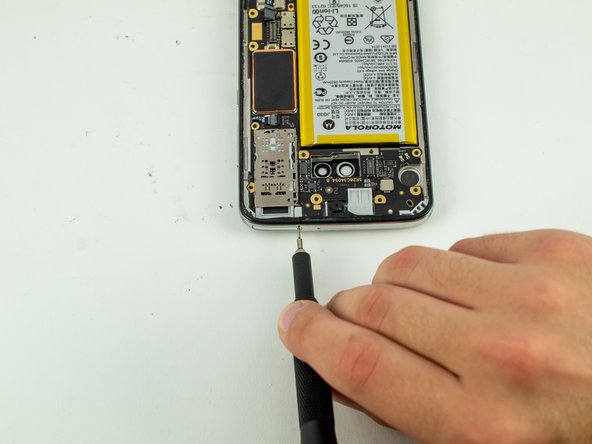
Setze den Spudger oberhalb des Akkus unter den Akku ein.
-
Heble die Hauptplatine behutsam aus dem Smartphone heraus.
The microphone/speaker holds the motherboard in. There are no directions here to remove it. It’s still attached in Step 4 but gone in Step 5.
1. In the lower left corner of the phone, there are three black T5 screws that need to be removed.
2. Use your spudger to lift it out of the phone. There are no cables to detach. It has two contacts that press against the motherboard.
3. There is a small white piece of plastic that sits at the edge of the motherboard. The part we just removed holds it in so there should be nothing attaching it to the phone now. Remove it.
(Note: Step 8 of the guide for replacing the motherboard in this phone explains this step.)
-


Um dein Gerät wieder zusammenbauen, folge den Schritten in umgekehrter Reihenfolge.
Um dein Gerät wieder zusammenbauen, folge den Schritten in umgekehrter Reihenfolge.
Rückgängig: Ich habe diese Anleitung nicht absolviert.
5 weitere Nutzer:innen haben diese Anleitung absolviert.
Besonderer Dank geht an diese Übersetzer:innen:
100%
VauWeh hilft uns, die Welt in Ordnung zu bringen! Wie kann ich mithelfen?
Hier starten ›
Team

Cal Poly, Team S19-G6, White Winter 2020 Mitglied von Cal Poly, Team S19-G6, White Winter 2020
CPSU-WHITE-W20S19G6
4 Mitglieder
20 Anleitungen geschrieben
Ein Kommentar
You forgot about removing the little cable on the right side of the motherboard. About 1/4 down the board up against the outside of the case. It's one of those Zero Force cables.
Right below the SIM card holder.
Above the highest black chip.
And to the left of the second screw hole
(from the top).
You can see it in the picture
I just destroyed my screen by dividing it in two parts. You have to be extra careful to dig deep enough in the first step, so you lift the entire screen unit!
Michael - Antwort
Thanks... I almost did just that!
Carlisle “Mike” Wick - Antwort