Diese Übersetzung enthält möglicherweise noch nicht die neuesten Änderungen der Original-Anleitung. Hilf mit, die Übersetzung zu aktualisieren oder sieh dir die Original-Anleitung an.
Einleitung
Folge dieser Anleitung, um ein defektes Display am Moto X4 zu tauschen.
Dabei musst den Fingerabdrucksensor von deinem alten Teil auf das Neuteil übertragen.
Was du brauchst
-
-
Bereite einen iOpener vor und erhitze die linke Seite des Telefons für zwei Minuten.
-
Solange du wartest, achte auf die folgenden Bereiche:
-
Displaykabel - achte darauf, an dieser Kante nicht zu tief zu schneiden, du könntest das Displaykabel beschädigen.
-
Kabel des Fingerabdrucksensors - achte darauf, an dieser Kante nicht zu tief zu schneiden, du könntest das Kabel des Fingerabdrucksensors beschädigen.
-
-
-
Befestige einen Saugheber so nah wie möglich an der erhitzen Seite.
-
Ziehe den Saugheber mit gleichmäßiger Kraft nach oben, bis ein Spalt zwischen Display und Gehäuse entsteht.
-
Schiebe ein Plektrum in den Spalt.
On the left side it is a very thin strip of adhesive—but there are other places where there is alot more adhesive—If you look at the black part of the new adhesive-if you have the phone specific adhesive thing—you will get an idea what you might be trying to push through at any given spot on the phone. orient the new one over the old screen to line up holes etc-to understand where the adhesive is.
-
-
-
Schiebe dein Plektrum an der gesamten Kante entlang, um den Kleber zu lösen.
-
Lasse das Plektrum im Spalt, damit sich der Kleber nicht wieder verbindet.
-
-
-
Erhitze die obere Kante des Displays, um den Kleber darunter aufzuweichen.
-
Schneide vorsichtig um die Ecke und über die obere Seite, um den Kleber zu lösen.
-
-
-
Erhitze die rechte Seite des Telefons mit einem iOpener.
-
Achte darauf, in der Nähe der Kabel nicht zu tief zu schneiden, damit sie nicht kaputtgehen.
-
Schiebe dein Plektrum an der gesamten rechten Kante entlang, um den Kleber zu lösen.
-
-
-
-
Hebe die linke Kante des Displays vorsichtig nach oben und zerschneide die restlichen Klebestellen mit einem Plektrum.
-
-
-
Klappe das Display nach oben und lehne es gegen eine kleine Box, während du die Kabel abtrennst.
-
-
-
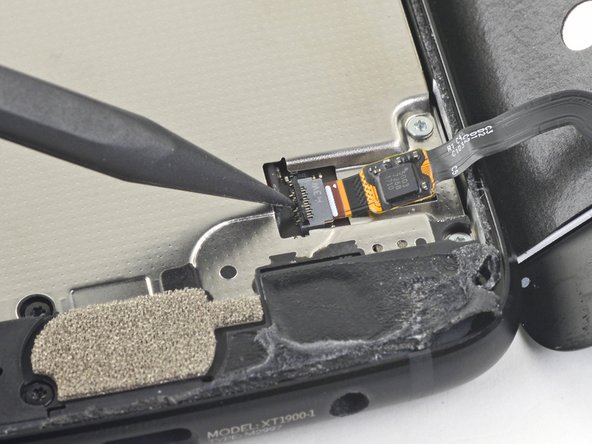
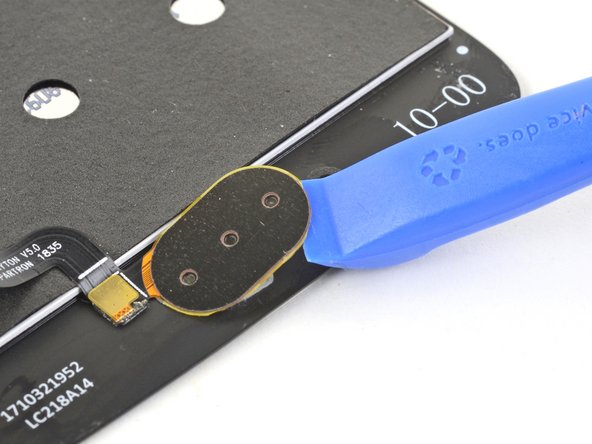
Schiebe die Spitze eines Spudgers unter das Kabel des Fingerabdrucksensors und heble es sanft nach oben, um das Kabel am Telefon zu lockern.
-
-
-
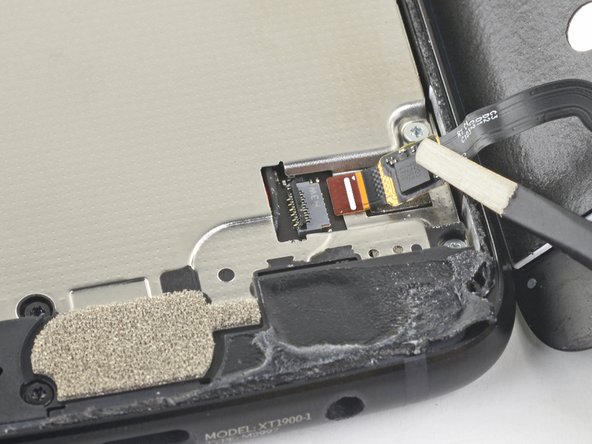
Nutze die Spitze eines Spudgers, um den Verschlusshebel am ZIF Anschluss hochzuklappen.
-
Ziehe das Kabel mit einer Pinzette vorsichtig aus dem Anschluss.
-
-
-
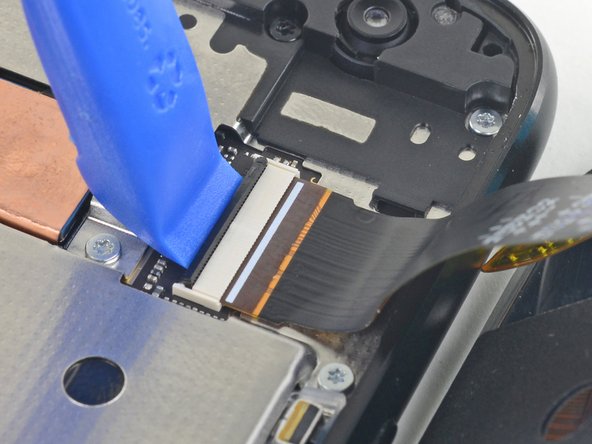
Klappe den großen Verschlusshebel des ZIF Anschlusses des Displaykabels in der oberen rechten Ecke des Telefons mit einem Openingtool nach oben.
-
Ziehe das Kabel vorsichtig mit einer Pinzette aus dem Anschluss.
-
-
-
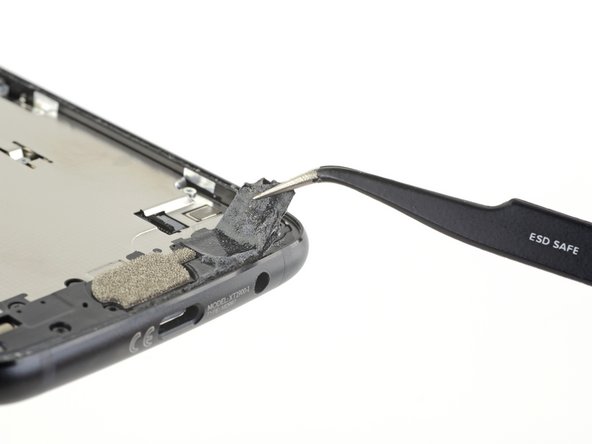
Entferne das Display.
I found that the subsequent steps will be smoother if you spend a little time at this point cleaning out the old adhesive pieces. The picture above shows pulling off some of the old glue strips, but the bullet points don’t mention it. Removing the mid-frame and other steps is easier if the old adhesive has been cleaned out.
Good point Gordon! I’ve adjusted the wording on the second bullet to point people in the right direction.
I’d already used the free form adhesives to glue the screen back on before I realized the kit came with a ready-to-go adhesive sheet. It’d be nice if this were mentioned (or pictured) here.
The provided replacement screen does not have the black plastic film w/ 5 x 3 holes in it
photo to illustrate: top is replacement screen. Bottom is old screen, w/ black film w/ holes
Not sure how to proceed here.
-
-
-
Lege einen erhitzten iOpener für eine Minute auf den Fingerabdrucksensor um die Klebedichtung aufzuweichen.
-
-
-
Schiebe die Spitze eines Spudgers unter das Kabel des Fingerabdrucksensors und löse es sanft vom Display.
-
-
-
Hebele und löse den Fingerabdrucksensor mit einem Öffnungswerkzeug sanft vom Display.
-
-
-
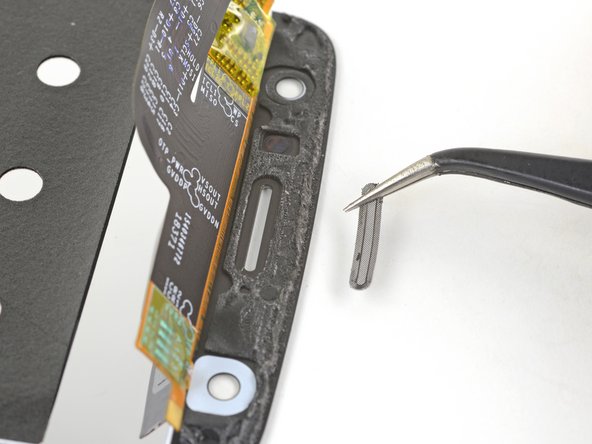
Drücke das Gitter mit dem flachen Ende eines Spudgers von vorne heraus.
-
Entferne das Gitter.
-
-
-
Wenn dein Ersatzteil nicht mit einer Mikrofondichtung kam, musst du es von deinem Originalteil übertragen.
-


Um dein Gerät wieder zusammenzusetzen, folge den Schritten in umgekehrter Reihenfolge.
Bitte entsorge deinen Elektroschrott fachgerecht.
Hat die Reparatur nicht ganz geklappt? Guck in unserem Antwortenforum nach Lösungen.
Um dein Gerät wieder zusammenzusetzen, folge den Schritten in umgekehrter Reihenfolge.
Bitte entsorge deinen Elektroschrott fachgerecht.
Hat die Reparatur nicht ganz geklappt? Guck in unserem Antwortenforum nach Lösungen.
Rückgängig: Ich habe diese Anleitung nicht absolviert.
23 weitere Nutzer:innen haben diese Anleitung absolviert.
Besonderer Dank geht an diese Übersetzer:innen:
87%


Diese Übersetzer:innen helfen uns, die Welt zu reparieren! Wie kann ich mithelfen?
Hier starten ›


8 Kommentare
This guide really only covers screen removal, and should detail replacing the screen as advertised. Here are a few more steps that should be added:
1. Transferring old hardware to the new screen (seals, filters, fingerprint sensor, & the grey carbon mat.
2. Cleaning up old adhesive.
3. Applying new adhesive, whether it’s the one-piece that ifixit carries (recommended), or Tesa tape.
4. Installing the new display assembly
Is it possible to remove and replace only the glass? Can I do that without removing the whole LCD screen and avoid disconnecting/reconnecting wires?
Hi Drew,
I haven’t tried, but I think it is possible to do a glass-only repair for this LCD screen, as long as you have the necessary tools and bonding adhesives. You would still have to deal with the fingerprint sensor, which is sealed onto the glass.
I noticed the fingerprint sensor not being quite as low on the right edge after this. Also, I think it has a bit of “give” now when I press on it with a thumbnail. If the tips of my thumbs weren't so dry right now I might not have noticed, though.
Hey Chris,
Did you add adhesive to the fingerprint sensor, if you didn't add some adhesive it may have some play, as most things need to be glued in place, and you could have forgotten to add some new adhesive.
I just finished following your guide and mostly satisfied. Somehow my fingerprint sensor doesn’t work but <shrugs> If I loose that convenience for a time, then I still payed less and got experience. Now, for the constructive criticism. YOU NEED a re-assembly guide. We’re not all at the level you guys are and it took a lot more work for me to put things back together as I had to flip things around and watch a few other videos to see steps I missed. You need a guide because you some of the items you’re supposed to use are not mentioned here because they’re not used until you re-assemble it. Please add it to this guide (for future people) unless you’re going to stop selling this kit, then just add it to the other kits. It would be a great help.
Agree completely with this statement and others above. Please do re-assembly. It’s a few more photos and it makes sure you did not miss anything as this user said. At this point, in my replacement, I do not know where to start with the adhesive, etc.
Andrea -
What is the 'carbon mat'?? Is it the black backing with 15 holes that was on the inside of original screen? I'll transfer this and hope that's right. And YES . . . We definitely need ReInstall directions. I would really like to know exactly how to use the pre cut adhesive, or the Tesa tape, if needed... which I think I will. I lost the speaker screen and had to pull one from another phone. But as for other holes... I would feel much better k king I'm doing it right. It really dies no good to perfectly remove the old screen. . . If you screw up installing the new one. All in all - I'm so very Thankful this site dies exist and you guts are excellent. There's still room to grow to reach perfection ( wink**) but helping to keep the power in our hands, is priceless. I love learning and always like to know what I'm using, how it works, and how to fix it. The automotive world is pushing us further away each year. Thank you and good luck everyone.
Complete novice. Getting old screen off was time consuming! I was too afraid of ruining something by overheating. Spent many hours trying to use iopener, afraid to risk bursting it in microwave. Read many comments in the iopener use guide; a guy said to get the screen temp up to 120-130F. Saw several youtube videos esp. Witrig one on replacing Moto x4 screen, they used heat gun 100C=212F so I got braver and put my phone on kitchen hot plate. Measured temperature by laying stem of candy thermometer on the surface. When hot plate got to 150-160F I finally got a pick under phone ‘s glass edge & got the screen off. Hot plate temp. not stable, guess phone was there a few minutes. May have damaged display but was replacing it anyway. Now new screen installed everything working properly! I’m not sure I was using the suction cup when I finally was able to push the pick under the edge.
Nahariyah Mosenkis - Antwort