Diese Übersetzung enthält möglicherweise noch nicht die neuesten Änderungen der Original-Anleitung. Hilf mit, die Übersetzung zu aktualisieren oder sieh dir die Original-Anleitung an.
Einleitung
Nutze diese Anleitung, um das Display und den Fingerabdrucksensor deines Motorola Moto Z2 Force zu ersetzen. Der Fingerabdrucksensor ist schwer vom Display zu entfernen, es kann leicht passieren, dass die Displayeinheit beschädigt wird. Es ist deswegen oft besser, die ganze Displayeinheit auszutauschen, wenn der Sensor nicht mehr funktioniert.
Entlade vor Reparaturbeginn zur Sicherheit den Akku bis unter 25%. Du reduzierst dadurch das Risiko eines Brandschadens, selbst wenn du den Akku versehentlich während der Reparatur beschädigst. Wenn dein Akku aufgebläht ist, dann musst du entsprechende Vorsichtsmaßnahmen treffen.
Was du brauchst
-
-
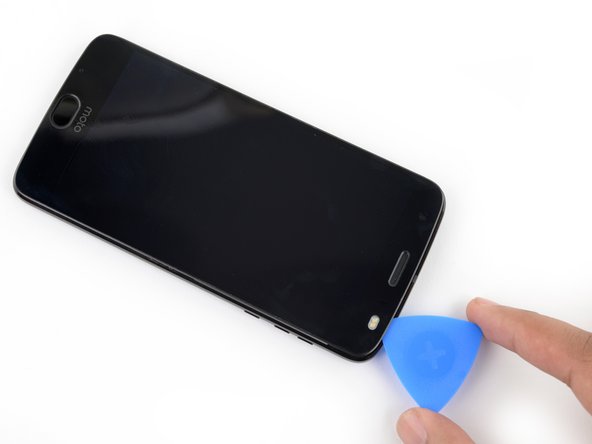
Wenn du die Displaykanten vom Rahmen entfernst, musst du fünf Clips aus Metall lösen, die das Display halten.
-
Drei Clips sind auf der linken Seite, drei auf der rechten.
-
Du musst dich mit dem Plektrum um diese Clips herumarbeiten, um sie ganz zu lösen.
-
Entweder fährst du mit dem Plektrum vorsichtig um die Clips herum oder du lässt ein Plektrum auf einer Seite des Clips stecken und arbeitest mit einem anderen Plektrum auf der anderen Seite weiter.
-
-
-
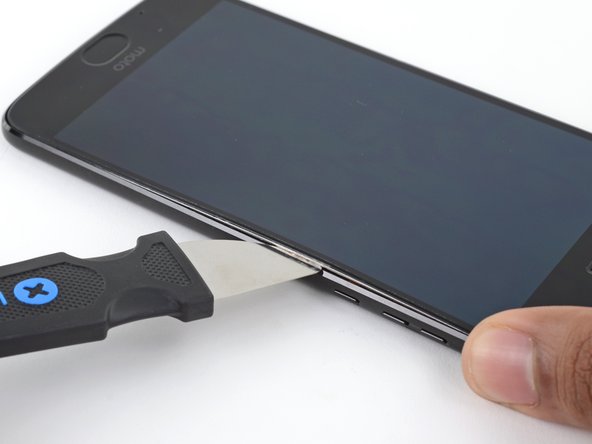
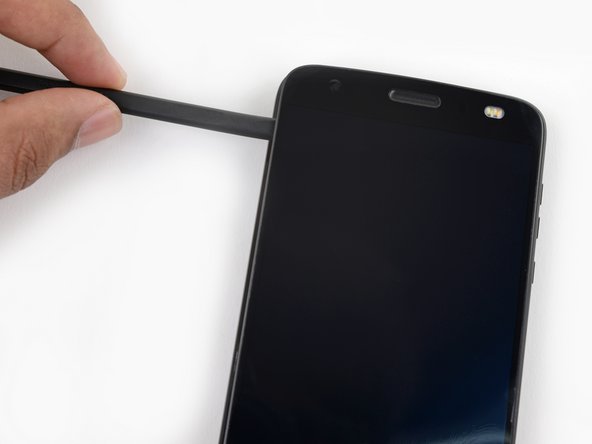
Setze einen Jimmy oder ein anderes Metallwerkzeug zwischen der rechten Seite des Plastikdisplays und dem Rahmen nahe an den Seitentasten des Smartphones ein.
-
Kippe den Jimmy nach unten und drücke ihn gleichzeitig tiefer in den Spalt hinein, so dass die rechte Seite der Displayeinheit hochgehebelt wird.
No — *slaps wrist* No. Bad steps! Don’t use the suction cup at all, ever. It causes the two layers to separate immediately, long before the frame clips give way to let the screen come off.
I’m being super ultra very careful with this second attempt on a new device (that was in pretty pristine condition, if I can keep it that way!), and right when I tried pulling as instructed, the screen layers started to pull apart. Use a blade shoved into the edge of the phone and pry it apart, releasing the latches in the process!
I have to agree with Matt above. At the smallest bit of pressure on the suction cup, the screen de-laminated from the metal base. It still “works”, but….
None of the tools in the kit is terribly suited for getting in there and prying that clip apart without splitting the screen.
lease Read the Comments poste on “STEP 2”, When you apply the heat, the screen becomes unglued from the metal fram that it is attached to. I ended up damaging my screen. You need to make sure that what is coming unglued is the metal, and not just the plastic screen. I found out when I saw another video, where they do not apply heat, they just use a tool to pry the frame-display assembly… But apparently it was too late… You should be more specific about the warning…
A jimmy does not come with the kit. Buy one before beginning this procedure. It is the best way to lift the screen assembly without damaging the assembly.
This whole guide has been rewritten since my last comment, and I super appreciate it. The steps are now much more appropriate and less likely to cause damage. Jamming your Jimmy (huehue) into the edge of the screen is actually quite a good idea, not likely to hit anything as there’s nothing but body underneath it.
-
-
-
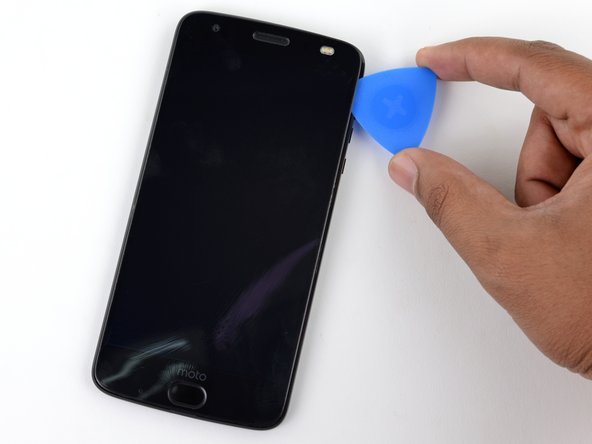
Lasse zunächst den Jimmy stecken und setze ein Plektrum unter den silberfarbenen Mittelrahmen an der gleichen Stelle über den Jimmy ein.
-
Entferne den Jimmy.
-
-
-
Schiebe das Plektrum an der gesamten rechten Kante entlang, um die Clips und den Kleber zu lösen.
this is really for the digitizer and screen replacement. there are still more steps for just the screen.
There is an enormous amount of adhesive sticking this thing together. As the adhesive is not essential (it holds together with clips, mostly), you really need to focus on *removing* the adhesive, so that it doesn’t stretch and bunch-up, preventing clean reassembly. Leave behind the adhesive that you can prevent from bunching-up (by cleanly breaking it, in turn by holding down one edge to the phone or screen), so you have some sticky left, but just make sure it’s not bunched-up.
Revisiting this comment a year later: there’s now replacement adhesive available (or maybe there always was - wish I knew!) for this model in the iFixit store. So, it would be best to remove the adhesive whereever you see it, cleaning everything up and preparing for the new adhesive. That darn adhesive in step 9 below, though… ugh. Work slow, don’t expect it to all be apart by this point.
-
-
-
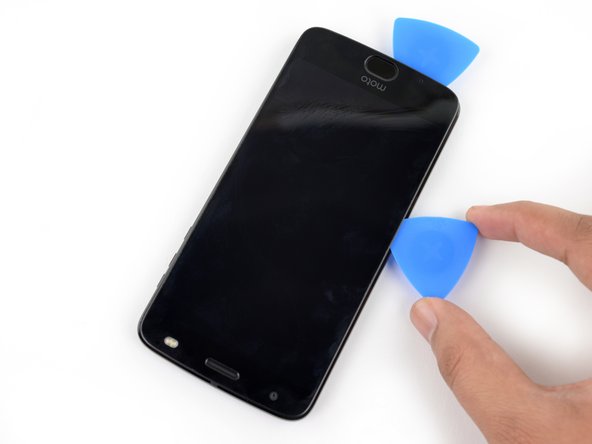
Wenn die rechte Kante komplett abgelöst ist, dann schiebe das Plektrum um die rechte untere Ecke des Gerätes herum, bis es unter der Unterkante der Einheit steht.
-
Schiebe das Werkzeug unter der Unterkante des Smartphones entlang, wobei du den Kleber auftrennst und die Plastikrasten öffnest.
-
Lasse das Werkzeug unter der Unterkante der Displayeinheit stecken, so dass sie nicht wieder festkleben kann. Benutze für den nächsten Schritt ein neues Werkzeug.
-
-
-
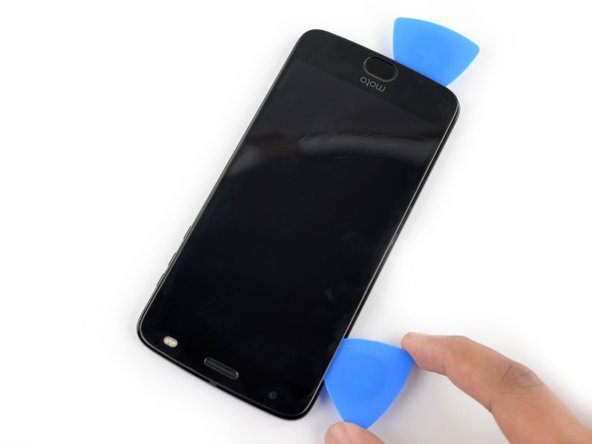
Wenn du dich an die linke Seite machst, achte darauf, dass du das Displaykabel nahe des unteren Endes nicht beschädigst.
-
-
-
-
Setze ein weiteres Plektrum an der Unterkante ein und schiebe es um die linke untere Ecke des Gerätes herum, so dass es unter der linken Seite der Einheit steckt.
-
Schiebe das Plektrum an der linken Seite entlang. Löse dabei alle Metallclips und den Kleber, mit denen die Displayeinheit befestigt ist.
-
Achte wie vorher darauf, dass wirklich die drei Clips geöffnet werden, so dass die Einheit komplett abgelöst wird.
-
-
-
Schiebe dein Werkzeug unter Oberkante der Displayeinheit entlang und trenne dabei den Kleber auf.
-
-
-
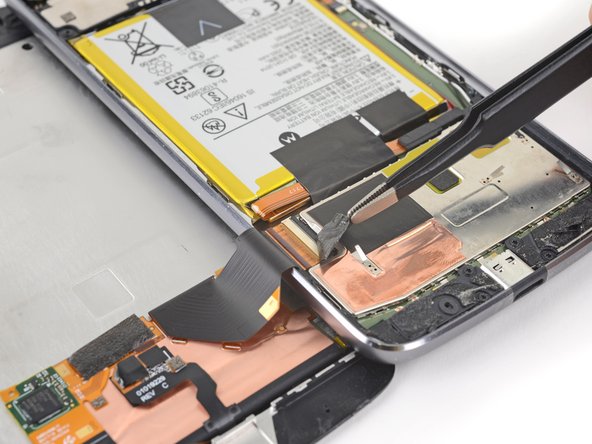
Es gibt zwei große Klebeflächen, die das Display an der oberen Kante festhalten, größer als die 4 mm, die du schon durchgeschnitten hast.
-
Die Sensoreinheit und die Kabel liegen über und rechts der rechten Klebefläche, weshalb du sie beschädigen könntest, wenn du versucht, den Kleber von dort zu lösen. Die folgenden Schritte zeigen dir, wie du den Kleber von der linken Seite aus löst.
This is a tricky part. See the biggest red-squared section in the photo above? That part always wants to detach — the adhesive to the screen is stronger than the molding that holds the metal into the plastic. The metal will detach from the plastic pretty easily, and there’s no way to get that metal back into the plastic frame (as it seems to have been molded as a single part). So, the adhesive is a booby-trap.
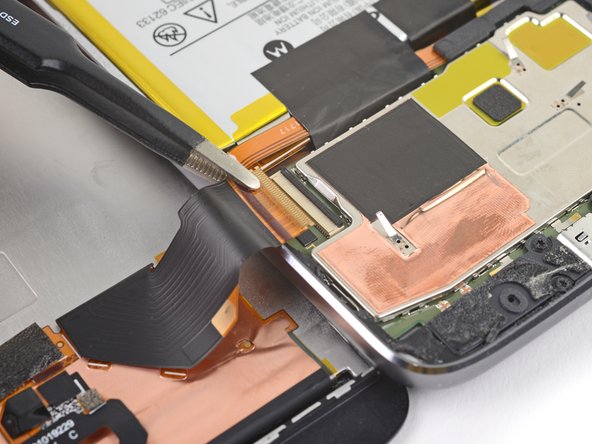
To defuse the booby-trap, heat the heck out of it, insert one end of tweezers (or perhaps a spudger) from the right side, hold the metal plate down, and verrry slooowwly convince the adhesive to separate. At some point, it’ll start cascading and snap free.
The metal finger area, between the two red squared sections above, also is a problem area — it’s latched into a frame above the battery, and those latches can get pulled up on top of the frame, preventing the phone from reassembling clean and flat. Make sure to re-insert those tabs so that little edge with the metal fingers sits flat and proper.
-
-
-
Träufle etwas hochkonzentrierten (mehr als 90%igen) Isopropylalkohol unter die linke Kante der Displayeinheit oben am Gerät.
-
Lasse das Gerät etwa fünf Minuten lang senkrecht auf der rechten Seite stehen, so dass sich der Alkohol verteilen und einwirken kann.
-
-
-
Schiebe ein Plektrum so tief wie möglich unter obere die linke Ecke der Displayeinheit, um die linke Klebefläche aufzuschneiden.
I found that a plastic card inserted from the left side, and worked with a sawing motion, between the screen and the adhesive worked great after the adhesive was softened by the alcohol.
-
-
-
Schiebe das flache Ende eines Spudgers langsam und vorsichtig unter die linke Kante der Displayeinheit. Schiebe ihn vorsichtig weiter, um die obere Kante anzuheben und die rechte Klebefläche zu zerschneiden.
-
Bringe mehr Alkohol auf, wenn dies nötig ist. Achte aber darauf, dass es nicht zu viel wird, denn er könnte sonst auch den Kleber an unerwünschten Stellen auflösen. Lasse den Alkohol etwas einwirken, bevor du weiterarbeitest.
Again, pay careful attention to the strong block of adhesive sticking the display to a metal shield that’s molded into the plastic frame - the adhesive strength is quite likely to pull out the metal shield from the plastic frame and there’s no going back from that. Not as catastrophic as ripping a ribbon cable, but still pretty bad. See my comment a couple photos up about that.
I added some alcohol directly to the adhesive patches on this side of the phone and waited a couple of minutes before continuing with this step.
-
-
-
Hebe das Display an der rechten Kante an und klappe es nach oben, weg vom Telefon. Das Display ist an der unteren linken Kante noch mit dem Telefon verbunden, entferne es also noch nicht ganz.
-
Falls das Display noch festklebt, erhitze und zerschneide den Kleber an den notwendigen Stellen nochmal.
Do this only after slicing all the little ribbons of adhesive that hang around - and clean up any gummed-up, bunched-up strands of adhesive after removing it. I worked at detaching adhesive until the screen was totally free, only held by the ribbon cable, before moving on from this step.
-
-
-
Benutze eine Pinzette, um den schwarzen Klebestreifen über dem Anschluss für das Displaykabel zu entfernen.
-
-
-
Nutze die Spitze eines Spudgers, um den Verschlussbügel der ZIF Verbindung umzulegen.
-
Ziehe das Flachbandkabel mit einer Pinzette aus dem Anschluss heraus.
-
-
-
Entferne die Displayeinheit.
When reconnecting the display ribbon I found it much easier if you straighten out major 45/90 degree bend that is in the middle of the ribbon until the entire ribbon is all unbent and in parallel with the display face. You will then have a straight shot into the connector without having to hold the display at a 90 degree angle to the chassis and then having to look around, over or through the display to (and if luck is with you) find, lineup and insert the ribbon into the connector. You have to do a little in 3 dimensional thinking to re-bend the ribbon and line the display back up with the chassis but if you’ve made it that far then you should have no problems. Don’t bend the ribbon back and forth too many times.
-


Vergleiche das Neuteil mit dem Originalteil. Möglicherweise musst du vor dem Einbau des Ersatzteils fehlende Komponenten übertragen oder Schutzfolien entfernen.
Um dein Gerät wieder zusammenzubauen, folge den Schritten dieser Anleitung in umgekehrter Reihenfolge.
Bitte entsorge deinen Elektroschrott fachgerecht.
Hat die Reparatur nicht ganz geklappt? In unserem Forum findest du Hilfe bei der Fehlersuche.
Rückgängig: Ich habe diese Anleitung nicht absolviert.
17 weitere Nutzer:innen haben diese Anleitung absolviert.
Besonderer Dank geht an diese Übersetzer:innen:
96%


Diese Übersetzer:innen helfen uns, die Welt zu reparieren! Wie kann ich mithelfen?
Hier starten ›

14 Kommentare
lol exactly what i was thinking, john!!
like what the !&&*….guide us thru removing the entire screen and then just leave us with our d in our hand lol
Just do the same thing backwards.
Can I use a z2 play screen on the z2 force?
You can but they have a big difference the LCD pixelation. The Z2 Force has 2,560x1,440 pixel resolution while the play has a 1,920x1,080 resolution. So even thought it can be done it is not recommended.
Hello!
Where can I buy Z2 force screen?
I replaced the screen and now the touch is not working. Is there anything I need to know? I tried putting kapton tape around the digi IC Chip and that didn’t work.
Same problem!
Where is the best place to buy a Motorola Z2 Force LCD+Digitizer screen?
Buy a “bad IMEI” phone on eBay. They can’t be activated, but the screen is just fine. I just picked one up for $40 to replace my damaged screen (when I was following a previous version of this guide) - less than half the asking price for an LCD+digitizer alone. It also gives you more experience and a full set of replacement parts (except a motherboard which contains the bad IMEI).
Will this void my warranty or make my insurance deductible higher? My screen is flickering- and I am imagining that perhaps the ribbons need to be unplugged/dusted etc. Do you guys think its worth trying? My thinking is… right now I have to pay $120 for the deductable so why not try to fix it. My fear is- they will auto charge my account for the entire phone.
My Z Force 2 is showing a black screen, but I can tell it’s not dead. I tried the online suggestions of holding the power button down for 30 seconds (it cycles through the “restart” sequence, with all of the attendant sounds, but no visuals), and the second tier suggestion of holding down the power button while also holding down the volume button in the decrease volume position. No luck with that either. Now, even though I’m no longer messing with it, every so often it makes a little buzzing sound, with a bit of vibration, like it’s trying to come back to life. So, first of all, I don’t know if I need to replace the “display and fingerprint sensor” (is that the correct diagnosis?) or is something else at fault, and how would one tell? Secondly, if this IS the correct diagnosis, then there’s the problem of trying to power off the phone, while having no access to the display. And, I’m not sure I can drain the battery, but would taking it out suffice? Finally, do you think my phone repairable? Thx, Gigi
My phone screen went dead, however the touchscreen and fingerprint is still working. Is there any way to test wether it’s the mainboard or screen that’s defective? my phone took some water damage, I flushed it with 99% isopropanol and dried it with rice, however after a while the display first started to display afterimages before giving up entirely… any ideas? I’d rather not replace screen and motherboard.
Can a bad screen short out the phone? I replaced my screen assembly but when I plug in the new screen the phone won’t boot and make any booting noises, but when I unhook the screen assembly it boots and makes all the start up noises? Or could a pin be bent on the screen assembly connector?