Einleitung
Verwende diese Anleitung, wenn der Akku in einem Motorola Moto Z2 Play ohne Funktion ist oder nur noch eine niedrige Kapazität hat. Wenn dein Akku aufgebläht ist, musst du entsprechende Vorsichtsmaßnahmen treffen.
Lade vor Reparaturbeginn Motorolas Rescue and Smart Assistant App herunter um damit ein Backup deines Systems durchzuführen und um festzustellen, ob dein Problem von der Hardware oder der Software verursacht ist.
Warnung: Wegen des sehr starken Klebers unter dem Display sind sehr dünne Werkzeuge zum Einführen und eine hohe Temperatur notwendig. Die Wahrscheinlichkeit ist hoch, das Display beim Entfernen versehentlich zu beschädigen. Wenn du das Display wieder verwenden möchtest, sei sehr vorsichtig beim Erhitzen und Einführen von Werkzeugen zum Entfernen des Displays vom Gehäuse.
Was du brauchst
-
-
Entferne das SIM-Fach, indem du mit dem SIM-Karten-Werkzeug vorsichtig in das Loch links oben am Gerät drückst.
-
Zieh das hervorstehende SIM-Fach heraus.
-
-
-
Erhitze die Kanten des Motorola Moto Z2 Play Displays mit einer Heißluftpistole für zwei bis drei Minuten. Setzte die Temperatur der Heißluftpistole auf 85 °C, passe jedoch auf, dass du nicht zu lange auf einer Stelle bleibst, damit das Display keinen Schaden davonträgt.
-
Das Display sollte fühlbar, aber nicht schmerzhaft heiß sein. Eventuell ist erneutes Erhitzen notwendig.
-
-
-
Löse das Display vom Gerät, indem du mit dem Öffnungswerkzeug nahe des Ladeanschlusses unter das Display fährst.
-
Arbeite dich mit dem Öffnungswerkzeug einmal um das gesamten Display.
-
-
-
-
Finde den Anschluss rechts oben im Gerät.
-
Löse den schwarzen Verschlusshebel vorsichtig mit einem Öffnungswerkzeug.
-
Ziehe das Kabel mit einer Pinzette vorsichtig aus dem Anschluss.
-
-
-
Finde das Flachbandkabel rechts unten im Gerät.
-
Trenne dieses Flachbandkabel ab, indem du es mit einer Pinzette herausziehst.
-
-
-
Entferne mithilfe einer Pinzette das orangene Klebeband unten rechts.
-
-
-
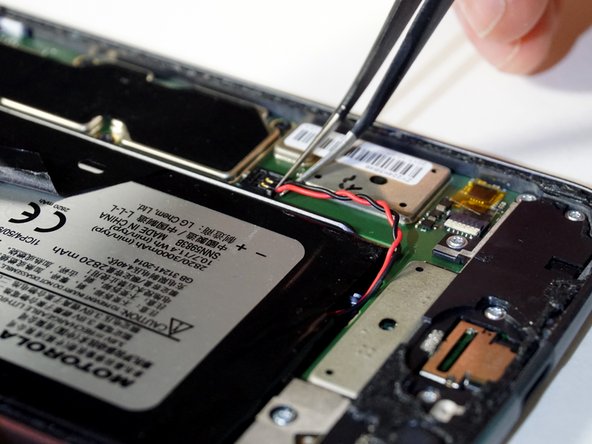
Löse das rote und schwarze Akkukabel ab, indem du es mit einer Pinzette hochhebst.
What if the whole black box came off. I think i broke it! :( is this fixable?
-
-
-
Hebe das schwarze Klebeband an und schiebe eine Plastikkarte unter den Akku.
-
Richte die Karte parallel unter dem Akku aus.
-
Zwänge die Karte tiefer unter den Akku.
-
Hebe die Karte an, um den Akku aus seiner Klebeverbindung zu lösen.
-
-
-
Hebe den Akku hoch und entferne ihn ganz aus dem Gerät.
Why can't they just go back to the phones where you can snap off the back and simply replace the battery? I'm afraid to do it myself and Verizon won't do it for me. Now I have to find someone whom I will have to pay to replace a battery. This is ridiculous. It should not be so difficult to replace a battery and I should not have to jeopardize my phone to replace a battery. Why? Sorry, I just needed to vent. I miss simplicity.
I agree
I agree with both of you guys, but it’s the breaking point between performance, convenience, and safety. Older phones had batteries with hard protective casings that wouldn’t leave them vulnerable to pocket-fire if your keys jammed the battery.
Unfortunately, with phones getting more powerful(requiring a higher-capacity battery), AND slimmer, the protective casing for the battery is literally the casing on the phone. Look at the battery above; it could easily be pierced and dangerously vent.
I’m with you in wishing I could just pop a spare in, but those days have passed. =/
I suggest NOT to do this. Followed the directions exactly, with the slight deviation of my cable into the battery crumbling so I carefully pulled out the lose pieces with the tweezers and had NO problem putting it back together. My phone was WORKING with the exploded, puffy battery with NO deficits. Now? No charging (but checked it with the multi-meter so I know it is not the fault of the new battery). Only reaction I get is the phone making a vibrating sound when I plug it in to charge. Will NOT turn on. Will NOT react. F*CKED.
Without knowing what I was getting into I ordered a replacement battery, toolkit, and screen adhesive. Thanks to this guide I was actually able to remove the screen, replace the battery, and get it sealed back up relatively easily. Definitely nerve-wracking as I haven’t attempted anything like this before, but my phone was at the end of the battery life so I figured why not give it a shot.
Thank you for the easy instructions!
i followed the guide step by step, but unfortunately i touched the lcd in one place ... with the result that the screen went KO can i fix it somehow?
-


Um dein Gerät wieder zusammenzubauen, folge den Schritten dieser Anleitung in umgekehrter Reihenfolge.
Nach Abschluss dieser Anleitung solltest du den neu installierten Akku kalibrieren.
Um dein Gerät wieder zusammenzubauen, folge den Schritten dieser Anleitung in umgekehrter Reihenfolge.
Nach Abschluss dieser Anleitung solltest du den neu installierten Akku kalibrieren.
Rückgängig: Ich habe diese Anleitung nicht absolviert.
37 weitere Nutzer:innen haben diese Anleitung absolviert.
Besonderer Dank geht an diese Übersetzer:innen:
100%


Diese Übersetzer:innen helfen uns, die Welt zu reparieren! Wie kann ich mithelfen?
Hier starten ›

Team

Cal Poly, Team S19-G5, Livingston Winter 2018 Mitglied von Cal Poly, Team S19-G5, Livingston Winter 2018
CPSU-LIVINGSTON-W18S19G5
4 Mitglieder
30 Anleitungen geschrieben
11 Kommentare
Great instructions, clear and concise.
thank you
so now that I've heated the adhesive to get the screen off do I need to apply new adhesive? or simply reheat it?
Hi Eli,
The most ideal option would be to replace the adhesive. This ensures the best chance for your phone to stay sealed. You can re-use the existing adhesive and it may work well enough for awhile.
Pretty good guide altogether. The only thing I’d add is some more detail on the heating phase, as far as temperature, adhesive depth, strength etc. Don’t want someone putting a heatgun on max temp and using it on their screen for 3 mins, ya know?
Thanks for making it really straightforward though.
Total fail. Used an iOpener but could not judge how hot it needed to be to soften the adhesive nor how firmly it can be pried/pulled without damage. Ended up with multiple internal cracks in the screen. Tried finishing the repair anyway, couldn’t tell how far the flat-flex cables needed to be inserted into their sockets to make a good connection. Pix in the guide are not clear enough to tell, and I neglected to take my own photos.
Oh well, so much for repair. Kid got a new phone out of the deal, the Z2P is headed for the landfill.
Finished the guide , battery works well, only problem I encoutered was my own hastines with prying the screen out. On the right side near the fingerprint sensor i went too deep with the pryer and tore the flex cable. Now I am waiting for the new one. So I’ll update when it comes and I change it.
Can the battery be replaced with a larger one or is it too tight.
Great guide - thank you 😊