Zum Hauptinhalt wechseln

Motorola V276 Main LCD Screen Replacement

Was du brauchst

  1. Motorola V276 Main LCD Screen Replacement, Front panel/ Screen Logic Board: Schritt 1, Bild 1 von 1
    • Using the plastic opening tool, pry off the top faceplate.

    • Place the tool in the small crack that runs along the side of the phone and pry.

  2. Motorola V276 Main LCD Screen Replacement: Schritt 2, Bild 1 von 1
    • Using the T6 Torx Screwdriver remove all 4 small screws.

  3. Motorola V276 Main LCD Screen Replacement: Schritt 3, Bild 1 von 1
    • Remove silver plate from phone.

  4. Motorola V276 Main LCD Screen Replacement: Schritt 4, Bild 1 von 1
    • Using the spudger remove the plastic camera casing

  5. Motorola V276 Main LCD Screen Replacement: Schritt 5, Bild 1 von 1
    • Using the iPod Opening Tool remove the yellow flex cable from the green logic board.

  6. Motorola V276 Main LCD Screen Replacement: Schritt 6, Bild 1 von 1
    • Use Spudger or hands to detach flex cable from front screen logic board

  7. Motorola V276 Main LCD Screen Replacement, Main LCD Screen: Schritt 7, Bild 1 von 2 Motorola V276 Main LCD Screen Replacement, Main LCD Screen: Schritt 7, Bild 2 von 2
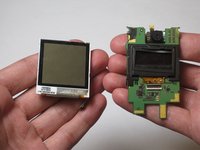
    • Using spudger remove the LCD screen from the green logic board.

Abschluss

To reassemble your device, follow these instructions in reverse order.

Cecilia

Mitglied seit: 04/11/10

1 Reputation

3 Anleitungen geschrieben

Team

Cal Poly, Team 27-96, Amido Spring 2010 Mitglied von Cal Poly, Team 27-96, Amido Spring 2010

CPSU-AMIDO-S10S27G96

4 Mitglieder

15 Anleitungen geschrieben

0 Kommentare

Kommentar hinzufügen

Seitenaufrufe:

Letzte 24 Stunden: 0

Letzte 7 Tage: 4

Letzte 30 Tage: 4

Insgesamt: 1,349