Zum Hauptinhalt wechseln

Motorola V551 Earpiece Speaker Replacement

Was du brauchst

  1. Motorola V551 Earpiece Speaker Replacement, Screen: Schritt 1, Bild 1 von 3 Motorola V551 Earpiece Speaker Replacement, Screen: Schritt 1, Bild 2 von 3 Motorola V551 Earpiece Speaker Replacement, Screen: Schritt 1, Bild 3 von 3
    In diesem Schritt verwendetes Werkzeug:
    Spudger
    $3.99
    Kaufen
    • On the phone's face, remove the four rubber caps from the screw covers using a spudger.

  2. Motorola V551 Earpiece Speaker Replacement: Schritt 2, Bild 1 von 1
    • Unscrew the four cover screws using a T6 Torx screwdriver, turning counterclockwise.

  3. Motorola V551 Earpiece Speaker Replacement: Schritt 3, Bild 1 von 2 Motorola V551 Earpiece Speaker Replacement: Schritt 3, Bild 2 von 2
    • Loosen and remove the protective cover using a plastic opening tool.

  4. Motorola V551 Earpiece Speaker Replacement: Schritt 4, Bild 1 von 2 Motorola V551 Earpiece Speaker Replacement: Schritt 4, Bild 2 von 2
    • Gently loosen the second protective cover with the plastic opening tool.

  5. Motorola V551 Earpiece Speaker Replacement: Schritt 5, Bild 1 von 3 Motorola V551 Earpiece Speaker Replacement: Schritt 5, Bild 2 von 3 Motorola V551 Earpiece Speaker Replacement: Schritt 5, Bild 3 von 3
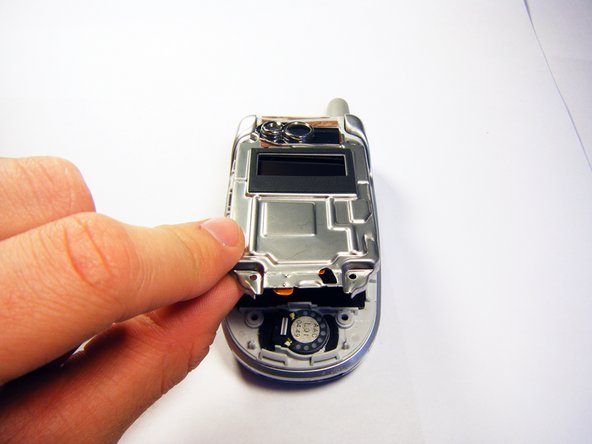
    • Carefully remove the protective cover from the circuitry.

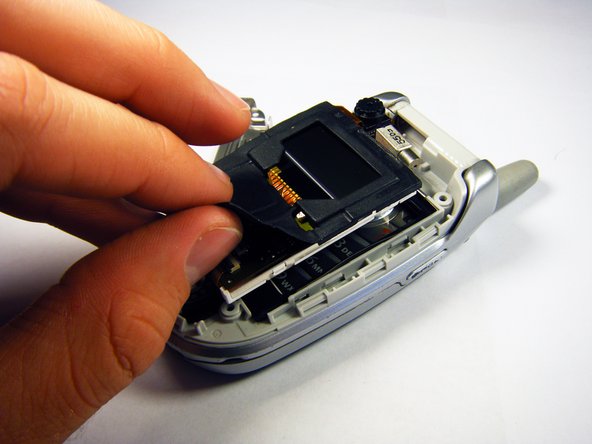
    • Slowly peel the black rubber gasket off of the circuit board.

    • Carefully move the camera out of the way using your hand.

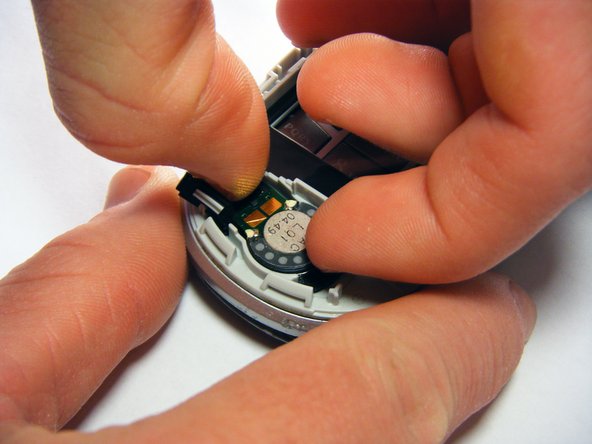
    • Use a flat tool to disconnect the upper and lower circuit boards.

  6. Motorola V551 Earpiece Speaker Replacement: Schritt 6, Bild 1 von 3 Motorola V551 Earpiece Speaker Replacement: Schritt 6, Bild 2 von 3 Motorola V551 Earpiece Speaker Replacement: Schritt 6, Bild 3 von 3
    • Gently slip the copper strip out from under the circuitry by using your hand.

  7. Motorola V551 Earpiece Speaker Replacement, Earpiece Speaker: Schritt 7, Bild 1 von 3 Motorola V551 Earpiece Speaker Replacement, Earpiece Speaker: Schritt 7, Bild 2 von 3 Motorola V551 Earpiece Speaker Replacement, Earpiece Speaker: Schritt 7, Bild 3 von 3
    • Pry out the speaker using your fingers.

Abschluss

To reassemble your device, follow these instructions in reverse order.

gregatron

Mitglied seit: 10/29/09

105 Reputation

6 Anleitungen geschrieben

Team

Cal Poly, Team 6-6, Maness Fall 2009 Mitglied von Cal Poly, Team 6-6, Maness Fall 2009

CPSU-MANESS-F09S6G6

4 Mitglieder

12 Anleitungen geschrieben

0 Kommentare

Kommentar hinzufügen

Seitenaufrufe:

Letzte 24 Stunden: 0

Letzte 7 Tage: 1

Letzte 30 Tage: 1

Insgesamt: 2,716