Zum Hauptinhalt wechseln
Gemeinsam reparieren - Jetzt registrieren

Nabi 2S Battery Replacement

Was du brauchst

  1. Nabi 2S Battery Replacement, Nabi 2S Disassembly: Schritt 1, Bild 1 von 1
    • Remove the red rubber case from the device.

    Frag FixBot

    Kommentar hinzufügen

  2. Nabi 2S Battery Replacement: Schritt 2, Bild 1 von 2 Nabi 2S Battery Replacement: Schritt 2, Bild 2 von 2
    • Make sure the screen is facing away from you and the back cover is facing you.

    • Using a Phillips #0 Screwdriver, unscrew the 3mm screws counter-clockwise in each corner of the plastic back cover. It will be a total of four screws. The smaller case on the back cover is attached to the main cover so it will not need to be removed.

    Frag FixBot

    Kommentar hinzufügen

  3. Nabi 2S Battery Replacement: Schritt 3, Bild 1 von 1
    • Using the plastic opening tool, remove the case.

    • Removing the case will take a bit of effort and force. We recommend using two hands and if possible another person to help. It will require some gusto.

    • It is helpful to pry at the corners first to loosen the case.

    Frag FixBot

    Kommentar hinzufügen

  4. Nabi 2S Battery Replacement: Schritt 4, Bild 1 von 1
    • After the back case is loosened, remove it from the device to change or access the battery.

    Frag FixBot

    Kommentar hinzufügen

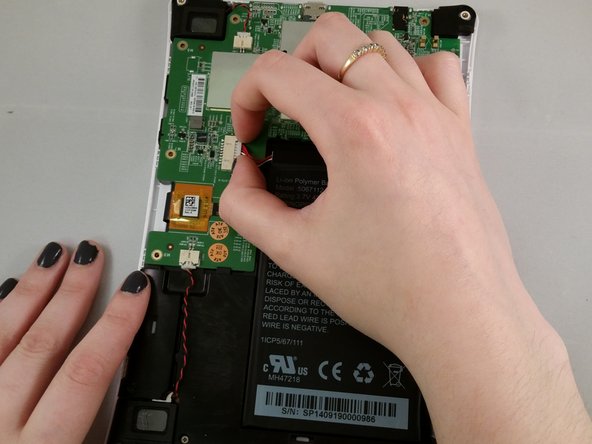
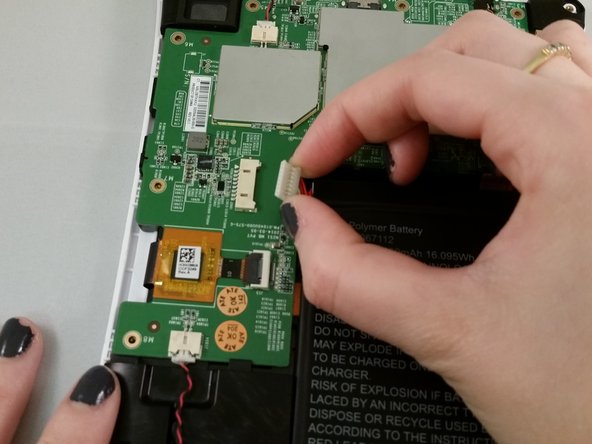
  5. Nabi 2S Battery Replacement, Battery: Schritt 5, Bild 1 von 3 Nabi 2S Battery Replacement, Battery: Schritt 5, Bild 2 von 3 Nabi 2S Battery Replacement, Battery: Schritt 5, Bild 3 von 3
    • Grasp the circuit connected to the battery via wires.

    • Slide the wires from the circuit to detach it.

    Frag FixBot

    Kommentar hinzufügen

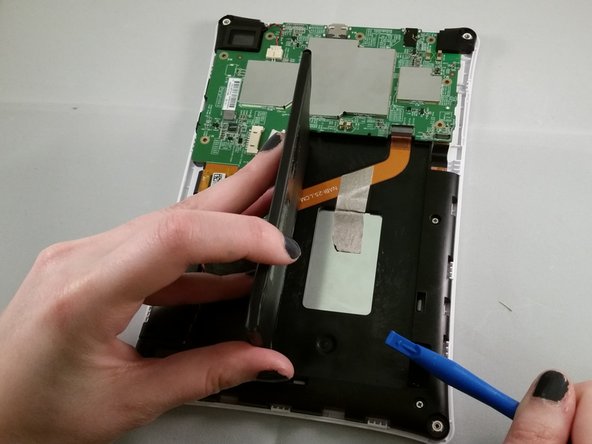
  6. Nabi 2S Battery Replacement: Schritt 6, Bild 1 von 2 Nabi 2S Battery Replacement: Schritt 6, Bild 2 von 2
    • After the circuit is detached, the battery will be easily removable.

    • Don’t rip the battery off of the board.

    • The battery is stuck with adhesive tape to the board.

    • Use a plastic opening tool to apply pressure to the battery and lift it up from the adhesive.

    Frag FixBot

    Kommentar hinzufügen

Abschluss

To reassemble your device, follow these instructions in reverse order.

Rückgängig: Ich habe diese Anleitung nicht absolviert.

4 weitere Personen haben diese Anleitung absolviert.

Team

Marist, Team 1-4, Laflen Spring 2016 Mitglied von Marist, Team 1-4, Laflen Spring 2016

MARS-LAFLEN-S16S1G4

2 Mitglieder

10 Anleitungen geschrieben

0 Kommentare zur Anleitung

Kommentar hinzufügen

Seitenaufrufe:

Letzte 24 Stunden: 1

Letzte 7 Tage: 4

Letzte 30 Tage: 24

Insgesamt: 1,105